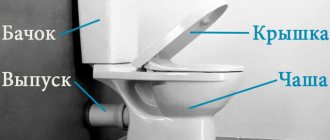
- Toilet cistern device
- Instructions for replacing fittings
- Adjustment of fittings
- How to replace shut-off valves in the drain tank?
- Problems that do not require replacing the cistern fittings
- Connecting the water hose to the tank
When the cistern breaks down and there is no way to call a plumber, most people who encounter this problem for the first time have a question: what to do? There is no need to be upset, replacing the toilet cistern fittings is practically a trivial matter. Before starting the replacement, you need to understand the principle of operation of the drain tank.
Toilet cistern device
Regardless of the toilet model, it consists of two main parts: the tank where the water is located and the niche itself. The drain works using the hydraulic bolt method. By pressing the button, the valve opens, which allows the water to drain. And to see how the fittings should be correctly located in the tank, you just need to remove the lid from there.
Basically, the device system is divided into: systems that supply water and drain. For water to start flowing back into the tank, just remove your hand from the button and close the drain. The water level is controlled by a special float; it is connected by a lever that turns off the tap. Sometimes the designs of different brands of toilets differ, but the meaning is the same.
Toilet cistern device
The fittings that perform the function of water supply vary. In case of side feed, it should be located at the top. This type of fittings is the cheapest and quite noisy. Almost all toilets manufactured in Russia have such a water supply system. To reduce the noise level, additionally put on a tube and direct it to the very bottom of the tank.
The most common drain mechanism is a push-button one. When the toilet model includes a hidden tank, the button is often attached to the wall. Repairing a wall-hung toilet is much more difficult than repairing a regular toilet. In this case, all manipulations have to be performed through a small hole. Most often, push-button mechanisms consist of 2 modes. To drain the water halfway, just press one button, and to flush the water completely, press the second. This is mainly intended to save water.
Design and main components
Different models of toilet cistern may differ greatly in design from one another, but the set of their components generally remains unchanged. Each drain tank must contain the following components:
- intake unit with valve mechanism;
- float chamber with a hollow container;
- drainage unit having its own fittings.
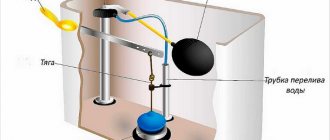
The industrially produced samples of drainage devices differ in the method of supplying water to the float chamber in the upper or lower location of the supply hose. The locking mechanism located at the inlet can be designed in the form of a simple cuff or have a more complex design (in the form of a check valve).
The principle of operation of such a system is quite simple: when a hollow container (float) is raised, a rod moves with it, transmitting a closing force to the valve with its reverse arm.
Unlike outdated models, in which the float is shaped like a pear, modern products are equipped with a “double glass” that is more reliable in terms of tightness.
In new tanks, the drain assembly has the form of a vertical column installed strictly in the center (directly under the control button). In its lower part there is an annular seat with an elastic cuff that seals the drain hole. The closing force required for this is created both by the weight of the rod and by taking into account the mass of water accumulated in the tank.
In order for the drain channel to open, it is enough to lift the rod, which is rigidly connected to the control button by a special lever mechanism (in some models a toothed rack is used for this).
Instructions for replacing fittings
You will need the following tools:
- Special tape (for sealing);
- To unscrew the hose that supplies water, you need to use a 22 wrench;
- The tank is secured and tightened with a 13mm wrench;
- Special lubricant;
Before starting work, the water must be turned off and the tank must be emptied of water as much as possible. To remove the fittings, you will have to dismantle the drain tank. When unscrewing the bolts, a rust-related problem may occur, since the bolts were previously constantly in water. When the tank has already been removed, the fittings are unscrewed, draining the water and the tap.
Then new fittings are installed and the tank is installed in place. During the installation process, it is advisable to replace the old gasket to prevent leakage. Next, a special float and a sealing washer are installed to supply the water supply. Taking the nut, tighten the hose with light hand force using a wrench. This is done so that increased movement does not damage the sealing gum.
Basic principles of repair
Before you replace the fittings or make any other type of repair, you need to prepare the toilet. First of all, turn off the water supply and drain the water that has already collected in the tank. Remove the top cover to gain access to the mechanism. To do this, you need to unscrew the locking button, which is usually located on the left, or remove it and unscrew the fastening screw. Inspect the mechanism that supplies and drains water. Pay attention to places that have defects. In the inside of the tank you can see one or more holes that serve to supply water. If there is only one hole, then the filling fittings are located in it. If there are several of them, then there is reinforcement in only one of the holes.
Toilet size chart.
A diaphragm valve is located inside the filling fittings. The principle of operation of the fittings is very simple and is as follows: when the tank is empty, it begins to supply water, and when it is filled with the required volume, it stops supplying it. The membrane, which is located inside the fittings, is sensitive to the effects of impurities that are in the water. If you do not have filters installed or their quality is insufficient, then replacing this part of the drain mechanism will be necessary quite often. In this case, it is much easier to completely replace the push-button mechanism with a rod mechanism.
How to replace shut-off valves in the drain tank?
Replacing the shut-off valves of a drain tank often does not take much time and can be easily done with your own hands. The outdated membrane must be treated with silicone sealant to restore elasticity.
Replacing shut-off valves in the drain tank
- It is important to prevent water from entering the tank, as this will interfere with normal operation; to do this, you simply need to turn off the valve. If there are sewer plugs present, they should be pulled out.
- After carefully studying the instructions and taking an adjustable wrench, you need to assemble the fittings. When assembling shut-off valves with your own hands, it is not at all necessary to use keys; everything can be done by hand.
- Rubber gaskets are installed on the inside of the tank, and plastic ones on the outside. If the membrane has insufficient elasticity, it is advisable to coat it with non-acid silicone sealant. Even if the membrane or gasket is sufficiently elastic, experts strongly recommend coating them with sealant. The reason for this is the effect of cold water on the gaskets, as a result of which they lose their elasticity and become brittle. This often causes breakdowns, especially in winter. You can replace the gasket by disassembling and reassembling the mechanism.
- It is important to carefully ensure that the plastic spacer is located between the ceramic wall and the nut. This is necessary to prevent water leakage.
- The shut-off valves should not tightly touch the walls of the tank, but have a distance of 6 mm.
- When installing a non-monolithic toilet, it is also advisable to lubricate the gasket.
Repair of liner to toilet cistern
The drain hole is adjusted to the valve using scissors or a regular thread. Often there may be some difficulty in fitting the valve. This problem can be eliminated by adjustment using a thread. But in older models you need to use scissors to cut out the required valve size.
After installation is complete, it is advisable to wait 20 minutes, during which time the gasket will be able to take shape, which will allow it to be tightened even more tightly.
We begin work on dismantling the old fittings
Step by step, all the preliminary work looks like this:
- We turn off the tap on the riser that is responsible for supplying water to the tank. Disconnect the water supply hose.
After turning off the tap, you need to drain all the water and soak up any remaining water with a rag. Sometimes, in a hurry, people forget to do this. They begin to unscrew the fastening screws - and there’s a flood.
We disconnect the tank from the drain pipe (old model) or the toilet bowl in new products. In the first case, unscrew the large metal nut located on the pipe. In the second there are two nuts located below, under the toilet platform. In older modifications, there are difficulties with dismantling - the iron fasteners rust and are difficult to unscrew. A problem has arisen - we cut off the nuts. This can be done with a hacksaw blade or a file.
- Filming;
- Place the removed tank on a wide, stable surface;
- First we dismantle the float and the water pipe with the valve;
- Remove the main drain system.
When removing the drain mechanism, this applies more to old structures, you should be careful. A metal tool used incorrectly will damage the surface of the plumbing fixtures.
Having removed the old fittings, wash the tank and wipe it dry. We inspect for damage in the form of chips on the holes or possible cracks appearing on the surface of the sanitary ware.
Problems that do not require replacing the cistern fittings
There are situations when replacement of fittings is not required. It is enough to carry out minor repairs yourself, which will help save a considerable amount of money.
Water leaking from the tank or its continuous filling are considered the most common problems. Main reasons:
- Damaged seal;
- The valve adjacent to the drain fittings is not sufficiently secured;
- Broken float;
- Skewed float.
Transparent toilet cistern
To properly align the float, all you need to do is lift the reservoir cap and place it in the desired position. If the valve is not in the right place, after correcting it, you need to install it in the seat. Continuous filling of water is considered a big nuisance. To check the mechanism, you need to raise the float to its maximum height. If water continues to accumulate, there will be no need for repairs. In such a situation, it will be necessary to install new fittings. As for the seal, to avoid unpleasant situations, it is recommended to change it at least once every 8 months.
If the float no longer floats on the surface of the water, this means a complete replacement of the fittings in the drain tank. In this situation, it is not advisable to resort to self-repair, since such a float will not last long. It is best to purchase and install a new unit.
Installation of new parts
Replacement of fittings begins with the fact that the old part must be removed from the hole. This is not difficult to do, just turn it clockwise and pull it towards you. Do not use excessive force: this can damage the part and make it difficult to remove. The new fittings must match the diameter of your toilet model. Please pay attention to this before purchasing.
Related article: Do-it-yourself book door: installation technology (video)
There are 4 standard diameters: 10 or 15 mm, and 1/3 or 1/2 inch. A very important nuance that you need to pay attention to when installing new fittings is the tightness of the joint. To ensure correct installation, a rubber seal must be used. Such a gasket will not only serve to seal the joint, but will also protect the earthenware surface from damage. When the installation of the fittings in the corresponding hole of the toilet cistern is completed, it must be tightened with a nut using an adjustable wrench.
Installation diagram of the tank on the toilet.
Installation of the fastening nut does not require excessive force. If this work is not done carefully, the earthenware can be damaged and cracks will appear in it. If there is more than one hole inside, then after the installation of the new fittings is completed, you need to insert decorative plugs into the remaining holes. In most models, the plugs are inserted by simply pressing until they click, but sometimes they are secured with a nut. In this case, do not tighten the nut very much, and before inserting the plug into the hole, put a sealing gasket on it.
If necessary, for example, if the tank is replaced with a new model with a different configuration, you can change the position of the water supply, in other words, connect the fittings to the water supply through a different hole. If you need to replace shut-off valves, then all the steps this work will require are similar to those described for water supply valves. The only difference is the location of the elements and the method of fastening: the shut-off valve is located at the bottom of the tank, centrally in the largest hole, its installation is carried out using a washer, which is put on the new valve through a gasket.
Thus, replacing the fittings in the drain tank is not a difficult task. First of all, understand the structure of your toilet model, and assembling new parts will be easy for you if you follow the recommendations from this article.
The best posts
- Do-it-yourself cradle, hanging type and on a frame
- Burlap and lace decor
- Floor board: thickness of wooden flooring, which one is better to use and what goes for technical boards
- Closing the loops with knitting needles with an elastic edge: video for beginners
- Condensation on the entrance metal door: why does the metal door “cry”
- Differences between plastic windows
- 8 ways to beautifully fold a scarf into your jacket pocket
- Curtains with 3D effect in the interior of your home
Related article: How to properly plaster corners with your own hands
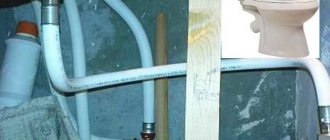
Connecting the water hose to the tank
For this, a flexible water hose is best suited; it must be connected to a special tank filling system that supplies cold water. You should carefully ensure that the hose is not tightly stretched, but at the same time it should not hang. The thread also needs to be taken into account, since it can be on the outside and on the inside.
The connecting hose comes with union nuts and union nuts. Due to the sealing rubber inside the hose, there is no sealing process when screwing the nut. A fitting is used to wind in FUM or tow. This was the final stage in the process of replacing the toilet cistern fittings; now all that remains is to unscrew the tap and use it.
Replacing the fittings of a drain tank is quite a painstaking job, and if you make some mistakes in the process, you will soon need to replace damaged gaskets and membranes due to cold pipeline water.
Most often, the process of repairing a toilet requires a basic replacement of fittings. And as it has already become clear, you can easily do this yourself without resorting to the help of a specialist. Also, an important role here is played by how high the quality of the fittings themselves is; the better it is, the less noise there will be when filling the tank.
We install new fittings in place
It was said above that older models of drain systems have more holes for attaching fittings. This does not matter if new parts of similar design are installed in place of worn fittings. But often, to equip our old plumbing with a more reliable new “filling”, we have no choice but to replace the toilet cistern fittings that have become unusable with modern fittings. In particular, we will devote a few lines to this in the general assembly process.
Let's start:
- In older models, we attach a bracket with a rod and a metal bulb to the bottom of the tank. In new ones, the drain system is secured in the center with one plastic nut.
- Be careful! We work with plastic fasteners gently. Excessive tightening force may damage one of the fastener elements.
- We install the water supply pipe. In older systems, we will then attach a spoke with a float to it. In new ones, the pipe can be combined with a water level control system. That is, the float and water intake pipe are combined into one structure. We install everything together.
- Next, the tank with the assembled drainage system needs to be installed on the toilet.
- In older models, between the cistern and the toilet we use a large rubber gasket-shock absorber of an oblong shape. It “captures” two holes: a drain hole and a hole for overflowing water. If a modern drainage system is installed in the “Sovdepov” compact, we close the additional hole for the water overflow tube with a plug.
- The compact of today is equipped with a shock absorber gasket in the form of a ring.
- We place the tank on the gasket installed on top of the toilet. We press it to the toilet with two fastening bolts and nuts.
When buying fittings, you need to focus on original products, from a “branded” manufacturer. It will last longer and there will be fewer problems during operation.
Stages of work
Installation of tank drain fittings begins with its purchase. It is better when the fittings are purchased complete with the toilet. So, if you buy a toilet from a certain company, then it must be equipped with shut-off valves for the tank of the same company. Why is it important?
One of the reasons is that the shut-off valves of one company will be completely calculated according to the size and volume of the purchased drain tank. This will avoid having to adjust the float.
It is worth noting that branded fittings will be of much higher quality, in contrast to purchased Chinese ones, the manufacturer of which is unknown. Of course, you could have guessed this yourself.
Now let's look at the processes of its installation.
Preparation
When the inlet fitting is installed, the socket of the connecting hose is screwed onto it. In some cases, the inlet fitting is made of plastic, then it is necessary to use a rubber ring for sealing purposes. For safety, the metal fitting must be sealed with FUM tape. After that, all that remains is to connect the float. For this purpose, systems of levers and guides are used.
Installation of a drain system
A vertical stop valve pipe is installed above the flush pipe fitting. This valve is connected to the release lever using a drain rod. Then you need to install a release button above the lever. This button is installed on the tank lid, so it is necessary to accurately install the lever that controls the vertical rod.
There is another version of the drainage system, when instead of a vertical valve there is a simple hatch, which is attached to the locknut of the flush pipe fitting. In this version, the installation is performed differently. A vertical stand is added to the hatch. A lever pair called a rocker arm is fixed in its upper part. The rocker is connected to the hatch with a plastic chain. Afterwards, it is necessary to secure the drain button rod to the end of the rocker.
In this embodiment, the drain unit works according to the following principle. When you press the button, one edge of the rocker lowers, the second rises accordingly. A plastic chain is attached to the side that rises. The rocker tensions the chain and the drain hatch opens.
The disadvantage of this system is that at the time of descent it is necessary to hold the button constantly until the drain is completed. However, unlike a vertical valve system, it is much easier to install and maintain.
Commissioning
Now you need to adjust the fittings of the drain tank. To do this, fill the tank with water, but do not cover it with the lid.
As the tank fills, you need to watch the float. It should not touch the mechanism of the supply and drain system, as well as the walls of the tank itself. If the float comes into contact with anything, it must be adjusted.
It is also important to adjust the height of the fittings, namely the float. This can be done by making adjustments to the assembly that connects the float to the supply valve. In the best case, the tank should fill within a few minutes. The float's ascent level should stop the flow of water at a distance of 70 mm from the edge of the tank.
Adjusting the drain mechanism
After installation, all that remains is to check how the fittings in the tank work. It is important to correctly adjust the water level inside the tank. To do this, the glass is fixed in a position in which the water will stop at the same level. The overflow height is also adjusted in parallel. Each locking mechanism usually comes with instructions from the manufacturer. If you study it, you will learn how to configure the toilet fittings correctly in your case.
Adjusting the toilet fittings
In the attached video you will see how to properly install the toilet flush fittings. If you have experience in this work, then leave your comments at the end of this article.
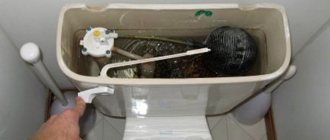
Tank assembly
We insert the float valve with the thread into this hole and tighten it with a nut on the reverse side.
The valve has been installed. We make sure that it does not block the small hole. We try to make sure it rises and falls normally without touching the edges of the tank. Also, then you can lower the drain valve and make sure that they do not interfere with each other in the tank.
Take an adjustable or regular wrench and tighten the nut. Don’t pull too hard; you don’t need a lot of force; the nut may burst or the thread will break, and then you’ll have to buy this valve separately.
We have the valve, now we are installing the drain fittings. We take a small ring and install it in this place.
Next, we lower our valve into the large hole. On the reverse side we tighten it with a large nut.
Now we take out the bolts that secure the tank itself. We need to assemble these bolts correctly. First we install the plastic washer.
There are also metal washers and brass washers. Next, we put on such a conical elastic band with the base down.
We have one bolt assembled. Now we assemble the second one in the same sequence. Install the washer, install the rubber cone. For convenience, you can remove the drain valve - just remove it from the latch, the lower part then remains, and the upper part is removed so that you can conveniently install the bolt.
Now we will need to tighten them with nuts. To do this, we install a plastic washer and tighten the nut. Now we take a screwdriver, a 10mm wrench and tighten our nuts. A screwdriver is needed to secure the bolt.