What types of toilets are there? Floor-standing. Everyone is familiar with them: they are the most common. Recently appeared pendants are gradually taking their place in the sun. However, there is also an interesting hybrid of floor-standing toilets and installation systems typical of wall-hung systems.
Meet: the attached floor-mounted toilet.
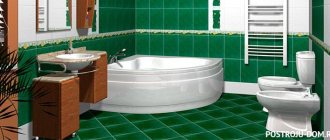
Such a toilet can have very elegant shapes. However, this also applies to other modern plumbing fixtures.
What does an attached toilet model look like?
A floor-mounted wall-mounted toilet is a rather interesting design that has a hidden, and in some cases, external drainage system. At first glance, this is an overly complicated scheme, but if you look into it a little, everything looks simpler. To better understand what this type of plumbing is, you need to use the example of the familiar wall-hung toilet. To install it, a strong frame is installed in the wall, inside which a tank with fittings and all other communications are advantageously placed. And the sink itself is integrated onto strong studs protruding from the wall. The entire structure, with the exception of the toilet, is hidden in the wall.
An attached toilet is placed on the floor, and not suspended using pins. Thus, there is no need to use a strong frame. The installation for this model is a tank hidden in the wall and a cold water connection to it. Separately, you need to connect the sewer. Thus, we can conclude that the attached-type toilet is a kind of hybrid of wall-hung and floor-standing models.
Design features of the equipment
When choosing a wall-mounted toilet, it is important to consider the approach to the sewer lines. It is equipped with an outlet, which, when connected to a pipe, should ensure unimpeded drainage of liquid.
Manufacturers produce products with three types of releases:
- Oblique.
Belongs to the subtype of horizontal options, the pipe is located at the back of the bowl and is directed from top to bottom at an angle of 45°. It is the most ergonomic and efficient type. - Straight.
The tube is parallel to the floor and is suitable for sewer pipes hidden by wall structures. By means of a corrugated adapter it can be converted into an oblique view if necessary. - Vertical.
A very convenient option for Stalinist and private houses. The pipe exits at a vertical angle and connects to the socket of the sewer pipe directly below the equipment. The ladder goes to the riser under the ceiling of the lower floor apartment.
Keeping the inside of the bowl clean and the difficulty of this process lies in its shape. Models of attached equipment are available with plate-shaped, funnel-shaped bowls and in the form of a half-shelf.
Disc type
was common in Soviet times. Waste products were placed on a shelf, after which they were washed off under the pressure of water from the tank. This form is practical in that there is no splashing during the process, however, due to the small depression in the shelf, liquid accumulates. This contributes to the appearance of an unpleasant odor and the formation of salt deposits from process water. Such models are in less demand on the market and are gradually disappearing.
Funnel shape
much more perfect, as it eliminates unnecessary contamination and specific odors. When visiting the toilet, the contents are sent directly into the water mirror through the drain funnel. The design reduces water consumption, but contributes to the formation of splashes, which are unpleasant to the body and do not comply with hygiene rules.
Half shelf bowl
is a combined version of the first two types. On one side, the shelf has a flat shape, and the water surface is shifted closer to the side. This model allows you to extinguish splashes, eliminates the formation of plaque on the shelf and a specific smell in the toilet.
Methods for organizing drainage
An attached floor-standing toilet is placed flush against the wall or with a small gap, and the flush cistern is installed in a false wall or installation. The flat-type tank has a drain tube connected to the device and a housing, the fittings in which are activated mechanically or pneumatically using a button.
The drain is classified into several operating options:
- Shower.
It is triggered along the perimeter of the bowl and forms a kind of whirlpool, allowing for high-quality flushing of waste products without residual masses. - Cascade.
It is a uniform flow of water, which is capable of washing only the internal volume of the bowl, therefore it is less efficient in operation. - Sucking.
Belongs to the most powerful type. The principle of operation is to fill to a certain level with water, which completely falls into the drain hole through the open valve.
Hidden tank design
Installing an attached toilet involves hiding the cistern into the wall structure based on factors such as:
- appropriate design of the drainage system;
- minimum gap between the toilet and the wall;
- creating a good appearance of the bathroom, where the system is hidden in a false wall, and only the flush button is located outside.
The system is mounted on the wall and does not take additional loads other than its own weight, therefore it has sufficient strength and durability. The sewer connection is made from above, behind, left or right. There must be a built-in valve for locking. The tank is recessed into the wall to a depth of no more than 10-12 cm.
Drain system fittings
The connection of the fittings to the drain button is carried out pneumatically or using a cable as a lever. Drains with two buttons are very popular, since one allows you to drain water in half the volume, which reduces consumption, and the second - only. The system operates thanks to a quick-acting storage valve.
Models with a stop-drain function are also available. The principle of operation is quite simple: the first press of the button flushes the water, and the second press instantly blocks the supply if it is no longer required.
Advantages of the innovation model
Floor-mounted toilets have a number of advantages over older sink models. So, the main advantages can be considered the following positions:
- All communications, including the cistern, are hidden in the wall. Thanks to this, the user can create an almost flawless design for their bathroom.
- An attached toilet takes up much less free space. It is several times shorter than the floor accessory, and therefore additional space will appear in the room.
- Due to the fact that there is no need to hang the toilet from the wall, there is no need to purchase a heavy and expensive frame. Thus, the overall design is more cost-effective.
- Considering that the tank is hidden in the wall, you can attach a heated towel rail, shelf or any other thing instead. In a word, the user can use all the free space in the bathroom as he sees fit.
Installation steps
Most often, our toilets do not boast a large area, so every centimeter counts. Manufacturers are not asleep, and new designs are constantly appearing that can somehow solve this problem. The latest such invention is wall-mounted toilets.
This toilet does not have a tank attached to it; it is mounted in a niche. This allows you to free up some space and everything looks neater. Installation of an attached toilet is quite simple and does not involve any complex structures.
Instead of a ceramic or earthenware drain column, a plastic casing is used; it is built inside the wall and attached, and at the bottom it is connected to the toilet bowl. The button for controlling the flushing process is located on the wall.
If we consider the entire installation process, we can distinguish the following stages:
- The first step is to secure the knee using metal fasteners. This must also be done in the case of a horizontal exit.
- Lubricate the cuff or toilet outlet, and then temporarily place it in the intended location.
- Trace the outline and mark the mounting holes, and then you can remove the device.
Installation of an attached toilet - Place the fasteners inside the marked outline.
- Place the toilet along the marks, pressing it into the pipe. If the tank is included, then everything is installed at the same time.
- Place the water release button on the wall. Some modern models have an additional button, which is designed for economical use of water. When you press it, the tank does not empty completely, but only half.
- Tighten the screws in the holes provided. You can hide them with decorative elements.
- Check the operation of the equipment.
If you follow these steps, everything will go smoothly. In some cases, a problem may arise when connecting plumbing to the water supply. Most often, this problem may arise if you purchased imported equipment. Often it does not harmonize very well and does not want to be combined with our plumbing system.
When purchasing a floor-standing toilet, you should especially pay attention to the quality of the cistern, because due to its location, repairing it if necessary will be problematic. If you do not have experience in installing plumbing equipment, then it is advisable to invite a specialist or at least an assistant. Incorrect installation of the tank can lead to a loose fit of the toilet to the wall, and this will affect its operation.
It is also worth paying attention to the strength of the attachment to the floor, otherwise the toilet will stand unstable and this will affect its reliability. Naturally, it is clear that there cannot be an absolutely flat surface, so all irregularities and cracks must be immediately sealed with sealant.
Disadvantages of an attached design
Despite all its advantages, the attached toilet also has some disadvantages. So, the sink itself will not cost much, but its installation, tank and other necessary communications will cost a pretty penny. As a result, everything together can be quite expensive. A hidden tank and the same communications are very expensive to repair and maintain. Replacing or repairing the drainage system is quite inconvenient and also troublesome.
An attached toilet does not have the advantages that wall-hung structures have. Since the attached model is mounted directly on the floor, there is no free space underneath. As a result, the room becomes more crowded and less voluminous.
Basic nuances during installation
When installing wall-mounted toilets, some features should be taken into account:
- The hidden tank is secured using dowel nails or anchor bolts, and then covered with plasterboard or plastic for easy access during repairs.
- Only the outlet from the tank and the socket for connecting the plumbing should stick out from the outside. All connections must be made rigid using silicone-based sealant.
- It is prohibited to use corrugated and flexible pipes for sewerage, as they have less resistance to aggressive environments and less service life.
- The connection is made taking into account the angles of inclination, so that leaks or unpleasant odors do not form in the future.
- Installation of plumbing is carried out before the start of finishing work. The height of the bowl should be calculated taking into account the floor covering (1-2 cm).
- If the drain button is powered by mechanical traction, then the wall thickness should not exceed 7 cm. Devices with a double button can not only reduce water consumption, but also eliminate condensation.
- The tiles on the floor are laid from the door, and on the wall from the location of the button.
Materials from which wall mounted toilets are made
An attached toilet with a hidden cistern can be made from liquid or natural stone, earthenware, porcelain and other materials. Thus, of all the materials existing today, faience is considered the most practical and cheap. In addition, it is an incredibly durable substance.
A more expensive option is porcelain. In terms of strength and density, it is several times superior to glazed faience.
Today, attached toilets made of liquid stone are considered incredibly popular. Due to the fact that polymer concrete contains color additives, the sink can imitate the texture of natural stones.
Although not often, attached toilets are also made from natural stone. The cost of a model made from such material is quite high, and the consumer characteristics are low.
For public spaces, stainless steel products are often chosen. This metal does not break and is easy to clean.
Required Tools
Even when purchasing plumbing fixtures, you will find out that the installation is sold separately from the main equipment, but it usually comes with all the necessary pipes and fasteners.
Before you begin installation work, you will need to “arm yourself” with certain tools:
- a hammer drill or drill to drill holes;
- a set of wrenches of wrenches and adjustable varieties;
- marking kit - tape measure, level, pencil;
- screwdriver;
- spatula for glue and paint brush.
All other tools and materials should be selected as needed.
You should also take care of the covering material in advance. This is usually a large sheet of drywall and a finishing product - primer, tile (with adhesive) or paint. Instead of drywall, you can use plastic decorative panels - they are appropriate if they are already present in the decoration of the bathroom.
Features of cisterns
Cisterns for attached toilets differ from systems for conventional sinks in that they operate silently. In addition, they are distinguished by stylish design and ergonomic performance. The operation of installation systems makes it possible to integrate the built-in toilet cistern anywhere in the bathroom. This design is also characterized by hygiene. After all, the standard flush tank is the main dust collector in the toilet. In built-in models, all elements that are most susceptible to dust settling are hidden in the wall. Therefore, the absence of dirt is guaranteed.
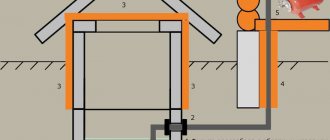
Using the installation system for installation
Another option for installing a floor-mounted wall-mounted toilet is possible. An installation system is used for this. In this case, all supply lines will be hidden.
To carry out this option for installing a toilet, you will need: • a supporting frame • fastening elements • a flat hidden tank • a water flush button. The supporting frame is installed at the required height. The position of the frame is adjusted using a building level.
Then the frame is fastened between the supporting profiles. A hidden barrel and a floor-mounted toilet are being installed.
Using a plastic clamp, the sewer pipe is fixed. Install the mounting screws into the mounting holes and tighten.
A water flush button is installed in the technological hole in the wall. The last step will be to fill the system with water and check its functionality.
This is what the installation system for the attached toilet looks like in the video.
User opinions
In general, the attached toilet with a hidden cistern has positive reviews from consumers. They love the compact design and especially how well it fits into small bathroom spaces. Thanks to the integration of such a bowl, you can increase the space, making it more stylish. All users who have installed such models at home note this fact. People also like the huge selection of materials from which such plumbing fixtures are made. You can choose the offer that suits you most, rather than being content with what you have.
Domestic and foreign manufacturers
Remember that, in essence, the country of manufacture of toilets is not so important. Of course, repair specialists advise buying plumbing fixtures only from trusted foreign manufacturers, but you also need to pay attention to domestic models. You should only be wary of cheap Chinese models, because no one knows how such a purchase could turn out.
The most important thing when buying an attached toilet is installation. The service life of your toilet will depend on the reliability and quality of the fittings, tank, etc. Recently, some representatives of Western Europe can boast of the highest quality installations: “Grohe”, “Tece”, “Geberit”, “Sanit”, “Viega”.
Currently, repairmen and plumbers practice a combination of installations and toilets from completely different manufacturers. Thanks to the fact that all connections are unified, this can be done.
Floor-standing toilet: classic version
The most common model, familiar to each of us. Equally suitable for an apartment, office or country house. Suitable for you if you are a fan of the classics and are not limited by the small size of the room. It is easy to install and does not require special equipment or skills. You can install such a toilet even if you have never done it, just read the instructions. Simple design ensures reliability. There is simply nothing to break, and if a breakdown does occur, then repairing a floor-standing toilet is quite simple; you don’t have to buy expensive equipment for this. Floor-standing toilets are cheaper than side-mounted or wall-hung toilets; this is a budget option. Buying an inexpensive floor-standing toilet is much easier than buying a wall-hung toilet for the same money.
Connecting the toilet to the sewer
There are several ways to connect a toilet to a sewer system, namely vertical, horizontal and oblique. Moreover, each of them includes its own installation features, as well as various other nuances.
Vertical connection
This method is quite convenient and widespread, especially in European countries. Its essence lies in the fact that the pipe and siphon, which is located in the toilet bowl, are directed downwards. This makes it possible to install the structure at any angle relative to the wall. And the installation itself takes place in several simple steps:
- First, markings are made on the floor.
- After this, a screw flange with a lock must be installed in place of the drain pipe.
- There is a round hole in the center of the flange. It is into this that you will need to insert the sewer pipe.
- Then the toilet is installed on the flange, fixed, and the outlet pipe must be pressed against the end of the sewer pipe.
Horizontal connection
Horizontal connection is the most common type of toilet connection in Russia, as it is suitable for installation in apartment buildings. However, in this case, you need to connect the toilet to a certain wall, connecting it to the sewer outlet. The principle of operation for a horizontal connection is approximately the same as for a vertical connection.
Installation of a wall-mounted toilet
Wall-mounted toilets are installed using a durable installation. As a result, only the bowl and the drain button remain visible. This looks the neatest, but is much more complicated compared to other types. However, even the most complex installation method is completely within the capabilities of the average person.
First of all, a steel installation is attached to the main wall. In this case, dowels are used for fastening. After this, you should check the evenness of the installation using a level. Water pipes and sewer pipes are removed at the installation site. Water can be supplied to the barrel using a rigid or flexible line. The first option is a little more complicated, but much better quality than the second.
At the next stage, the toilet is connected to the sewer hole using corrugation. At this stage, it is recommended to completely screw the bowl to the installation and check the entire structure with a test drain. The final stage will be covering the section of the wall on which the toilet is attached. However, during this process, its bowl is usually removed and finally secured after all the finishing work.