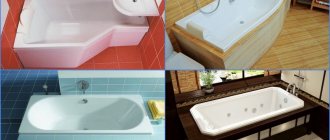
Damage Prevention
In order to avoid various types of defects, it is necessary to follow all instructions for bathtubs.
Taking into account all the requirements of the product, you can keep its appearance perfect for many years. Basic rules for proper use of bathtubs from professionals:
- do not place metal or other objects that can damage the enamel in the bathtub or on its edges;
- the cleaning agent must be soft, it must not contain any kind of abrasives, and the use of chlorine bleaches is also unacceptable;
- If possible, protect the bath from sharp objects;
- during repair work, the bathtub should be covered with a thick film;
- Do not use for cleaning or pour substances containing acid onto the product;
- the bathroom itself must have fairly thick walls;
- You can't jump in the bathroom, even for a child.
Additional Tips
To prevent the occurrence of defects, as well as to effectively remove them, you should remember the preventive measures and repair recommendations:
- When cleaning the bowl, do not use abrasives or rough brushes, as they can cause scratches.
- When bathing animals, it is necessary to lay a polyurethane or fabric mat on the bottom of the bath.
- It is recommended to protect plumbers from sharp and heavy products, the impacts of which lead to splits and cracks.
All the most important and useful information about cleaning the bathroom is collected in this section of the site.
How to extend the life of an acrylic bathtub
Prevention is always better than repairing the acrylic layer. Following simple rules can significantly extend the life of an acrylic bathtub.
When cleaning, avoid using acid-alkaline detergents.
The temperature of the water in the bath at the time of use should not exceed the maximum values specified by the manufacturer. For acrylic bathtubs this is 60 degrees.
After completing the water procedures, wipe the enamel coating dry.
Apply polishing gel twice a month.
Remove lime stains from the surface of the bath in a timely manner with a soda solution in the proportion: 50 grams of powder per 0.5 liter of water.
Glue stains can be easily removed with alcohol.
Hydrogen peroxide applied for 5 – 10 minutes works well with yellowness.
From simple to complex: how to repair chipped enamel on a bathtub without much effort, skill or knowledge
It is clear that you always need to start doing your job, starting with the simplest solutions, and only if they do not help, can you move on to heavy artillery, that is, look for ways of greater resistance. So, while we live in Russia, problems will definitely not arise, since the people here are inventive and smart. That is why the domestic industry, adapting to the indefatigable immunity to all sorts of craftsmen to call for money, produces a wide variety of kits and kits for home craftsmen. Moreover, kits for emergency “treatment” of a bath are also no exception.
The most popular kit on the market, which contains everything needed to restore a chip in a bathroom, is the Cramer brand, well known to all true professionals. That is, if you are tormented and tormented by the question of how to repair a chipped enamel in the bathroom, then you should definitely purchase such a set and not fool yourself with unnecessary worries.
Keramik-Email-Acryl Reparatur-Set for everyone whose hands grow from the right place
So, first, it’s worth understanding what is included in the notorious set, and what you need to know when purchasing this particular product.
- Putty mixture, which is offered in two containers - a plastic tube (tube), as well as a tin can, like for paint.
- A plastic spatula, which you will use to mix the putty solution, as well as seal the chip itself.
- Paper with an abrasive surface, or in common parlance simply sandpaper. Moreover, the kit comes with both metal and acrylic bathtubs. In the first version it is brown, and in the second it is grayish.
- The final step is spray paint in a can, which is also suitable for metal enameled surfaces and for acrylic, that is, in fact, plastic bathtubs.
A chip in the bathroom down to the metal: how to repair it, simple instructions for using the kit
It is worth considering that other manufacturers also offer similar kits for emergency bathroom repairs in an assortment, and what is described in our article is not a panacea at all. You yourself can choose what to give preference to, so you should read the instructions, composition and other details very carefully, even if you are not very strong in this.
- First of all, you need to clean and degrease the chip, especially if we are talking about how to repair a chip on a cast iron bathtub. First you need to thoroughly remove all traces of dirt in the chip, and not miss the moment of removing the rust. The more efficiently you do the preparatory work, the more reliable the final result of your work will be. It would be optimal to also purchase an American corrosion remover called WD-40. It acts almost suddenly and with extremely high quality. If you don’t have something like this at hand, you can use simple Domestos, especially when it comes to repairing chips on an acrylic bathtub.
- Next, you will need ordinary soda, which can be used to thoroughly degrease the surface, after which you will need to wipe it dry or wait until it dries itself. Ordinary acetone also works well to get rid of traces of grease, especially if emergency repairs are required on an acrylic bathtub, the crack of which has already become clogged with dirt.
- The proportions for mixing the putty base (tin can), as well as the hardener (plastic tube), are usually indicated on the packages themselves. But most often they leave it at thirty to one. You need to mix extremely carefully, and it will be a real crime to overdo it with the hardener, so carefully monitor the proportions.
- Apply the solution to the previously prepared chip and level it with a plastic spatula, which is usually included in the kit.
- You will have to wait from half an hour to several hours; in our version, even thirty minutes will be enough, and smooth the unsightly surface with sandpaper. You will need to work as a grinder until the transition between your improvised enamel and the original coating is completely felt under your fingers.
- All that remains is to paint the chipped area with spray paint and you're done. However, here you need to be extremely careful, do not rush to pour a lot of paint, but it is better to spray it gradually, in layers, until the differences are no longer noticeable.
Information for your information
When working with professional kits, you need to understand that you can touch the freshly painted area with your hand only four hours after the last manipulations. The enamel will completely harden only after forty-eight hours, but all instructions do not recommend using the bath for its intended purpose for four days.
Preventive actions
Having learned about the options for solving the problem of how to repair chipped enamel on a bathtub, you can solve such problems yourself. However, a situation may arise when suitable material is not found for certain types of repair work or when it is not possible to use any method.
It is worth saying that you don’t have to look for a solution to the problem of how to repair a chipped enamel in a bathtub if you follow the tips to prevent cracks and chips from appearing on the enamel coating of the bathtub.
In particular, we are talking about the following:
- To care for an enamel bathtub, it is recommended to use mild detergents that do not contain abrasive particles of any fraction.
- Contact of the enamel coating with hard objects should be avoided. Particular care must be taken when performing any repair work in close proximity to the bathroom. First, cover the bath with a blanket, bubble wrap from packaging or cardboard, and lay boards or sheets of drywall on top. After this, you can safely carry out any installation or repair work and decide how to repair the chips on the bathtub.
- It is forbidden to pour preparations containing acid into an enamel-coated bathtub. They can cause destruction of enamel and all elements of the sewer system made of polymer materials. Plastic sewer pipes are easily damaged by acid-containing preparations, which can cause a huge amount of trouble. And in addition to the question of how to paint over a chip on a bathtub, you will have to solve the problem of sewer repair.
- When cleaning a bathtub with an enamel coating from stains with a knife or other sharp object, tiny scratches may form that spoil the appearance of the bathtub and may subsequently require measures to restore the enamel.
- In order not to look for a solution to the problem of how to repair chips in a bathtub with your own hands, it is not recommended to use products containing chlorine or other aggressive components to clean the bathtub. Such drugs have a destructive effect on the enamel coating.
- Acrobatics or jumping in a bathtub with enamel on it can cause the bowl to deform and damage the enamel coating. Moreover, even a person with a small mass, jumping in the bath, can damage the enamel.
- When purchasing an acrylic bathtub, you should pay attention to the thickness of the walls of the bowl. Cheap, low-quality models can become deformed even under the weight of poured water.
Having studied the methods of restoring the enamel coating, you can independently answer the question of what to do if the enamel of the bathtub is chipped, and at the same time save money. After all, the services of professionals involved in the repair of enamel and acrylic bathtubs, at least a little, are worth it. In addition, do-it-yourself repairs allow you to gain invaluable experience in performing installation and repair work.
Folk remedies
Various products have become popular among people that also effectively eliminate damage to furniture. Most of the methods described do not require any special costs and are easy to use.
Walnut kernel
When rubbing scratches with a walnut kernel, the damaged area is gradually filled with mass and becomes almost invisible. The procedure can be performed several times in a row to achieve a better effect. It is possible to replace the kernel with nut oil and wipe the scratches by applying the substance to a napkin.
Mayonnaise
The effectiveness of mayonnaise is ensured by its strong penetration into the wood structure. Mayonnaise should be applied to the damaged area several times with an interval of 2 hours. After treatment, the wood will swell and the crack will fill on its own. This method can eliminate defects on any wooden furniture.
Vinegar with vegetable oil
It is recommended to treat light furniture with a mixture of olive oil and vinegar, using the components in a ratio of 5:2. The damaged area is wiped with the mixture and left for a day for complete absorption. Then the furniture is polished with a rag.
Sandpaper
Fine-grained sandpaper helps remove defects on steel furniture elements. The damage is smoothed over with sandpaper and, if necessary, treated with putty. After the material has dried, paint is applied to match the color of the product to mask the area.
Mastic
You can paint over small scratches on wooden products with mastic. The material is distributed on the surface and rubbed with a napkin. To make your own mastic, you need to melt 40 g of wax, add 30 g of turpentine and a teaspoon of alcohol, and then mix thoroughly.
Colored crayons
Colored crayons contain wax, which allows you to paint over scratches. To achieve the desired effect, you just need to choose the right color crayons.
Paraffin
Candle paraffin is kneaded, applied to the damaged area and rubbed until the defect is eliminated. When processing glossy furniture, you need to wipe the surface with a soft cloth after completing the restoration. It is enough to remove the remaining paraffin from the matte surface.
Coffee
By mixing ground coffee beans with a small amount of liquid, you get a semi-thick substance to remove scratches. Apply the substance to the scratches using a cotton swab or disk. You can eliminate defects with coffee only on dark furniture.
Lemon juice and oil
A mixture of lemon juice with vegetable or olive oil in equal proportions is also suitable for treating damaged furniture. The mixed components are applied to a clean, lint-free cloth and the surface is polished, making movements in the direction of the scratch.
Through Hole Repair
Through damage to the bathtub requires the implementation of measures to seal the crack through which water flows and restore the damaged enamel coating.
To solve the problem of how to seal the bathtub from chipping, you should use a special repair kit, which can be purchased at any hardware store.
A qualitative solution to the problem of how to repair a chip in a bathroom down to the metal is possible only if all actions are carried out consistently.
In particular, the operating procedure should be as follows:
- To prevent the crack from growing larger during use of the bathtub, it is necessary to drill small holes at the ends of the damage. For this purpose, it is recommended to use a drill with a diameter of 2-3 mm.
- Next, to repair the bathtub enamel with your own hands, the damage is cleaned with sandpaper, while sandpaper with a fine fraction will prevent damage to the entire enamel. The resulting fine dust must be removed using a cotton or gauze swab soaked in an alcohol solution.
- Now you can prepare epoxy glue, for which you connect the components from the two vials included in the kit. The preparation of glue must be carried out in strict accordance with the instructions that the manufacturer includes in the packaging.
- The prepared adhesive composition is applied to the crack in the bathroom. Then it is imperative to use a sealant, also included with epoxy glue. The substance must be introduced into the adhesive layer and directly into the crack when repairing chips on the bathtub.
- After carrying out these activities, the restored container is left until the epoxy composition completely hardens. The manufacturer indicates the drying time in the attached instructions for the repair kit.
- After drying, the composition is cleaned with sandpaper and degreased. Then a special paste is applied to the repaired area, designed to restore chips on the enamel bathtub.
- The final steps when deciding how to remove a chip on a bathtub involve polishing the repaired coating using a soft flannel cloth.
If you need to decide how to cover up a chip in a bathtub with an acrylic coating, you can also purchase a repair kit. However, in this case, you should choose a composition for restoring the acrylic coating. The procedure remains the same.
Elimination of small defects
Small and inconspicuous cracks can be removed using epoxy glue without additional components. To do this you need:
- wash and clean the damaged area;
- use a drill or screwdriver with a thin drill to drill through the end points of the crack to stop the spread of the defect;
- wash off the dirt, dry the area, wipe it with a degreaser;
- mix epoxy glue and carefully apply it to the crack;
- level the coating and wipe off excess glue with a piece of rag;
- wait until it hardens, sand the finished seam with fine-grained sandpaper.
Epoxy adhesive.
The hardened resin fixes the edges of the damage and isolates it from water and air.
Restoration of the enamel layer
We carry out our own repairs of chipped enamel of metal bathtubs made of cast iron and steel using the following technology:
cleaning the metal in the defective area with coarse sandpaper;
- removing dust with a vacuum cleaner or washing with a cleaning agent without abrasive impurities;
- solvent degreasing;
- preparing an acrylic mixture or epoxy enamel;
- layer-by-layer application of enamel paint or filling the cavity with self-leveling acrylic in one step.
After laying the repair mixture on the chip site, it should protrude like a bump above the factory coating adjacent to this area. After the composition has hardened, this tubercle is polished with abrasive materials with a change in grain size from larger to smaller. Next, polishing is carried out with a special paste.
To avoid getting new scratches with sandpaper, cover the chipped area around the perimeter with masking tape.
Small chip
Repairing a chip on a small bathtub with your own hands is quite simple. The main nuances of restoration work in this case are:
- cleaning of cast iron and steel is impossible due to the microscopic size of the defect;
- instead, rinsing is done with a chlorine-free cleaning agent;
- It is economically feasible to use repair kits in small packaging (syringes, cans, barcode correctors);
- application in one go.
Preparation of the mixture according to the manufacturer's instructions.
The product can be applied with a brush; it is more convenient to level the material on the surface with a spatula.
Applying acrylic reducing agent with a homemade wooden spatula made from wood chips.
Manufacturers of some bathtubs open their inner surface with varnish. Therefore, after repairing a defective area, it may be necessary to apply one or two layers of varnish.
Large chip
To restore areas of plumbing with large chips, the repair solution must be applied in stages over several steps. This is due to the low viscosity of the product and the complex geometry of the bath.
In order to remove the required amount of “patch” with sandpaper without grinding off the structural material in the areas adjacent to it, you can shade the treated area with a dark marker.
As soon as the abrasive material removes the last traces of the marker, the surface at the site of the former chip will take on the design outline.
This technique is discussed in more detail in the video below:
Thus, a chip in the enamel coating of a cast iron or steel bowl, or the very structural material of an acrylic bathtub, can be repaired on your own. For this purpose, the industry produces one, two and three-component repair compositions of self-leveling acrylic, enamel paint, and acrylic restorer with special properties.
How to repair bathtub enamel
Before finishing the bath, you need to start preparing it. First you need to get rid of the deposits that have formed over the entire period of operation. The ideal product for this would be any household chemical designed for cleaning bathtubs and sinks. Lemon will help you remove traces of dirt and stains from the enamel coating. It's better to try using it first.
Next, using a sandpaper soaked in water, treat the surface of the bath, periodically washing off the sludge that appears during the work.
Materials for work
For repairs you will need the following materials:
- enamel (jar or spray can);
- one type of suitable putty;
- sanding paper, resistant to moisture;
- lemon or household cleaning chemical.
You need to restore the enamel coating of the bathtub using the following sequence of actions:
- protect the site of damage;
- clean the surface from deposits;
- sand the damaged area;
- remove dust, rinse the sink well and wipe it;
- degrease the area intended for repair;
- Apply the coating in a thin layer in several steps, allowing each of them to dry;
- fill up severe chips, let the putty dry completely, sand and degrease the treated surface;
- polish the repaired surface.
Apply the enamel as follows:
- using coarse sandpaper, clean the entire surface;
- polish it, remove dirt;
- apply an enamel coating using a foam roller;
- blend it using a flat brush.
Also, in order to update the coverage, you will need to purchase:
- foam paint roller;
- enamel tray;
- flat brush.
The reliability of renewed bathtub enamel is much less than coatings that are applied using hot drying in an industrial manner. It is highly susceptible to all kinds of acids, various salts, as well as special cleaning agents. These substances can corrode the new enamel. For this reason, when choosing enamel, you need to carefully read the instructions and recommendations of the manufacturer. A new bathtub or sink should be handled with care.
How to restore minor coverage defects?
A smooth and clean base for the new coating is prepared by treating the sharp edges of the chips with damp sandpaper. Acetone, white spirit or another solution applied to a swab is used to wipe the sanded surface. It needs to be cleaned, degreased and dried. The coating is applied in several layers, and when applying the next layer, the previous one must already be completely dry.
How to restore bathtub enamel?
The edges of the treated bath are covered with adhesive masking tape. Using a foam roller, the enamel is applied in cross movements. Then, using a flat brush, the enamel must be shaded.
Now, knowing the technique for eliminating defects in a bathtub or restoring its coating, it will not be difficult for you to make repairs yourself.
How to cover up a chip on an enamel bathtub at home?
Newly installed bathtubs delight the eye with their impeccable cleanliness and perfectly smooth surface, but intensive use over time leaves visible signs of gradual wear and tear on them. A chip is a defect in the enamel of plumbing fixtures that occurs due to mechanical impact, a pinpoint impact, or the fall of heavy objects. Fortunately, the appearance of a chip is not yet a reason to carry out the labor-intensive and expensive procedure of replacing the bathtub. In most cases, cracks and abrasions in enamel can be easily repaired at home using available products and tools.
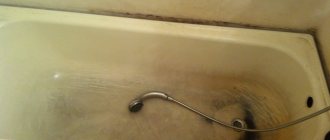
Damage to enamel
Enamels on bathtubs are applied in a factory using the electrostatic method followed by baking, so the coating is durable and wear-resistant; if handled properly, it will last for at least 7-10 years. A chip on the surface of enamel bathtubs is the result of mechanical impact or impact, violating the integrity of the top layer of the sanitary ware. If the defect is not repaired in time, it will lead to the following problems:
The appearance of rust. There is no way to avoid contact with water in the bathtub, so a chip in the enamel will inevitably cause rust. The oxidative reaction that occurs between the metal and oxygen leads to further destruction of the walls of the bowl.
Note! You can assess the repairability of an enamel bowl by assessing the number and scale of defects and damage. Repairs are carried out if chips and cracks are superficial; if there are through holes, it is more rational to restore the bathtub using an acrylic liner
Surface preparation
In order to efficiently repair bathtubs with enamel coating and repair chips, it is necessary to carefully prepare the area to be treated. The quality, durability and resistance of the result to temperature changes, exposure to water and damage depend on compliance with the technology. To repair chips, you need to perform the following operations:
- The area around the chip is carefully but thoroughly cleaned of dirt and rust. The bathtub can be removed from dirt using any alkaline detergent, and pockets of corrosion can be removed with a rust converter.
- To remove rust residues and level the enamel surface around the chip, use fine-grained sandpaper.
Please note that the time spent preparing to repair chips directly depends on the degree of oldness of the damage, so it is better to repair bathtub enamel immediately, without waiting for significant pockets of rust to appear.
Removing defects using improvised means
If the chip on the enamel surface is fresh and not yet “overgrown” with rust, it can be repaired using improvised means, without resorting to large-scale restoration. Of course, the result of such a restoration will last less, but the costs will be several times less. If the bathtub is more than 15 years old, and in addition to chipped enamel, it has limescale and yellow deposits, it will require more extensive repairs. In simpler cases, you can use one of the following methods:
Using BF-2 glue and whitewash. To cover up a chip using this method, you will need glue and crushed whitewash or chalk. An adhesive composition is applied to the previously prepared surface of the bath, which is sprinkled with crushed chalk or powder. After setting, the procedure is repeated until the crack is level with the enamel surface. This is a fairly simple, economical technology that allows you to repair the enamel coating of bathtubs. Please note that it will take at least 4 days for the glue to dry completely.
Experienced craftsmen believe that timely repair of damage to the enamel coating of washing containers using available means at hand, subject to careful preparatory work, can protect the product from further destruction, as well as the spread of rust.
Recovery using special tools
A much more stable, long-term result is obtained if you restore the enamel layer of bathtubs using special means. The kit for sealing cracks includes: special moisture-resistant putty, enamel in aerosol form, spatula, fine-grained sandpaper. To use them to eliminate defects on the surface of the bowl, you need to:
- The putty is diluted according to the instructions until a thick, homogeneous mixture is obtained, and then applied to the surface of the chip so that it is equal to the intact enamel.
Please note that to seal cracks on the surface of enamel-coated bathtubs, it is recommended to use putty of the lightest shades, since dark tones can show through the paint layer.
Surface preparation
To ensure adhesion of the new coating, you need to properly prepare the surface. Preparation is performed in the following sequence:
- thoroughly wash the bathtub with a cleaning agent;
- clean the surface around the defect from rust, traces of paint and other contaminants;
- clean off any remaining rust and unevenness using fine sandpaper;
- degrease the surface;
- dry the bowl with a hair dryer or wait until it dries completely.
When covering a large area, the remaining enamel is cleaned off with a grinding wheel or coarse sandpaper.