General information
Attention! The shower stall should be assembled in a prepared room, all repair work must be completed.
The instructions below will help you assemble any type of shower structure: one with a glass back wall, with dimensions of 100 x 100 centimeters, 80 x 80 or 90 x 90 centimeters.
Shower cabins differ in the design of the tray. It can be high or low. Their assembly is no different, the only difference is in the installation location of the structure and its preparation before installation. It is better to assemble the cabin with a partner; assembly time averages three hours.
Purpose of the product
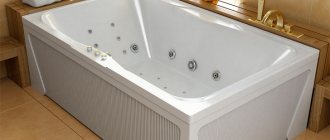
A shower cabin or hydromassage box is designed for a person to receive water procedures in the form of a shower (manual and tropical), as well as hydromassage of the back and/or lower back.
This product must be used in rooms with an ambient temperature of at least +5 degrees and no more than +40 degrees Celsius, and equipped with water supply and sewerage.
Water should be supplied under pressure of 0.5-2.5 atm. through a coarse filter (particle size more than 0.1 mm). If the water pressure is insufficient, it is necessary to install a pump; if it is excessive, a reducer must be installed.
Types of shower cabins, how to choose a model.
When choosing a model, they rely on the size of the room, how the communications for connection are located, and the location for installing the device.
The cabins are:
1. open, containing a tray and a front side.
2.closed, having a back wall with a roof.
Methods for installing a shower stall divide devices into:
1.angular.
2. rectangular.
Many models are equipped with additional functions:
1.contrast shower, the ability to alternate the supply of cold jets with hot ones.
2. hydromassage jets on the sides.
3.The tropical rain feature involves water flowing from above with music and color effects.
4.radio
5.aromatherapy, ozone therapy or chronotherapy.
When determining the number of functions required, you should study the product installation instructions to decide whether the model is suitable for your specific operating conditions.
Stage 1. Site preparation
○ – water supply outlet ½
○ – sewer outlet 40, 50 mm
☐ – socket
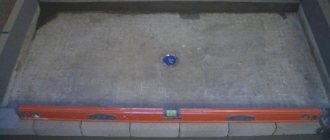
If a podium is made under the shower stall, then all distances indicated on the installation diagram (especially the distances to the hot and cold water outlet points) must be measured from the surface of the podium.
If it is impossible to ensure the height of the drain pipe indicated on the installation diagram, a podium must be built at the installation site of the product.
The height of the podium should be such that the distance from its surface to the center of the drain pipe does not exceed the value indicated on the installation diagram.
The surface of the floor or podium must be smooth and continuous (without depressions or protrusions) and must be covered with tiles.
A shower cabin sometimes weighs over 100 kg, so it is almost impossible to move it on a bare cement screed. Installation of equipment is carried out before installation of other plumbing fixtures and furniture.
Rice. 1 Incorrect
Rice. 2 Correct
It is mandatory to have grounding in the bathroom and a residual current device (RCD) with a leakage current of 30 mA according to the power consumption on the electrical wiring.
25A – for steam shower cabins (hereinafter: equipment) (three-core cable in double insulation, copper) 2.5 mm2;
16A – for shower cabins (hereinafter: equipment) without a steam generator.
It is necessary to have mechanical filters for cold and hot water. It is not allowed to install filters directly on the output fittings to the equipment due to overall dimensions.
The presence of reducers that maintain the same pressure of hot and cold water in the water supply system, no more than 2.0 atmospheres. It is not allowed to install gearboxes directly on the output fittings to the equipment due to overall dimensions.
The equipment assembly room must be cleared of foreign objects, such as construction debris and dust. The cleanliness of the room determines the quality of the assembly and the continued quality of operation of the installed equipment.
Because The cabin is assembled in a position moved away from the wall; for its installation it is necessary to leave free space in the bathroom (so that it can be moved at least 60 cm from the walls).
Also, to ensure further maintenance, the Buyer is obliged to provide free access to the Equipment. The distance from the ceiling to the roof of the cabin must be at least 20cm. The distance from the Equipment to other items (furniture, washing machine, toilet, washbasin) installed in the bathroom must be at least 20cm.
For the purpose of safety and security of equipment, high-quality assembly, when installing equipment, any other work is NOT ALLOWED
.
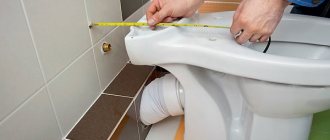
Recommendations on how to choose a device.
To select the dimensions of the booth, prepare a cardboard stencil with the necessary parameters. It will be used to determine the location of the booth and the desired model.
Pallets are made of plastic material, or the products are reinforced with fiberglass. If you choose pallets made of cheap material, they will sag under the weight of a person. The fasteners for installing the pallet must be reliable.
The cabins can withstand fluid pressure of no more than five atmospheres. At higher pressure levels in the network, reducers are installed. If the pressure in the water supply is low, you also need to select the appropriate model.
Checking parts before assembly.
First, unpack the boxes with parts and components.
All structural elements should be laid out and checked for their presence.
The cabin, which has a glass back wall, includes:
1.pallet
2.roof.
3.screen for decoration on the front.
4.lower, upper profile of horizontal type.
5.frame.
6.component parts in the form of studs, bolts, legs.
Attention! Sometimes the pallet is delivered assembled.
These parts are usually located in one large box.
If there are no studs for the frame or legs in a visible place, you should shake the frame; sometimes the studs are inside it.
Installation of glass sashes
Before installing the doors on the doors, it is necessary to attach the rollers and seals in the places indicated for fastening. Having carefully secured and coated with sealant, it is necessary to install the sashes. You can adjust the gap between the doors using the upper rollers, ensuring that one door is completely adjacent to the other, in order to avoid water leaks while using the shower stall. On some models, the rollers have screws where you can install plugs to protect them from moisture.
Accessories for the rear wall.
The rear wall is installed from two glasses of the same size.
Glass can be placed in aluminum profiles immediately, or without them, provided that the wall is assembled at the corners.
The two walls have drilled holes for components (shelves, mirrors, hand showers, etc.), this is what makes them different from each other.
Attention! To determine the left and right glass, you need to check the product with the picture in the instructions.
Tips before assembly.
There is no need to throw away the boxes from under the parts; they are laid on the floor to collect the pallet and glass without damage.
Attention! Glass parts should not be placed on tile or concrete floors.
Glass should be handled with particular care. For the booths, safe, durable glass is used, which has a weak point - the corners.
Glass cannot be placed on a corner. Glass cannot be drilled; it will break into small pieces.
Holes for fasteners are made at the factory. If there is no hole, then there was a defect during production, or the equipment was replaced at production.
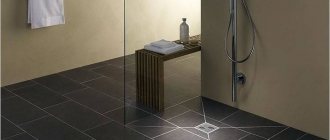
Shower in the room's recess
A shower of this type does not need a tray , because...
water flows into the drain due to the slope of the floor. An alternative option is a drainage system. Convenient in cases where even the smallest pallet is too high for some family members (for example, for the disabled and the elderly). A special feature of the installation is the installation of a water collection system (stairway or channel). The pipe and siphon are placed inside the screed. According to the rules, the sewerage system is located with a slope towards the riser.
Waterproofing of walls and floors near the shower stall in this case should be of particularly high quality and use antifungal agents . A special cuff is laid on the floor, which surrounds the drainage ladder. The cuff covers the main waterproofing layer to eliminate the possibility of leaks.
The sound of water transmitted to the rooms on the lower floor can be muffled by soundproofing . Some drainage drains are initially designed to absorb unnecessary sounds.
We will tell you how to make a shower stall in a private house yourself in the next review. Learn how to properly build a shower stall in an open-air summer cottage from this material.
Recommendations for the installation and installation of a garden shower made of polycarbonate can be found here.
How to assemble a pallet.
Before installing the pan, flexible hoses are connected to it, connecting it to the sewer. The sewer hole for draining liquid is located directly under the outlet from the pan.
Instructions for assembling the pallet:
1.legs are attached from below. The pallet should be turned over and the frame should be installed so that all the holes line up.
2. Screw the nuts onto the studs, then attach the washers.
3. Two nuts are screwed onto four studs, then the studs are attached to special inserts to put on the frame.
4. There should be no gap left between the frame and the pallet. Using an adjustable wrench, tighten the nuts located at the top, then the bottom ones.
5.select screws according to size to connect the pallet to the frame in convex areas of the structure.
Using a building level, level the legs. If the structure is tilted, then the doors will not close tightly.
The pan is turned over and put in place, connecting to the drain hose. The joints are lubricated with sealant. Next, check the pan hole for leaks. To check, shut off the water outlet and fill the pan with water. If no leaks are found, you can proceed to the next step.
Attention! If the device has a low sump design, then a special podium should be erected, under which the sewage system will be connected to the sump.
How to assemble side panels.
Vertical parts are secured to the pallet using bolts. You should make sure that the walls are exactly vertical; their slope can be less than 5 centimeters. The joints are lubricated with sealant, then the bolts are installed.
After installing the walls at the rear of the structure, water supply is supplied, and all joints are sealed with sealant.
If the cabin is equipped with a steam generator with a hydromassage, then electricity is required.
The power supply must have:
1. circuit breaker for the device.
2.moisture resistant socket.
3.special cable coming from the shield.
Stage 7. Connecting the cabin to water and sewerage
7.1. Take a PVC hose for the nozzles and lower back massage, cut it into pieces of the required length. Put them on and secure them to the injector fittings using clamps. Attach the hose from the upper nozzle to the mixer fitting, to the outlet with the “back massage, lumbar massage” indicator on the reflector (use a clamp).
7.2. Take a PVC hose for your foot massager. Attach one end of it to the chrome-plated corner of the water supply to the foot massager, using a plastic corner-fitting with a gasket and a clamp, and attach the other end to the fitting of the mixer, to the outlet with a pointer on the reflector “foot massager” (use a clamp).
7.3. Take a PVC hose for the overhead shower, attach one end of it to the mixer fitting, to the outlet with the indicator on the reflector “overhead shower” (use a clamp), and attach the other end to the plastic corner fitting with a gasket, which must be screwed to the overhead shower.
7.4. Take a PVC hose for a hand shower. Attach one end of it to the chrome corner of the water supply to the hand shower using a plastic corner fitting with a gasket and a clamp, and attach the other end to the fitting of the mixer, to the outlet with a pointer on the “hand shower” reflector (use a clamp).
7.5. Take a PVC hose for pouring water into the bathtub, attach one end of it to the faucet fitting, to the outlet with a pointer on the reflector “pouring water into the bathtub” (use a clamp), and attach the other end to a plastic corner fitting with a gasket, which will later be screwed on to the spout installed on the pallet.
7.6. Take reinforced water hoses of the required length (minimum recommended length 1m).
7.7. Screw the hoses to the water supply system and pre-discharge dirty water into the sewer.
7.8. Screw the hoses to the cabin mixer according to the “cold-hot” markings.
ATTENTION! THE MIXER IS CONNECTED TO THE WATER SUPPLY SYSTEM ONLY BY FLEXIBLE HOSES (HOSES ARE NOT INCLUDED IN THE DELIVERY SET). PIPE FITTINGS SHOULD BE EQUIPPED WITH SEALS AT THE CONNECTION POINTS AND THE NUTS SHOULD BE TIGHTENED TIGHT. ALL CLAMPS LOCATED ON THE WATER SUPPLY HOSES (MIXER, HYDROMASSAGE JETS, OVERHEAD SHOWER, SHOWER HANDLE, FOOT MASSAGER) LOCATED ON THE REVERSE SIDE OF THE CABIN MUST BE CHECKED BEFORE TURNING ON THE WATER IN THE SHOWER STATION BINE, AND IF NECESSARY, TIGHTEN.
7.9. Push the cabin into the installation location (be careful not to bend the hoses behind the cabin).
7.10. Pull the corrugation to the required length and stick it into the sewer socket; if necessary, cut off the unnecessary size
7.11. Check the water supply and drainage of the cabin components, and if there is a leak, fix it.
7.12. Install the decorative screen (item 2.15) by removing the protective film from it.
How to assemble a ceiling with your own hands.
The roof structure may include the following elements:
1.speaker,
2. tropical rain,
3.fan,
4.backlight.
Having prepared all the details, you can begin to assemble:
1.To connect the lamp, lead the wire through the desired hole, insert the lamp, fastening it tightly with steel spacers.
2. The speakers are installed using a screwdriver and screws on two decorative grilles.
3.Use nuts to attach the shower. From the outside of the roof, check the symmetry of the fastening. To adjust the shower, the nut is loosened, then tightened again.
The finished roof is connected to a frame of assembled panels, and a sealant is used to seal it.
Stage 6. Connecting the electrical part
6.1. Connect the wires with terminals from the remote control to the light, exhaust fan and speaker, according to the indicators on the wires or the color of the terminals.
6.2. Place the power supply on the roof and connect it to the remote control using terminals.
6.3. Secure the radio antenna wire to the roof using tape.
6.4. Plug the plug into a 220V socket and check the functionality of all electrical components of the cabin.