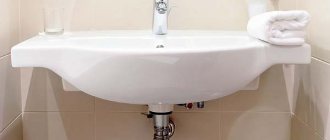
Installation of sink and mirror
Assembling the sink includes fitting with marking of the place of attachment to the wall, as well as installation of the mixer and outlet with siphon.
You also need to mount a mirror on the wall above the sink, if one is included in the kit or was purchased separately.
You will need:
- drill;
- tile drill;
- drill with carbide tip;
- adjustable wrenches;
- open-end wrenches of the required sizes;
- fluoroplastic sealing tape (FUM) or combed flax for sealing threaded connections;
- level;
- soft pencil;
- hammer.
To try on the sink, you need to place it on a cabinet and use a soft pencil to mark the places where it is attached to the wall.
After this, you should make holes in the wall to the required depth in accordance with the dimensions of the fasteners included in the kit.
You should drill the tiles with a special feather drill, and drill into the wall with a drill with a carbide tip, switching the drill to impact mode.
We insert dowels into the holes and screw metal pins into them, which will serve as fastening of the sink to the wall:
After this, you can attach the mirror to the wall.
To do this, using a tape measure and a level, you need to mark the locations of the mounting holes, drill to the required depth, install dowels and screw metal hooks into them. Everything is done in the same way as was described just above for the sink fastenings.
After hanging the mirror on the hooks, you need to check its horizontalness using a level:
Sequence of installation work
The first mark for the bracket is made on the wall surface, draw a horizontal line from the floor base 85-90 cm, measure the thickness of the washbasin from the side adjacent to the wall. Step back from the drawn line at a distance equal to the thickness of the product, and place a second mark in this place.
Measure the width of the sink, mark on the line where the brackets will be located, and make holes at the marked points. Install the dowels, screw the brackets to them, install the bowl, it should fit tightly to the wall surface, it is necessary for the structure to be stable.
If you consider at what height to install the sink, it may vary; mount the plumbing fixture so that it is convenient to use.
At the final stage, connect the drain to the mixing device, treat all joints with sealant. If the bowl is mounted on a foot, place the tulip at a distance from the wall surface. This method is difficult for an inexperienced person to do independently, since it requires high-quality fastening of the sink.
Making a homemade cabinet and installing it
The sink with siphon and mixer is placed on a cabinet and moved towards the wall. Use a pencil to mark the mounting bolts. Then the cabinet with the sink is moved away from the wall and drilled at the markings. Dowels are inserted into the holes and the sink is screwed on.
If purchasing a bathroom cabinet is impossible due to some circumstances, you can make it yourself. To do this you will need the following materials and tools:
- waterproof tabletop;
- metal legs;
- fasteners;
- self-tapping screws;
- drill;
- jigsaw
You can cut out a hole in the waterproof countertop that is the size of the washbasin. In addition, it is necessary to purchase special metal legs and fasteners for them. The legs are attached to the bottom of the tabletop near its corners. Fastenings are made using self-tapping screws that are screwed into special fasteners. If it is necessary to reduce the height, the legs are cut to the desired size.
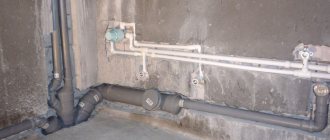
Before installing a sink with a cabinet, conduct communication lines (water supply and sewerage) under the washbasin to the location of the latter. After this, corner valves are installed on the cold and hot water supply pipes. The mixer kit comes with flexible hoses, which are mounted together with the mixer on the back panel of the sink in a specially provided hole. If the hoses are not long enough, you need to buy pipes of the required length.
To make a cabinet, you need to purchase material for the tabletop, doors, as well as legs, handles and fasteners.
Before installing the mixer and connecting water to it, the bathroom cabinet is marked for installing a sink. To do this, using paper and scissors, make a shell pattern, the outline of which must be marked with a pencil, after which a hole is cut out in the pattern so that the bottom of the shell fits freely in it. The resulting paper template is applied to the surface of the tabletop and its inner contour of the hole is traced.
Using a drill with a thick drill bit, drill a hole, which will become the beginning of cutting a hole for the sink. A jigsaw blade is inserted into the resulting hole, with the help of which a hole for the sink is cut along the marked line. It should follow the contours of the bottom of the sink. Silicone is applied to the edge of the sink and inserted into the previously cut hole, gluing it to the bedside table.
After this, installation of the mixer and water connection to it begins. If the washbasin has a special hole for the faucet. At its location, a hole of the appropriate size is drilled in the tabletop. If the sink has the form of a trough without a faucet edge, the faucet can be secured to the countertop by drilling a hole with a diameter of 32 mm in it near the sink. From the outside, the mixer is inserted into the hole, and from the inside, it is pressed with a nut. After this, flexible cold and hot water pipes are installed
Such work must be carried out with special care; it is important not to mix up the hoses, otherwise hot water will flow from the cold water supply tap and vice versa
The sink kit usually includes a siphon. It must be attached to the sink drain hole and connected to the sewer system using a corrugated hose. The connections must be sealed with putty or sealant to prevent sewer odor from escaping into the bathroom.
There is another option for installing a cabinet under the washbasin - a hanging cabinet under the sink. It differs in that in order to secure the tabletop at the desired level, legs are not used. Metal corners are attached to the wall. Their number depends on the width of the countertop, but at least one on each side, after which the countertop with the sink is attached to them. Hanging structures can also be bought in the store. This option should be attached to the wall only with the help of several powerful hangers.
So, the basic rules for choosing and installing a vanity cabinet in a bathroom are described. You will only need to purchase all the materials and tools necessary for this, prepare the installation site and perform the installation work correctly.
Share a useful article:
https://bezsantexnika.ru
Siphon
The simplest siphon is an S-shaped bend of a corrugated outlet hose, rotated 90 degrees in a vertical plane. For the washbasin, in theory, it is quite enough: used toilet paper, sanitary pads and scraps from dishes do not end up in the sink.
Elite washbasin with decorative siphon
However, there is a “but” - when cleaning a sewer with a plunger, the corrugation plays a lot and breaks over time, and when cleaning with a pneumatic plunger (powered by a can of compressed inert gas), it often breaks immediately. Corrugations cannot be cleaned with a cable at all. Therefore, if the sewage system in the apartment is unimportant and you have to “break through” it often, you need a rigid siphon with an inspection (removable lid for inspection and cleaning), and in the kitchen it is absolutely necessary.
There are two types of rigid siphons: an elbow with a removable hatch (obsolete) and a bottle siphon. The last one is two concentric pipes, of larger and smaller diameter. The smaller one is inserted into the larger one with a gap at the bottom. The bottom cover of the bottle siphon is a threaded hatch; outlet - on the side.
Cleaning the bottle is simple: put on gloves, place a bucket, unscrew the bottom hatch and all the “bad stuff” plops into the bucket. You just need to make sure when purchasing that the outer pipe has some narrowing towards the top, otherwise the dirt may get stuck and you will have to pick it out.
The pinnacle of the evolution of siphons and at the same time tulip washbasins (see below) is a decorative chrome siphon with revision (see picture on the right). Among other things, it is also absolutely hygienic and functional. But the cost is an order of magnitude higher than usual, the sewerage installation for it is only built into the walls, which is also not cheap, and installation requires professional work.
Installation of the siphon with revision is always carried out before hanging the sink; corrugated siphon - whatever is more convenient for the location. In both cases, a transition collar is required from 32 mm (diameter of the sink outlet) to the existing diameter of the sewer pipes, from 40 to 100 mm; you need to look locally.
More in-depth details of choosing and installing a siphon are described in the link.
How much does it cost to install a bathroom sink?
In the modern world, many men, due to their absolute busyness at work, have absolutely no time for housework. And some simply prefer to entrust the installation to professionals. But since many are interested in the cost of such services, we will certainly tell you about it.
- The cost of installing a console sink in a bathroom on average across the country ranges from 1,200 rubles to 2,000 rubles. This includes the installation of a mixer and drain fittings.
- If the bathroom requires installation of a sink with a cabinet or on a supporting pedestal, then the price for the work increases by five hundred rubles.
- Cutting a hole in the countertop for a built-in washbasin costs 800 rubles.
- In Moscow and St. Petersburg, the price range is slightly higher than in other regions, and leads to an increase in the cost of each operation by an average of 500-700 rubles.
- Well, naturally, the more famous the company, the more expensive its services. Follow this advice when choosing a specialist, and you will save up to a third of the stated installation cost.
Installing a sink usually does not take much time and does not require a lot of effort. If you carry out all the operations of the process correctly and carefully, the washbasin will last a long time, and the result of the work performed will pleasantly please you and your household.
Installing a wall-hung sink in the bathroom
Peculiarities
This device needs to be installed correctly in order to be used comfortably for beautiful interior design and long-term service. To do this, it is necessary to comply with installation standards, accurately calculate the size and determine the installation location.
Therefore, initially you need to accurately measure the space intended for the sink; the width dimensions can range from 60 to 250 centimeters. In addition, installation must be carried out based on the design and shape of the product and the type of tap or mixer.
Choosing a place to install a sink with a cabinet
Drawing of a corner vanity unit with basic dimensions.
Now you need to determine where the selected sink with cabinet will be located in the bathroom. The ideal option would be to install it at the location of the previous sink. However, this is not always possible, since when renovating a bathroom, it is most often remodeled. The location of furniture in the bathroom must be determined at the stage of laying pipes for cold and hot water supply and sewerage. This is necessary because the place for a sink with a cabinet is selected based on its size, that is, the room must be measured and divided into segments corresponding to the location of a particular piece of furniture, plumbing fixtures, and other things.
The cabinet may have shelves; it is important to ensure that the pipes coming out of the wall do not rest against them. To do this, you need to calculate in advance the level of outlet of the hot and cold water pipe fittings for the sink
The best option would be to place the fittings at a level just above the middle shelf. The same rule applies to sewerage. If the pipe comes out of the floor, then when installing a cabinet with a sink, you will have to cut a hole in it to pull the hose from the sewer pipe to the siphon. If possible, the sewer pipe should be located next to water pipes
To do this, you need to calculate in advance the level of outlet of the hot and cold water pipe fittings for the sink. The best option would be to place the fittings at a level just above the middle shelf. The same rule applies to sewerage. If the pipe comes out of the floor, then when installing a cabinet with a sink, you will have to cut a hole in it to pull the hose from the sewer pipe to the siphon. If possible, the sewer pipe should be located next to the water pipes.
System health check
Before you start using the washbasin, you need to check the quality of the connections and how firmly the bowl is installed. To do this, check the quality of all fasteners again. After this, open the hot and cold water tap and check the tightness of the water hoses. If there are water leaks, then the connections must be tightened, and when this does not help, unscrew the hose and rewind the FUM tape.
To check the tightness of the siphon, it is recommended to fill the sink with water by closing the drain hole . Then drain all the water - if there are no leaks in the siphon or hoses, then you can start using the sink.
When draining the water, check the tightness of the connections.
Do not over-tighten the connections, as you may damage the gaskets or strip the threads.
Installation of a washbasin with a cabinet
Assembly diagram for the washbasin cabinet.
Now we will talk about how to install a washbasin with your own hands. After making sure that the water supply and sewerage connections are correct to the place where the bedside table will be installed, you need to prepare the necessary materials and tools:
- cabinet;
- sink;
- self-tapping screws;
- screwdriver;
- perforator;
- metal corners;
- mixer;
- metal-plastic pipes;
- siphon;
- FUM tape;
- sealant.
The cabinet can be connected to the bathtub sink using a metal angle and screws. A furniture assembly kit may include instructions with an assembly diagram, but they may not be required, so there is nothing complicated in this process. During the assembly process, it is necessary to ensure that all the screws are well tightened, since after the sink is installed, the screws may not be able to be tightened.
After assembling the cabinet, you need to install the sink. The mixer is tightly screwed to it so that it does not rotate. After this, you need to install the water pipes, screw them to the mixer and finally press it to the sink. It is not recommended to use metal braided pipes included with the mixer, since the hose may leak if the metal corrodes. It is recommended to install metal-plastic pipes.
The siphon is installed by screwing it to the washbasin drain hole.
Next you will need to install a siphon. screwing it to the sink drain hole. A washbasin with a siphon and a mixer is placed on a cabinet and the structure is moved towards the wall, where it was planned to be installed. Markers are used to mark the wall for several mounting bolts. The holes for them are located on the back wall of the sink, while the mounting bolts with offset plastic washers usually come with the sinks. But if they are missing, you can purchase fasteners separately. The cabinet with the sink is moved aside and the wall is drilled at the markings.
Dowels for such bolts, as a rule, have a diameter of 10-12 mm. They are inserted into the drilled holes, after which you can install the cabinet in place and screw the sink to the wall. After this, water supply and sewerage are connected. In order to avoid leaks when connecting water to the mixer, it is necessary to use sealant or sealing paste. The paste is best used in combination with FUM tape.
Selecting a sealant
The sealant plays an important role in installation. The building materials market offers several options for this product:
- acrylic - does not contain harmful substances, is excellent for metal, chipboard and MDF, dries quickly. The main disadvantage is strong shrinkage and rigidity; joints can crack over the years and will allow water to pass through;
- polyurethane - suitable for places with high humidity and unstable temperatures, has excellent adhesion to almost all materials. The sealant is elastic and practically does not shrink, but it is better not to use it for MDF, chipboard, or plastic. The polyurethane composition is ideal for sinks made of stone, granite, and metal;
- silicone - elastic, does not shrink, has excellent adhesion.
Apply any sealant to clean materials to improve adhesion. Without preliminary preparation, cracks may appear and moisture may enter.
Installing a bathroom sink
Before you begin, you need to decide on the location of the sink. In order to be able to easily approach it, it is worth leaving some free space. For example, you can leave 70 centimeters wide and 110 centimeters deep. The height of a bathroom sink depends on a person's specific needs. Today, the standard height is 80-85 centimeters from the floor.
The work itself is carried out in several stages. The first step is to drill several holes in the wall. Screws are screwed into them, onto which the brackets are hung.
Installing a sink in a bathroom video will help anyone who decides to install such a unit. The video shows in detail all stages of installation.
If we are talking about a sink on which a faucet is already installed, then it is attached to a water source using a winding. After this, the sink itself is attached to the brackets, and then the flexible pipes of the mixer are connected to flexible wiring.
When installing, you must pay attention to the fact that the upper font of the bracket fits tightly into the hole in the lower plane of the sink side. First of all, it is necessary, of course, to connect the outlet to the sink
Lucky are those who have all their pipes hidden in the floor or wall. in this case, the sink can simply be installed on a stand.
If we are talking about installing a sink with a siphon, then the outlet can be connected to the pipe. Its length should be 110 millimeters. In this case, one end of the pipe must be designed for a siphon, and on the other side a thread is cut on it. After this, a coupling is put on the pipe, through which it is connected to the drain pipe. To avoid breaking the sink, rubber rings must be placed before installing the outlet. The following sequence of actions follows:
The sink fits neatly onto a leg or bracket
This should be done with extreme caution so as not to damage the unit; a sink faucet is attached to the washbasin, unless, of course, it is sold together with the sink; water pipes are connected to the faucet installed on the sink; a siphon for the sink is attached to the outlet.. practical location of the sink above the washing machine
practical location of the sink above the washing machine
This sequence of actions completely describes the entire process of installing a sink on special brackets. As you can see, it's not that difficult. Even a non-professional plumber can do the job.
Nowadays, there are other types of sinks that are also widely used. For example, a sink above a washing machine is a great option for those who want to save space in the bathroom. They are installed above front-loading washing machines. This type of sink is very easy to install. A person who does not want to spend extra time on installation can certainly be
built-in washbasin
I'm interested in buying just such a unit. It allows you to expand the boundaries of the bathroom and gives it additional space and comfort. This option is especially good for small rooms, where there is already quite a bit of space.
There is another option that can save space inside the bathroom. These are built-in sinks. They do not take up much space and allow you to install other plumbing fixtures without interfering with this process in any way. In addition, various items can be placed around such a sink.
The installation principle for such options is the same as for a sink on a bracket. You will need the same tools and materials. Plus, extra. For each option there are different materials and tools.
Thus, installing a sink in a bathroom is not such a tricky task, which can be done by almost any people who know how to use simple construction tools. The materials, as you can see, are all simple and are widely available in any construction and plumbing store. The entire installation process, with the right approach to work, can be completed within a few hours. It takes professionals very little time. If an amateur is engaged in this type of work for the first time, it may require much more time and effort. This article has been created to help those who have decided to install a sink in their home or apartment for the first time. It describes how to install a sink in your bathroom correctly and professionally. In addition, a video is attached that clearly shows all the actions that will need to be performed in order to do all the work quickly and at minimal cost.
Which sink can be mounted on the wall?
Based on the type of mounting, bath washbasins can be divided into two large groups: base-mounted or wall-mounted. Both options have a number of advantages and disadvantages. Washbasins with a base are installed on a special pedestal or on a cabinet.
Usually a hole is cut out in it, which serves as a fastener for the sink. Almost the entire weight of the washbasin falls on the cabinet. It takes up significant space in the bathroom, but can be used to store various small items on convenient shelves located inside.
Compared to a floor-mounted option, wall-mounted sinks are almost always preferable in a small bathroom. It takes up minimal space, while the space below remains free
A popular solution is to place a washbasin above an automatic washing machine. In this case, the siphon and other fittings are attached as close as possible to the wall.
When installing a washbasin on a wall, the weight of the structure falls on the brackets or frame, so you should fix them as securely as possible, strictly following the technology. It is best if the sink is installed on a load-bearing wall, and not on a thin partition.
If the sink weighs a lot and the wall is too thin, the structure may simply fall off and fall to the floor.
Glass sinks have a very stylish design, however, such products require more careful care, since they show not only dirt, but also water stains
To install a sink mounted on the wall, use special brackets or a frame. First, these elements are installed, then the sink is lowered onto them, then the mixer, siphon and everything else are secured. Sometimes it is more convenient to first secure the fittings and then carefully place the washbasin on the console fixed to the wall.
In any case, the siphon and pipes leading to the sewer remain visible in such structures. Sometimes they are hidden behind a washing machine or a decorative element. Sometimes this is not possible; in this case, you should think about purchasing beautiful elements that will not spoil the interior, for example, a chrome siphon, etc.
Since wall-mounted bath sink models do not hide the siphon and other fittings, it makes sense to choose a beautiful and minimalist option
Separately, it is worth mentioning the rather popular version of the “tulip” type sink. The washbasin itself is attached to the wall, but the weight of the structure is supported by a special ceramic base, which at the same time disguises the fittings connecting the washbasin to the sewerage system and water supply.
When installing such a structure, knowledge about attaching a sink to a wall will be useful, although it is considered floor-mounted.
It is impossible to adjust the height of such a structure; it depends on the size of the base. Usually, over time, housewives discover that it is somewhat difficult to clean such a base from dirt.
A more convenient option may be the wall design of a “tulip”; it is also called a “half-tulip”. In this case, both the washbasin itself and the base on which it is installed are attached to the wall.
The height of a conventional console model is determined only by the wishes of the bathroom owner. There are no special building codes in this regard. When deciding on these dimensions, you should focus on the height of the residents of the house in order to provide them with a sufficient level of comfort.
Using a double sink allows two family members to use the bathroom at the same time. Installing this model is not much more complicated than installing a regular sink.
Another interesting type of sink is the so-called heated washbasin. In this case, it is not the washbasin itself that heats up, of course, but the water supplied to it. This design is appropriate where there is no normal hot water supply, for example, in a country house or in a private house. This is not a very profitable and rather cumbersome purchase.
The sink is simply equipped with a flow-through heater, which requires a large amount of electricity to operate. To solve the problem of autonomous hot water supply using electricity, it makes sense to install a boiler that will provide the required amount of hot water not just for one washbasin, but for the entire house.
Connecting the sink to the water supply and sewerage
After the cabinet is assembled and the mirror is mounted on the wall, you can install the sink on the cabinet and connect it to the water supply and sewerage network.
To do this, a faucet is attached directly to the sink, to which flexible hoses are attached, and discharge pipes are attached to the outlet and to the overflow, which will be connected to the sewer.
Check in advance whether the diameters of the sewer pipe at the point of connection and the outlet pipe of the siphon or corrugation match. If you are connecting a 32mm outlet pipe to an existing 50mm pipe, you will need an adapter or adapter rubber collar.
The sink with the mixer and outlet pipe attached to it is placed on the cabinet and pressed against the wall with nuts that are screwed onto previously installed metal studs. Do not forget to place plastic spacers under the nuts so as not to damage the fragile ceramic body of the sink when tightening the nuts
Tighten the nuts very carefully, alternately making several turns, first one and then the other, until noticeable resistance appears. After this, you should stop tightening so that cracks do not appear on the sink body from over-tightening.
A sink fixed to the wall can be connected to water and sewerage.
To do this, flexible hoses are connected to ball valves or valves through a rubber gasket. And the siphon or corrugation assembled and attached to the outlet pipe is inserted into the existing sewer system.
The end of the pipe that is inserted into the existing sewer can be soaped a little so that it fits into the hole more easily.
A sink connected to water supply and sewerage looks like this:
Below you can watch a video of installing a sink with a cabinet:
The last step is to seal the gap between the sink and the wall so that water does not leak into it and dirt does not accumulate.
To do this, coat the gap with silicone sealant.
An hour after sealing the joint, the sealant will be completely dry and the sink can be used.
Open the water and carefully check whether the connections are leaking. To do this, you can put dry newspaper under the sink. If there is a leak, you will immediately notice the drops.
If any connection is not tight enough, you should turn off the water again, disassemble the connection, wind several turns of sealing fluoroplastic tape (FUM) or a thin braid of combed flax onto the thread, and then tighten it again, tightening with sufficient, but not excessive, force.
Mixer and fittings
The best mixer is one with a ball valve and a swing lever. When purchasing it, you need to make sure that the faceted parts of the threaded fittings of the flexible supply pipes - henok - are located at different levels, otherwise during installation they will not fit on the mixer pipes. This problem does not arise in a mixer with separate taps.
Henks are more durable and reliable than metal-plastic ones, but installing a mixer with them is only possible in an already suspended sink, which is inconvenient. Plastic henki in a woven fabric shell can be pulled out through the opening under the sink and attached without bending over and in the light, but they sometimes tear.
Sink in the cabinet
How to properly install a faucet on a sink or sink - read further here.
Types of bathroom sinks
The modern market offers a wide range of sink choices. The devices are made from various materials, have a variety of shapes and colors, and have several types of installation.
The materials used for making sinks are most often earthenware and ceramics; there are also products made of glass, stainless steel, marble, and so on. Based on the installation method, sinks are divided into 3 groups:
- Mounted (suspended);
- With a pedestal or half-pedestal;
- Built-in;
Mounted models, in turn, are divided into linear and angular.
Wall-mounted sink
Products of this type are attached to the wall surface in 2 ways:
- Using brackets (including height-adjustable);
- Using studs (anchors) wrapped in dowels.
Pedestal sinks are also a subtype of wall-mounted sinks, but differ in the presence of a full or partial pedestal profile.
Sink with half pedestal
Pedestals serve to hide communications - water supply and sewerage, and give an aesthetic appearance.
The third type of sinks is built-in. They are divided into mortise and overhead.
Built-in countertop sink
Mortise ones are installed in a hole previously cut in the tabletop or cabinet, overhead ones are installed and fastened on top of the tabletop. For overhead devices, holes are cut for the siphon and mixer (if it is separate).
In addition, sinks can be with or without a tap hole. If the model does not have a hole, the mixer is installed separately - on the countertop or wall. In the case of a bathroom, the swivel tube (“gander”) of the bathroom faucet can be used to supply water to the sink.
Preparatory stage
Before installing your bathroom sink, make sure you have the following tools:
- hammer drill or drill and set of drills,
- wrenches (including adjustable ones),
- dowels and screws,
- screwdrivers,
- hammer and pliers,
- marker, tape measure, building level,
- winding, fum tape,
- sealant.
If the bathroom (or kitchen) is already free of old equipment, then the surface is marked. For this, the necessary measurements are made.
Determine the fixation height that is comfortable for using the washbasin. At this level, draw a horizontal line. Strictly perpendicular to the floor surface, draw two lines corresponding to the width of the bowl. Make marks using a building level.
This completes the preparatory part of the installation work.
Height standard
The standard installation height of a bathroom sink is not regulated by any regulations. There are criteria that determine the level of installation at a height of 80 or 85 centimeters, but they are calculated based on the average height of a person. But it is different everywhere. In Scandinavian countries, I recommend hanging washbasins higher than this indicator, and in South American countries - lower.
Therefore, do what is convenient for your family. If all its members are tall grenadiers, feel free to set it higher, if on the contrary, lower the level.
The only exceptions are sinks with a pedestal (“tulip”) and with a floor cabinet. In these cases, you will have to adjust to the height of the products.
Self-installed bathroom sink
How does a sink differ from a washbasin?
According to the generally accepted definitions of buyers and sellers of plumbing fixtures, a sink and a washbasin are one and the same. If you go to a store and ask, “Show me the sinks,” they won’t show you any kitchen or bath sinks. And that's okay. However, in fact, a washbasin is just a type of sink designed for washing your face and hands. A sink is any sanitary container designed to collect and drain used water into the sewer. That is, a bathtub is a sink for washing the whole body by immersion, a washbasin is a sink for washing the face and hands, a sink is a sink for washing dishes, a shower tray is a sink for rinsing the body. One good thing is that the toilet is definitely not a sink. In this article I use the concept of sink, in the sense of washbasin.
Design features of different types of siphons
The simplest design is a pipe siphon. This is a curved pipe in the shape of the symbol “S” or “U”, which can be collapsible or non-dismountable. Its advantage is the need for precise alignment with the inlet to the sewer, resulting in a rigid drainage system.
USEFUL INFORMATION: Installing ventilation in the bathroom and toilet with your own hands
A classic of the 20th century – the bottle siphon. It is well known for its simplicity and ease of use and has the following features:
- takes up relatively little space under the sink;
- the connection to the sewer pipe can be made with either a straight or flexible pipe;
- it is easy to disassemble during cleaning;
- To rinse and remove sediment, simply unscrew the bottom of the tank;
- ideally protects sewer pipes from contamination.
The miracle of the late 90s of the last century - the corrugated siphon - became fashionable along with interest in apartment redevelopment. This type of design has its advantages:
- makes it possible to connect non-standard sinks to the sewerage system;
- very easy to install;
- By bending the tube you can form any slope and create a water seal.
Hidden siphons began to be used relatively recently. They entered the apartments along with built-in sewage systems. This is the same bottle device, but hidden behind a partition and ennobled by a stainless steel pipe located outside.
A new product on the domestic market is a dry siphon, which functions not by creating a water plug, but thanks to a special membrane. When water enters, it opens and releases water, and then contracts again, tightly closing the flow hole and preventing water and odors from returning.
The nuances of installing a built-in washbasin
There are two options for how to properly install a built-in sink in a countertop in a bathroom - lower and upper.
Each installation method has certain nuances:
- When placing the bowl on top, it will be one to three centimeters higher above the surface.
- The lower insert is preferable because during operation, splashes can be collected in one movement.
The drain fittings, regardless of whether the sink is completely recessed into the cabinet or slightly raised above its surface, are placed inside the furniture. To make the lower insert, L-shaped fasteners are used, and fixation is carried out to the base of the support.
Using mounting brackets
Installing an overhead sink requires a little less time and can be done using special metal corners. They usually come with it. In total, you will need at least 4 mounting plates, which will be fixed on the outside of the cabinet using self-tapping screws. Since the wall of the stand cabinet rarely exceeds a thickness of 18 mm, the screws in the set are 16 mm long.
The step-by-step process looks like this:
- We screw in the screws 5-6 mm.
- We hang a mounting bracket on them (with the inner corner part facing the cabinet).
- We tighten the screws, but not completely, leaving room for adjustment.
- We place the sink on the stand so that the powerful main fastening screw is fixed in the very depths of the metal corner.
- We tighten the screws all the way and make sure that they are securely fastened
We are preparing to install new equipment - what needs to be done?
First, you need to stock up on all the tools, without which the installation of new plumbing equipment cannot be completed. You will need: concrete drills, impact drill or hammer drill, silicone-based sealant, adjustable wrench, set of screwdrivers or screwdriver, dowel screws, wrenches, self-tapping screws.
Removing an old sink
Now start removing the old sink. With your own hands, a similar procedure is performed as follows:
- Shut off the water supply to the house (apartment).
- Unscrew the fasteners that secure the mixer.
- Disconnect the water pipe.
- Remove the mixer.
- Tighten the nuts at the bottom of the old washbasin.
- Drain the remaining water from the siphon. Then dismantle it.
- Disconnect the siphon from the pipe (if you are replacing it with a new device).
- Remove the sink itself.
When disconnecting a flexible or rigid pipe from the mixer, lower its end into any container. There may be a lot of water left in the liner. It will flood your bathroom if the above precautions are not taken. Also, after disconnecting the siphon, we recommend plugging the drain pipe with a plug of a suitable size or with a regular rag. Then unpleasant odors will not penetrate into the bathroom. The plug or plug should be removed immediately before installing the new siphon.
Marking the installation site
To simplify the marking of the countertop under a recessed sink, use a template. Most manufacturers include it in the kit for built-in products.
When determining the location of the washbasin, you need to pay attention to the following:
- the sink cannot be located at the very edge and close to the wall;
- there should be free access to the device and its convenient use.
Correct marking is required to ensure that the washbasin is firmly fixed in the countertop and does not fall into the hole. If there is no template, the bowl is placed upside down, after which it is applied to the surface and traced along the contour with a pencil.
To find out the distance from the edge of the product to the eyes of the fasteners, take measurements and move them to the created outline of the product. The resulting value means the distance by which one should retreat from the line to form an internal contour, which is a support for the sides of the bowl.
Fixing the sink with glue
Installation of an overhead sink is possible using glue. But this method is only suitable if the underframe almost perfectly matches the sink itself. It will be placed on top, and the ribs will “sit” on the cabinet.
Advice! Do not skimp on the sealant on the entire contacting surface. It plays the role of glue and will additionally protect the joints from moisture penetrating into them.
Installation using wooden blocks
You will have to think about how to attach an overhead sink to wooden blocks if you do not have fastening corners at hand or if defects are found on the surface of the cabinet frame. So what do we need?
- bars of suitable size;
- furniture corners;
- small nails or screws.
The first step is to build a mounting platform in the form of a rectangular frame. It will serve as the top frame of the stand. It is he who will smooth out all the unevenness. The assembled bars are sent to the box of the overhead sink and fixed there with steel corners around the perimeter. And we place the resulting structure directly on the stand. We will secure it using the same corners, but from the inside to the walls.