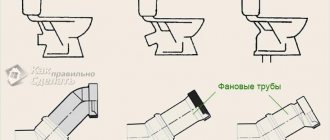
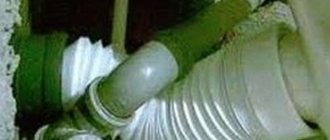
A non-pressure corrugated plastic pipe or cuff is used to connect the toilet to the sewer system. It replaced heavy cast iron products that had to be caulked at joints for tightness. The corrugation allows you to move the device to a convenient position up to 200 mm and even rotate it, which could not be done when using metal pipes. With this device you can replace your plumbing fixtures yourself. The plastic adapter is easily removed during dismantling.
Quality of corrugated pipe
Replacement of corrugation.
Modern plumbing stores have a large selection of corrugated pipes for toilet repairs, varying in price and quality. But is it worth shelling out for expensive products or can you get by with cheap ones? Research by experts in the field of plumbing equipment will help answer this question. The experiment was carried out as follows: cuffs from corrugations from different manufacturers were put on a regular pipe one by one.
Related article: How to make a branch from a wire
It turned out that cheap, low-quality corrugation does not fit tightly to the inner walls of the pipe and forms waves, which (according to experts) intensify over time, which inevitably leads to leakage. In addition, during the repair process, with minor bends, the corrugation can easily become deformed. It was also noticed that the cuff skirt of some products is not straight, but cone-shaped, which is completely unacceptable. More expensive products, especially imported ones, are considered to be of higher quality, so they are necessary for a good repair.
To carry out repair work, you should call a specialist. When replacing pipes, knowledgeable people advise monitoring the actions of the plumber, because good specialists are rarely found in this matter. However, even with correct and careful installation, low-quality corrugation still very quickly becomes unusable. It follows from this that there is no need to save on materials, otherwise you will have to make repairs again and again. It is important to note that when calling a plumber, it is advisable to ask not only about the cost of the material, but also about its manufacturer. A qualified master will always give a specific and detailed answer to any question related to his field of activity.
How to change the corrugation on a toilet yourself without removing the toilet
A non-pressure corrugated plastic pipe or cuff is used to connect the toilet to the sewer system. It replaced heavy cast iron products that had to be caulked at joints for tightness. The corrugation allows you to move the device to a convenient position up to 200 mm and even rotate it, which could not be done when using metal pipes. With this device you can replace your plumbing fixtures yourself. The plastic adapter is easily removed during dismantling.
Do-it-yourself toilet corrugation replacement
Replacing corrugations with your own hands.
If you decide to install an accordion pipe with your own hands, then you need to take into account some parameters: the corrugation varies in length and degree of rigidity. In addition, it can be reinforced or unreinforced. It is best to purchase corrugation reinforced with stainless steel, as it is considered the most durable. In the manufacture of this product, steel threads are used, which help increase the density of the pipe and protect it from cracking.
In stores you can also find different types of corrugated pipes: angular, offset, with and without an outlet. If we are talking about a regular replacement that excludes remodeling the bathroom, you should purchase the same pipe (in size and shape) as was installed previously, only of better quality.
For installation you will need:
- corrugation;
- plumbing sealant;
- sharp knife;
- gloves;
- rag.
Related article: How to properly cut corners on baseboards
Corrugation replacement diagram.
The corrugation has a simple design: it is a tube, one end of which (with internal membranes) is intended for attachment to the toilet, and the other (with O-rings) to the sewer pipe. Before proceeding with installation, you need to turn off the water and dismantle the sanitary fixture. Then you should remove the old tube and thoroughly clean the toilet and sewer outlet from residual waste and mucus. The old sealant is scraped off with a sharp knife. The internal and external surfaces of the sockets must be not only clean, but also smooth, without small debris. To seal the connection and reduce unpleasant odors, they are lubricated with silicone sealant.
Next, you need to put one end of the pipe onto the toilet drain hole, and push the other into the sewer hole until it stops and seal the joints again. Place the toilet in place and tighten the mounting screws (if any) until it stops wobbling. It is important not to overdo it in this matter, otherwise you may split the base of the toilet. If the floor is uneven, then it is lubricated with cement mortar (or sealant) so that the structure stands firmly and does not tilt under the user’s weight. When the sealant has dried, you need to check the quality of the work done: pour water into the toilet - if it doesn’t flow anywhere, then the installation process can be considered successfully completed.
Ways to solve the problem
The most reliable option is considered to be a complete replacement of the defective unit. However, such an approach is not always possible or necessary. Before you seal the gap between the toilet and the sewer, you need to determine the extent of the problem and decide whether minor repairs can be done. Sometimes attempts to dismantle a particular unit lead to even more severe damage. It is often better to strengthen the defective area so as not to completely disassemble all elements of the system. Let's look at some methods for eliminating leaks:
Replacing or repairing a tee
Changing a tee is not easy, especially if the pipes are covered with a decorative box. You will have to first dismantle it, and after replacing the problematic fitting, install it again. This is not always possible, since many craftsmen seal the pipes tightly, glue tiles, or even fill the pipes with cement mortar. Access to sewerage is virtually eliminated. It is impossible to change the fitting in such conditions, so you have to break the lining and the box. The procedure involves additional work, increasing the costs and duration of repairs.
When the tee is completely free, the decision can be made to replace or repair. The sewerage system is a non-pressure system, so you can not change the fitting, but repair the defective unit. Before sealing the connection between the toilet and the sewer, you need to inspect the problem area and decide whether to change the element or make do with less effort.
Replacement will require a new tee of the same size. Procedure:
- The toilet is temporarily dismantled. To do this, you need to turn off the water using a valve before draining it to the tank. Rinse off the water, unscrew the screws on the base of the toilet and carefully move it forward to remove the drain pipe from the socket;
- the horizontal pipe is disconnected by 50 mm;
- the released tee is removed from the socket of the previous element and a new fitting is inserted in a reverse motion;
- Reassemble the system section in the reverse order.
If it is decided not to completely change the tee, the connection is repaired. Choose a material that strengthens the joint between the toilet and the sewer, a sealant or a rubber clamp. Both options are good in their own way, but do not provide a complete guarantee of connection reliability. Experienced plumbers recommend applying a layer of sealant to the damaged socket and carefully wrapping it with a bandage.
Also read: Storm water inlets for storm sewers: design, characteristics, installation
Replacing the rubber coupling
A dry coupling becomes covered with cracks and begins to leak water. Replacing it is easy:
- dismantle the toilet and carefully remove its outlet pipe from the socket;
- remove the used clutch;
- clean the socket from the remains of old sealant and dirt;
- apply a fresh layer of sealant and insert a new coupling;
- Carefully install the plumbing fixtures in the old place.
Before sealing the joint between the toilet and the sewer, you should decide how big the problem is. Sometimes it is enough to apply a surface layer of sealant and wrap it with a bandage, polyethylene strip or FUM tape. This gives a good effect without requiring dismantling work.
Advice from the experts
Corrugation device.
Experts advise placing the toilet (if possible) at a minimum distance from the sewer pipe, since in this case the corrugation stretches less and, therefore, sag less. A stretched pipe becomes deformed, deposits accumulate on its walls, which pull it down - this leads to potential blockages. There are times when it is impossible to dismantle a sanitary fixture. In this case, you can simply cut off the old plastic pipe with a knife and replace it with a new one.
Some disadvantages of a corrugated toilet pipe should be noted: it is easy to damage from the outside and inside. In the first case, this can happen from any mechanical impact, and in the second, from a sharp object, such as a piece of glass, being flushed down the toilet. Despite the fact that plastic is considered resistant to aggressive environments, exposure to various chemicals that are part of cleaning products still destroys it over time. From an aesthetic point of view, the corrugation does not look very nice, because unpleasant deposits inside are visible through its walls.
Related article: Which finishing putty is better and how to apply it?
Repair and connection methods
Installation procedure
Experts give advice on how to change the corrugation on a toilet. There are two connection methods for this. The first is used in cases of moving the location of the device or to change its rotation. But if you want to install the device end-to-end in order to ergonomically use a small space, then the plastic pipe will prevent you from doing this.
Therefore, you need to determine in advance the required length of the soft corrugated product, since a long pipe will bend and prevent drainage into the sewer and cause blockages, and installing a short element will lead to its stretching and loss of strength.
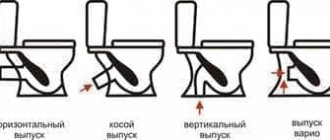
Another method is to use a rigid corrugation, which provides maximum reliability when connecting a toilet with a horizontal or oblique outlet.
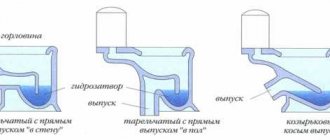
Types of toilet outlets
Types of toilet outlets.
Quite often, if a corrugated pipe leaks, plumbers suggest replacing it with a rigid pipe. Is it worth doing? Rigid pipes made from high-quality polypropylene have the following advantages: they have thick, opaque walls, do not sag, and are more resistant to blockages. Rigid bends can be divided into conventional and eccentric. They produce 2 types of similar cuffs: long and short. Eccentric ones are a connection of 2 pipes with axes shifted relative to each other. This allows you to dock the toilet with the sewer hole in the case when its diameter does not coincide slightly with the socket of the receiving pipe.
In addition to plastic outlets, fan pipes are used. They are made from porcelain, semi-porcelain or earthenware. However, installing such a pipe is quite difficult: it cannot be bent or trimmed, so installation requires precise calculations of axes and distances. Many people think that a drain pipe never leaks. The cause of the leak may be the same - careless handling or leaky connections. In general, rigid pipes are considered stronger and more durable than corrugated pipes.
Whatever option you choose to fix a toilet leak, it should be done immediately so that you don’t have to pay for repairs in your neighbors’ apartment, which was flooded due to your own negligence and inattention to the existing problem. For preventative purposes, you need to check your plumbing from time to time to see if there is a leak somewhere?
Leak at the junction between the bowl and the tank
One of the common reasons why a toilet joint leaks is a misalignment or damage to the gasket. If you just bought a new toilet, and there is dripping at the junction with the tank, it is due to improper installation or a defective rubber gasket.
If the toilet has already been in service for some time, the reason is probably a cracked gasket or a misalignment of the tank (for example, someone pressed hard on it from the side). It should be clear to you what to do if the joint between the bowl and the tank leaks due to the gasket - the rubber seal needs to be replaced. The algorithm of actions is quite simple:
- turn off the water supply and drain the water from the tank.
- blot the remaining water at the bottom with a sponge or rag, otherwise it will flow out onto the floor;
- unscrew the water supply hose from the tank;
- Unscrew the screws that hold the tank on the toilet shelf, after which it can be dismantled;
- unscrew the locknut that holds the drain;
- install a new gasket, coating it with silicone (gaskets differ in shape and size, so it is better to choose according to your own example);
- put everything back together in reverse order.
Fill the tank with water and make sure there are no more leaks at the junction.
Ways to repair a hole in a pipe
In order to seal a hole in the pipe you will need: - a towel, - a piece of rubber, - clamps of different diameters.
Let’s assume: it’s night, the emergency service is not rushing to the rescue very quickly, there is a global accident somewhere in the city. Your application is not the first in line for salvation. Is it possible to do something ourselves? It turns out that it is possible.
Try to find out in advance before any cataclysms where and how to turn off the water in taps and radiators in your apartment. Very useful knowledge. Checked!
So, let's turn off the water.
The consequences can be twofold.
You win, the leak has stopped, we collect the water from the floor and call a locksmith in the morning.
The water continues to flow.
We bandage the hole with a towel, or any unnecessary rag, so that the water does not splash and flow down the long ends of the rag into the basin, which you managed to carefully place, saving your property and those of your neighbors below.
Until the basin is full and the leak is localized, check what is available in your household.
You can temporarily save yourself from a small hole in a cold water pipe by wrapping it with electrical tape, adhesive tape, or a medical roll of adhesive tape.
You can use plasticine as a plug and then also add a wrapping with electrical tape.
For the same purposes, so-called cold welding, sold in hardware stores, is also used. It is used like plasticine. Having kneaded it in your hands, put it on the hole, grabbing 2-3 centimeters around the hole.
Cold welding is suitable for both hot water pipes and batteries.
The ideal method, plumbers consider, is to apply a clamp.
The most primitive clamp can be made from a piece of rubber or thick film in several layers, placed over a hole in the pipe and tightly tied with wire or thick twine.
Of course, industrially produced clamps, which are a metal strip with perforations and a screw with a nut, designed for pipes of various diameters, are better suited.
Very easy to use.
We put a piece of rubber over the leak and secure it to the pipe by wrapping it with a clamp. Remove the nut, insert the screw into the appropriate perforation hole, and tighten it with the nut. The clamp firmly secures the rubber to the pipe.
A correctly selected and secured clamp can not only wait for the arrival of the savior-plumber, but also for the demolition of the house due to its disrepair.
If your home has pipes and radiators, don’t be lazy and go to the store.
If you can't measure the diameter, no problem. Take a thread or a strip of paper. Wrap the pipe and cut off the excess.
In the store, show it to the seller and tell them that you need clamps and rubber gaskets for them in accordance with your measurements. They will definitely help you.
Prepare to deal with utility disasters in your home.
Sealing rectangular and square pipes
To ensure the reliability of the roof in the areas of valleys and junctions, a tie made of metal parts (junction strips), which are inserted 150-200 mm under the covering, will help.
The junction of the apron with the corrugated sheet around the chimney is sealed with roofing sealant. Eaves outlets are installed at the bottom and sides, directing the flow of precipitation onto the roof slope.
Before applying corrugated sheeting, it is necessary to seal the passage of the riser with a membrane.
- A cross-shaped cut is made in the material and glued to the walls of the chimney at a height of more than 5 cm.
- Self-adhesive “Vakaflex” tape is attached under the upper junction bar: from below, from the side, then from above.
Sometimes a chimney is installed in a finished roof, cutting a hole in the corrugated sheeting with a margin of 1.5-2 cm. To do this, the metal sheet at the junction of the rectangular pipe is bent, a waterproofing membrane is glued and a lower and then an upper sheathing is installed, tightly pressed against the roofing pie and the chimney.
Safety precautions when installing a chimney must be strictly observed
Plastering a pipe
To avoid the formation of a thick layer of plaster, you should know how to properly insulate pipes:
- First, seal all existing irregularities in the pipe with cement mortar;
- Then cover the walls with reinforcing mesh;
- The final stage is applying plaster.
Important! Before covering the first layer, bring the solution of lime, cement and slag chips (or sand) to the consistency of sour cream, spray without leveling. The second coating is denser; it is applied with a trowel, rubbing until a smooth surface is obtained. The reinforcing mesh will allow the plaster to adhere well to the pipe and not crack when drying.
The reinforcing mesh will allow the plaster to adhere well to the pipe and not crack when drying
Strengthening the pipe with asbestos cement
Lining a chimney with asbestos cement requires the use of a cement-lime mixture applied to the surface of the slabs.
- The chimney is reinforced with mesh and the first layer of solution is sprayed.
- A new layer of the mixture is applied to the insulation sections and attached to the surface of the chimney.
Asbestos contains carcinogens that are dangerous to humans, so experts do not recommend using it in residential areas.
Sheet iron cladding
When insulating a metal pipe, you should maintain a distance of 60 cm from the chimney to flammable materials.
- The structure is wrapped in mineral wool 5 cm thick, overlapping, and clamped with steel wire. The top is wrapped with a metal sheet.
- Rivets are inserted into the previously prepared gaps, and the heads of the clamps are closed with a special tool.
What is the goal?
When preparing drawings, it is important to provide for the direct location of the pipe coming from the furnace
- The maximum heating temperature of the outer wall of the chimney should not exceed 50 degrees.
- Waterproofing a brick chimney on the roof allows you to comply with established standards, and metal elements will require additional insulation to prevent the formation of condensation.
If the outer part of the pipe is 2 meters or more in height, it is strengthened with additional braces
External damage
Violation of tightness. If the toilet is installed on cement mortar, then in the place where it is connected to the sewer pipe, the cement crumbles, cracks appear and it begins to leak. Sometimes this occurs because the toilet was used shortly after it was installed. It is not recommended to use the toilet for 24 hours after installation. Clean the joint area from old cement. Do this with a screwdriver, chisel or knife. Prepare a new solution by mixing cement and silicone-based sealant. Do not add sand to cement. Leave for a day until completely dry.
What to do if the toilet leaks at the junction with the sewer
The procedure depends on the area and cause of the leak.
The joint between the bowl and the tank is leaking
If your plumbing has been working for some time, then most likely the leak was caused by a cracked gasket or a skewed drain tank. What to do if water oozes out because the gasket has served its purpose is clear without much explanation. It needs to be replaced. We do everything according to the instructions:
- turn off the water and empty the drain tank;
- wipe the inside of the tank dry so that not a drop of moisture remains there;
- disconnect the supply hose;
- unscrew the fastening screws holding the tank and remove it;
- remove the lock nut on the drain;
- remove the old gasket and replace it with a new one - it is better to immediately place the gasket on the sealant, it should not differ in shape and size from the old one;
- We reassemble in reverse order.
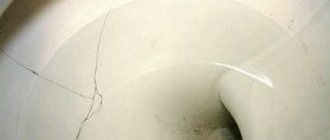
Crack in the base of the toilet
It often happens when a large amount of boiling water is suddenly poured into the toilet. Earthenware cannot withstand sudden changes in temperature and bursts. Two holes are drilled at the ends of the crack. The crack and holes are cleaned with sandpaper to remove irregularities and burrs. Apply epoxy resin to the leak site. Do not use the toilet until the epoxy resin is completely dry. If the epoxy resin does not help, then you need to replace the toilet with a new one.
Some tips for the future
- Periodically check the areas behind the toilet and joints for moisture. Sometimes it can ooze out completely unnoticed. There will be no puddles, but brown streaks will be visible. These are the “first signs” and they cannot be ignored, since a large leak can occur at any inopportune moment.
- Every few years, check the condition of the gaskets and replace them with new ones if they are already outdated. Don't wait until the parts fail completely.
- Try not to lean on the tank while sitting on the toilet; press the flush buttons carefully.
- Special water filters will help prevent premature wear of fittings. This way, foreign impurities will not get into the tank, which will undermine the metal and clog the space between the moving elements.
- When replacing gaskets and other parts, do not skimp and buy from reliable manufacturers. This is a guarantee of long service life for your plumbing fixtures.
Having understood such an unpleasant phenomenon, we can draw the following conclusion:
- Minor defects such as wear of individual elements, which can be reached without complex disassembly of the entire system, can be repaired independently. Anyone with “hands in the right place” can do this.
- If there are serious cracks in the thicket or at its base and you definitely need to reinstall the plumbing with new ones, then decide what to do based on your experience. If it is not there, it is still better to entrust this work to a professional.
Share on social media networks:
Tips and recommendations for further care
Successful operation of sewerage in an apartment building depends on the choice of pipes. Care is related to the characteristics of the material used. Plastic is sensitive to high temperatures. For normal work at home, it is recommended that the drain temperature be 40 degrees, short-term - up to 60 degrees, otherwise the material loses its properties and the pipe may leak.
Deposits also form on smooth surfaces of PVC products. Together with the drainage of hot water, they turn the cross-section of the pipes into an ellipse, which leads to a loss of throughput. Polyvinyl chloride is a flammable material, so fire safety rules must be followed. Aggressive substances corrode the connections and walls of the corrugation; it is not recommended to drain them into the sewer.
Source
Why the tank leaks - the main reasons
If you are wondering why the toilet tank is leaking, then the problem has already occurred. Now it remains to find out the reason why this may happen. The most common is ordinary overflow, in which excess liquid is washed away. There are several main factors that in most cases lead to disruption:
- deterioration of the elastic properties of the rubber gasket. Over time, this material wears out, as a result of which the water flow cannot be tightly blocked and the plumbing leaks. The deformed part allows water to pass through perfectly;
- The rubber gasket has not lost its elasticity or deformed, but it does not fit very tightly into the outlet hole located next to the valve mechanism. Due to loose pressing of the part, the toilet cistern leaks;
- The valve train pin has suffered corrosive deformation or physical damage. This part keeps the float in the required position, but during prolonged use the element wears out;
- the valve body was damaged - another cause of leakage. However, the cracks that cause the toilet cistern to leak occur only on plastic products. If parts made of brass are installed, such problems will not arise, because... brass components are known for increased strength.
Other common reasons for a leaking toilet tank include:
- damage to bolts and other fasteners connecting the flush tank and toilet. After a long period of use, metal elements often corrode, and plastic elements often break;
- if there is a leak from under the toilet tank when flushing, then the problem may be in the bulb, which has lost its elasticity over time. After prolonged use, this part loses its original properties, as a result of which the ability to acquire the required shape is lost.;
- displacement of the lever fixing the position of the float. This can occur due to prolonged use as a result of which the float loses its tightness. Therefore, liquid may enter the float. Sometimes low quality components also cause a similar malfunction and plumbing leaks;
- breakdown of the siphon or tank hoses;
- Water may leak between the tank and the toilet due to a leak in the connection. As a rule, this occurs when the shape of a seal made of rubber changes;
- the shut-off valve mechanism is damaged;
- cracks appeared.
The main signs that the toilet tank is leaking include:
- frequent or constant sound of pouring liquid;
- the appearance of traces of limestone in places where liquid exits;
- the surface of the bowl, which is located closer to the tank, is constantly wet from the inside, even if the plumbing has not been used for a long time;
- When draining, water flows slowly;
- water consumption increases;
- Condensation occurs on the pipeline and drain tank.
The appearance of even one of the above problems indicates that the toilet tank is leaking. In this case, repair work is required. We invite you to familiarize yourself with the structure of the toilet cistern, common faults and their repair.
What to do if the toilet is leaking at the junction with the sewer
As a rule, we don’t even think about plumbing in everyday life. It stands and stands, works and works. But as soon as a leak appears, rust appears, puddles accumulate, or in the case of continuous noise of water - that’s when we grab our heads. We immediately remember about the plumbing and understand that it requires repair. You can solve the problem by purchasing new equipment. But is it worth spending so much? It is often possible to extend the life of old equipment and fix any breakdowns on your own.
Replacing the damaged area
Often it is possible to eliminate a leak only by replacing the damaged piece of pipe with a whole one.
Necessary tools and parts: metal hacksaw; linen; pipe wrenches; sealing putty; coupling; pipe cutter; union nut.
Progress
- Use a hacksaw to cut out the section of pipe with a leak + 30 cm.
- Unscrew the threaded connections, clean the threads, and remove the cut piece.
- Let's cut a thread on an old pipe. To do this, you need to hold it with a pipe wrench. This will prevent the pipe from deforming and twisting.
- Screw the coupling onto the stationary pipe and find out the length of the replacement pipe, taking into account the length of the thread.
- Having fixed the pipe with a vice, we cut off the required section with a pipe cutter.
- Let's cut a thread on it with a clamp.
- Having wound flax around the thread, seal it and lubricate it with sealing putty.
- We will connect the new section with the old pipe using a pipeline coupling.
- Using a union nut, connect the new pipe to the old one at the other end.
Replacing a pipe section
For emergency repairs, the pipe can be wrapped in rubber from a bicycle tube and secured with couplings until major repairs.
Repair of cast iron pipes
We seal the joints of cast iron pipes:
- winding strands;
- strand settling;
- putty with asbestos cement mortar.
But first you need to clean the pipe to bare metal.
If the service life of the sewer pipes has expired, the system must be dismantled:
- cut the pipe with a grinder to the joint;
- We remove the remaining packing and cement from the socket;
- on the remaining section of the pipe we use a grinder to make transverse cuts - a stop for the lever;
- We insert the pry bar into the resulting grooves and loosen it along the axis of the pipe;
- we take the rest of the pipe out of the socket;
- We place a rubber adapter coupling in the socket;
- We put a plastic pipe in it.
Repair of plastic pipes
- If the surface of a plastic pipe is damaged, repair is not advisable due to its unreliability and low cost.
- The question of how to seal a sewer pipe, its minor damage, can be solved in a simple modern way: with sealant.
- Additionally, you can embed shaped parts. Tees are suitable for inserting into a sewer pipe (see welding of polypropylene pipes for more details).
- If there is a leak at the joint, it is necessary to replace the deformed seals, lubricating the new ones with silicone.
Resoldering of plastic pipes
If the sewer pipe is leaking (see also how to fix a leak in a heating pipe), you can easily and quickly eliminate the leak using the indicated available means and self-confidence, or replace the sewer pipes in the apartment.
Causes of a toilet leaking at the junction with the sewer
There are only a few reasons why a leak may form at the sewer connection points:
- A skewed or damaged gasket is the most common cause of a leaking toilet joint. If it is new and the joint is leaking, most likely you have assembled it incorrectly or there is a defective gasket.
- The toilet bowl can often leak. This nuisance can easily be eliminated on your own. The reason for this is a dried out seal. Over time, the rubber from which it is made ceases to be elastic and cracks. The result is gaps that allow water to enter.
- Loose cistern mounting bolts. They are usually made of metal or plastic. Metal rusts over time, and plastic can burst.
- Another cause of leakage is the drain pipe.