Home / Welding technique
Back
Reading time: 2 min
0
6405
The bumpers of new car models are made of plastic. This is a multi-purpose and cheap material from which bumpers of various designs are made. Unfortunately, they are quite fragile.
You may have noticed that even on new cars the plastic bumper is covered with small scratches, as if this was provided by the manufacturer.
What can we say about cars that are many years old, the bumpers of which have dents, scratches, and sometimes holes, which become larger over time without repair.
In addition to such damage, you can regularly encounter chips, scratches from curbs and accidents. Many car owners do not repair the bumper, and those who care about the appearance of the car go to a service station for repairs or try to repair it themselves.
In many car workshops, plastic bumpers are welded using a welding gun. This is a simple method that will quickly and efficiently repair a broken product.
You can do this yourself by purchasing the necessary set of equipment. Let's talk a little about how to cook a damaged bumper. Based on the operating diagram, you can try to repair it yourself.
- Repair method
- Preparation
- Materials for work
- Welding process
- Conclusion
Repair method
Let's look at the basic expressions. Everyone basically calls bumpers plastic because when you look at them, that's what they look like. But in the production process they use not ordinary plastic, but propylene or polyurethane.
Such polymers are classified as thermoplastics and are considered impact resistant. This allows them to cope with external loads. Of course, they scratch quickly, but serious damage can only be caused by strong loads in the form of a collision.
By understanding these subtleties, you will be able to better understand welding techniques in the future. Because in this case, you need to cook not ordinary plastic, but a polymer that can withstand the load; they are still a little different compared to ordinary plastic.
But, basically, they are called “plastic bumper” or “plastic bumper”, meaning thermoplastic bumper. For convenience, we will use this definition.
Sequence of actions when soldering a damaged bumper
- The first step is to clear your workspace, be it a workbench, shelving or table. After removing the bumper from the car, place it on a flat surface and securely fix it.
- Thoroughly wash the bumper outside and inside (regular dishwashing detergent will do the job).
- Degrease the soldering area on each side; the surface should be clean and dry.
- Before you start soldering cracks, you need to make sure that the bumper is not deformed, as this can make it much more difficult to repair the cracks. To return the bumper to its original shape, you need to heat the plastic with a hairdryer. To do this, heat the bumper throughout the entire thickness of the plastic at the place of deformation and squeeze out the dent. It is better to straighten the dent with a blunt object (it can be a wooden block or the handle of a screwdriver), and then cool the area with a damp cloth. When working with a hairdryer, use a rag and straighten the hot plastic with gloves on, this will help protect your hands from burns.
- Remove all varnish and paint in areas where soldering will be carried out. Use a wire brush or coarse sandpaper.
- It is necessary to thoroughly clean and degrease not only the damaged area, but also the surrounding area.
- To eliminate further growth of cracks, their ends must be drilled.
- After this, start soldering. In places where the edges of the crack are in close contact, grab the plastic with small solders; this must be done as accurately as possible.
- Having soldered the main places of the crack, you need to wait until the plastic hardens. It is easy to determine whether plastic has hardened or not: semi-liquid plastic is shiny, while fully hardened plastic has a matte texture.
- Next you need to adjust the broken pieces of the bumper. Applying a splinter to the crack, trim off the interfering edges. In the same way, grab them to the bumper.
- Thoroughly sand the joint, apply primer, paint and varnish.
Preparation
We prepare a plastic bumper for cooking. First, clean the bumper of any dirt. If you omit this step, the quality of the repair will be mediocre and you will need to redo it in the near future.
It is not necessary to dismantle the plastic bumper; you can carry out repairs directly on the car, but for the best effect it is still better to remove it.
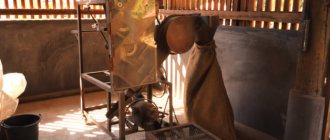
In car workshops, a plastic bumper is installed on a special pedestal for painting, but you can make it yourself from what you have on hand.
In addition to standard cleaning from dirt, it is necessary to grind the area where the repair will be done.
Sandpaper or a grinding wheel in combination with a grinding machine or a standard grinder will do a good job of this. This will stop the crack from getting bigger.
Next, if you cook the crack, you need to process its edges. It is better to make a V-shape. There is no need to process the edges to repair holes or chips. After all these manipulations, the bumper must be wiped with a damp cloth and degreased.
Tools and Supplies
- Soldering iron. Any device is suitable for soldering plastic; you can take a regular electric soldering iron (using a tool with a power above 50 W will make soldering much easier) or less popular types of soldering irons - gas, hot-air and infrared. All devices have their advantages and disadvantages. You should choose based on your own experience and preferences, or from what is available.
- Scissors. Simple household scissors or a stationery knife will do.
- Metal mesh - mesh with 1 mm cells. The mesh will help hold the plastic fragments together. You can purchase this mesh at a hardware store, but if this is not possible, use an old air filter.
- Priming. The most common automotive primer will do.
- Putty. It is better to use a special putty for plastic to level the surface of the sealed area.
- Sandpaper. For rough grinding - 40 and 80 numbers, and for finishing - 800.
- Rags - it is used to remove dirt from the work surface.
- Plastic solder (use part of an old bumper). It is used in cases where the bumper is severely damaged, has split into small parts, and the crack does not heal. A piece of plastic from an old bumper is used as a patch.
- Hot air gun. Needed to eliminate bumper deformation. The heated plastic bends easily, so you can return the bumper to its original appearance.
To avoid unnecessary expenses, it is better to buy a repair kit. Typically, such kits include rough and finishing sandpaper, retouching, primer, and fillers. Such a kit will cost you much less than purchasing materials separately, since they usually use small packaging.
Materials for work
For self-repair, prepare to buy a set of devices and tools. Without them it is impossible to repair efficiently.
To begin with, you will need a welding hair dryer or a heat gun (it is better to use a professional or semi-professional inverter), special rods for welding when repairing plastic bumpers (their material must be identical to the material of the bumper), a reinforcing mesh made of metal, a tripod, fiberglass, thermosetting polymer and putty , intended for working with plastic, clamp for laying out the mesh.
Bottom line
You can restore a plastic bumper with your own hands, you just need to be patient and put in a little effort. To carry out repairs at home, you do not need an equipped place and special tools. The main thing is to follow the repair technology presented in this article, understand the importance of following it, and you can eliminate damage to the bumper that, as it seemed at first glance, cannot be fixed. A high-quality repaired bumper is no different in external and technical characteristics from a new bumper.
Welding process
Let's take a welding hair dryer and a heat gun. We adjust the required heating degrees. This depends on the material from which the bumper is made and its melting point.
It is also important to check that the purchased rods are made of the same material as the plastic bumper.
To make sure that the degrees are set correctly and the rods match the material of the bumper, weld on a small piece. This way you will be less likely to ruin the entire part of the car.
Final stage
After the soldering area has cooled and completely hardened, use 40 and 80 grit sandpaper to remove excess plastic and smooth the seam with putty.
To finish leveling the seam, we use a special putty for plastic. Try not to apply too thick a layer of putty, as this may lead to it peeling off from the seam during use. We wait until the putty has completely hardened and begin sanding the seam with P800 sandpaper. We dilute the primer according to the manufacturer's description indicated on the can of primer. Apply the primer in 2 layers, waiting 15 minutes between each layer. Additionally, you can apply a layer of developing primer, after which the identified defects can be eliminated using nitro putty, followed by sanding with P1000 sandpaper. After removing dust from the surface, you need to degrease the part, after which you can begin painting the bumper. Paint the part following the paint application technology.
Features of contraction
As already mentioned, tightening may be necessary for soldering large cracks and in case of serious damage to the structure of the structure.
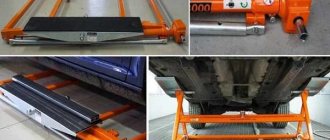
How exactly is this procedure done? First of all, you should purchase metal fasteners for attaching guides of the required size - they are available in almost any building materials supermarket. Then you need to cut this fastener into plates of the required sizes.
Holes are made on both sides of the cracks in the bumper, after which suitable plates are installed on the back side (this allows you to maintain an aesthetic appearance). At the next stage, screws are inserted into the holes, and the entire structure is secured with nuts.
The holes in the bumper must be drilled with a drill with a diameter of 3.6 to 3.8 millimeters. In this case, the drill must be located closer to the outer edge of the plate hole.
Each drilled hole in the bumper must also be countersinked so that the screw head “sinks” into the bumper. If a countersink is not at hand, you can alternatively use a drill whose diameter is slightly larger than the diameter of the screw head. The main thing is to achieve the desired angle for this hat.
Bumper repair
The surface is prepared using a Dremel.
This universal tool is great for a lot of other jobs. The surface is prepared using a Dremel. This universal tool is great for a lot of other jobs.
The plastic of this bumper is marked “PP” (polypropylene). The master selects a rod with the most suitable profile from a set with this composition.
Bumper repair
For the convenience of welding work, the master selects rods of the required profile.
For the convenience of welding work, the master selects rods of the required profile.
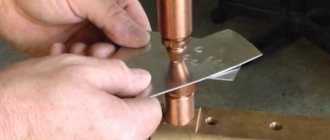
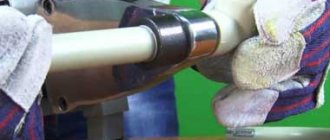
After laying the rod, it is additionally melted and crimped with special tongs. Next, by analogy, welding is carried out on the inside of the bracket.
Sanding, puttying and painting
After the bumper has cooled, you need to apply a layer of special plastic putty to problem areas - this can be done with a spatula or any other handy tool.
Once the putty has hardened, you can begin sanding the entire bumper. Grinding should be done as carefully as possible so as not to damage the bumper itself. Particular care should be taken to clean and smooth corners, chips, and the seam itself. Where it is not possible to go through with a machine, you can work manually (with sandpaper).
It will be necessary to apply another layer of putty to the bumper after treating the part with a primer. Moreover, nitro putty should be used for this purpose. And after applying this composition, the surface must be degreased and dried.
Painting the sealed bumper occurs at the very end - this is the final stage. Now there is a large assortment of paints specifically for plastic - choosing the right color and texture is not difficult. It is only important to remember that oil paints and acrylic paints are not suitable for painting plastic.
To apply layers of paint evenly, it is best to use a spray bottle or spray can. And if you are painting a bumper that has already been installed back in place, then other parts of the car located nearby should be covered with film or other protective material. And one more tip: painting should be done in a dry and warm room at a temperature not lower than +12 degrees.
Bumper repair
A groove is made at the junction in order to better lay the molten plastic rod and, in addition, to compensate for the increase in the final layer thickness in this place.
A groove is made at the junction in order to better lay the molten plastic rod and, in addition, to compensate for the increase in the final layer thickness in this place.
Bumper markings
An example of marking the composition of plastic on a bumper.
The stamp is located on the reverse side. The letters “PP” indicate that the thermoplastic has a polypropylene base. And, for example, ABS plastic, which is more familiar from interior elements, has a corresponding designation. An example of marking the composition of plastic on a bumper. The stamp is located on the reverse side. The letters “PP” indicate that the thermoplastic has a polypropylene base. And, for example, ABS plastic, which is more familiar from interior elements, has a corresponding designation.
Bumper repair
At the final stage, the master additionally shrinks and straightens the resulting seams by connecting a hair dryer to the hair dryer.
At the final stage, the master additionally shrinks and straightens the resulting seams by connecting a hair dryer to the hair dryer.
The front part of the bumper is first sanded and the welding process is repeated in the same way as the inner side.
Repair with fiberglass
The technology is used to eliminate damage to body kits made of fiberglass, since the previous method will not work in this case. What you will need for work:
- fiberglass for bumper repairs;
- polyester (epoxy) resin complete with hardener;
- soft brush;
- stationery knife or scissors;
- latex gloves.
Advice. If a bulge or depression has formed at the site of the impact, then immediately after cleaning, level it using a hair dryer to heat it.
Since fiberglass patches will have to be applied on both sides of the damaged area, it is better to remove the bumper from the car. After completing all the preparatory work, including stripping paint and degreasing, proceed in the following sequence:
- Using a grinder with coarse sandpaper (P80-P120), make a recess in the body of the bumper from the front side, covering a radius of 3-5 cm from the crack. This is necessary so that the fiberglass overlay does not ultimately protrude beyond the plane of the part.
- On the back side, sand with coarse sandpaper, but without deepening. Degrease the area and let it dry.
- Cut out patches from fiberglass. On the front part you need to make a neat patch that follows the shape of the recess, and on the back you can glue a rectangular overlay.
- Mix the resin and hardener in the proportions indicated on the package. Apply the composition with a brush to the surface, apply a patch (several layers are possible) and saturate it with resin.
- Carefully observe the time specified for curing the epoxy composition (written on the resin container), and then thoroughly clean the repair area with fine sandpaper. The task is to level the surface by removing protrusions.
Note. Initially, coarse sandpaper is used to create a roughness on the surface of the plastic that promotes better adhesion of the polyester adhesive.
At this point, the work on repairing the plastic itself is completed; then cleaning, priming and painting are carried out using standard technology. The last operation is polishing the bumper; it is necessary to give the element a uniform shine.
Read also: Low-melting solder for soldering
Photo of fiberglass body kit repair
Video about sealing defects with fiberglass
Bumper repair
The process of directly repairing such damage takes about an hour.
Taking into account further local painting, the total cost of work in a particular case is about 17,000 rubles. This is a clear example when it is more profitable to buy a new bumper. The process of directly repairing such damage takes about an hour. Taking into account further local painting, the total cost of work in a particular case is about 17,000 rubles. This is a clear example when it is more profitable to buy a new bumper.
Bumper bracket repair
Using the example of the same long-suffering bumper, we will consider a more profitable repair. Often, due to a broken fender mounting bracket, the entire bumper is ordered to be replaced. Basically, only his ears suffer, but welding will come to the rescue if the whole bar falls off with them. Such repairs are done without local painting, so it saves a lot of money.
Tool Requirements
The most important tool in this case is, obviously, a soldering iron.
Here it is quite possible to use a regular electric soldering iron or a gas torch with a power of 100 watts or more. In general, the following principle works: the greater the power of the soldering equipment, the better. You can also use a tool such as a soldering hair dryer (or, as it is also called, a soldering gun). Actually, it is similar in principle to the hair dryer that women use after a shower. But the power and temperatures that a hair dryer can generate for soldering plastic bumpers are much higher - with its help it is quite possible to melt and solder plastic.
In addition, there are soldering stations that contain both a hair dryer, an ordinary soldering iron, and many attachments. If you have such a station, soldering any bumper will not be difficult.
Another important tool that will be useful here is a grinding machine with abrasive wheels. It is needed to remove paint and varnish from a damaged bumper. The best option is machines with a P240 wheel.
Sandpaper will also be needed during the repair process - for rubbing the putty. Finally, it is worth mentioning the additional tools that almost every craftsman has - drills with a set of drills, clamps, pliers, screwdrivers, and so on.
Bumper repair
In this example, restoration of the mounting ear cost 1,500 rubles.
Repairing a headlight bracket will cost the same amount, and for welding a crack on its body they will charge only 300 rubles. You can also brew various tanks. In this example, restoration of the mounting ear cost 1,500 rubles. Repairing a headlight bracket will cost the same amount, and for welding a crack on its body they will charge only 300 rubles. You can also brew various tanks.
***
If the attached plastic elements of the car are damaged, do not rush to buy new spare parts. Even if the damage seems very serious to you, you should first contact repairmen. Perhaps in your case you will be able to save a decent amount of money by purchasing and completely painting a new part. Even for budget cars, with an appropriate price tag for spare parts, plastic repair can be a cheaper option. And in the case of more expensive cars and some particularly “golden” spare parts, restoration will be a real salvation for the wallet.
We thank the local body repair service “AvtoTOTEMM” in Volgogradsky for their help in preparing the material.
How are bumpers repaired?
Bumper repair
Rear bumper from Chevrolet Cruze.
Numerous tears, cracks and dents. If desired, such damage can be properly repaired. Rear bumper from Chevrolet Cruze. Numerous tears, cracks and dents. If desired, such damage can be properly repaired.
It is not economically feasible to restore such a bumper. But you can clearly show the possibilities of plastic welding. To begin with, the master, using a hair dryer, straightens numerous dents in several stages and, using metal tape, fastens the places of ruptures.