Currently, spot welding for batteries has found its active application in various fields. For example, when a battery runs out of resources, it needs to be replaced and replenished. Due to the fact that the batteries are placed in a block in which contact connections are created by micro-welding, during repair work the used element must be removed and a new one placed in its place, restoring strong and stable contact between them. In order to carry out the steps described above, they resort to a method such as do-it-yourself spot welding for batteries - this means that it is not necessary to purchase a spot welding machine, you can make it yourself.
Design and principle of operation
Do-it-yourself resistance spot welding for batteries is constructed from a power source and working controls. It is with their help that the welding process itself is carried out.
The structure includes:
- electrodes, they are responsible for conducting electricity,
- components that compress parts directly during the welding process,
- welding transformer.
The operating principle of resistance welding of batteries is based on the fact that heat affects the parts that are connected to each other. Such devices have found wide application in installation and repair work.
The purpose of spot welding is as follows: this method allows you to connect battery terminals using small metal plates.
The process of joining parts using resistance spot welding occurs due to thermal energy, which is released under the influence of electric current.
Thanks to the use of contact welding of 18650 batteries, you will be able to repair household appliances, as well as firmly secure the battery terminals. In addition, it is widely used in replacing batteries in laptops and similar devices. Thus, the feasibility of using spot welding is obvious.
Flaws
It is also worth highlighting the disadvantages that a home-made spot welding machine has:
- Poor protection of the housing from external influences;
- There is no possibility of fine adjustment of operating parameters;
- The design turns out to be not as reliable as its factory counterparts.
Device
Contact welding for batteries has several main parts that are included in its overall design. The mechanical part contains electrodes that conduct electricity. There are also elements for compressing parts during welding. In powerful factory devices, hydraulics can be used here, but in homemade ones, almost everything is mechanical.
In the electrical part, the main device is a welding transformer. It is connected to the primary circuit breaker, as well as to the elements supplying electricity to the welding site. Modern factory models also contain complex electronics, which are not used in homemade devices.
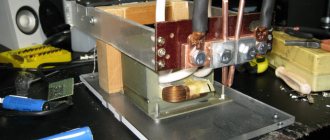
Transformer in design
Principle of operation
A do-it-yourself spot welding machine has a fairly simple operating principle based on the influence of thermal energy. Electricity is supplied to the electrodes, which subsequently come into contact with metal parts. A welded core is formed at the junction. Under mechanical influence, the electrodes are strongly pressed against the part being welded. When exposed to electric current, the parts heat up and are welded to each other.
Advantages and disadvantages
Do-it-yourself contact spot welding for batteries is characterized by a large number of advantages. Let us note the main ones:
- homemade spot welding is a budget option; you don’t have to spend a large amount of money on making the device,
- the design is quite simple, and purchasing consumables does not require large expenses,
- the resistance welding machine is “powered” by a very small amount of power,
- using the method of resistance welding of batteries, you can work with thin cast metal,
- It is possible to adjust and monitor indicators within a specified range.
Despite a number of positive aspects highlighted in the use of homemade spot welding for batteries, it is worth noting some disadvantages:
- unreliability, the case is poorly protected and may be subject to external damage,
- there is no possibility to fine-tune operating parameters,
- In terms of operational characteristics, this installation is inferior to factory analogues.
Advantages and disadvantages of spot welding for batteries
Advantages:
- excellent “budget” – low cost of the device;
- availability of resources and consumables, simplicity of the device itself;
- clarity and accessibility of device parameters;
- the ability to control and regulate technical parameters;
- low electrical energy consumption;
- the ability to connect thin-sheet material.
Flaws:
- not very effective protection from external influences;
- regulation of the device’s operating parameters cannot be called subtle and precise;
- Loss of the device according to the factory parameters.
DIY contact welding of batteries
There are a wide variety of resistance welding machine models on the market. However, such devices are quite expensive and not everyone can afford them. Therefore, if necessary, you can make a machine for spot welding batteries with your own hands.
The technical characteristics of homemade units are significantly lower than those of battery welding machines produced in factories, but homemade spot welding is quite suitable for use at home.
Do-it-yourself resistance spot welding for batteries can be carried out using a homemade device, the design of which includes a current source and controls.
When carrying out the production of spot welding with your own hands for lithium batteries, you should be very careful and consistent in meeting all the necessary requirements.
To create a high-quality resistance welding machine, first of all, you need to acquire the following components, which are an integral part of the welding machine.
You will need: a transformer, a wooden base, bars for racks, a power button, a wide cable for the secondary winding, a thin wire for power supply from the electrical network, copper lugs, bolts, nuts and screws that will be needed for fastening.
Build process
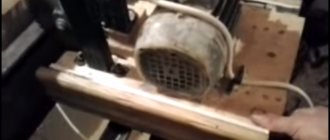
It is quite easy to create a resistance welding machine from a transformer from a microwave oven or TV that you already use. Take a node with a power of 180 W.
Note! The secondary winding in the transformer must be completely eliminated. You can do this using a hammer or grinder. The upper part of the winding must be cut off and the remaining part removed from the housing.
The secondary winding is carried out using a thick welding cable. Usually three are wound
turn. This is quite enough to increase the current to 300 Amp. And do the welding. It is worth noting that the output voltage will be low, approximately 2V, so if the parts accidentally come into contact, they will not be damaged or deformed in any way. In order to adjust the current effect, just press the button.
You can design a more advanced version of the spot welding machine yourself. To do this, you need to additionally install capacitors and a torustor. The capacitor is designed to accumulate charge, which will be directed to the electrodes by closing and opening the toristor. This design will provide an impulsive supply of current, with a certain period of time.
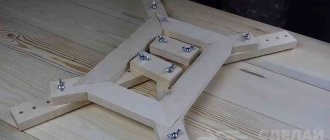
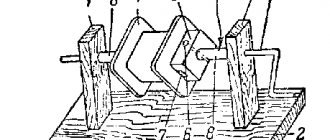
The resistance welding machine is assembled using a dielectric base. It is to this that the current source will be connected. To do this, you can use either a sheet of plywood or an equilateral piece of their board. The transformer occupies one of the corners of the base, and racks are placed in the free area. Next, these posts need to be attached to the base, this process is performed using a screwdriver. In the upper part of the racks you need to drill a hole for the axle. A lever with electrodes will be fixed in this place. At the end of this lever you need to fix several copper electrodes with a diameter of 2 to 4 mm. All wires must be thoroughly washed, insulated and tied to the working part.
With your own hands
The welding equipment market offers consumers a huge selection of various devices, differing both in size and price.
Well-known manufacturers use only high-quality materials, equipping their models with a variety of control devices, making the work process not only comfortable, but also safe.
Homemade devices cannot provide factory quality, but they are quite suitable for repairing lithium batteries at home. On the forums you can find many diagrams and drawings of devices that can be used in any conditions.
Regardless of the type of purpose, do-it-yourself spot welding for 18650 batteries will require the following materials for assembly:
- Apparatus for reducing the voltage of electric current.
- Material for the frame with dielectric properties.
- Wooden bars as load-bearing elements.
- Power supply device.
- Copper wire with insulation as the material for the secondary winding.
- Cable for connecting to your home network.
- Electrode tips (copper rods work great).
- Hardware for fastening the structure.
After preparing all the components, begin assembly.
Additional Information. You can use a regular transformer from a microwave oven. In this case, it must be upgraded to match the welding parameters. For electronic components, we recommend paying attention to Arduino modules.
Current source
It would be best to use a transformer from an old TV - on message boards, rare models cost mere pennies. Please note that welding requires a power of at least 200 W. The parameters of the primary winding must correspond to the parameters of the home network - 220 V, 50 Hz.
First of all, it is necessary to completely get rid of the secondary winding using bench tools - a hacksaw, hammer and chisel. This procedure should be performed with extreme caution. Careless actions can damage the primary winding, after which it will have to be restored.
The new secondary winding is made from thick insulated cable . To obtain the necessary parameters, 4 turns are enough. In this case, the current parameter will increase to 300 A and reduce the voltage to a level that is safe for human health.
The duration of exposure of the welding current to the surface to be joined is adjusted using a power supply device. As a rule, for high-quality contact, the operating cycle should last no more than 2 s.
The above scheme is the simplest possible. If you add capacitors and a thyristor to the device, the current will be supplied pulsed, with a clearly measured length. Thus, the homemade product will have the properties of a spotter, automating the workflow.
Working elements
For safe welding, load-bearing structural elements must be made of dielectric substances . Experts recommend using the following materials:
- plywood;
- plexiglass;
- tree.
A transformer is installed at one of the corners of the frame. Racks are installed on the other sides, attaching them to the base using self-tapping screws or bolts. In the upper part of the racks it is necessary to make a hole for the mechanism with electrode rods.
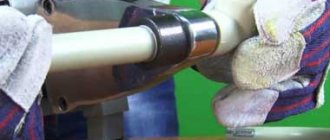
The main part of the working unit is copper rods, which act as electrodes . Their diameter should be in the range from 1 to 5 mm. Larger cross-section rods can be sharpened to the required size.
The end distance should not be large - the units are not designed for connecting thick sheets. A distance of 3-4 mm is considered optimal.
The supply cables must be equipped with copper or aluminum ferrules, which are attached to the lever with bolts.
The power supply device should be located in a convenient place, in an area of free access - this will simplify the operation process.
According to safety requirements, all wires must be reliably insulated.