How to make a tenon and groove using a hand router with a dovetail cutter
In this article, we will introduce you to the process of cutting various joints with a hand router, and consider the process of making additional devices for increasing labor productivity, such as tenoning templates and a dovetail wood cutter.
How to make a tongue and groove with a hand router
To make this tenon joint, we will need the router itself and the work table. To facilitate the process, you can make an additional device such as a conductor.
The procedure is as follows:
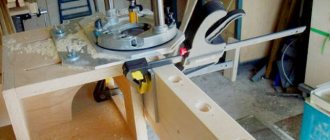
- We install two slatted stops on a plywood sheet, cut out holes to suit the size of the groove for the drawer and the leg. Rack stops must be secured across the width of the router. They fix it across the working plane. To fix the longitudinal displacement, two other stops are placed at the ends of the intended location for installing the joinery machine.
- To move the workpiece along its length, we mount a pair of bars to the tabletop that correspond to the dimensions of the workpiece.
- We mark the axis and dimensions of the grooves. We install the additional device so that the markings on the workpiece and the jig completely coincide.
- It is necessary to set and secure the stop.
- Secure the jig to the bars using self-tapping screws.
- It is necessary to take a straight cutter and set the milling depth, taking into account the thickness of the manufactured jig. After this, you need to fix the workpiece with a clamp and process the groove.
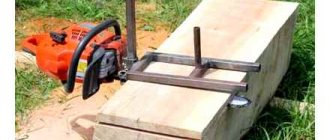
Let's start cutting out the spines.
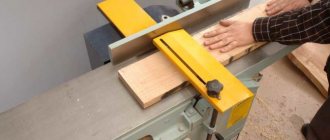
- For small production volumes, it is best to do this on a circular machine.
- First you need to measure the depth of the groove, which will correspond to the length of the tenon.
- We measure the resulting value on our workpiece. The length of the tenon will be determined by the difference between the width of the workpiece and the length of the groove, the height of the workpiece and the width of the groove, divided in half. The resulting material residues should be removed to obtain a spike.
- After this, you should set the size on the machine equal to the length of the groove, taking into account its width. The circular saw should be fixed at a level equal to ½ the difference between the width of the workpiece and the length of the groove from the tabletop line. Make a couple of cuts along the length of the tenon.
- We fix the saw blade at a height equal to ½ of the difference in the heights of the workpiece and the width of the groove from the tabletop line. Two cuts are made from the end of the workpiece.
- Let's start sawing. To do this, it is necessary to fix the circular saw to the length of the tenon, and the distance from the disk to the stop should correspond to a value equal to ½ of the difference in the width of the workpiece and the length of the groove. We make two cuts along the width of the product on both sides.
- We adjust the distance from the cutting disc to the stop. It should be equal to a value equal to ½ of the difference between the heights of the workpiece and the width of the groove. We make two slits. We round off the edges of the resulting tenon with a carpenter's knife and sand it with sandpaper.
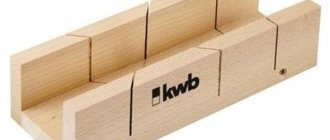
Tenon cutter for router
Tenoning templates come in a variety of configurations. They serve to facilitate the work of cutting joints such as tongue and groove, as well as to speed up the work. With their help, you can make frames, box joints, and cut out various joints for furniture.
The size of the groove, as well as the evenness of its edges, will depend on the shape of the template tooth. To make a tenon cutter with your own hands, you will need guides, with the help of which you will mill the tenons. They should be mounted on two opposite sides of the housing in a checkerboard pattern, located equidistantly.
If these conditions are met, they will fit together perfectly.
Dovetail wood cutter
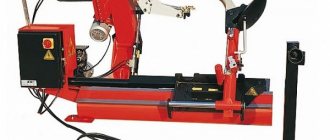
They are most often used in conjunction with milling machines and machines for making grooves in products made of hard and soft wood. Manufactured from monolithic hard alloys.
Designed to work in conjunction with cylindrical cutters.
How to choose a groove with a router
When performing this work, you need to know that the technique will directly depend on the location and size of the groove. If it is open, then your tool is attached to the tabletop, and the workpiece is guided along the cutter. Accuracy will depend on the position of the plank and the height of the cutter.
To avoid mistakes during the sampling process, always make a test run on scrap wood. Sampling should be done in stages, several passes must be made. After each pass of the cutting part of the router, to prevent it from overheating, it is necessary to remove waste from the working surface of the tabletop.
This can be done using a template cut out of plywood, which should be followed by a cutter with an upper bearing.
We hope that the information obtained from reading this article will be useful to you and useful for use in the household.
Tenoning attachment for a router with a constant size.
Every carpentry workshop simply needs to have a tenon-cutting device for the router for making tenons of different sizes. When making such a device, you need to understand that it, in this case, is made for one specific size of spikes. It's not difficult to make and it will work like a clock. The necessary parts are guides for making tenons; they are installed on opposite sides of the device body in a checkerboard pattern and at the same distance from each other. A cutter with a thrust bearing is inserted into the hand router, which follows the shape of the guides. If the guides are cut to the same size and evenly mounted into the body of the device, then the tenons will fit together perfectly. These studs measure 7/8″ wide and the stud height is 3/4″. Before making tenons, install the router and cutter on the router table. Note: A situation may arise when a cutter with a thrust bearing is not available, then a guide bushing for the router will correct the situation. Securely secure the device itself with clamps on a 15″ long board.
DIY accessories for a wood router: stops, templates, guide rails
For accurate operation, a milling cutter requires auxiliary devices; at the same time, the sales package of the device includes a limited set of such items.
The market for milling attachments extends from protractors to numerous attachments. The user, for whom this is not enough, can make auxiliary devices himself.
Rip fence
The list of useful accessories for a wood router is quite long. Many tool owners are able to make them from scrap materials or, if more convenient, simply buy them separately.
One such device is a rip fence. This is a component of the basic set of any router, and the owner of the tool does not have to make the stop himself. It is needed to directly follow the cutter along the surface of the base, which can be the smooth edge of a part or a workbench.
The stop allows you to process edges and grooves, firmly fixing the part.
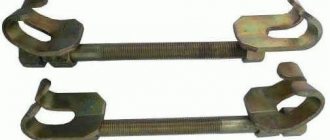
This useful addition to the milling tool consists of the following parts:
- rods entering the recesses on the router;
- screw fasteners that tighten them in the desired position;
- adjusting screw for fine adjustment of the distance of the cutter axis from the edge;
- the supporting part that holds the structure to the base.
To make the wood router stop ready, the rods must be positioned in the recesses on the tool body and tightened with a stopper. By loosening the stopper, you can use the adjusting screw to make minor adjustments if necessary.
With a little addition, the rip fence allows you to make, in addition to straight cuts, more complex ones. This addition is a wooden block with one flat side. The other side has an angular or round notch. The block is inserted between the supporting part and the edge of the material, which has a curved shape.
The block is in contact with the support with its smooth edge. The side where the notch is is in contact with the curved base. A tool with such a device should be manipulated with extreme care, since the block introduces an element of instability.
Guide rail
Having a similar purpose to the rip fence, the tire is responsible for the accurate movement of the cutter in a straight line. The time spent on work is noticeably reduced due to the use of the tire. It also allows you to guide the tool on the table at any angle to the edge.
Note! You can secure the tire to a tabletop or material using clamps.
Some mass-produced tires include a separate component - a shoe. It is connected to the router by rods and, passing along the bus, moves the milling head along a given path.
The tire is best combined with a tool whose base stands on retractable legs. This eliminates the height difference between the guide rail and the router.
It happens that the functionality of commercially produced tires is not suitable for the user. You can always create an individual version of the router guides with your own hands. The most elementary one is a long, even beam - in other words, a ruler. The master only needs to provide it with fasteners, and the tire is essentially ready. To make a simple device, you don’t even need a drawing.
Of course, such a homemade version will not be stable. The combination of a plywood base with a board nailed to it will be more stable in operation. The edge of the router base will rest against the board, and the edge of the base will mark the processing area. This design is used when using cutters of the same diameter.
Another option works when wood cutters can be of different sizes. Here the board acting as a ruler is not nailed to the base, but is reinforced with clamps. Thanks to this, it can adjust the distance from the working area according to the diameter of the cutter.
Templates and copy sleeve
The copying ring is a circle with a protrusion that slides along a template, guaranteeing accuracy of processing. The ring can be screwed to the base of the router or secured with antennae. The diameter of the device is selected so that it does not come into contact with the working part of the tool.
The ring template is fixed on the material being processed, firmly adhering to the tabletop. Reliable clamping is provided by double-sided tape and clamps. Having finished the part, you need to make sure that the sleeve fits tightly along the edge of the template when working.
A self-made template for a router can also be used for processing the corners of a part, when it is necessary for them to be round. Depending on the location and dimensions of the template, the radius size of the rounding can be any.
The template design often includes bearings or rings. If this is a ring, then it should be selected according to the size of the cutter. If there is a difference in diameters, it is necessary to add stops to the template design, with the help of which you can move the device away from the edge of the part.
Among the auxiliary devices for the router, the most flexible templates, in addition to processing the edges of the material, also allow you to cut complex grooves. The special design of the accessory makes it possible to effectively create recesses for door hinges. Using a template, you can even carry out decorative work with a router, for example, cutting out wooden patterns.
Compass
This auxiliary tool is designed to create round and oval cutouts. The basic compass design includes a rod with a pin fastening at the end. By inserting the fastener into the hole in the center of the circle along which the groove is made, you can change the size of the circle by simply moving the rod.
Note! The convenience and reliability of the design is increased by adding a second rod.
There are various auxiliary elements that work on the circular principle. They offer the advantage of creating different radii of circular grooves. A mandatory component of such auxiliary devices is a pin with a screw for adjusting the length of the radius.
If a small hole is cut, the compass structure must be adapted for mounting on the base of the router. When processing a part, the pin is located directly under the tool.
A wood router, in addition to round ones, is also capable of cutting elliptical holes. The device for this can be assembled with your own hands from the following parts:
- base with fixation on material made of screws or suction cups;
- shoes moved on crossing guides – 2 pcs.;
- rods for installation – 2 pcs.;
- bracket for connecting the structure to the tool.
The fastening bracket, thanks to the grooves intended for this purpose, allows the frame of the structure to be in the same plane as the base of the router.
Cutting round openings is done using one shoe. If you need an oval hole, both are used.
This auxiliary design makes it possible to make holes more accurately and faster than other tools, such as a band saw or jigsaw.
For grooves on narrow surfaces
Recesses for locks or door hinges can be made with a drill and chisel, but a router is much better suited for this. You just need to equip the tool with a certain device.
It consists of a flat plate that is attached to the base of the device. The shape of the plate can be round or rectangular.
2 pins are made on it, ensuring smooth movement of the tool during operation.
The main parameter that must be adhered to when manufacturing such an element is that the axis of each pin must be on the same line as the center of the cutter.
If this parameter is observed, the groove will be cut exactly in the middle of the workpiece, regardless of thickness.
If it is necessary to shift the groove to the right or left, a sleeve of the size needed for the desired shift is put on the corresponding pin.
Using this design, the router is driven with the pins tightly pressed to both sides of the workpiece.
The same effect is achieved if you use two parallel stops with a router.
Even one stop may be enough. It is necessary to strengthen the workpiece between two surfaces, for example boards, so that all three elements are in the same plane. In this case, the problem of insufficient part width is eliminated.
When you often have to work with narrow surfaces, a good solution would be to build a special table of two halves. By pressing the material between them, the master can easily achieve the effect of one plane.
Bodies of revolution
When working with round workpieces, such as posts or balusters, a structure is made up of a frame into which the part is placed, a carriage for the router and a rotary disk. The part is inserted into the frame, securely fixed, after which the carriage with the tool is pulled out to the processing area. The position of the part in the frame can be changed using a rotary disk.
The same frame with a router in the carriage can serve as a lathe. You just need to turn the disk while simultaneously operating the milling cutter moving along the guides. This can be done by a master’s assistant or a drill connected to the disk.
Tenoning devices
Such devices ensure the creation of joints based on spikes. Such profiles, which require high precision in processing the material, are easily made with a milling machine.
Using a hand router, the master moves it freely to the material. Therefore, the material needs to be securely fastened for error-free tenoning.
Such conditions can be created by a simple device made from the following parts:
- rigidly fixed guides, lower, upper and side;
- a bar with one degree of freedom that will limit the sample.
The parameters of the parts depend on the specific tool for which the device will be assembled. The assembly procedure is as follows.
Along the edges of the plywood base, vertical ribs of equal size are installed with cutouts in the center. Rails are attached to these ribs on which the tool will move. To ensure safe movement of the router on the rails, they are locked with limiters, which can be simple wooden slats.
A moving part is attached to the plywood base - a regulator for selecting the edge of the part. The lock can be a wing screw or another fastener of the technician’s choice.
Regardless of the manufacturer, a hand router with the addition of such a structure can easily cut out a simple tenon profile.
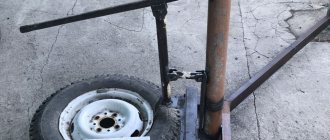
Another means for producing spikes is a conductor. It consists of a base, stops and a moving part in the form of a slide. Experienced users begin to manufacture and use it for very fine and precise work.
Hidden Features
The listed case of auxiliary tools may seem unnecessary when the master performs only the simplest operations with a router. But if you look at this tool from the angle of its potential capabilities, then a number of directions appear before the user.
Those works that the master did not even think that he could carry out turn out to be quite accessible - you just need to build several auxiliary structures. As if this is not a simple manual milling machine, but a CNC coordinate machine.
Article rating:
(2 4,00 of 5) Loading...
Do-it-yourself tenoning device for a router
Using tenon saw , you can make tongue-and-groove joints. The tenoner comes to your address completely assembled.
Why you need a tenon cutter can be found here.
How to work with an FMT tenon saw:
What is included in the package when purchasing a tenon cutter:
When communicating with customers, changes were proposed:
— rotary stop for basing workpieces;
- corner for pressing small workpieces;
- side stops - “ears” for pressing small workpieces;
— a clamping bar has appeared that can be installed in different holes in the inclined plate;
The FMT tenoner with the parts installed after the upgrade looks like this:
Set of parts for modernization:
The changes also affected the inclined plate:
You can see more details here:
Structurally, the tenon cutter has not changed and performs the same functions. The upgrade kit can be ordered separately.
All parts of the tenon cutter are made of metal, 3mm thick.
For the convenience of working with a tenon cutter, you can use the following devices in terms of fixing workpieces:
— lever clamp — clamps
Example of installing a lever clamp on an FMT tenon saw:
At the moment, it is possible to apply a protective (anti-corrosion) coating to parts - galvanizing.
Coating thickness is 3-5 microns. The appearance of the coating can now be seen here
When purchasing a tenon cutter, you need to perform several simple operations for high-quality work, namely:
Set the rotary stop at an angle of 90 degrees with respect to the horizontal table. Because During transportation, the settings may be lost. And loosen the indicator screws and install it opposite the corresponding protrusion.
The tenon cutter comes with a set of templates for making various types of tenons. The dependence of the template and cutter on the size of the groove and tenon can be considered below.
Template sizes depending on the cutter and tenon/groove size.
This section will help you quickly figure out which template needs to be applied for a specific connection:
The dimensions of the tenon/groove are indicated in Fig.1, Fig.2, depending on
They need to select the desired cutter and template (Fig. 3).
The following is a general table for all types of templates that are supplied with the tenon cutter:
For round tenons, special templates are used:
The templates differ from each other in size by 0.2 mm (the template with a triangle is larger) - this was done in order to eliminate errors when using cutters from different manufacturers.
The tenon cutting kit includes 5 templates without deviation and 5 templates with deviation +0.2mm for the production of round tenons f15, 20, 25, 30mm - for them a f12mm cutter is used, and for f35mm a f10mm cutter is used.
Using these templates you can make a spike.
- How to make a groove?
— It’s very simple - we take a Forstner drill, respectively f15, 20, 25, 30 or 35 mm and make a groove.
Here is a real example of making a tenon joint. Production is carried out only for demonstrative execution of the tenon and groove.
Making a spike:
We make a groove and try it on:
* Tenoner (tenon-cutting device) is a device designed to facilitate tenoning in woodworking.
Tenoners are assembled and ready to be sent to customers:
This is what the template set looks like:
More templates for making round tenons:
When making tenons, a situation may arise when the connection turns out to be loose or too tight. To do this, the tenon joint gap can be adjusted:
At this moment, the tenon cutter is equipped with a plate for attaching the router, which has holes for the following models of routers:
By clicking on this link you can see the models of milling cutters for which there are mounting dimensions for the soles.
It is also possible to manufacture plates to individual sizes - but in this case these dimensions must be provided.
A logical question arises: “How to make precise markings for making holes yourself?”
I answer: The delivery set includes a centing washer:
It is inserted into the central hole of the plate for attaching the router:
Next, install a cylindrical cutter f8mm or rod f8mm into the collet of the router, clamp and center the router relative to the plate, mark and make holes.
Accessories for a wood router: DIY production, instructions and assembly
Products made from wood are distinguished by their uniqueness and environmental friendliness, which is why they are so valued. But you won’t be able to make a wooden masterpiece with your own hands without a hand router. In addition, it will need accessories with the help of which the craft takes on a given shape.
You can even make them with your own hands, and no special strength or skills are required. Before working with a router, you must first familiarize yourself with each of these devices, as well as learn the principle of their operation . In this article we will look at the most necessary designs for a router.
Device - rip fence
This device, as a rule, is already sold along with the router. Therefore, there is no need to develop and create it independently.
For reliable support of the processed material, this element is used.
With it, the movement of the cutter becomes rectilinear relative to the base surface, which can be a table guide, slats or a straight edge of the part .
This device makes it possible to quickly mill various grooves and process edges while firmly holding the material.
Circle milling
Compasses are used for such purposes. With their help, the router can move around a circle. The simplest of them is a device consisting of a rod, one end of which is equipped with a screw with a pin, and the other is attached to the base of the tool. Of course, it is better to use a compass equipped with two rods.
In general, there are many proprietary and even homemade devices for a router for cutting circles, which differ from each other in ease of use and dimensions. Quite often, compasses have a mechanism that changes the radius of the circle . As a rule, it is a screw with a pin at the end that moves along the groove of the router.
But you don’t have to buy a milling compass to cut out circles. Instead, you can use a rip fence. To do this, the device is attached to a groove on the sole. A screw is screwed into it, which is recommended to be equipped with a sleeve so that its diameter matches the size of the hole. That's it, the compass is done. The radius can be adjusted using the stop.
Devices for replication and copying
To create a series of identical products use:
- Angle lever;
- Copy probes.
There is a scale on the angular lever, the division value of which is 1/10 mm . It allows you to center a stop ring under the cutter, which helps accurately reproduce the shape of the part on the workpiece during copying. It is often equipped with a chip guard and support plate for best edge finishing.
Using copy templates and rings
Copy rings are a round plate with a protruding edge that slides along the base surface along the template. This device provides an accurate path for the cutter to move. Basically, this element is installed on the base of the workbench. There are several methods for attaching it:
- Installation of special antennae in the holes on the sole;
- Screwing the ring into the threaded recess.
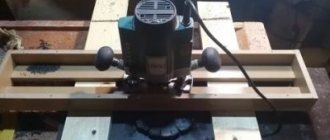
Adjustable tenoning jig for router.
How to make grooves in the body of a device for a hand router at ideally equal distances from each other and the same size? We can say that this is a common operation in woodworking and a router is the ideal tool for the job. The grooves can be located widely, as in the example in the photo, or they can be located very close, like box tenons. It doesn’t matter for what purpose the grooves are located, the main thing is that the grooves are evenly spaced - parallel to each other, at the same distance and with the same width. To do this, you need to make a simple device consisting of a piece of MDF on which the router is attached. Such a jig can be made to fit one size or with the ability to adjust the distance between the grooves, as shown in the photo below.