A tongue and groove board is a flooring option made of wood and has a special, very convenient installation mechanism. It is this mechanism that makes tongue-and-groove flooring so popular, because even an inexperienced craftsman can handle the flooring process. Let's consider this mechanism in more detail.
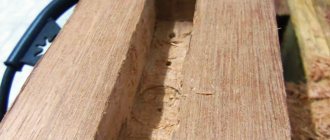
A tongue and groove board has a special protrusion on one side of the board, it is called tongue and groove (recess) on the other side, this system allows you to install the floor like a construction set, without using other methods of strengthening (glue, nails, etc.). The tongue-and-groove board floor will be laid tightly, all boards will fit tightly together, leaving no gaps or cracks.
In addition, the lower part of the tongue and groove board is also equipped with grooves; they are needed there so that air can flow between the board and the base of the floor. This way the floor covering will be ventilated, this will protect it from dampness, mold, rot and fungus.
The tongue and groove board has a flat and smooth face. If you purchase ready-made boards, then such boards, as a rule, no longer require additional processing and sanding.
Grooved board - advantages and disadvantages
how a tongue and groove board and what distinguishes it from other types of floor coverings. Now let's study in more detail the advantages and disadvantages of this coating.
First of all, let's list the advantages. The tongue and groove board has quite a few of them.
Advantages of using tongue and groove boards:
- environmentally friendly floor covering. The tongue and groove board is made of natural wood and therefore is absolutely safe for human health.
— tongue-and-groove boards have high sound-proofing and heat-insulating qualities. This property makes it very suitable for use in both apartment buildings and private houses.
- ease of installation. To lay a tongue-and-groove floor, you don’t need to hire a team of professionals; you can simply lay it yourself, armed with free time and video instructions from the Internet.
- aesthetic appearance. A floor made of tongue and groove boards looks very beautiful due to the fact that the joints between the boards are practically invisible and the effect of a solid floor covering is created.
- long service life. The tongue-and-groove board is wear-resistant. If installed correctly, the floor will not bother you with unevenness, squeaks and other troubles.
Disadvantages of using tongue and groove boards:
- one of the main disadvantages is the high cost
— a tongue and groove board, if it is made from low-quality raw materials, is prone to warping.
Making a tongue-and-groove board with your own hands
Indeed, those tongue-and-groove board options that hardware stores offer are quite expensive. The high price of such a board is mainly due to the complexity of the technological process of its manufacture. For tongue and groove, special equipment is used, which fits one board to another with pinpoint precision. This is what determines how tightly the boards are held together when laying the floor.
But it is still possible to reduce the cost of tongue and groove boards. How? It's simple - a do-it-yourself tongue and groove board will be cheaper.
This process is quite complex and will require a lot of effort and time from you, but in the end you will have an inexpensive and high-quality floor covering.
Of course, it is simply impossible to achieve the ideal look of a tongue-and-groove board at home, but you can do basic tongue-and-groove boards.
How to make a tongue and groove board:
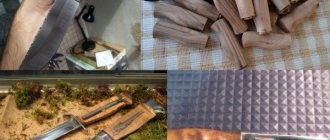
— we begin the process with the selection of material. Larch is best suited for tongue and groove boards. It has an average price category, resists rotting well, is resistant to moisture and pest attacks. It can be used for laying floors both indoors and outdoors. The material for making tongue and groove boards must be dry. Humidity should not exceed 15%, otherwise there is a risk that the board will change shape during use. This will cause the floor to become uneven. If the boards you have chosen are damp, leave them in a warm, dry room for several days to dry.
- adjust the size. To make a tongue and groove board, it is very important that all the boards are the same size, have the same width and thickness. Otherwise, you won't be able to place them correctly.
— then we fix the board for further processing. It must be secured very firmly so that it does not wobble or change position at the most inopportune moment.
— on the fixed board it is necessary to determine the middle of the end surfaces and apply the appropriate markings.
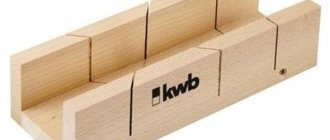
- the most crucial moment - using a machine or a manual jointer you need to cut a quarter groove on one side of the board, and a tongue and groove on the other. This is a very painstaking and filigree process. After all, one wrong move can irrevocably damage the board, and it will be unsuitable for further use.
Making a tongue-and-groove board with your own hands is a rather complicated and risky process, because you may not succeed. But a beautiful, high-quality, and most importantly, hand-made floor covering is worth the effort and time spent.
The process of making tongue and groove boards is covered in more detail in the video.
Irina Zheleznyak, Staff correspondent of the online publication “AtmWood. Wood-Industrial Bulletin"
How useful was the information for you?
What is a tongue and groove board?
The tongue and groove board is made of wood. Such an element has a centimeter-long groove on one side, and a tenon of the same length on the other. They got their name precisely because of the presence of such a locking system, because the groove is also called tongue and groove.
Sheet piling is a monolithic, seamless structure. Floors finished with this material will not begin to creak or fall apart over time.
The advantages of tongue and groove boards include long service life, low price and excellent appearance.
Devices for tying boards (tenon and tongue) are made on a milling machine. Only if these two elements have the exact dimensions will the boards be firmly connected to each other.
The tongue and groove board can be made from different types of wood. The material of such a product is selected depending on what it will be used for.
Types of tongue and groove boards:
- The cheapest option is pine tongue and groove boards. They are not very durable and are afraid of moisture, so they need to be opened with several layers of varnish.
- Larch tongue and groove is not afraid of moisture, but it costs twice as much as pine boards. This material is more durable and unattractive to insects.
- Oak and ash boards are the most expensive and beautiful materials. Floors made from trees of such species look noble and aristocratic. The high cost is offset by strength and long service life.
How to make a tongue and groove board with your own hands
Another important advantage of tongue and groove is the ability to make it yourself if you have certain woodworking skills. This painstaking work requires free time and knowledge of the intricacies of technology, as well as the rules for choosing quality raw materials. Based on the appearance and condition of the material, the board is divided into the following grades:
- extra - the most expensive grade, there are no knots or defects on its surface, it has an absolutely smooth, uniform structure;
- A is a high-class grade, but small spots and darkening are allowed on its surface without the presence of knots or other defects in the wood structure;
- B is the most popular variety in the mid-price category. Knots and other inclusions and stains on its surface do not spoil the overall appearance, but create an additional decorative effect of naturalness;
- C is a cheap grade with acceptable various structural inhomogeneities and through knots.
Having decided on the grade, you should pay attention to other criteria for choosing the original lumber:
- humidity should be 10–15%, and ideally up to 8%; such indicators are achieved using industrial drying in special chambers, after which the board acquires its stable size and will no longer dry out. High-quality drying can be determined by the shiny surface and a ringing sound when tapped, and a high level of humidity is determined by the presence of condensation on the inside of the plastic packaging;
- the integrity of the packaging will allow you to maintain a low level of humidity and the quality of the raw materials; when purchasing, you should also check for certificates, receipts and other accompanying documentation; it is recommended to choose products from well-known large brands that have earned the trust of consumers; a cheap board from an unknown manufacturer may be of low quality;
- Violations of the geometry and smoothness of grinding, especially for high-end products, are unacceptable; they will complicate installation and can spoil the appearance of the finished coating. These parameters are checked visually and manually;
- When combining several different types of wood, you should select boards of the same standard size to reduce the number of trims. The type of wood depends on the purpose of the room and the planned loads and operating conditions.
Required materials and tools
The boards have been purchased, now you can start working.
In large factories, tongue and groove work is carried out on high-precision computer-controlled machines.
For home tongue and groove you will need the following tools and materials:
- tape measure, level, ruler, square, marking pencil;
- impregnation against fire and biological damage;
- jigsaw or hacksaw for size correction;
- jointer with quarter selection function, milling machine;
- clamps for fixing the workpiece.
In cases where solid floorboards cannot be used, covering the floor with engineered planks may be a good option. We will tell you what an engineered board is and how to install it on our website: https://pol-master.com/pol-pokritiya/trehsloynaya-inzhenernaya-doska.html.
Step-by-step manufacturing process
Of course, it will not be possible to achieve production-grade extra-grade boards in a home workshop, but making a locking connection and subsequently getting a beautiful, flat floor without creaks and cracks is quite possible.
Stages of work to be performed:
- Before work, you should keep the purchased raw materials indoors for several hours to adapt to temperature and humidity conditions. A dry, clean board ready for processing must be secured to the work table with clamps so that it does not wobble or move during work.
- Measure along the long side the middle of the end side surface and apply markings for the locking connection.
Video: how to make a tongue and groove board with your own hands
A tongue and groove board will last for decades if the material is chosen correctly and the tongue and groove is done slowly and carefully. After laying the floors, it is advisable to cover them with several layers of protective varnish, then they can be washed, move heavy furniture and walk on them in high heels without the risk of scratching or pushing through. Hardwoods that are resistant to mechanical stress can be coated with a special oil, which will highlight the beauty and reveal the texture of the wood.
Grooved board and its features
Tongue and groove flooring has a number of distinctive features that make it such a popular and sought-after material. First of all, it is worth noting its design. Each board has a unique lock, thanks to which they can fit tightly together. This lock consists of a longitudinal protrusion on the edge of one board, which is called a tongue and groove, and a groove on the edge of the other, corresponding in shape. A similar system can be found in PVC panels, laminate, parquet, etc.
A distinctive feature of the tongue and groove board is also its processing: the front side has a smooth surface that does not require sanding. The reverse side may not be sanded, but there will certainly be grooves on its surface, which should ensure the ventilation process between the plank flooring and the base of the floor. Such ventilation will prevent wood rotting, fungi and mold.
The tongue and groove coating is an environmentally friendly material, which is undoubtedly a big plus in modern construction. But this advantage is not the only one. Among the advantages of this flooring are the following characteristics:
- high sound insulation material;
- high level of thermal insulation;
- long service life;
- fairly simple installation;
- does not attract dust;
- aesthetic appearance.
The disadvantage can be considered the cost, since it is quite high, and the tendency of the wood to warp. The second can be eliminated by choosing the right boards and following the installation technology. The tongue and groove board must be well dried by the manufacturer, either industrially or naturally. The percentage of moisture should be between 12–16%. To determine whether the wood is dry enough, you need to perform several actions:
- knock on wood - this helps not only against the evil eye, but also in determining the degree of drying. A dull sound indicates that the material is not ready for use and needs to be dried, while a loud sound indicates that the board is ready for use;
- touching is the simplest thing you can do. Touch and see if the wood is dry;
- evaluate the appearance. After industrial drying, wooden blanks should have a shiny surface.
Dry boards have a shiny surface, and if you knock on them, they will make a ringing sound.
Visual inspection is also important when assessing the quality of the material. During this procedure, you should check the boards for the presence of green-blue spots and a whitish coating, which will indicate fungal infection. It would not be superfluous to inspect the purchase from the point of view of geometry, i.e. how straight it is. To find out, you need to look at it from the end and conduct a visual analysis. If at least one item does not meet the requirements, then you should refuse the purchase or make a replacement.
DIY tongue and groove board
Having experience in wood processing and an equipped workshop, you can save a lot and make tongue-and-groove boards yourself. Considering the difference in the cost of solid wood and processed wood, the savings will be quite significant. Of course, to obtain high quality products you will have to work hard.
It's worth starting with the choice of material. The selection criteria are exactly the same as when purchasing a ready-made tongue and groove board. The wood must be dry and have a minimum of knots. Darkening, traces of rot or insect activity are not allowed. In terms of species, it is better to take larch; it is suitable for work indoors and outdoors, but you can limit yourself to cheap pine.
Note! The workpieces must have the same dimensions, otherwise the coating will not be even.
The array is marked. Using a circular or hand-held circular saw, cut out the workpieces with the required parameters.
The next stage of work will be processing the back side. This work should not be neglected, because it is thanks to the grooves that the dryness of the board is maintained and the durability of the surface is ensured. For work, use a milling machine or a hand router. The groove configuration depends on the available cutters; it is easier and faster to make one wide groove.
Next, create the elements of the castle. Here you cannot do without a milling machine; a manual milling machine will not work; in extreme cases, it needs to be secured to the frame. The workpiece is marked; it is better to count from the bottom of the board, since the top will still have to be sanded.
The cutter is set according to the markings. Slowly, without strong pressure, a groove is made along the entire length. There is no need to rush; one awkward movement can ruin the workpiece. All the boards are processed one by one. The cutter is changed, and the tongue and groove is also carefully cut out.
The process of making tongue and groove boards is almost complete; all that remains is to level the front surface and give it an attractive appearance. This can be done on a jointer or with an electric planer. You should not try to get an ideal surface; in any case, after laying the floor will have to be sanded; it is unlikely that you will be able to maintain the exact thickness at home.
Self-production
The production of grooved boards on an industrial scale is carried out using high-precision automatic equipment. All processes are controlled by the program, so the person only controls them.
It is impossible to achieve the same quality at home, however, it is quite possible to perform basic tongue and groove work. And then we will look at how to make a tongue and groove board with your own hands.
To do this you will need the following tools:
- manual frezer;
- tape measure and pencil.
So, making a tongue-and-groove board with your own hands is carried out in the following sequence:
- before making a tongue-and-groove board with a hand router, you need to select suitable lumber, which must be dry and without signs of rot or fungal attack;
- if the lumber is damp, it must be dried - stacked in a dry room on stands. Drying usually takes several months. The period depends on the type and thickness of the tree;
- you need to fix the prepared board on your work surface with your own hands using clamps;
In the photo - making a groove using a router
- Next, you need to mark with a pencil, having previously outlined the axes of the edges;
- in one of the edges you should select a quarter groove with a router;
- opposite the edge, using a jointer or router, you need to select quarters on both sides, as a result of which a tenon is formed;
- All other boards are processed in the same way.
Note! Wood should not be dried in the sun, as the outside will dry out quickly, but the inside will remain wet, which can lead to various defects.
This completes the work. It should be noted that do-it-yourself tongue and groove work is a painstaking task that requires the ability to handle wood and power tools.
After manufacturing the material, you lay the tongue-and-groove board yourself on the floor or attach it to the wall. In any case, this procedure consists of connecting the boards together and fixing them to the base with self-tapping screws.
Here, in fact, is all the basic information about this lumber.
How to choose quality material
Installing a tongue and groove floor begins with choosing the material. First let's talk about sizes. The width of the floorboard varies from 70 mm to 200 mm. If you choose one that is too narrow, it will take a lot of time to install; if it is too wide, there is a very high probability that when it dries, the edges of the board will rise and the floor will turn out ribbed. The problem can be solved by grinding, but this requires additional time and money. Therefore, most often they take a tongue-and-groove board of medium width - 130-150 cm.
The choice of floorboard thickness depends on the distance between the joists
The thickness of the tongue and groove board is from 18 mm to 45 mm. It is not profitable to lay a thin one - so that it does not sag when laid on the joists, they (the joists) must be installed often. Therefore, lumber with a thickness of 28 mm, 36 mm, 45 mm is often used for flooring.
The tongue and groove board is sold in different lengths. The standard ones are 3 m and 6 m, but they produce 4 m and 5 m. The choice here is simple: the length of the material should be slightly greater than the length of the room in which it will be laid. Splicing in length is not very beautiful, that’s why they do it this way more often.
Choosing a wood type
The floorboard is made from pine and spruce, larch, oak or ash. Pine and spruce are not expensive, but their wood is soft. Traces remain from heels, fallen objects, and are pressed through furniture. In places of active movement, “trails” are formed over time. The situation can be saved by covering with wear-resistant varnish in several layers. If this option suits you, it’s a good choice.
Pine or spruce tongue and groove boards under varnish last a long time
A tongue and groove larch board is a more expensive material, but also more wear-resistant. The wood has a pronounced pattern and a pleasant color. Can be used uncoated or coated with oil-based formulations without creating a hard film on the surface.
Oak and ash are very beautiful hardwoods with dense, wear-resistant wood. But the price for them is completely inhumane. As in the previous version, floors made of these types of wood can be used without coating or with more gentle compositions.
Type of tongue and groove board and its characteristics
All lumber is divided into four grades:
- Class "Extra". Made from top quality material. There should be no brown or black knots, irregularities, cracks or other defects.
- Class A. Single stains are acceptable, otherwise no defects.
The difference between different types of tongue and groove floorboards
Grade C is used when constructing a subfloor. There are too many defects in it for a clean one. The remaining classes are suitable for fine coating, but which grade you choose depends on your financial capabilities - the difference between the classes is significant.
Humidity
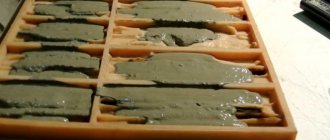
For comfortable installation of tongue and groove flooring, choose kiln-dried wood. In this case, after sawing, the raw material is kept in drying chambers, in which it is brought to a humidity of 8-14%. Such material is unlikely to dry out after installation - this is almost impossible, but the cost is approximately 50% higher compared to naturally drying material. This is due to the costs of equipment (drying chambers) and fuel for drying.
Kiln-drying tongue-and-groove board packed in polyethylene
Humidity is measured with a special device, which professionals have, and even then not everyone has. You can also try to determine by appearance. Most often, kiln-dried lumber is packaged in polyethylene so that it does not absorb moisture from the air. Naturally, the packaging must be undamaged and free of moisture (condensation on the inside). If you knock on dry wood, it makes a clear, ringing sound, while wet wood sounds dull.
What happens if you lay a floor made of tongue-and-groove boards with high humidity? The first thing you have to deal with is the formation of cracks as it shrinks. After six months or a year, the floor will have to be re-laid, removing the resulting cracks. Secondly, when drying, cracks often appear and the wood is twisted in different directions. Sometimes these curvatures can be compensated for by pressing the board harder, sometimes not. So you have to keep a couple of boards “in reserve”: to add when reassembling from shrinkage and to replace severely crumpled fragments.
Geometry
When choosing, be sure to pay attention to geometry. In addition to the fact that the thickness and width of the board must match, and there should be no significant curvature, you need to pay attention to the correct formation of the tongue and groove:
- The depth of the groove should be slightly larger than the tongue. In this case, laying a tongue-and-groove floor will be simple and you will not have to manually modify the lumber.
- Keep track of the distance from the top plane to the tongue and groove. It must match, and on all boards of the party. Then, immediately after installation, you will get an even coating that does not require additional sanding.
Two tongue-and-groove boards should fit together without gaps
In normal production, this is all monitored, but in reality there is a very large spread - 5 mm is not the limit. It is clear that such a floor will have to be sanded. But the smaller the discrepancy, the smaller the amount of work will be. Therefore, try to find a manufacturer whose difference will be minimal.
Selecting boards
Wood type
This parameter directly affects the quality and characteristics of tongue and groove boards:
- Spruce and pine. The main quality for which coniferous trees stand out is their low cost. In addition, spruce and pine boards retain heat well, even in the coldest times. Among the disadvantages of such boards, one can note their poor wear resistance: any point loads, such as furniture legs or fallen objects, will immediately affect the wood. Also, softwood boards should not be used in high traffic areas.
- Larch. Being a hard conifer, larch differs from spruce and pine in its durability and good resistance to moisture. In addition to its strength characteristics, this breed has good visual qualities, so it does not require additional varnish treatment.
- Oak and ash. Boards made from these types of wood are distinguished by their utmost quality and reliability. Pleasant texture and noticeable shade are also advantages. The disadvantage, based on all the positive qualities, is obvious - oak and ash boards are much more expensive than their coniferous counterparts.
Board sizes
You need to select the dimensions of the boards depending on the size of the room in which they will be laid. It will be much easier and more convenient to lay boards whose length matches the length of the walls along which they are laid. The thickness of the boards affects their cost and reliability.
Standard sizes of tongue and groove boards range from:
- Length – from 1 to 6 m;
- Width – from 70 to 200 mm;
- Thickness – from 18 to 45 mm.
Quality class
This indicator allows you to select boards depending on their purpose and quality requirements.
Tongue and groove boards are divided into four classes:
- Extra class (Eurospunt). Such boards are distinguished by the highest price, but at the same time they are distinguished by their uniform structure, shade and absence of flaws.
- A-class. A cheaper option, which also does not have cracks or knots, but may have an uneven shade.
- B-class. This quality class allows for the presence of small stains and small cracks on the surface of the boards.
- C-class. The cheapest material, which has all sorts of defects: knots, cracks and small single holes. As a rule, economy class boards are used to create a subfloor.
This aspect is incredibly important for tongue-and-groove boards: poorly dried boards will certainly become deformed after installation and begin to rot, and eventually the entire floor will have to be re-laid.
It is for this reason that before attaching a tongue-and-groove board to joists or another base, you need to monitor the moisture content of the material using the following recommendations:
- A suitable moisture content for boards is about 12-16%. To determine this parameter, it is best to use a moisture meter, and if you don’t have one, you will have to use simple but effective methods:
- Lightly tapping dry wood will give a clear and ringing sound, while wood that is too wet will sound dull and almost inaudible;
- Wet boards usually feel quite damp to the touch. Well-dried boards do not give this feeling;
- A dry board usually has a lighter shade than a wet one. In addition, a dried board after high-quality processing begins to shine slightly, while a board with a high moisture content looks completely dull;
- If condensation collects on the inside of the board packaging, it always means the boards are too wet.
How to make a tongue-and-groove board with your own hands: action diagram
On an industrial scale, the production of tongue and groove boards takes place on high-precision equipment. Everything is carried out by programmed mechanisms, and humans only control the process. And the higher the class of equipment the manufacturer has, the better and more expensive the final product. Grooving boards is a complex process, and at home you will never be able to achieve a high level of quality, but basic tongue and groove work can be done.
In production, milling cutters with complex cross-sections are used to cut the workpiece on the sides. In a home workshop, this mechanism can replace a manual jointer with a quarter selection function or a milling machine. Next, following the instructions on how to make a tongue and groove board with your own hands, you need to perform a number of actions:
- Carefully select the material for further tongue and groove. The most durable coating will be larch. It is less susceptible to rotting and insect attack than others. Larch can be used both for arranging floors in the house and for covering open terraces. This is a denser material, so it will be more difficult to work with than, for example, pine or spruce. The cost of larch is also higher than spruce and pine boards, but much less than the price of oak, ash or beech.
- Dry existing boards. It is better that the boards are already dry, since wood naturally dries for several months. And in order to dry the material to the required level, you need to place the workpieces on stands in stacks in a dry, well-ventilated room. There must be ventilated spaces between the workpieces. The humidity level can be measured with an electric moisture meter. You cannot dry wood in the sun, as the outer side will heat up and the inner side will remain wet, which will lead to the appearance of various defects in the future.
- The board, ready for processing, must be secured with clamps on the work surface (workbench, table).
- Determine the middle (axes) of the side surfaces of the workpiece and apply markings with a pencil.
- Using a router/hand jointer, you need to carefully and accurately select a quarter groove in one side of the board.
- On the other side of the workpiece, using a machine or jointer, quarters are selected alternately to the right and left of the intended axis, and the result should be a tongue and groove.
Do-it-yourself tongue-and-groove boarding is a very painstaking task that requires experience working with wood and certain tools, as well as free time. To carry out this procedure, a “steady hand” is also very important so as not to waver at the wrong moment. But it is also an interesting experience for anyone who likes to do things with their own hands.
Laying a tongue and groove floor on a concrete base
Anyone who is interested in working with wood, does this as a hobby or professionally, a hand router will be an indispensable assistant.
First of all, it makes the work of cutting out loops and holes of complex configuration easier. Before you start working with the tool, you must remember the following rules:
- A sharpened tool is required for the job. If the cutting edges are not sharp enough, the electric motor overheats.
- The working material must be firmly secured to prevent movement.
- It is not recommended to cut to the full depth - this will damage the engine and create excessive load on the cutter, among other things. If the required cutting depth is large, it should be done in stages, removing layer by layer.
- Replace the cutter with a completely de-energized unit.
- If extraneous vibrations occur, it is necessary to immediately stop work until the reasons are clarified.
Using a hand router, you can cut out parts and products of various configurations - shelves, racks, railings and other parts. This tool is indispensable when used at home. For example, when restoring old furniture. Once you gain experience, it is quite possible to do the following things:
- Treat flat and shaped surfaces, facades.
- Cut out various recesses: imitation of panels, grooves, ridges. Perform end processing of wood.
- Punch holes.
- Apply various inscriptions - engrave.
- Insert door hardware – locks and hinges.
- You can make a complex connection - a spike. Ensure reliable joining of wooden parts.
List of necessary tools and devices for working with a router:
- Milling cutter
- Jigsaw
- Electric drill with drills
- Templates for cutting parts
- File
- Protective clothing
The depth to which it is planned to go deep is adjusted by setting the distance between the pin and the washer near the electric motor. A straight guide is used to maintain the distance from the edge of the workpiece.
Note! Some models additionally include a circular guide, which is used for milling circles with large radii. For circles with a radius of less than 25 cm, technological holes are made in the base of the tool for the centering pin, into which it will be inserted at a certain distance. Cutting grooves can be done using an angle stop.
Milling of various round holes is done with templates. They are performed using an adjustable rod compass, which is a metal rod. There is a height-adjustable center at one end, the other end is fixed in the holes in the base for the rip fence.
To work you need:
- Unscrew the stop screw.
- Ensure that the length of the compass rod is adjusted to the desired radius.
When milling external arcs, you should monitor the distance from the center to the inner cutting edge of the cutter, and for internal arcs - from the center to the outer edge. It is possible to secure the leg of the compass to the material by directly sticking the leg of the compass into the material if this part is to be thrown away as scrap. Otherwise, you can place a piece of plywood by gluing it with double-sided tape.
Processing metal (stainless steel or aluminum) with a milling cutter is not the best idea, since, unlike a metal processing machine, it does not have a gearbox or gearbox.
However, in the absence of a professional tool, the device is suitable for one-time work. A manual milling cutter, due to its design and functions, allows processing in two planes: vertical and horizontal.
When working, you should correctly determine the direction of movement of the tool.
Note! To work on metal, the milling cutter must be set to minimum speed, as there is a danger of the metal softening during work. It is necessary to make a minimum passage depth.
Various connections that serve to strengthen structures, from furniture to building elements, are made using wood cutting tools. Some of the joints that can be made with a router are dovetails, tongue-and-groove joints, tongue and groove joints, and others. This can be achieved using various special cutters.
There are two ways to remove the edge: with or without a template. It is better for an inexperienced carpenter to use a template. To process the edges of the board, you will need 2 cutters - with bearings at the beginning and end of the cutting part.
On the working site, it is necessary to mark the axis around which the cutter will move. Mark the radius from the cutter located further, make a hole and install the axis.
Note! When working, eyes must be protected with goggles!
To perform this work, you need high-quality material - dry, without visible damage. The board is secured to the table with clamps and marked with a pencil. A quarter groove is selected in the edge, quarters are selected on both sides in the opposite edge, forming a tenon. This completes the work.
To start working, you need to insert the cutter into the boring head. The boring head allows you to adjust the radius of the recess by moving it to the sides. The depth of the recess is adjusted by moving the milling table. The chamfers are removed with a cutter.
When processing parts with a milling cutter, a margin of about 5 mm is made on each side. The router provides an ideal cutting surface after processing. Guaranteed to be free from chips and cracks.
Back
Today, the building materials market is bursting with an abundance of flooring products in a wide price range. However, consumers prefer natural materials, so they often choose boards for flooring. This is not surprising, because such material is characterized by a lot of advantages:
- Good thermal insulation. The material itself retains heat perfectly, and if the floorboard is also laid on a heat insulator, then such a house will be warm even in frosty weather.
- Good strength characteristics. True, this parameter directly depends on the type of wood used for manufacturing.
- Long service life.
- Low price. Unlike many materials, floorboards are really inexpensive.
- Ecological cleanliness. I think that no one doubts the naturalness of such material. Wood has been used for many centuries to make flooring in the house, and during this time the material has never shown itself to be negative.
However, there are no ideal materials, and wood is no exception. Among the disadvantages it is worth highlighting:
- Low sound insulation properties. The floorboard has a low level of sound insulation, but this deficiency can be corrected if soundproofing underlays are provided when laying the floor.
- It is not recommended to lay lumber in rooms with high humidity.
- Poor abrasion resistance.
- Lumber is susceptible to damage by fungi, and rodents and insects love it.
- Fire hazard.
Floor boards
Production
The production of floorboards is on a grand scale, because the popularity and demand for this material is growing every year. To produce high-quality flooring material, different types of wood are used. At the production stage, logs undergo several stages of processing; knots, branches, and mechanical damage are removed from them.
A large log is cut crosswise and then processed. After this, the blanks are sent to the workshop, where they are cut into individual boards. Of course, the technological process is wider and more complex; we are talking only in general terms about the production of floor coverings.
Lumber shop
Attention! For the manufacture of flooring, it is better to use coniferous wood; this option is attractive both in terms of price and quality. Although it is permissible to use maple or birch wood.
As already mentioned, not every type of wood is suitable for making floorboards. The most valuable species are larch and oak. But linden and poplar are generally not used for this purpose, because they do not have sufficient strength.
Aspen and pine are suitable for floorboards, but these species are not used so often. Although pine produces high-class products.
After the boards are processed, they are sent to the sawmill, then they are fed to a special four-sided machine for the production of floorboards, after which the finished product is again processed and dried.
Wood for lumber productionWood defects
Prices are rising rapidly, and people are looking for different ways to save money, so craftsmen are making floorboards at home.
However, in order to produce the material, you need to have a special manufacturing machine; in no case can you save on it, because the service life of the entire floor structure depends on the quality of the final product.
Now we will tell you how to make a floorboard with your own hands, and what you will need for this.
DIY lumber
Before you start home production, you need to purchase a log, preferably rounded or timber. The prepared material will need to be dissolved on the machine so that several blanks are obtained, which will then turn into floor boards. The thickness of one such workpiece must be at least 20 mm.
READ MORE: Do-it-yourself cork floor installation technology, how to install it correctly, video instructions
Material thickness table
So, the material is prepared, but before cutting, it needs to be marked in order to determine the required thickness of the future flooring material.
After such cutting, the workpieces are dried under natural conditions until the wood moisture level is less than 50%. After this, the wood needs to be cut, for this purpose special cutters for floor boards are used. Cut to the desired width and length.
Floorboards are made no more than 2.5 m in length, but their width should be from 150 mm to 200.
The manufactured workpieces are leveled and processed. For the first operation, you can use a plane, and for processing - abrasives.
If defects are noted on the surface, they must be eliminated using special means, and then the area must be sanded. At the last stage, the boards are varnished, of course, if necessary.
If you need to make a tongue-and-groove board, then you will need to mill the edge; for this work, a cutter is used for processing the floorboard.
Installation of tongue and groove boards
Structurally, a tongue and groove board is similar to a regular board, but it has a longitudinal groove on one side and a tongue (tenon) on the other side. Due to these elements, simple installation of a floor from a tongue-and-groove board is ensured: the tongue of the next one is inserted into the groove of the previous board, resulting in a reliable and tight connection.
Grooved boards, unlike edged boards, have a perfectly smooth surface, so additional sanding of the floor made from tongue and groove boards is not required. The underside of the boards is often not treated, but there are always ventilation holes on it that ensure air circulation in the underground space, which significantly extends the service life of the coating.
High-quality laying of a tongue-and-groove floor allows you to assemble a structure without cracks, and such a structure will not creak and wear out, as often happens with a covering made of edged boards. Of course, if you lay wet boards or do not prevent moisture from getting on them, then sooner or later even the highest quality material will rot, so these nuances should be taken into account in advance.
Technology for laying tongue-and-groove floor boards - step-by-step diagram
Step 1: Calculations and cutting of blanks
The first step is to measure the required length of the board. The length should be equal to the width of the wall from which installation begins. You can cut it using a hacksaw.
Step 2: Lay the first row
The first board is tongue-and-groove mounted to the wall. In order for the tree to expand freely in the future, you need to leave a gap of about 1 cm between the wall and the board.
Step 3: Secure the first board
The starting board is secured with self-tapping screws or screw nails through the entire thickness to the joists or subfloor.
Step 4: Lay the second row
The second row already fits into the groove of the first board with a tongue and groove and is secured with screws/nails into the lower part of the groove. Subsequent rows are installed in the same way.
Step 5: Installation of the final row
If the last board does not fit, it can be cut lengthwise with a circular saw. In this case, the cut will be turned towards the wall. It is attached in the same way as the first one through the entire thickness.
Laying tongue and groove boards on the floor: fastening to joists and screed
Tongue and groove floor boards have tongue-and-groove fastenings on the sides, which allow for quick installation and enhance the overall strength of the structure. Fastening can be provided on both sides or on all four. In addition, there are special bevels on the back side that allow air to circulate and prevent rotting of the wood inside the floor.
The floorboard has a long service life and a beautiful appearance, especially if it is coated with varnish, paint or stain. Another advantage is the environmental friendliness of wood. You will certainly appreciate the high quality of such flooring if you have ever seen a finished wooden floor in an old Khrushchev-era building. Ordinary boards dry out quickly after laying, cracks form between them and the floor creaks.