For those who have decided to build a toilet in their country house with their own hands, drawings, dimensions, and sketches are the necessary help that does not allow you to deviate from the chosen technology or build a structure that is not suitable for use. Before proceeding with more precise developments, it is important to choose the type of design of the country toilet, its location and other parameters. They, in turn, depend on operating conditions, which indicates the need for detailed analysis taking into account the future. For example, if there is a possibility that after some time the number of people visiting the dacha will increase, or you plan to equip the house in such a way that you can live in it longer, create a toilet in advance with the expectation of an increase in load, so that you do not have to redo it later .
Material selection
To build a toilet on the street, 3 types of materials are used:
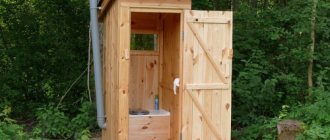
- Wood is a traditional construction raw material that has become popular due to its low price and ease of processing. Depending on the desired characteristics of the building, various types of material are used: block house, lining, timber, log house, boards. A wooden toilet is often designed in the shape of a hut or house, turning it into a decorative element. The downside of the material is its low resistance to moisture and rot, which is why it needs to be additionally treated with an antiseptic, water-repellent paints, and varnish.
- Brick is a building material with high strength and reliability, low thermal conductivity (provides warmth in winter and coolness in summer), and good resistance to external influences. It is more difficult to work with than wood. A brick house must be placed on a foundation, otherwise the structure will not support its own weight and will crack.
- Metal is a modern material with ambiguous characteristics. Rarely used due to the complexity of processing, requiring additional tools and knowledge. It has high thermal conductivity, so for comfort you will need additional thermal insulation of the panels. Due to the flexibility of the sheets, it is difficult to achieve a sealed cabin without sealants.
Most often, outdoor toilets are made of wood. The design is inexpensive, easy to assemble, and requires a minimum of equipment.
Drawings of wooden toilets for a summer residence
In order to make a wooden toilet in the country, at the very beginning you need to create a project drawing. It is necessary in order to calculate as accurately as possible the required amount of building material, clarify the dimensions of the toilet cubicle at the location and determine the sewer drainage scheme (if required).
The plan drawing of the outdoor toilet “Birdhouse” is presented below.
Plan drawing of the outdoor toilet "Izbushka":
Plan drawing of the outdoor toilet "House":
Plan drawing of the outdoor toilet "Shalash":
Interior arrangement
When designing the interior of a structure, it is worth paying attention to hygienic requirements. The finishing of walls and floors must be resistant to moisture, not absorb odors, easy to clean from dirt, and not rot. These properties are found in tiles, varnished boards, laminate, and plaster. They can be combined.
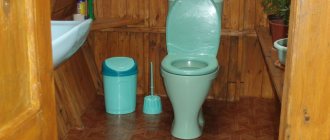
The basis of the toilet is the toilet. The following types of plumbing fixtures are suitable for a country house:
- Plastic. Lightweight (which is important for a house without a foundation), easy to clean, temperature-resistant, medium-strength toilet. An inexpensive option, which is chosen if the dacha is not used often.
- Ceramic. It is heavy and therefore requires additional reinforcement of the floor. Stronger, more durable, but more expensive than plastic. Suitable for permanent use.
- Wood. Cheap, but short-lived option. It is made independently from a box and a separately purchased toilet seat. It is used in garden toilets because it cannot be connected to the sewer system.
For summer cottages, portable toilets are chosen, the installation of which takes a minimum of time and effort. Expensive monolithic sanitary ware with a thermal seat, lighting, automatic flush and other additional functions are purchased only when a private home is the main place of residence of the family.
In addition to the toilet, shelves, toilet paper holders, hooks, and towel racks are installed in the toilet. They are placed on the doors or back wall. You can decorate the house with plants and bunches of herbs - they will add liveliness to the interior and eliminate unpleasant odors.
Projects of superstructures for country toilets
When choosing a suitable project for a country toilet, the selection of material is of particular importance. It is he who largely sets the parameters of the future building. There are several typical options, which will be discussed further.
Brick toilet
The advantages of this material can be listed endlessly. It is resistant to atmospheric influences, retains heat and cool equally well, and is environmentally friendly. Moreover, it allows you to give the structure any shape.
The basis of this project is the foundation. Without it, creating a country toilet out of brick is simply impossible. Separately, it is necessary to mention the quality of the masonry. This is the real art of laying bricks that will last forever. The top of the building is covered with a roof, a material for which in most cases slate is used.
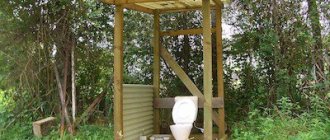
In the picture you see an example of a related project. One design combines a toilet and a shower. This is not only practical, but also allows you to save a lot on the cost of building materials.
Wooden toilet
The project of a wooden country toilet is a classic. Its construction takes a minimum of time, but in order for the structure to serve you faithfully, it is necessary to strictly follow the planned plan during the work process.
The picture shows one of the most popular options among summer residents - a teremok. As you can see, it has a small internal space and small dimensions. This allows you to install it anywhere. It is also worth noting the aesthetic appearance.
Metal toilet
This project option will appeal to those who want to save time and money. During construction, you can use sheets of metal left over from the construction of the house. The only thing you need to take care of is the interior lining. Of course, you can do without it, but in winter it will be very problematic to stay in such a structure.
The main advantage of the project is that there is no need for any knowledge. Almost anyone can build such a country toilet. This is the most cost-effective option you can imagine. The only thing you need to pay attention to is the toilet seat. It is best made of wood to make it comfortable to sit on.
Placement nuances
Features of the placement of the toilet depend on the parameters of the summer cottage. The position of the remaining buildings, the height of groundwater, and the communications scheme play a role. Main sanitary standards:
- In order not to create inconvenience to neighbors, the toilet must be located at least 1 m from the boundaries of the site.
- The otkhodnik or cesspool is located at a distance of 25 m from wells, boreholes and other watershed sources.
- Before construction, it is worth studying the wind rose. The toilet is located in places where air does not rise - this helps to avoid problems with unpleasant odors.
- If the groundwater lies high, the cesspool is sealed. It is worthwhile to provide in advance a convenient way to clean it from waste.
Violation of sanitary requirements leads to accidents, environmental pollution (water, soil, air), and fines from local control authorities. Therefore, they need to be studied before construction begins and taken into account when designing a toilet.
"Shalash"
When groundwater comes close to the surface, the only option for setting up a latrine is a powder closet. There is no cesspool in this toilet, and under the toilet seat there is a container (tank) that needs to be emptied periodically. To prevent odors from the toilet from spreading throughout the entire area, place a reservoir with sawdust, ash or peat next to the toilet seat. After visiting the toilet, feces are “powdered”, and as the container is filled, they are taken out to the compost heap.
For powder closets, hut-shaped booths are often installed. You can make a similar toilet design with your own hands in a couple of days, and the cost of materials, frankly speaking, is inspiring.
The booth is installed in the following order:
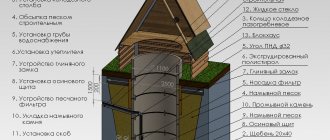
- For the foundation, you can use sand-cement blocks or lay a red brick strip around the perimeter of the hut base. The foundation is covered with roofing felt.
- A drawing of the hut toilet is shown below. The first step is to make the front and back walls of the booth. They are connected to each other with a 100 x 100 mm beam and an edged board, which will act as a roof sheathing. The frame of the toilet seat is assembled from timber and attached to the back wall.
- The inside of the toilet is lined with clapboard. A “spectacle” hole is cut out in the toilet seat flooring. Install the cabin on the foundation.
- The roof can be made of metal tiles or corrugated sheets, screwing it with self-tapping screws to the sheathing boards. The building will look like a real forest hut if the roof is covered with boards 2.0-2.1 meters long, which must be pre-treated with an antiseptic. They are nailed to the sheathing, starting from the bottom edge of the roof, so that each top board overlaps half of the bottom one (overlapping). A shingle roof is made in a similar way.
- The ridge is reinforced with a galvanized sheet, as shown in the drawing of the Teremok toilet. The boards of the toilet seat are sanded, all wooden surfaces are covered with stain and varnish.
The roof in such a cabin reaches almost to the ground, so the walls and floor inside remain dry even in the heaviest rain.
Dimensions of the toilet for the Shalash dacha
Toilet dimensions
The minimum size of the room is 1 x 1 m. If you make the structure smaller, it will be inconvenient for an adult to use the toilet. The minimum height of the building is 2 m. It is calculated taking into account the same reasons.
Usually the structure is stretched in length, achieving dimensions of about 1 x 1.2 m. In the drawings, indentations are left for the thickness of the boards (2-4 cm) on both sides. The rear wall is made 20-80 cm lower than the front wall to install a sloping roof. With these parameters, any adult can use the toilet without discomfort. If you plan to build not a simple latrine, but a country bathroom with all amenities, the dimensions are calculated taking into account the layout.
Country toilet design "Teremok"
The minimum size of a toilet with a sink is 1.6 x 2.2 m. Exceptions are designs in which it is located above or on the cistern. If the bathroom includes a bathtub, the dimensions increase to 2.2 x 2.2 m.
The size of the cesspool depends on the number of users of the latrine. For a family of 2 people, a container with sides of 1.5 x 1.5 m and a depth of 1.2 m is sufficient. For each additional resident, the dimensions increase by 30%. First, the hole is dug deep (until the placement threshold is reached, taking into account groundwater), then it is expanded.
The walls of the sealed drainage basin are at least 15 cm thick. If the soil on the site has high absorbency, it is additionally reinforced with a drainage layer.
Rules for placing a toilet in a summer cottage
A toilet on a summer cottage or on a plot of land in a private residential sector cannot be located close to the water intake. The distance from a regular well should be 50 m, and from a well with casing pipes 30 m. If your site is located in the water protection zone of reservoirs and rivers, then this distance increases to 200 m. In fact, residential areas have an even greater restriction on the location of toilets the buildings. According to Sanpin 42-128-4690-88 “Sanitary Rules for the Maintenance of Populated Areas,” yard latrines should be located away from residential buildings, all kinds of children’s institutions, such as schools, kindergartens and even playgrounds.
The minimum distance is 20 m, but the distance to the toilets, even if they are yard latrines, from children's institutions should be no more than 100 m. But there are some relaxations; for private housing construction, the distance to the latrine is determined by the homeowners themselves and it is allowed to reduce this distance to 8-10 m. Just don’t forget about the neighbors. They may not agree that the distance from your restroom to their house should be less than 30 m. In this case, a commission of local councils will sort out the conflict. How you can come to an agreement is a separate question, but judicial practice shows that the court may well take your side, but, anyway, the minimum distance to the neighbor’s house should not be less than 8 m. which, it should be noted, is not so little , if the neighbor’s house is built in compliance with building codes and regulations, it cannot be located closer than 3 m from the border of the plots, that is, closer than 5 m from the fence for your toilet is a prohibited zone.
Other important restrictions. The depth of the cesspool depends on the groundwater level, but in any case, it should not be more than 3 m. If we remember, in the village, when filling the hole, they simply dug a new one. It is clear that no one has concreted such pits. Today, a cesspool must be waterproof, it’s just that pits are not even provided for by the rules. True, the method by which waterproofness is achieved is not specified, therefore, it could be a metal caisson, concrete rings, etc. You simply cannot move such a pit, so a cesspool with a lid is required. That is, it is assumed that the pit will be cleaned regularly.
In previous articles, I have already considered the issue of for my country house and how. The availability of water at least within walking distance and the choice of a method of waste disposal (including human activity) are tasks that sometimes require complex engineering solutions. And the first stage in meeting these needs, as in any construction activity, is design. That is, drawing up a design scheme that takes into account not only the requirements of users, but also sanitary standards and rules.
Drawings and diagrams
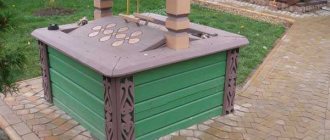
The drawings of country toilets are of the same type. The most commonly used design is the “birdhouse”. The building looks like a rectangular box with no frills. It is integrated into the interior of the yard using external decor, unusual materials, and additional equipment. Traditionally, the “birdhouse” design includes a homemade seat covering the entire width of the building, which simultaneously serves as a stand for the toilet seat and a shelf.
The drawing of a triangular hut building is even simpler. The side walls in it simultaneously play the role of a roof and are covered with a roof, which saves material. The structure must be made of great height, otherwise it will be inconvenient to use. Wide doors of non-standard shape will help decorate the building and make it unusual.
More complex projects in the form of a mansion, hut, carriage, house are used to give the structure greater beauty and fulfill decorative purposes when arranging the yard. They require more materials and are more difficult to manufacture. Non-standard toilets are often combined with a shower, a woodshed (it is mounted on the side wall), a warehouse, a summer kitchen, a garage and other premises.
Features of drawing construction
A country toilet is not such a simple design as many novice builders tend to think. There are a number of features that are important to consider when developing a project and drawing drawings.
Toilet installation rules:
- Dimensions . Consider the size of the restroom interior. The minimum allowable area is 1 x 1 m. If you save money and make the booth smaller, it will be inconvenient to use. Also, special attention should be paid to the choice of a country toilet.
- Height . There is also a height limitation. It is not advisable to build a toilet less than 2 m in height. You will soon get tired of entering it bent over.
- Roof slope . When installing a pitched roof, the rear wall is designed slightly lower than the front. This is done to form the slope of the roof and drain rainwater behind the building.
- Lighting . If you do not plan to install electric lighting, ensure that daylight enters your toilet even when the door is closed. If you don't want to bother with windows, cut at least a small hole in the top of the door.
- Ventilation . The country toilet is a poorly ventilated building. To fix this, a ventilation pipe is run along the back wall.
- Shadow . To keep your country toilet from being stuffy in the summer, place it in a shady place.
- Place on site . Another tip for choosing a construction site: avoid the proximity of a septic tank or cesspool to water intake sources, wells, and boreholes. This is done for sanitary and hygienic reasons.
Country toilet cleaning system
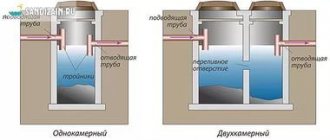
One of the most difficult tasks when building a toilet is installing an autonomous cleaning system. Land owners often do without it, preferring to regularly empty the cesspool and transport the waste to the appropriate delivery point or use a septic tank. But these methods are not optimal because they damage the environment. To avoid this, the following types of water filtration are used:
- Ultrafiltration. Water purification is achieved due to the difference in pressure in two sectors separated by an ultra-thin membrane. The advantages of the method are complete safe water purification with the possibility of reuse, the disadvantages are high costs of money and resources.
- Use of chemicals. Special compounds stimulate ion exchange, thereby purifying water from harmful impurities. The purification is incomplete, and the hardness of the liquid increases, so water filtered in this way cannot be drunk, but can be used for irrigation, cooling or other household needs.
- Electrochemical filtration. The combination of electrical radiation and chemicals effectively cleans the water of foreign substances, causing them to settle at the bottom of the container. The reagents additionally destroy heavy impurities.
- Reverse osmosis. Water passes through a semi-permeable membrane that traps other substances. The liquid is cleared of all substances (harmful and beneficial), which is both an advantage and a disadvantage of the system.
Installing an autonomous waste filtration system is an expensive and labor-intensive undertaking. Typically, owners of several sites agree and purchase common filters. Their advantages include eliminating unpleasant odors, improving the environmental situation, reducing the frequency of emptying cesspools, and reducing water costs due to reuse.
Construction of a country toilet of the Birdhouse type
- four sand-cement blocks 400/200/200 mm;
- 2 m² roofing material;
- two buckets of sand;
- three cut 6-meter boards 100×50 mm;
- one cut 6-meter board 100×25 mm;
- three 6-meter floorboards 90×32 mm;
- forty 3-meter linings with a thickness of 87 mm;
- one 6-meter beam 50×50 mm;
- one corrugated galvanized sheet 1250×2000 mm, 4 mm thick;
- five linear meters of plinth;
- door block 900×2000 mm;
- two hinges for the door;
- two door handles;
- door bolts;
- five linear meters of lining for finishing the door;
- 2 kg of nails 12 cm long;
- 0.5 kg nails 0.7 cm;
- 1.5 kg finishing nails 1 cm;
- corner profiles;
- nine roofing screws, 10 cm long;
- 50 pieces of wood screws 5-7 cm;
- 5 kg texturol;
- 1−2 liters of bitumen varnish.
Stages of installation of a Birdhouse type toilet
The base of the toilet measures on average 1000×1000 mm, and the floor is lined with a thick board of 40 mm . The base and floor from the inside must be treated with an antiseptic, because they will constantly be in an unfavorable environment.
The front wall should have a height of 1.90−2 m, and the rear wall 2.20−2.30 m. The horizontal and vertical of the frame is controlled by a level.
The walls of the house are painted with ordinary oil paint, and the roof is lined with roofing felt or one sheet of corrugated slate.
An inspection hatch is made at the back of the house to clean the cesspool.
The cesspool is dug manually with a height and width of 1.5−2 m. It must be dug at a distance of at least 12 m from the dwelling, 1.5 m from the site and 25−30 m from the well. You can put a layer of crushed stone or brick at the bottom of the cesspool.
The wooden house is placed on foundation pillars (usually a concrete sidewalk curb or sand-cement blocks) installed along each side of the base of the cesspool. Cement blocks are not placed on the ground, but in pre-dug holes so that the block is 20 cm above the ground. Between the concrete base and the wooden flooring you need to lay out several layers of roofing material or a layer of moisture insulator.
is built over the cesspool , which is covered with boards. A hole is cut into the floor for the passage of feces (“hole”).
A small hole in the form of a square, circle or heart is cut out at the top of the door to allow daylight to pass through
In order to eliminate unpleasant odors, you can install improvised ventilation in the toilet. To do this, you can take a regular sewer pipe made of polypropylene or PVC with a diameter of 10 cm and run it vertically through the hole in the podium and roof of the toilet. The entry and exit points of the pipe are carefully sealed. The pipe should rise 15-20 cm above the toilet roof. To enhance traction, a deflector is placed on the end of the pipe.
The inside of the house can be covered with foam sheets, roofing felt, or clapboard. If possible, the outside of the house can be covered with siding.
With cesspool
A standard, easy-to-build and install toilet for a summer residence is a house with a toilet, the waste from which goes directly into a cesspool dug under the structure. Installed exclusively outdoors. Areas with a groundwater level no higher than 3.5 m are suitable for construction, otherwise human waste products will inevitably end up in the environment. It is not recommended to dig a hole in shale rocks or in soils with natural cracks.
The depth of the otkhodnik should be 1 m below the groundwater level. The value should be taken into account based on indicators obtained in the spring, when ice and snow melt. The walls and bottom of the pit are insulated with rot-resistant material - rubble, brick, concrete, tarred wood. It is important to process all joints to achieve a tight seal. Ventilation is required for this type of toilet, otherwise it will be impossible to use due to a constant unpleasant odor.
The cesspool is covered with a removable lid. For convenient emptying, it is better to place it on the side of the road - this will make it easier for the relevant services to carry out the work of clearing the container of waste.
Let's start construction
Materials and tools
Before starting work, buy lumber in advance.
- To build the frame, purchase timber. Pay attention to its cross-section, the best option is 100 x 100 mm ; to increase the strength of the building, you can buy lumber with a cross-section of 150 x 150 mm.
- To cover the toilet you will need an edged board at least 20 mm thick.
- For roof sheathing, 50×20 mm , and a 40×150 mm .
You can easily replace the cladding board by purchasing OSB boards or sheets of waterproof plywood. If you have chosen OSB, then the slats can be cut from these boards.
You will need the following tools:
- hammer, screws and nails;
- shovel and bucket;
- pliers;
- hammer drill or impact drill;
- brush for applying stain and paint;
- containers for solutions and paint.
How to choose a place
Determine the location where you plan to build the toilet. Its distance from the house and other buildings depends on whether it will have a cesspool, or whether the building will be built without one.
It is not recommended to build a toilet in low-lying areas, as it may flood when the snow melts in the spring. When choosing a place to build, taking into account the wind rose in your area.
Remember that construction should not interfere with neighbors; do not forget to make a 1 meter retreat from the fence. The door should open towards your yard. When digging a cesspool, leave access roads for the sewer truck.
Pit toilet
Most restrictions apply to the construction of cesspools. They must be properly insulated to prevent environmental pollution.
- The cesspool should be located 25 m from the water source . This could be a well, borehole or pond. The rule also applies to water sources located in neighboring areas.
- From the cesspool to the basement or cellar there should be at least 12 m, to the bathhouse or house - 8 m . At least 4 m away from buildings where animals are kept . Pay attention not only to the location of buildings on your site, but also on your neighbor’s. This will help avoid conflict situations.
Before starting construction, you need to choose the internal structure of the toilet. The building can be with or without a cesspool.
If groundwater comes close to the surface, being above 3.5 m from the surface, you can only build without a pit. Otherwise, waste products will be found in the water.
If groundwater comes close to the surface, being above 3.5 m from the surface, you can only build without a pit.
Similar restrictions are imposed on buildings built on shale rocks and in areas with natural cracks. Consider the water level in the spring when the snow melts. The lowest point of the cesspool should be 1 m above the maximum water level in spring.
If the groundwater is deep, then any type of garden toilet can be made on the site. The optimal volume of the pit is 1.5 cubic meters; it can be located under the building or to the side of it.
The cesspool can be:
- round shape;
- square shape.
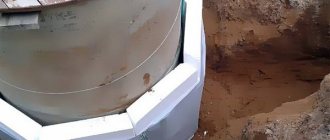
In the first case, concrete rings are used to arrange it. In addition, the walls can be made of brick and rubble stone to make a toilet for a dacha. But remember that this option will require labor, time and certain financial investments.
- Pay special attention to the tightness of the bottom and walls . At the bottom they make a castle from a layer of clay. It is compacted; the layer thickness should be at least 30 cm . If you don’t want to work with clay, the bottom can be filled with concrete.
- Be sure to do bitumen waterproofing .
- to make a hatch inside the toilet , or leave several boards on the floor loose. You can choose a design in which the hatch is located outside the toilet.
- It is recommended to equip the toilet with a ventilation system . When the pit is filled to 2/3 of its volume, the contents should be pumped out.
Detailed instructions for building a tire cesspool:
Options without pit
It is much easier to build a wooden toilet for a summer house without a cesspool. Human waste will be collected in a sealed container.
There are several types of such toilets, but the differences relate only to the method of waste processing.
- In biotoilets this is done by microorganisms, in chemical installations - by special substances.
- In the powder closet, the waste is sprinkled with powder, which can be peat, sawdust or ash.
We are building a house
When the work on arranging the cesspool is completed, you can proceed to the construction of the foundation.
It must be sustainable, and its reliability matters. These are the main points to pay attention to.
If the region often experiences windy weather, it is better to use metal pipes as the base. They must be buried in the ground, and the beams must be installed inside. This way the structure will be further strengthened.
If the region often experiences windy weather, it is better to use metal pipes as the base.
The frame is made of wooden beams. For the base, buy lumber of a larger cross-section, and for the load-bearing elements you can choose thinner bars. To construct the door opening, take a 100×100 mm beam.
- First, saddle the base , connecting the beams with nails. To make it easier to work, the bars can be pre-fastened with thin strips. Reinforce the base with stiffeners. For this purpose, use lumber with a smaller cross-section. It is very good if the frame and stiffeners are one whole.
- , make a sheathing at the top of the frame . The crush can be covered with slate; you will need one sheet. In order to fix it, fill the strips on the facade and back of the booth. Attach the beams to the bottom of the frame; they will become the basis for the floor. After this, you can proceed to the construction of walls. Cover them with boards, this is the best option. In addition, chipboard or plywood sheets can be used.
- Make a door . After attaching the awnings, install it in the opening.
- Cover the roof with slate or other material.
- If you wish, you can paint the toilet .
Without cesspool
Pitless toilets vary in type. The simplest of them is a sealed can installed under the toilet. It contains waste, which is then manually taken to the landfill. The disadvantage of this option is that it fills quickly, which means you have to change containers very often. Advantages: no negative impact on the environment, ease of installation and cleaning.
In addition to the simple option, there are 3 types of modern solutions for a summer residence:
- composters;
- septic tanks;
- purchased biosystems, such as a peat toilet.
Latrines without a cesspool are becoming increasingly popular. They are easy to install, located in any convenient place, and do not depend on the characteristics of the soil and groundwater.
Recommendations for the volume and design of the cesspool
- If the area of the adjacent area does not allow the toilet to be moved away from the house, then a latrine is installed near the blank wall of the building, away from the terraces and windows. In order to pump out sewage, there must be a free entrance (approach) to the rear wall of the structure.
- How big should the cesspool be? It is believed that on average one person produces up to 600 liters of urine and feces per year. Family of 4 people – 2400 l or 2.4 m3. A pit with a volume of 4-5 cubic meters is enough to meet the needs of a small family.
- The bottom and walls of the cesspool must be concreted (the walls can be made of brick, rubble, or logs), and then carefully plastered from the inside. The bottom of the pit is made at a slope (minimum 15o) so that urine and feces flow towards the hatch, as shown in the picture of a backlash closet with a Birdhouse type booth.
Autonomous sewerage
If the country house is used as permanent housing, a good solution would be to install an autonomous sewer system. It is connected to indoor and outdoor toilets, showers, sinks, bathtubs, washing machines and dishwashers. A personal waste treatment system allows you to get rid of the inconvenience associated with installing a toilet in your country house.
Installing a complex system of pipes, containers and filters is an impossible task for one person, for which they turn to professional companies. There are many offers on the market - from simple and relatively inexpensive systems designed for seasonal use, to large-scale projects that are not inferior to public installations.
How to put a wooden toilet in place
In this chapter we will talk about how to build a toilet, the drawing of which is given below. We present complete instructions for its construction:
Assembly drawing
Frame drawing
Drawings of frame parts
- Set the foundation . For this purpose, it is not necessary to pour a concrete base; it is enough to dig concrete wall blocks or pillars around the perimeter of the building.
- Make a frame from a wooden beam 50x50 mm or 80x80 mm . In the same capacity, you can use profile metal pipes. The frame must have four vertical supports.
- Longitudinal elements are installed as roof lining , protruding at least 30 cm beyond the perimeter of the house.
Sanding the floor
We cut and knock down the beams
Fastening the seam with a pin We advise Building a toilet in the country: step-by-step instructions for constructing a toilet of the Birdhouse and Hut type
Fastening the floor with a bracket
Nailing the block house
Fastening the door frame with a pin
- To strap the base, fasten four strips at the level of the toilet seat . At the same time, be sure to take into account your height for the convenience of using the toilet. Typically, the height of the toilet seat is set no more than 40 cm from the finished floor.
- Next, install the jibs diagonally along the rear and side walls.
Diagonal spacers
- To install the door, add two vertical supports no more than 190 cm high, connected at the top by a jumper.
- Cover the frame with wooden boards , corrugated sheets, slate, etc.
- Make a door on the back wall for easy emptying of the waste container. You can make a cutout along the entire width of the wall to the height of the toilet seat, securing it with loops.
- When covering the roof, seal it with roofing felt or other moisture barrier if using wooden boards. Still, it is better to use slate or sheet metal.
Stuffing the sheathing
Fixing ondulin
- If necessary , install a ventilation pipe by cutting a hole in the toilet seat and roof. Be sure to seal all cracks.
- Hang the door . Don't forget to equip it with a latch or hook. Make a window in the door for natural light.
Veil
Window
The restroom is ready
Handle and bolt
Lavatory side view
Rear view of restroom
Don't forget to paint the toilet to protect it from the elements. If you are installing a metal frame, then it is covered with a protective layer before sheathing it.
Backlash closet
A backlash closet is a type of toilet connected to a sealed cesspool. The waste tank is located behind the foundation, to which it is connected directly or through an inclined pipe. It is equipped with a hatch through which it is convenient to clear waste. The bottom of the container is tilted towards the lid so that waste accumulates next to it
Backlash-closet diagram
Unlike a traditional house with a cesspool, a backlash closet can be installed inside the house. This eliminates the need to additionally insulate the structure. This type of toilet is suitable for permanent use in houses without a sewer connection and is built without the possibility of further movement.
Types of toilets
The easiest way to build a toilet for a summer house with your own hands is a wooden one - drawings of such structures are not difficult to find, and in some cases, step-by-step instructions without illustrations are sufficient. However, a beautiful and reliable house is not enough to ensure comfort. It is important to take care of waste disposal. From this point of view, there are several options for a country toilet.
Backlash closet
The backlash closet is designed in such a way that waste from the toilet moves by gravity, collecting in the receiver, which is cleaned as it is filled. Typically, the movement of waste is facilitated by the inclined floor of the tank, which has a shape that expands in the direction from the toilet. The advantage of this design is the ability to install a toilet in a warm room in the house without building a full-fledged sewer system , and move the tank outside to avoid odor. The part of the backlash closet located outside is equipped with a lid through which cleaning is carried out using a sewer machine. To ensure thermal insulation, it is made hermetically sealed and multi-layered (for example, made of metal and wood with a “layer” of thermal insulation material). The disadvantage of a backlash closet is that it is built into a load-bearing wall, which means that its arrangement is best done during the construction of the house.
The photo shows a diagram of the backlash toilet
Powder closet
The powder closet has a storage tank in which waste alternates with layers of backfill (“powdered”). Sawdust, peat, ash or a mixture of these components are used as such backfill. Backfilling is performed after each visit to the toilet. For purchased models, a special distributor is responsible for the distribution of the bulk mixture. Homemade ones use a regular bucket or other container with a scoop, which is installed in the toilet.
The advantages of the powder closet are:
- the ability to use the contents of the country toilet storage tank to obtain organic, safe fertilizer (for this, when the tank is filled, it is unloaded into a compost pit for ripening),
- solving the disposal issue (no need to call a sewer truck),
- minimum excavation work (they will only be required to construct the foundation of the building, the tank is placed on the surface),
- the possibility of constructing compact portable toilet models that can be brought into the house (for example, based on a regular bucket).
Drawing of a wooden powder closet with dimensions according to the “hut” type
Drawing of a country toilet like a powder-closet made of corrugated board, “birdhouse” type
Dry toilet
Dry toilets are structures in which waste is processed . During the decomposition process, the contents of the tanks turn into sludge that is uniform in consistency, safe, takes up less space (and therefore requires less frequent emptying of the tank) and is convenient for pumping. In order to ensure the decomposition reaction, factory dry toilets use fillers, which can be:
- peat mixture
- chemically active reagents,
- biological products (dry or in liquid form), which are colonies of bacteria of a certain type.
Water closet
A water closet is a toilet that uses a stream of water to flush away sewage. This is installed in almost every city apartment. The system works due to the drain tank. It is included in the original composition of the toilet or is connected to it separately, attached directly to a piece of plumbing or an adjacent wall.
You can add a water closet to any type of toilet in your summer cottage. It will help maintain hygiene and fight unpleasant odors. The tank cannot be used in outdoor toilets in winter - the water will freeze, causing the device to crack and become unusable.
Why a toilet hut
First, we want to explain why we are considering a hut-type country toilet. The thing is that such an unusual design has some advantages over its traditional “competitors”. Let's see the positive sides:
- The peculiarity of the design is that when creating it, you do not need to bother with the construction of the roof, securing it and designing it in such a way that it does not leak. In our case, the roof of the toilet is the side walls themselves. This is clearly visible in the photo.
- You can build a toilet hut with your own hands much faster. The thing is that the structure has fewer structural elements.
- The buildings themselves are quite unusual and original. It's safe to say that your neighbors don't have such a toilet. You will be able to stand out.
- The toilet door will not be triangular in any way. This is an ordinary square door, without truncated corners or other problems.
- In winter, you will not have problems with precipitation accumulation on the roof. The snow will come off the toilet, because its slope is quite large.
- The size of the garden toilet may vary. To get the desired result, you can adjust the angle of the vertex of the resulting triangle.
- The material that will be used to build the toilet is wood, mainly beams. Their processing is quite simple.
As you can see, we have counted as many as 7 advantages that a hut toilet has. They are talking about actually starting to build just such a structure. However, there were some downsides. Almost half of them:
- it's all about appearance. Although it is original, it is not always practical. The design may be radically different from other buildings on the site, not fitting into the landscape;
- since the shape is triangular, useful space is lost with height;
- if you do not have materials of the required length (which is quite large), then building a toilet in the country will be more difficult.
You have all the data to compare the pros and cons. This will help you decide whether it is worth building such toilets on the site. If yes, then let's look at the drawing of a hut-type country toilet and the technology for its creation.
Selecting a site for building a hut toilet
The construction of any building begins with choosing a suitable location. This is even more important for the toilet. It is not for nothing that there are different norms and rules, compliance with which is not just a formality, but the key to your comfortable stay. One of the basic rules is to create conditions in which the contact of waste with groundwater will be minimal.
But these are not all the requirements that require your attention. Let's look at the full list of criteria to ensure that your structure is built correctly in all respects:
- If there is a water area nearby (river, lake, well), then the distance allowed for building a toilet is at least 30 m. In the case where the location of the reservoir is lower than the future location for the toilet, it is recommended to change the location or build below the water source .
- If there is a basement, cellar or other similar structures on the site, you need to maintain a distance of 15 m.
- As for residential buildings, the optimal distance is considered to be from 8 m.
- If you have pets at your dacha, then you need to retreat 5 m from their “settlements”.
- Vegetable gardens, flower beds, beds and other plantings, which can often be found on a summer cottage, also do not like such a neighborhood. The minimum distance of the toilet from them is 1 m.
- Finally, consider the wind direction in your area. This is important so that you do not cause discomfort to your neighbors or listen to complaints from them. It is not recommended to build a toilet hut close to the fence.
Note!
Before starting construction of a toilet, it is important to find out the location of groundwater. It is allowed to build a building if the water level is 2.5 m underground or more. Otherwise, you will have to replace the cesspool with a septic tank, a backlash closet or a powder closet. If you take these rules and recommendations into account, then from an environmental point of view the constructed structure will not affect the external environment in any way. Everyone will be happy - you, the plants, your neighbors, and even your pets. Have you found such a suitable place? Then we begin the construction of the hut toilet.
Stage 1 - we make a cesspool and the foundation of the hut toilet
The basis of the “thinking room” is a cesspool. It is she who will take the main “blow”. The frequency of cleaning depends on its size. It is recommended to perform cleaning not when the pit is filled to the brim, but when the amount of sewage in the toilet has reached 70%.
In fact, such work cannot be called difficult. It is labor intensive and requires some time. You can do this yourself using a shovel, or hire heavy equipment. But for a small country house, your own efforts will be enough. The recommended dimensions of the hole are 2x2x2 m. Mark the area and start digging. Use a tape measure and a plumb line to control the size and evenness of the hole.
When the pit is ready, it is better to strengthen its walls. They will become our foundation on which the ground hut will rest. Strengthening occurs through boards, concrete rings or bricks. Before work, boards must be soaked with an antiseptic.
Advice! When arranging the bottom, you can make it inclined towards the rear of the structure. Then the contents will fall towards the hatch designed to clean the pit. Do not forget that you need to make a hole for the toilet, ventilation and pumping out waste.
Stage 2 - toilet extension
From groundwork we smoothly move on to the process of building the frame itself. Country toilet hut, drawings and dimensions will be provided. After all, half of all success depends on them. The superstructure itself can be of several types: hut, hut, birdhouse or house. In our case, this is the first option. In the photo you can see exactly how such a design is made.
Thanks to the drawings you will not make mistakes. Next, make sure you have the right material. The raw material for construction will be wood, namely boards. They are easy to work with and practical. To work with it you cannot do without:
- saws;
- plane;
- tape measure and pencil;
- nails and a hammer (an alternative is self-tapping screws and a screwdriver).
Here are step-by-step instructions for creating a frame from above:
- To protect the foundation, lay waterproofing material on top of it. Ruberoid will be just right. Lay it in 2-3 layers.
- Begin assembling the hut toilet floor. Ideally, use 50x50 mm beams and a 40 mm board. Don't forget to make a technological hole in the frame. Recommended diameter 30 cm or more.
- Now you can assemble the front and back walls of the structure. Thanks to these visual drawings, you can quickly repeat what you saw. And the dimensions will help you in your work. The photo shows the back wall of the hut toilet.
- Create walls on a separate surface. It is better to use timber, but a 50 mm board is considered an alternative. The photo below shows the front wall of the hut toilet.
- When the two parts are completely ready, you can fix them to the bottom of the structure.
- Now it's time to create the sheathing on the side walls, which will serve as the roof. If you are planning to install roofing material, then the lathing can be an unedged 20 mm board.
- In fact, all the most difficult things are left behind. Now it's down to the details. All you have to do is finish the hut, namely, install the door, create a ridge, line the walls with clapboard and lay down the roofing material. The work is not difficult, but it will take a little time.
And to protect your wooden fortress, the finished structure must be treated with an antiseptic. You can even buy special wood paint for exterior use and make your toilet hut even more beautiful.
Advice! We do not recommend that you use metal roofing materials (such as corrugated sheets, metal tiles, etc.), as it will be incredibly hot inside in the summer. The metal heats up well and retains heat for a long time. And this is very bad for the toilet.
That's all. Construction is complete. The structure is ready for use. You can be the first to use it in action. Watch a video on how to create a structure with your own hands.
Dry toilet
Biotoilets refer to environmentally friendly portable cabins. They are used by those who rarely visit their summer cottage. The structures are small in size, lightweight, and have minimal sanitary requirements for installation. There are 3 types of dry toilets:
- Composters. They consist of the plumbing item itself and a reservoir with a biologically active substance. By interacting with it, human waste is exposed to beneficial microorganisms and over time turns into a safe organic fertilizer. Such designs are characterized by low frequency of unloading, independence from water supply and sewerage, hygiene and environmental friendliness. An example of them is a peat toilet for a summer house.
- Chemical toilets. They are similar to composters, but instead of recycling backfill they contain special neutralizing substances. They eliminate unpleasant odor and rot, but the mixture remains dangerous and toxic, so it cannot be used as a fertilizer.
- Electric toilets. Equipped with a dryer and compressor to mix the waste and bring it to a solid form. From it, substances enter the combustion chamber, where they turn into ash in 40-70 minutes. The tank complies with environmental requirements, but requires power supply and is difficult to operate safely, so it is rarely used.
Dry toilets can be placed indoors or outdoors. Their advantages are the absence of unpleasant odors, environmental hazards, and decomposition processes.
Options for constructing a toilet in the country
So that you have an overall picture of toilets for summer cottages, we recommend that you familiarize yourself with the designs that you can create with your own hands. There are many methods of construction, they depend entirely on the design itself. Here is a list of the most popular toilet options for a summer residence:
- Powder closet.
- Classic toilet with a cesspool.
- Dry toilet and chemical toilet.
- Backlash closet.
What does each one represent? The simplest and most common is a simple pit toilet. It is ideal for dachas, since the device requires little money and material, and the design itself is simple. You just need to dig a cesspool, strengthen it and build a superstructure. An example of such a toilet is visible in the photo.
As for backlash closets, they have a sealed pit where the waste goes. The tank itself can be different, differ in design and size and is located away from the structure. Disposal of waste from it is quite simple, as with a cesspool. You need to hire a sewer truck that will pump everything out from the inside. Alternatively, do it yourself. In the photo you will see this type of design.
A powder closet is a kind of container that is located directly under the saddle. No cesspool is needed, and the tank itself is quite small. It also needs to be cleaned as it fills. A special feature is that after use, additional means of disposal are crushed. We are talking about sprinkling sewage with peat. This option for a dacha can be called one of the cheapest, but the cleansing process itself causes trouble. Powder closet in the photo.
Ideal in terms of cleanliness, convenience and creation is a chemical or dry toilet. All you need to do is buy it and install it in its place. The advantage of such designs is that it does not need to be cleaned. And there is no unpleasant smell. The thing is that waste is broken down by special bacteria. The only negative is the price. But, if you can afford it, then it is better to go with this option.
But what if you have a limited budget and cannot afford such “benefits of civilization”? You can create a toilet with your own hands. The ideal one in this regard is a toilet with a cesspool. As for the superstructure, the hut toilet looks pretty good. Why is he so good? Let's find out.
Exhaust ventilation
Ventilation or exhaust is needed in any toilet, but it is especially critical in structures with cesspools. Constant air movement effectively eliminates unpleasant odors, prevents stagnation, and promotes the proliferation of beneficial bacteria that process harmful substances.
Exhaust ventilation system for country toilet
A simple way to ventilate a toilet in a country house with your own hands is to install a plastic pipe. It is mounted on the rear wall of the structure with bolts or brackets. The lower part is immersed in a cesspool to a depth of 10 cm, the upper part is positioned so that the end rises 20-30 cm above the roof. The diameter of the pipe must be at least 10 cm to ensure proper air movement speed. If there is not enough draft, a deflector is placed on top of the ventilation duct.
Choosing material for a country toilet
Most often, wooden toilet structures are installed in suburban areas. This is explained by the simplicity of their construction, availability and low cost of the material. However, even wood treated with antiseptics rots and collapses over time, so such toilets are very short-lived. If the drawing of a country toilet was made by an amateur, then this process can go even faster in the event of an incorrect design of the base floor or errors in the arrangement of the roof.
The most durable is considered a brick toilet , which is quite easy to build with your own hands; you don’t have to look for drawings. It is important to correctly mark the base, build a foundation and maintain the verticality of the walls. This is the only way to hope for sufficient strength of the structure.
Tree
Brick
Foam blocks
Metal
Plastic We advise Sewer pipe slope: features and SNiPs. Calculation and measurement of slope
No less reliable is a metal country toilet , the drawings and dimensions of which are not a problem in the age of information technology. But to build it you will need a welding machine and the ability to handle it. Despite this, such designs are very simple to manufacture, so they are successfully used in many dachas.
Lighting in the country toilet
Lighting in a free-standing toilet can be arranged in 4 ways:
- Window installation. It is mounted at the top of the wall to maintain user privacy. It illuminates the room only during the day.
- Connection to the general electrical network. Wiring a cable to the toilet is an easy task for knowledgeable people. If this option is not available, use a portable outlet. A lamp is connected to it, which is mounted on the wall or ceiling.
- Battery-powered lamps. Equipped with replaceable power sources from which they receive electricity. They do not require construction work, but they do require constant replacement of batteries, which is inconvenient.
- Lighting using an autonomous solar battery. Expensive and elite option. It is used to provide energy to utility units or entire areas.
Lights with motion sensors are good for toilets - they will help save energy while eliminating the inconvenience of searching for a switch. The downside of the devices is the price.
Roof
The roof on the toilet is installed at an angle. Its edge hangs over the walls, which prevents water from entering and rotting. The cutting of the boards is done in advance before installing the covering. It is not difficult to install it on a building - flat, single-slope, gable options without joists for fastening are used.
The simplest option for installing a roof is to use a sheet of corrugated sheets or slate. Metal, wood, bitumen, steel, and decorative tiles are also suitable. When choosing a material, it is worth taking into account the weather conditions of the region and additionally treating it with protective compounds, sealing it, and insulating it depending on them.
What we will work with - the choice of building materials
Once the decision on the type of toilet structure has been made, you need to select the material that will be used in construction. The choice of building material is important even at the stage of drawing development. Most often used:
- tree;
- brick;
- metal.
These are familiar materials for summer residents, which almost everyone knows how to handle.
Simple wooden toilet - fast and reliable
When it comes to country house construction, the first thing that comes to mind is all kinds of buildings made of wood. Boards and beams made from inexpensive, but quite strong and durable coniferous wood are easy to obtain, and the work does not require complex equipment. In extreme cases, you can work with wood even without the use of power tools.
Depending on how you design your toilet, you can build completely different restrooms from the same drawing. One of the options is to decorate the walls with a block house or clapboard
If you want to make a toilet not just practical and functional, but also a full-fledged decorative element at your dacha, try building it from a log house. It will take a lot longer, but the result is worth it.
A country toilet is not the most favorable environment. Wood can rot and collapse if it is not treated with special means. Impregnation with an antiseptic is a mandatory condition when constructing a latrine from lumber.
Capital option - toilet made of bricks
The advantages of brick buildings over wooden ones are known to everyone from the fairy tale about the three little pigs. In addition to strength, a brick toilet has low thermal conductivity, which is important if you go to the country in the cold season. A brick country toilet looks like a house with a single or gable roof. Windows can be designed.
It is not necessary to use ordinary brick. More modern block materials such as foam concrete, cinder block, aerated concrete will be an excellent alternative
The design of such a toilet includes not only a drawing of the above-ground part of the toilet, but also the foundation. In this case, it will not be possible to do without a foundation, since the dead weight of the brick building is quite large. Without support, the soil will soon become compacted and sag, which will cause cracks in the walls of the toilet.
An option for everyone - a metal toilet
Metal is a material with a high thermal conductivity coefficient. A toilet made of metal sheets will be unbearably hot in the summer and very cold in the winter. Without the use of thermal insulation materials, an iron toilet in a country house can only be a temporary project - until the construction of the main toilet.
Most often, corrugated sheets are used, sewn onto a metal profile frame. In this embodiment, a profiled sheet of metal is used. Polycarbonate roof on a metal frame
It is difficult to achieve tightness at the joints of such a thin and flexible material. There will be cracks in the corners through which the wind will blow through the house, which also does not add comfort.
If you apply modern technologies and use sandwich panels as wall materials, you can get a completely comfortable restroom. Polystyrene foam or mineral wool is used as insulation.
Frame base
You can build a toilet frame with or without a foundation. In the first case, preference is given to columnar structures and monolithic concrete blocks. They are treated with roofing felt to insulate them from moisture, and then laid in 2-3 layers. Then the floor covering is installed - boards or plates with a width of 10-15 cm and a length corresponding to the size of the future building. The construction of the floor is completed by placing a technological hole at the place where the rear wall of the structure will be.
The finished flooring is treated with antiseptic agents. It is important to ensure that the coating is saturated on all sides.
Birdhouse
A birdhouse is one of the simplest types of country toilet with a pitched roof, which will allow you to save on materials, but greatly reduce the comfort of use. The ease of manufacture results in a rather shaky design and easy wind blowability. Such a country toilet is usually used as a summer option, but in the case of heavy rainfall the walls may allow moisture to pass through. One of the few advantages is the ability to place a pressure tank on the roof.
12 drawings of a country toilet of the Birdhouse type
Frame assembly
The frame is installed on the resulting base. The exact step-by-step assembly instructions depend on the selected house model. First of all, the load-bearing supports are attached, then the beams for the roof and the tie for the toilet seat (if needed). Then they begin to install diagonal fasteners. Next comes the installation of the front and rear walls, lathing the sides.
Country toilet frame
Then the roof is installed, the toilet and communications are installed, and ventilation is carried out. The last step is to install the door. Before work, repeat measurements are taken to ensure that the house is tightly closed. In a small toilet, the doorway must open outwards, otherwise it will become difficult to use the latrine. After assembling the frame, shelves, a toilet paper holder, latches and other fittings are installed in the room.
Construction of a country toilet of the Shalash type
- four sand-cement blocks 400×200×200 mm;
- 2 m² roofing material;
- four sq. m. glassine;
- two buckets of sand;
- one cut 4-meter board 100×50 mm;
- one cut 6-meter board 100×25 mm;
- three 6-meter floorboards 90×32 mm;
- forty 3-meter linings with a thickness of 87 mm;
- seven 6-meter bars 50x50 mm;
- two corrugated galvanized sheets 1250×2000 mm, 4 mm thick;
- one sheet of smooth galvanized steel 1000/2000 mm, 4 mm thick;
- five linear meters of plinth;
- door block 900×2000 mm;
- two hinges for the door;
- two door handles;
- door bolts;
- five linear meters of platband or lining for finishing the door;
- 2 kg of nails 12 cm long;
- 0.5 kg nails 0.7 cm;
- 1.5 kg finishing nails 1 cm;
- corner profiles;
- nine roofing screws, 10 cm long;
- 50 pieces of wood screws 5-7 cm;
- 5 kg texturol;
- 1−2 liters of bitumen varnish.
Stages of installation of a Shalash toilet
A cesspool is dug We dig holes on the sides of the cesspool, pour a 10 cm layer of sand and install concrete blocks or a sidewalk curb at a distance of at least 1 m from each other.
We check with a level that the blocks form a clear square. two layers of roofing material on the blocks A 1000×1000 mm floor is knocked together from an edged board, and a floorboard floor is laid on top of it. the entire floor structure with an antiseptic. We lay the flooring on the roofing felt.
Separately, according to the sketch, we knock together the front and back walls of the toilet on the ground and
cover them with clapboard from the inside.
The front and rear walls are installed on the floor and secured with technological boards.
A sheathing board is sewn on which is also lined with glassine.
from boards 1.7-1.8 m and 1 m wide, which is installed on the back and front walls.
The roof is covered with galvanized corrugated sheets, which are secured with self-tapping screws. The ridge is also installed and secured with self-tapping screws.
Hinges, handles, a turntable, and a hook are attached to the door. The doorway is decorated with platband.
A technological hole is cut in the floor above the cesspool or cylinder for feces.
Source
Frame covering
Before sheathing begins, the material is measured and marked. Grooves are cut at the joints to avoid problems with tightness. Laying begins from the edges of the side walls. It is recommended to decorate them with long panels, and the back and front with short panels. Suitable materials for cladding:
- wooden boards;
- siding;
- plastic panels;
- drywall;
- metal;
- sandwich panels.
Sheathing helps to decorate the appearance, give the structure strength, stability, and durability. You should not save on it by installing an outdoor toilet in an area with unfavorable climatic conditions.
A country toilet is a good solution for private houses without a sewer connection. A variety of types of such structures - from a simple house with a cesspool to complex biological systems and bathrooms with independent sewerage - will allow you to choose an option depending on the budget, frequency of use, soil characteristics and other factors.
Features of toilet construction
So, you have found a suitable toilet design for your dacha and figured out its features. After this you can get to work.
The instructions for building a toilet with a cesspool are as follows:
- First of all, you need to choose a place for the toilet, which should be located no closer than 25 m from the water source. Sometimes it is impossible to fulfill this condition, in which case a sealed container is used as a dacha cesspool.
- Then you need to dig a hole with your own hands. It can be located strictly under the booth or occupy a large area.
- You can use tires to line the walls of the pit. Another common option is to install a special plastic container, which is reinforced with metal ribs.
- After installing the container, you need to fill it up and compact the soil around it well.
- The next step is to install a columnar foundation, which is located at the corners of the base of the frame. The foundation can be made of blocks or bricks. To do this, you need to dig holes the size of the blocks to a depth of about 30 cm and fill the bottom with sand about 10 cm thick, after which you can lay the blocks themselves.
- After the foundation is completed, it must be waterproofed with several layers of roofing felt.
- Then a timber base is installed on the foundation for the country house and further construction is carried out according to the project.
- When the frame of the structure is ready, the outside can be covered with clapboard, block house or siding.
In the photo there is a shelf with a toilet seat
- After the booth is installed, it is necessary to install a shelf in it at a level of 40-50 cm above the floor level. To do this, you need to attach the beam to the frame using corners and screws. You can sheathe the resulting shelf with a planed board, providing a hole.
- Next, according to the size of the hole, you should attach a toilet seat with a lid.
At this point, the construction of the toilet is completed. To make it more comfortable, you can add lighting and install a toilet paper holder.
Advice! If the summer cottage is not connected to power supply, you can use an autonomous generator. Of course, such equipment is quite expensive, but renting a diesel generator for a summer house will help solve the problem.