Is vulcanization possible at home? The question is by no means rhetorical, but one of the most discussed on forums among car and bicycle enthusiasts. Self-repair of rubber products - from a tire to a children's toy - will save time and money, and will give vent to the creativity and ingenuity of a true car enthusiast.
If we talk about “cold” vulcanization, then the materials for this simplest and quickest repair are a must-have in your travel first aid kit.
The essence of the hot vulcanization method is the hardening of the rubber mass under the influence of heat. Knowing what should happen in the end, and having a fair amount of patience, you can repair any camera at home and quite reliably - car, bicycle, football. You will need simple equipment (more on this later) and a piece of raw rubber (patch), previously soaked in gasoline.
“Home” vulcanization technology
A piece of raw rubber (from auto tube rubber) should be slightly smaller than the size of the patch. The tire at the point of damage is sanded (with a reserve) - this will improve the adhesion of the materials, and then cleaned with gasoline. The edges of the patch must be rounded (cutting off the end of the patch at an angle of 45 degrees), then also treated with sandpaper and degreased with gasoline (B-70 or Galosh). Then you should cover the damaged area with a paw, place it under a press and heat until hardened.
The most popular component of a home “vulcanizer” is the old one (a good Soviet one is the best option), using an electric stove with an open ceramic spiral. The main task facing the master is to create a reliable clamp connection in a home vulcanizing press.
Advice from the “experienced”
- Before applying the prepared patch to the cut site, lubricate it with glue. It is easy to prepare at home by dissolving raw rubber in gasoline.
- Get ready to gradually master this process. A very important point is maintaining the temperature regime. When the optimal temperature is exceeded, a characteristic smell of burnt rubber appears - your patch is “sintered”. If the patch does not merge with the cut, it means the vulcanization temperature was insufficient or the process was completed early.
- If the iron's thermostat works (this happens), you need to set the temperature to 140 degrees (or the designation for silk). This temperature regime prevents overheating of the patch and the product itself.
- To prevent the rubber from sticking to the metal during the vulcanization process, it is enough to lay a piece of paper.
- If water comes into contact with the vulcanizer and it boils, it’s time to turn it off. After waiting a little more, the vulcanizer can be removed, allowing the rubber to cool. Sugar is also used: if grains of granulated sugar begin to caramelize upon contact with the surface of the vulcanizer, the vulcanizer must be turned off.
- The product to be repaired is placed on a hot vulcanizer plate (heated iron) with the damaged area downward and kept for the technologically required time (10-15 minutes). After one or two ruined tires, everything will become clear and home vulcanization can be safely put on stream.
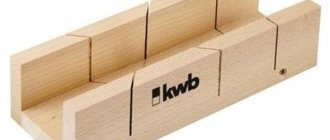
For cuts with a complex configuration, it makes sense to make a more complex mold from two sheets of steel 6-10 mm thick. The plates are tightened with screws using holes drilled in the corners.
When doing self-repair, there is a high probability of damage to the cord thread, which can lead to protrusion (herniation) of the rubber during operation. In addition, the wheel will be unbalanced; eliminating the imbalance at home is hardly possible. When the car is moving, such a wheel will make life very difficult for the driver.
Only a completely intact wheel can provide a 100% guarantee of safe driving. Therefore, it’s worth saving up and buying new tires.
Types of rubber
Rubber is one of the few materials that has different hardness. Depending on the percentage of sulfur, it is:
- soft – contains up to 3% sulfur;
- semi-solid – from 4 to 30% sulfur;
- hard – more than 30%.
Rubber is a natural material, and as a rule, products made from natural ingredients are of the highest quality and most durable. Therefore, components for bicycle and car wheels are made of soft rubber, which is based on rubber.
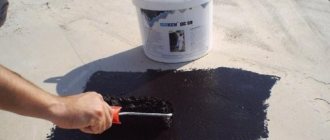
Technology of coating a car body with liquid rubber
To paint a car with liquid rubber you will need the following materials and equipment:
- Liquid rubber (thick, in cans);
- Liquid rubber solvent;
- Masking tape, polyethylene, cardboard (to protect non-painted areas of the body);
- Sprayer and compressor, or a regular electric spray gun;
- Knife for removing excess coating residue.
Painting a car with liquid rubber occurs in three stages:
- Preparing the machine for applying rubber coating.
- Preparing paint and sprayer.
- Applying liquid rubber to a car.
Let's look at each stage of painting a car with rubber paint in detail, and just below everything will be shown in detail in the video instructions .
Preparing a car for painting with liquid rubber
Before painting a car with liquid rubber, the car must be thoroughly washed and dried (our instructions: how to properly wash a car), after which the surface to be painted should be degreased, and traces of dirt, wax and other substances and protective coatings must be removed from it.
Next, all areas that are not subject to painting must be protected from contact with liquid rubber:
- Radiator grilles, bumpers, air intakes, etc. covered with cardboard or sealed with masking tape;
- The headlights and taillights do not need to be covered, since after drying the liquid rubber can be easily removed from them in one whole piece;
- It is better to remove the mounting frames for state license plates altogether;
- Cover the rubber glass seals with masking tape, and it is better to cover the glass with plastic film;
- Don't forget to also cover the wheels if you don't want to paint them to match the car's color.
If you are going to paint the wheel rims, then take care of reliable protection from rubber paint getting on the elements of the brake system and the brake discs in particular.
Despite the fact that it is possible to paint a car with liquid rubber without prior disassembly, we still strongly recommend removing and painting separately such elements as door handles, spoilers, deflectors, etc.
Preparing liquid rubber and spray for painting
Since the starting material of liquid rubber is very thick, in order to obtain an even layer of paint on the surface of the car body, it must be diluted to the desired consistency with a special solvent recommended by the liquid rubber manufacturer.
Depending on the manufacturer, liquid rubber can be diluted with solvent in proportions 1:1 (PlastiDip) or 1:2 (RubberPaint). In any case, read the manufacturer's instructions and recommendations, which are printed on each can of liquid rubber.
Pour diluted rubber paint into the sprayer through a standard mesh filter. This is done so that during the painting process, coarse particles do not prevent the paint from being sprayed evenly.
It is best to fill the sprayer with the prepared liquid rubber solution half or 2/3 of the volume. Do not fill the paint to the brim.
After filling the sprayer with liquid rubber, it must be adjusted correctly. To do this, you need to set the minimum paint supply and test it on any convenient surface. By increasing or decreasing the feed, achieve an even layer of paint without smudges.
Applying liquid rubber to a car
When applying liquid rubber, always strictly adhere to the manufacturer's instructions and recommendations. Also, do not forget to protect your respiratory system; work should be performed in a respirator and in a well-ventilated area.
- The temperature in the room where painting is carried out must be at least +18 °C. Also avoid drafts and direct sunlight.
- The sprayer should be kept at a distance of 13-16 cm perpendicular to the surface to be painted. The paint should be applied smoothly (without sudden movements) in 2-3 layers. And don’t try to paint the entire surface of the car at once.
- The first layer should be very thin, so that subsequent layers will adhere firmly to the car. Pay special attention to ends, curves and edges. And you shouldn’t worry about the fact that the first layer did not paint the surface evenly or completely; 50% transparency is the norm!
- After applying each layer of liquid rubber, let them dry for at least 10-15 minutes.
- The second layer of liquid rubber is applied similarly to the first, only more slowly and carefully. After applying it, the transparency of the rubber coating will be somewhere around 70%, and stripes and transitions will still be visible through it.
- After the second layer has dried, you can begin applying the third, fourth, etc. The number of layers will depend on the desired result: the more saturated the color you want, the more layers of rubber paint will be required.
- So that your car can be easily freed from liquid rubber over time, manufacturers recommend applying at least 10-12 layers to the car body.
- After applying all layers, the coating must be dried for at least an hour.
- When the material dries, you can carefully remove the masking tape and liquid rubber from those parts on which it should not be (headlights, locks, etc.). Until the rubber paint has completely dried, it can be removed very easily.
- The liquid rubber will finally harden only after 12-24 hours, and it is better to leave the car in the box while it dries.
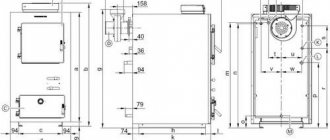
Electrical vulcanization of rubber
In general, vulcanization can be cold or hot. The electrical vulcanization process is a hot method. An electric stove with a ceramic heater is used as a heater at home; a hair dryer or a regular iron is also suitable. The optimal temperature for this method is 145C o. To determine the temperature, you can also use available means, for example, if a sheet of paper begins to char, it means that the temperature has reached the required values.
Electrical vulcanization of rubber
There are also special clamps with a heating element. Such devices can operate from a 220V household network, from a car battery, through a cigarette lighter socket, or from their own battery. It all depends on the performance of each device. These clamps are easy to use; you need to attach a rubber patch to the camera, clamp it and plug it into the network.
Raw Rubber Components
Natural and synthetic rubber, when heated to 50 degrees, turns into a soft mass that mixes well with other components:
- gray;
- gas soot;
- sand (silicon dioxide);
- oils;
- resins;
- dyes;
- softeners;
- accelerators.
The composition of the components varies and depends on the qualities that the resulting raw rubber must have. Sulfur is part of molecular compounds, and the hardness of rubber depends on it. Accelerators reduce vulcanization time. Soot and oil impart plasticity to the finished product. Sand and other organic substances make it harder, reduce abrasion, and increase tearing force.
Sulfur vulcanization of rubber
After rubber vulcanization
This operation consists of a chemical reaction in which sulfur atoms are added to the rubber. When added up to 5%, it produces raw materials for the manufacture of tubes and tires. In the case of gluing two elements, sulfur helps connect the rubber molecules, forming a so-called bridge. This procedure refers to the hot method, but it is unlikely that it will be possible to do it on a hike or on the highway.
Hot vulcanization
Rubber, as a raw material, has the property of being welded into a single composition at a temperature of 150 °C. As a result of this process, the rubber becomes rubber and cannot return to its original position. Thanks to its capabilities, rubber can fix any punctures and cuts in the tube and tire.
It is necessary to vulcanize rubber using a hot method, only using a press. The depth and area of the cut will tell you how long to weld. Typically, it takes 4 minutes of cooking to repair a 1mm cut. Accordingly, if the cut is 4mm, then it needs to be vulcanized for 16 minutes. In this case, the equipment must be warmed up and configured.
By performing hot vulcanization at temperatures above 150C o, you can ruin the rubber and achieve nothing, since the material will deteriorate and lose its characteristics.
Using clamps or a press allows you to properly patch the damage. After finishing the work, you should make sure that there are no voids or air bubbles in the seam. If there are any, you need to clean the puncture site from fresh rubber and repeat the whole process again.
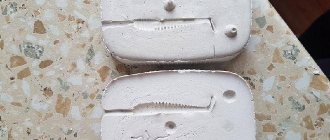
In order to hot seal a camera at home, you must do the following. From raw rubber, you need to cut a piece slightly smaller than the patch itself. The tube or tire is cleaned slightly wider at the damaged area, to a rough state, and then degreased with gasoline. When preparing the patch, you need to cut the chamfer at an angle of 45°, also sand and degrease. Then we cover the puncture site with a patch, clamp it in a vice and heat it to the desired temperature.
If you dissolve raw rubber in gasoline, you can get a special glue for rubber, the use of which improves the quality of the seam. Particular attention should be paid to temperature conditions. Vulcanization is carried out at a temperature of 140 - 150 ° C; if there is a smell of burnt rubber, it means the patch has overheated, and if it has not merged with the overall product, then it may not have reached the required temperature. To prevent rubber from sticking to metal, you need to place paper between them.
Main Product Components
Natural or artificial rubber is the central component of the raw rubber plate. During production, it is simply heated to the required temperature, that is, the state when it becomes as soft as possible, and mixed with the rest of the ingredients.
What is added to raw rubber? There are several types of substances that give rubber the properties it has. This:
- Accelerators or catalysts. These include zinc oxide, which is responsible for the speed with which the mixed ingredients are transformed into the finished product;
- Antioxidants and softeners that affect the scorching process, or simply the aging of rubber. They are needed so that the rubber mixture does not lose its elasticity and, that is, remains flexible, pliable and springy for as long as possible.
- Strength enhancers, which include chalk and soot. Such ingredients increase durability and strength, and also significantly reduce the cost of the product, because they reduce the amount of the main component - natural rubber. However, this does not affect the quality, so the addition of various plasticizers is only welcomed by customers.
In general, there are no complaints about the quality of such products: raw rubber is produced in accordance with all norms and rules and is considered a worthwhile purchase if it is necessary to regularly repair paths and more.
Cold vulcanization
Nowadays, using this method is not difficult, since you can purchase a repair kit in every auto or bicycle parts store. The contents of this set may vary, but each one contains patches and special glue.
Cold vulcanization of rubber
The repair procedure in this case is similar to the hot method. You also need to treat the damaged surface with an abrasive, remove rubber dust and degrease. After drying, apply glue to the camera and glue the patch. In this case, it is not the duration of the pressure that plays a role, but its strength. Therefore, it will not be enough to simply press down with a stone; more force is required.
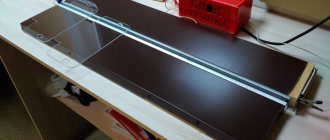
Making a vulcanization device
Each vulcanizer has two main elements - a heating part and a clamping device. The basis of such rubber processing equipment can be used:
- iron;
- “bazaar” electric stove;
- piston from the engine.
In a device with an iron, the heating part is the surface that is used for ironing in everyday life. If we plan to use an electric stove, then the heating coil should be covered with a metal sheet, and when working, you need to place paper between the rubber and the metal. Such a device must be equipped with a thermostat to avoid overheating of the material.
The pressing part of the vulcanizer is easiest to make from a clamp. The simplest device to manufacture would be a device consisting of an iron and a clamp. Since they are both metal, joining them using arc welding is not difficult. The iron also has a thermostat.
A piston vulcanizer also uses a metal plate. A rubber bladder is placed on it. The piston, with its smooth part, which is in contact with the explosive mixture in the engine, presses down the patch using a homemade clamp. Paper is also placed between the piston and the patch. After that, gasoline is poured into the piston and ignited.
Such a device made from a piston is especially useful on the road, when there is no way to connect to the electrical network. However, such a device does not have a thermostat, and the temperature will have to be controlled manually.
Pros and cons of vulcanization
The main advantage of the tire repair process is that it is cheaper to repair than to buy a new one. However, each situation is individual, so it is important to determine whether repairs will save the situation.
The cold method is quite easy to use, it will not take much time, and the costs will be minimal. The main disadvantage of this method is the unreliability of gluing. This procedure is temporary, and you should contact a service station as soon as possible.
Hot vulcanization reliably welds rubber, allows such work to be carried out at any temperature and has a low cost.
So, you can repair a tube or tire in different ways, but it is better to entrust this work to specialists, because it is for your own safety.
If you find an error, please select a piece of text and press Ctrl+Enter.
There are several ways to repair a puncture or cut in a bicycle tube, one of which is hot or cold vulcanization of the tires. This method can be confidently called reliable and durable; a wheel secured with raw rubber will serve like new and will not go flat at the most unexpected moment. You can easily carry out such repairs yourself, both at home and outdoors on a hike, if you have some necessary parts. The hot vulcanization method differs from the cold method only in how the patch applied to the wheel is fixed - with or without heating.
What is vulcanization? This is a chemical process due to which, with the expenditure of heat, the strength properties of rubber improve, it becomes elastic and hard. You can apply a patch to a puncture using a piece of an old tube or a ready-made patch from a repair kit, and to secure them you need raw rubber with your own hands, which is sold in rolls with a protective film. This is a very plastic material, it sticks to any surface, easily sticks together into a lump, etc. raw rubber instructions for use are indicated on the packaging.
- There are two types of vulcanization - cold and hot, let's look at both of them in more detail.
Homemade raw rubber production
Rubber, especially artificial rubber, requires a lot of effort to knead. A person does not have enough strength to knead it with his hands like dough. A special device is made for this. Mixing with additives is a labor-intensive and time-consuming process. Substances with different dispersion, specific gravity and physical state must be converted into a homogeneous mass.
You prepare raw rubber yourself in a machine with screw shafts. The screw protrusions grind everything that is put into the container and mix it. The production speed depends on the number of shafts. He is usually alone at home, and it takes a lot of time to bring the mixture to the desired state.
For molding into sheets and strips, two shafts are sufficient, one of which moves, changing the size of the gap, and therefore the thickness of the finished raw rubber. The mass is placed in a storage tank and goes to molding. When deformed, it cools down and loses its ability to flow, becoming tensile.
Equipment for a home workshop can be purchased at a store or made independently. Take the equipment available in the kitchen as samples. The engine will fit from a broken washing machine or any other machine. Automotive belts and pulleys.
Application of cold vulcanization
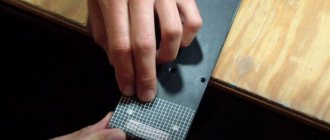
The material for such repairs appeared back in 1939 in the USA, almost immediately began to be successfully used and is popular among cyclists and motorists around the world to this day. With its help, you can easily and hassle-free repair any camera; the cold method is very easy to use at home. For the convenience of consumers, some manufacturers offer ready-made repair kits (cold wet rubber, instructions for use are indicated on the packaging), which include several patches of various sizes in the form of a patch, sandpaper, which is used to clean a puncture site or scratch on the rubber. , as well as a special quick-drying adhesive for cold vulcanization. It is this that reacts with the layer of raw rubber on the patch - it is applied in bright color around black. This causes a vulcanization process, making the rubber of the chamber easily glued together without heat (i.e. cold process). This method is best suited for repairing wheels on the go, when there are no more tools at hand. You won't find a single cyclist who hasn't been helped out by a kit like this at least once in his life. It does not take up much space in a bag or backpack, and its importance is difficult to overestimate, especially if you are alone on a trip without friends far from the city. The entire process of repairing a tire using cold vulcanization using a patch for the inner tube will take the cyclist no more than ten minutes, and the wheel will be like new.
Hot repair of tire surface damage:
- Rubber is cut into strips 1–2 cm wide.
- The material is heated to 50 - 55°C to facilitate pressing.
- The vulcanization process is carried out in a vulcanizer at a temperature of 149°C and a pressure of 3 kg/cm2. The holding time is determined at the rate of 10 minutes. into strips 3 mm thick.
If the pressure is insufficient, the rubber will have a porous structure. Hot melt adhesive is used to connect the material to the tire. A two-component mixture of 858 A and B with increased hardness is used to repair damage to rubber on the sides of cars using cold vulcanization to restore the tightness of the seating areas on the rim.
Do-it-yourself hot vulcanization technology for tires
This technology is used a little longer than cold technology. At a time when there were not so many tire shops around, car and bicycle enthusiasts repaired their vehicles in the garage using exactly this method, which uses an electric or gasoline vulcanizer, which can be easily assembled with your own hands. The technology here is as follows: the master burns gasoline, which warms up the rubber using a piston. As soon as the temperature rises to 90 degrees, the raw rubber for vulcanization begins to strengthen; if you raise the temperature to 147 degrees, the process goes noticeably faster and with better quality. But it’s better not to raise it above 150, because... the material begins to deteriorate and loses its properties. After 160 degrees, raw rubber begins to char. The ideal warm-up time for hot vulcanization of raw rubber is about 8-10 minutes. A fragment of material is applied to the puncture site on the camera and compressed using a clamp so that during the chemical reaction bubbles do not form and air does not collect, forming dangerous voids.
In field conditions, it is much more difficult to carry out such an operation for cameras, but it is still possible: if there is a piece of raw rubber, you can heat it over a fire. You can determine the temperature of the flame by looking at a piece of sugar or a piece of paper: both begin to melt/char at a temperature of 145 degrees – exactly what is required for vulcanization. You can use a flat heavy stone, a wooden log or any other suitable object as a clamp.
The entire operation will take you about 20 minutes. Do not forget that the area where the inner tube patch is glued must be cleaned with sandpaper or at least wiped with gasoline to remove dirt from the tire.
Reversing the rubber compound
During the vulcanization process, it is necessary to adhere to the specified time and temperature; when working with some materials, exceeding them can lead to reversion. It consists in the secondary disintegration of cross-links, manifested by the viscosity and plasticity of the material. To prevent such a mistake, it is necessary to pay close attention to the parameters of raw rubber. At the beginning of the development of the tire industry, specialists involved in tire repair had to independently select the composition of the rubber mixture, taking into account the type of tire and the type of damage.
Cement for vulcanization and its application
Another alternative option for repairing bicycle wheels while traveling is a can of cement vulcanizer. You can buy them, for example, at the car market - this material is very popular among car enthusiasts. The composition is sold in tin and aerosol cans under pressure from brands such as Abro, BL, Zefal, Top RAD and many others. In terms of their composition, they are not hazardous to health and are not toxic, because... they do not contain chloride and aromatic hydrocarbons, so they can be used freely both at home and outdoors without a protective mask. In order for tire cementation to occur, a temperature of 18 degrees Celsius is required. The composition is also used for hot vulcanization (150 degrees required). To repair, you need to remove the foreign object that caused the puncture from the rubber of the inner tube, fill the inner tube with a cement vulcanizer through the nipple, slightly inflate it with a pump and ride a bicycle for 2-3 kilometers to adjust the pressure in the wheels. This tire repair technology is simple and is also used everywhere. To consolidate the result, it is possible to use a patch of plaster followed by the hot vulcanization method - exactly the same as described in the instructions above. The technology is suitable for any tire cuts. In this case, the patch for repairing the tubes is applied before filling the tire with cement.
What is liquid rubber?
Liquid rubber for cars is an innovative coating for protecting the paintwork (abbreviated paintwork) of a car, and changing its appearance and style. In essence, liquid rubber is a rubber-based paint that can be applied directly to the car body, or to individual body elements or rims.
Painting a car with liquid rubber allows you to achieve high protective, shockproof and anti-slip properties of the surface of the painted elements. This coating is highly waterproof and elastic, it is resistant to temperature changes and ultraviolet radiation, and if necessary, it can be easily removed.
Rubber paint can have either a matte or glossy texture. At the same time, it does not have a very wide palette of colors, but by mixing the available ones, you can achieve many different shades.
Liquid rubber also comes in the following types:
- Metallic,
- Neon,
- Chameleon,
- Nacre,
- Transparent,
- Thermal.
Thermal rubber paint has the property of changing color with changes in body temperature and ambient temperature.
Liquid rubber compounds for cars are widely represented on the Russian market under the following brands:
- Plasti Dip (USA);
- Rubber Paint (Russia-China);
- Dip Team (Russia).
The products of the first two manufacturers are especially popular among car enthusiasts. In addition, Rubber Paint liquid rubber already has positive reviews, probably no less than Plasti Dip, despite the fact that it costs less.
You can buy liquid rubber for cars in small aerosol cans with a sprayer, or in canisters (for application with a spray gun). Naturally, spray paint will cost more, but to paint body parts or wheels you won’t need a lot of liquid rubber (see consumption tables below). Moreover, even an inexperienced car enthusiast can use the can.