How to repair a bumper by hand is possible, but it’s better not to
- Let's start with the most famous and controversial method - soldering a brass mesh into a fracture. The essence of the repair is to use a powerful soldering iron to heat the mesh until it is immersed in the molten plastic. The method really allows you to hold together cracked pieces of the bumper, and you will be able to meet dozens of craftsmen who “have been doing this for 100 years and no one has complained yet,” but this technology has a number of disadvantages: metal, brass plates and plastic have different temperature expansion coefficients, so the repair area is not a monolithic structure;
- metal corrosion. Brass has very good resistance to rust, but often damaged parts are soldered or screwed into metal parts, which begin to corrode over time. The process occurs especially quickly if individual fragments of soldered metal parts remain openly sticking out from the inside of the element. Rust will penetrate inside in a relatively short time, thereby compromising the strength of the connection, and can even cause a defect in the paintwork (paintwork) on the outside of the bumper;
- loss of elasticity with a large repair area. In the cold, long cracks after soldering the mesh plates become oak, which is why even a slight deformation of the bumper can lead to new cracks.
How to glue ABS plastic with your own hands: instructions
ABS plastic polymer is quite resistant to shock and mechanical stress. The material is elastic, but sometimes products made from it still break. The polymer manufacturing process is complex and labor-intensive. To produce one ton of raw materials, you will need special equipment, a large amount of raw materials, and the use of certain technologies.
At the same time, global production of the material increases annually. This is not surprising - high-quality polymer is considered the most advantageous for use in the production of tableware, office equipment and electrical appliances. In addition, in every home there are products made from this plastic material.
Thus, the polymer is formed by combining styrene, butadiene and acrylonitrile. All these elements undergo emulsion polymerization. Most often, the polymer is produced in the form of granules or individual sheets. Granular material is a raw material for the manufacture of various products. It is used to make household items and equipment components. And sheet plastic is used in the construction industry as finishing.
Instructions. DIY soldering of plastic using brass mesh
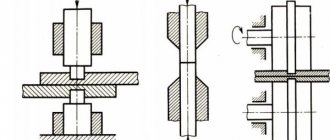
For repairs, you will need a soldering iron with at least 40 W (preferably 60 or 100 W). Prepare pieces of brass mesh of such a size that, after soldering, there is about 2 cm of overlap to the sides of the crack. You need to solder the mesh on the inside of the bumper.
If the bumper is split or a large missing piece needs to be soldered, secure the parts with plastic ties or metal plates before starting soldering.
Drill holes along the perimeter of the fault in increments of 2-3 cm through which you can stretch the ties. The plates are fastened with bolts and nuts using the same principle.
After tacking in several fragments and reliably connecting the screed sections, the plates should be removed in order to properly solder the fracture site. If the broken pieces are small, grab them from the outside with a heated soldering iron (the tip must be recessed to half the thickness of the bumper).
Soldering points must be cleared of old paintwork. After tacking, be sure to reinforce the structure from the inside with mesh or epoxy and fiberglass. To reinforce the mesh, use a heated soldering iron to press it down approximately to the middle of the thickness of the plastic. On the front side, try to leave the surface as smooth as possible, since you most likely do not have an orbital sander, and it is difficult to sand the plastic by hand.
Do-it-yourself plastic restoration using fiberglass
For DIY repairs, you can buy a kit for repairing plastic bumpers, which includes:
- polyester resin;
- hardener;
- a small piece of fiberglass fabric.
- Fiberglass can be used as a replacement for brass mesh to reinforce the inside of the bumper. Using fiberglass, it will be possible to restore the missing elements of the part, holes for parking sensors, etc. Without the use of fiberglass, it is almost impossible to repair tuning bumpers, the construction of which uses polyurethane foam or fiberglass.
Technology
The repair instructions are based on the example of the Novol Plus 710 Repair box.
- Clean the repair area from dirt and bitumen stains.
- Using abrasive P80-P120, sand. Sanding removes the outer layer of plastic and thereby increases resin adhesion. The old paintwork is polished with the same abrasives if work is carried out on the outside of the bumper.
- Cut the glass mat so that the finished pieces protrude beyond the crack by at least 2-3 cm.
- Degrease with a clean rag soaked in 646 solvent.
- In a separate container, prepare a polyester mixture (2-3 g of hardener per 100 g of resin). At a temperature of 20C you have 10-15 minutes to work with the finished mixture, so you need to knead it in small portions.
- Using a brush, apply epoxy to a small area of the repair area and lay glass mat on it. Using a brush soaked in the adhesive, press the fiberglass fabric evenly and expel all air bubbles.
- Applying more than 3 layers of fiberglass at a time prevents the bottom layer from drying out quickly. We recommend observing intervals between layers of drying (approximately 10-15 minutes at 20? C). Full polymerization occurs in 50-60 minutes, after which the section can be polished with abrasive materials.
Some subtleties
Retail fiberglass is classified in grams per m2. The coarser the fiberglass, the lower the grams/m2. For the final layers of the front component of the bumper, it is best to use glass mat (600-700 g/m2), since it is the easiest to process in preparation for painting. On the outside, try to apply the resin and lay the fiberglass mat as evenly as possible by hand to reduce the amount of sanding required later in preparation for painting. For initial processing by hand, use P80-P120 sandpaper. To level the surface of the bumper, plastic putty is applied to the repair area.
The putty is polished with abrasives P120, P240, P320.
An acrylic primer is applied to the prepared and degreased surface in several layers. Before painting, primed areas are sanded with P320, P600 abrasives.
This preparation method is universal and is suitable both for fiberglass repairs and for preparing the front side after soldering the bumper with electrodes.
Types of plastic with weldability characteristics
The joining method is chosen in accordance with the type of polymer and its characteristics.
They are distinguished by high weldability:
- Polyethylene. Products made from such plastic are joined by melting the edges, which are then combined under pressure to prevent deformation.
- Polypropylene. The material is used in the production of pipes, which are connected using a 1500 W electric soldering iron. By increasing the temperature at the junction, the 2 elements are tightly fastened. The properties of the material help to obtain a seam that does not allow moisture to pass through.
- Polyvinyl chloride (PVC). Plastic does not deform when heated. The welded joint is strong and uniform.
Polypropylene is a synthetic thermoplastic non-polar polymer.
The following polymers have medium or low weldability:
- Polystyrene. The polymer is used in the manufacture of dishes, toys, and household items. Parts made from this polymer have rather poor weldability and require careful preparation.
- Polyvinyl chloride. It is not recommended to use hot methods when comparing elements from such a polymer. This is explained by the possibility of edge deformation, which impairs the quality of the seam. Cold methods are more effective.
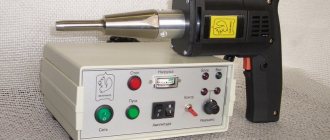
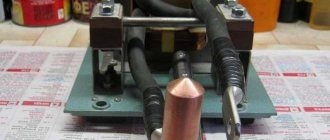
DIY tool for welding bumpers with electrodes
The technology of welding plastic parts currently makes it possible to achieve excellent quality repairs at home. For repairs you will need:
- soldering station or heat gun with a special nozzle for soldering car bumpers. A professional soldering station complete with a soldering iron will cost about $100, but a soldering iron can be purchased separately. The only drawback of construction hair dryers is that the soldering attachments lead to overheating of the heating element and rapid failure of the hair dryer. If you plan to repair bumpers and other plastic elements, then purchasing a soldering station will be the best solution.
- Electrodes. Unfortunately, the cost of ready-made twigs for soldering is quite high. Therefore, it is better to make them yourself from available materials. Only compatible types of plastic can be used as electrodes. Most car bumpers are made of polypropylene alloys (PP, PP-EDM) or ABS. Without much difficulty, a similar type of plastic can be found among headlight housings and fender liners, of which there are a great many in the landfills of garage cooperatives and body repair stations. It is most convenient to use an engraving machine to sand and clean the repair area.
Repair technology
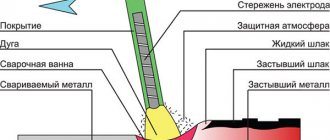
Each type of plastic has a threshold melting temperature, significantly exceeding which leads to loss of elasticity and strength. How to weld a bumper yourself:
- sand the old paintwork at the repair point with P80-P120 abrasive;
- to form a strong Y-shaped seam, the crack walls need to be slightly expanded;
- Observing the temperature regime, first heat the plastic and then the electrode itself. When laid correctly, the descending rod should be preceded by a ball of molten plastic.
- For reliable welding, it is important that the area where the electrode is placed is also heated.
- Following the technology, place the electrodes not only along the crack, but also at several points across the fault line.
Hot welding methods and necessary equipment
The following tools are used to connect plastic elements by heating:
- manual units that produce a stream of hot air;
- extruders;
- devices for joining sheet polymers;
- automatic welding units.
A plastic welding hairdryer can be used to join any thermoplastics.
To choose the right thermoplastic welding tool, you need to study the operating principles, advantages and disadvantages of each device.
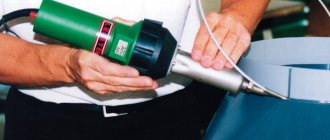
Handheld hair dryer or gun
Together with such equipment, a consumable material is used - a rod, which is placed between the elements to be connected. After this, the seam is heated with a construction hairdryer. The device resembles a household appliance used for drying and styling hair. The temperature and power of an industrial hair dryer are higher. Thanks to this, the edges of the elements being welded are melted, forming a homogeneous mass. As it hardens, it holds the parts together.
The temperature of the air stream is adjusted automatically or manually. The kit includes attachments that help connect plastic elements end-to-end or overlapping. The nozzle configuration is selected depending on the type of plastic, the thickness of the parts, and the experience of the welder.
Household hair dryers are used to perform routine operations. Industrial options are designed for laying polymer pipelines.
Extruder
The device is similar to a gun, at the end of which there is a nozzle for fixing a filler rod or tube.
An extruder is a machine for continuous processing of polymer raw materials.
The operating principle is based on:
- heating the consumable to a semi-liquid consistency;
- removing mass to the junction of parts;
- solidification of the melt followed by the formation of a seam.
Using an extruder, you can weld elements of any thickness in one pass. The performance of the device is higher than that of a hair dryer. The main disadvantage is the inability to weld products made from different types of plastic. This is due to the difference in melting temperatures. Before starting work, the edges of the parts are cleaned of traces of dirt and grease that can impair the quality of the seam.
contact welding
The equipment produces short-term heat pulses applied in combination with pressure. The devices are used at production sites where welded polymer sheets are produced.
How to determine the type of plastic without markings
- take a glass of cold tap water,
- cut a small piece of your plastic, about 1 centimeter in size, a couple of millimeters thick,
- clean this piece so that it is free of dust and oils,
- dip a piece into a glass: if the plastic floats easily on the surface, it is most likely thermoplastic labeled PE, PP, PP+EPDM ;
- If a piece has sunk, try to set it on fire; if it burns, most likely it is thermoset, marked PUR/TPUR , if it does NOT burn,
- most likely it is PC