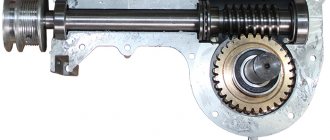
Snowblower gearbox design
The mechanism is based on a snow blower gear, which is produced using soft metals or, in cheaper models of snow blowers, plastic. The use of softer metals in the manufacture of gears is explained by the fact that in the event of an unexpected jamming of the auger mechanism, the snow blower motor will not be subject to mechanical damage.
The snow blower auger mechanism itself is attached to the surface of the shaft using several shear bolts, which play the role of primary protection for the snow blower motor. In the event of an emergency repair of the machine, the bolts are cut off, which makes it possible to protect the motor of the snow blower being used.
The gear of the snow blower gearbox and all other parts are located inside the protective housing of the unit. In the case of household snow blowers, the gear housing is made from a selected silicon alloy and aluminum components. In this case, the housing structure consists of two parts that are connected to each other with bolts. Gearboxes of professional snow blowers are equipped with a solid cast iron housing.
Gearbox design - studying the mechanism from the inside
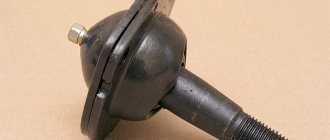
The main element of the mechanism is the gear of the snow blower gearbox, made mainly of soft metals.
Basically, bronze is used for this. The use of soft metals is explained by the fact that if the auger jams, the engine will not be damaged. The screws are fixed to the shaft using shear bolts, which act as the initial protection of the mechanism. If emergency repairs are necessary, the bolts must be cut off to protect the snow blower motor. If this does not help, the gearbox of the unit will take the brunt of the blow.
All elements of the gearbox are placed in its housing. If the snow removal unit is used for domestic purposes, the unit body is made of an alloy of aluminum and silicon. In this design, the gearbox housing consists of two parts connected by bolts. In professional equipment, the gearbox housing is made primarily of cast iron.
Depending on the scope of application, the snow blower gearbox can be large or small in size. In large units, the gearbox gear for a snow blower will also have quite large dimensions.
Classification of snow plow gearboxes
All modern snow blowers are equipped with mainly two types of gearboxes. These include:
- serviceable gearboxes - these types of mechanisms make it possible to disassemble for the purpose of preventive maintenance or repair. These gearboxes are characterized by increased reliability and long service life. The elements of these mechanisms are made mainly of bronze, which is why their wear is significantly reduced;
- maintenance-free gearboxes - these mechanisms do not need to be maintained and cannot be repaired. If such a gearbox breaks down, it must be dismantled and a new mechanism must be installed in its place.
Mechanisms for snow blowers of the second type are included in less expensive models, mainly made in China and Korea. Their service life under intensive load is, as a rule, 60–100 hours of operation.
Typical snow blower gearbox failures
Serviced mechanisms are deservedly considered the most reliable and durable. However, they are not always able to withstand long-term intensive use under high loads. There are a number of standard gearbox failures that owners of commercial snowplows most often regularly encounter.
These include:
- sudden appearance of sharp knocking sounds in the mechanism body - the cause of this malfunction most likely lies in wear of the bearings. Often knocking noises appear because the worm gear has begun to wear out. Replacing the bearings or worm gear will help solve the problem;
- rapid heating of the unit - if the gearbox begins to heat up intensely, this indicates wear of the built-in factory bearings. Another reason is the lack or loss of properties of the lubricant. To repair a faulty mechanism, you need to completely disassemble and inspect the bearings. If necessary, they need to be replaced and oil added;
- the appearance of strong vibration inside the gearbox - this sign indicates a violation of the axis on which the engine and the snow blower shaft are located. To eliminate the malfunction, you will need to adjust the alignment of the elements;
- leakage of lubricant from the housing - this problem manifests itself when the standard drainage hole located inside the vent is severely clogged. To repair a snow blower, the vent will need to be thoroughly rinsed with clean gasoline. After this, the operator must wipe it with a dry cloth;
- wear of one or more gears - any of the parts on which defects have formed will need to be replaced. In this case, new components must have the same dimensions as the spare parts that have become unusable.
Another typical breakdown of a built-in serviceable gearbox is wear of the shaft on which the gears and bearings are mounted. This happens as a result of operating the snow blower under constantly high loads. The essence of the breakdown itself lies in the formation of burrs and abrasions on the shaft walls, due to which the gears begin to slip when moving. Complete replacement of the shaft will help you fix the problem yourself.
How to remove the gearbox on a snow blower - step-by-step algorithm
Dismantling and disassembling the snow blower gearbox is required in cases where the owner of the machine needs to repair the mechanism or replace the lubricant in it.
The disassembly procedure is as follows:
- First of all, place the snow blower in a stationary position;
- Then unscrew the bolts and carefully remove the casing that protects the belts and drive cable of the snow blower auger mechanism;
- Unscrew the bolts located behind the snail;
- Carefully remove the auger belt from the gear pulley;
- Remove the screws that secure the auger shaft;
- Turn the “snail” until it clicks and pull out the screw mechanism along with the impeller installed in it;
- Remove the shear bolts and disassemble the shaft;
- Next, disassemble the snow blower gearbox. To do this, hold one of the shaft components motionless in a vice and unscrew the 6 bolts that secure both components of the gearbox housing. After this, tap the mechanism body lightly with a hammer. At the end, the gear for the snow blower and other elements of the assembly are removed from the gearbox.
After completing all of the above steps, you can repair and replace faulty gearbox elements.
How to make a snow blower from a trimmer with your own hands?
Immediately before assembling a household machine, the manufacturer must prepare all the materials and equipment required for the work. Tools for assembling the unit will require a drill, an electric welding machine, as well as a set of screwdrivers and wrenches.
To prevent possible errors during the direct assembly of a homemade machine from a trimmer, the manufacturer must study in advance suitable drawings that will describe in detail the rules for installing parts and how to fix them into the device of a homemade snow blower from a trimmer.
In the future, the diagrams should always be at hand by the manufacturer. This will allow him to observe in time the installation features of one or another element of the machine.
When making a machine from a trimmer, it is very important to follow a certain procedure. The correct work algorithm looks like this:
The correct work algorithm looks like this:
- The operator must first assemble the support frame. The frame for a snow blower is best made from metal pipes welded to each other and reinforced with steel corners. Before welding each corner, the internal holes of the pipes will need to be soldered to prevent snow and dirt from entering the internal cavities. Otherwise, the frame of the snow blower will begin to rust quite quickly. As a result, the finished support frame should be a rectangle with a niche located at the rear of the frame;
- Next, the manufacturer must make the intake bucket. An empty beer barrel or a cylinder in which gas was previously stored is suitable for this. On the side of a horizontally installed barrel or cylinder you will need to draw a rectangle that will deviate from the edges of the container by about 15 cm. The resulting rectangle must be carefully cut out with a grinder. Then the remaining edges need to be cleaned with a file;
- Next, you will need to drill 3 more holes in the same part of the container. As a result, their location should coincide with the holes that are made in the gearbox to securely fix the shield;
- On the side of the container you are using, you will need to cut a square hole with dimensions of 10x10 cm. The hole can be larger, since when the snow blower is operating, the snow being removed will be thrown out of it from the trimmer used;
- After this, you need to move on to manufacturing the rotor. Its assembly is carried out using 4 pre-made rectangular metal blanks with dimensions of 25x10 cm. For more efficient operation of the mechanism, each of the blanks must be shaped like a unique blade. After this, the finished parts will need to be welded to a standard metal trimmer disc in the shape of a cross;
- A homemade snow blower made from a trimmer must be equipped with a shovel. It is quite easy to make from a piece of tin. The edges of the blade will need to be bent. As a result, the dimensions of the part should be 30x40 cm;
- The finished blade will need to be fixedly fixed in the lower part of the machine from the trimmer;
- After this, you will need to install the gearbox in its regular place in the intake bucket. There is no need to weld it, since the operator should still be able to maintain and repair it. It is best to attach the mechanism body using bolts;
- As a result, the finished gearbox should be installed in the form of a regular knife for a household trimmer.
Lubricant for snow blower gearbox - selection and replacement of the product
Before replacing the lubricant in the gearbox of a snow blower, you should select the right lubricant. The best option in practice is gear oil - due to its consistency, this lubricant quickly penetrates into all holes and grooves and creates a strong protective film on the gear and other elements of the snow blower gearbox.
Under no circumstances should you use Litol and other thick compounds for lubrication. A worm gearbox, which in most cases is equipped with snow blowers, with such a lubricant will not be protected from increased wear, since the product will spread over the holes inside the mechanism for quite a long time. After purchasing the product, you should replace the old lubricant in the snow blower gearbox.
The procedure for this is as follows:
- First, get rid of the old grease in the fitting and on the assembly parts. To do this, it is best to place the elements of the mechanism in a container with gasoline and leave it in it for 1 hour;
- After this, unscrew the fitting and use a syringe to add the required amount of lubricant into it;
- Then screw the fitting back into place and reassemble the gearbox of the snow blower you are using in the reverse order.
In most cases, snow blower manufacturing companies must warn their customers that the required amount of lubricant is missing inside the gearbox. In this regard, it is necessary to pour oil into the mechanism after the first 10 hours of using the snow blower.
First service
Once you buy a car, you don’t need to use it right away. The first step is to service the equipment. To do this, perform the following actions:
- Check and, if necessary, tighten all bolts and nuts;
- Check engine operation;
- Evaluate the operation of the clutch and auger;
- Pay attention to the rotation of the rear wheels, lubricate them if necessary.
Nuts and bolts often become loose, so they need to be tightened periodically. After all, an auger processing snow leads to strong vibrations. If you do not do this, then over time they will completely unscrew. As a result, the fastening of the cleaner parts will weaken. Everything becomes the reason for further activation of vibrations, loosening the entire mechanism.
To check the motor, you need to connect the machine to the network or insert a charged battery into it. Next, without turning on the auger, you need to start the engine and listen to the sound of its operation. If it hums quietly, then there is no problem. When the engine is loud, a thorough diagnosis will be required.
Gearbox for a snow blower - how to make it yourself?
A gearbox is a component that quickly fails, especially when it comes to a maintenance-free mechanism for a snow blower. In this regard, some snow blower owners prefer to make homemade gearboxes. Provided that all assembly rules are followed, the result can be a mechanism that is practically in no way inferior in reliability to factory components.
To make a unit for a snow blower, you will need a diagram that will indicate the dimensions and installation methods of the mechanism parts.
After studying the drawings, you can proceed directly to assembly. The procedure for this is as follows:
- First, the gearbox gear for the snow blower is taken and mounted together with the bearings on the machine shaft. The gear must be made of bronze and have at least 20 teeth;
- Next, the first part of the housing is installed on the shaft. The bearings and gear should be located inside the housing at this time;
- Then the parts need to be sealed with seals. Their diameter should be 1 cm larger than the diameter of the gear. After this, the second part of the gear housing is installed on top;
- At the last stage, both parts of the housing should be fastened with shear bolts.
Self-made mechanism
Often, owners of snow removal equipment equip their units with homemade gearboxes. To make them, you can use improvised and purchased materials. To manufacture the mechanism you will need the following components:
- Housing – in order not to waste time, it is best to buy a ready-made cast iron or aluminum housing from an old gearbox;
- Gear with 20 teeth - it is made of metal using special equipment. You can also purchase a finished part from an old snow blower;
- Oil seals - you can use gaskets made of thick rubber;
- Shear bolts - you can buy fasteners at any store that sells garden equipment;
- Bearings – closed roller bolts can be used to make the gearbox;
- Shaft - to make it you need to take a regular pipe made of grade 45 steel.
Having prepared all the necessary components, you need to carefully study the work plan. The assembly diagram is shown in the figure on the right.
The manufacturing procedure is as follows:
- First, you need to attach the gear and bearings to the shaft;
- Then one of the housing parts is attached to the shaft. In this case, the gear and bearings must be located inside the housing;
- Next, the spare parts are sealed with oil seals, and the second part of the housing is installed on top;
- At the end, both parts of the housing are fixed with shear bolts.
Of course, you will have to spend a little money on making your own gearbox, however, in any case, creating a mechanism will cost much less than buying a new unit.
Device and application
The torque from the snowblower engine is transmitted to the working system through a V-belt transmission and a power take-off shaft, to which a screw mechanism is connected through a gearbox, as well as a rotor. The gearbox itself is divided into two types:
- Serviced. This type of gearbox must be periodically disassembled to replace the lubricant. Such gearboxes have a longer service life because the lubricant contains bronze components, which partially restore the gearbox gear.
- Maintenance free. Such gearboxes do not require any maintenance, but they are not subject to repair. In the event of a breakdown, the gearbox is removed and a new part is purchased in its place.
As for the gear located inside the gearbox, it is made of soft metals. The main material used is bronze.
This is understandable, because if the auger mechanism jams, it is necessary to prevent damage to the engine, which is the main working unit of the snow blower. The augers themselves are attached to the shaft using shear bolts, which provide initial protection.
In case of any emergency, these bolts are cut off, which avoids damage to the engine. If this does not help, then the gearbox will take the brunt of the blow, protecting the snow blower motor.
Obviously, repairing or purchasing a new gearbox will be much cheaper than purchasing a new engine. Read about how to repair a snow blower yourself here.
Depending on the classification of snow blowers, or more precisely, the scope of their application, the type of gearbox housing also depends. For professional models of snow blowers, which are used to remove snow masses from large areas, the gearbox housing will consist of cast iron.
In turn, household-level models have a gearbox made of an alloy of silicon and aluminum. The body itself consists of two halves, which are connected by bolts.
In addition, gearboxes may differ in their overall dimensions, as well as the size of the gear included in their device. This directly depends on the size of the snow blower bucket - the larger it is, the larger the size of the gearbox itself.
When purchasing, you need to pay attention to this, because snowplows of different power must have different gearboxes. If representatives of the same model range of units have different power, but the same type of gearbox, then they are unlikely to be completely reliable.
When you need to move heavy loads, only self-propelled cargo trolleys can help.
Hand pallet trucks, such as Pfaff, allow you to transport loads weighing up to a ton.
The carrying capacity of the folding trolley bag is limited to 600 kg.
Frequent malfunctions
If used incorrectly, the snow blower may break down. The device also contains parts that can fail as a result of dirt and rust. Before turning on the device, you need to read the instructions thoroughly.
There are some basic breakdowns in a snow blower.
The most common problem is broken keys, that is, shear bolts. With their help, the screw parts are strengthened. The bolt material is soft metal. If the snow blower accidentally hits any obstacle, the bolts will be cut off and the mechanism shaft will stop. Dowels are a necessary consumable. Every owner of a snow removal device should have them in stock.
If you save on buying shear bolts by replacing them with ordinary bolts, the snow blower may completely fail. In this case, you will have to purchase a new device. Shear bolts can serve a safety purpose, that is, they can protect the main elements - the engine and the rotor structure.
Among the breakdowns, there is also a failure of belts. When purchasing a snow blower, you can purchase a spare drive belt. If a snow blower is constantly clearing snow, the belt itself can become very worn, causing it to break. Belts can go to wheel bases, and can be driven for an auger design.
Friction disc failure is another common problem. They can drive wheels. There is a special friction wheel, it is pressed against the disk. When it starts to rotate, it can transmit movement to the wheels using gears. If the load on the wheel structure is exceeded, the entire friction ring may fail, and the steel friction wheel may damage the soft structure of the aluminum disk.
For the most part, these breakdowns lead to the fact that the snow blower will not start and will not function normally. In order for the device to work, it is necessary to either replace components or completely repair it.
Causes of malfunctions and repairs
Many experts advise choosing snow blowers that use a serviceable gearbox. Of course, it requires some handling, but it will last much longer than a maintenance-free gearbox.
However, this issue also has a second side - such gearboxes tend to break at the most inopportune moment. Using the example of Patriot, Tselina, Champion and Profi snow blowers, let's look at what gearbox failures can happen, as well as methods for eliminating them.
- There are sharp knocking noises in the gearbox of a Champion snow blower - the most likely cause of this problem is damage to the worm turns or bearings. The way out of the situation would be to adjust or replace the bearings, as well as purchase a new worm pair.
- If you observe that the Patriot snow blower gearbox is overheating, then several factors may be causing this phenomenon. In particular, the issue may be due to insufficient lubrication or wear of the bearings.
- In the first case, you simply need to add the required amount of lubricant, and in the second, adjust the bearings or replace them with new ones.
- If the gearbox of a Profi snow blower vibrates very strongly, then the likely cause may be misalignment of the shafts and the engine of the unit. Thus, do-it-yourself repair of the Profi snow blower gearbox is carried out by eliminating this misalignment.
- If grease leaks from the Tselina snow blower gearbox, the likely cause may be a clogged drain hole in the vent. To correct this situation, you need to rinse the vent plug in kerosene and then wipe it dry.
- Another common cause is wear of the gear included in the gearbox design. This is understandable, because it is made mainly of bronze, so during long-term use, its edges can simply wear off.
- The only way out of this situation is to completely replace the gear with a new one.
In most cases, snowplow gearboxes can be repaired without requiring replacement. Of course, you may need to purchase individual gearbox components - oil seal, gear, etc. However, this is not such a big expense as in the case of purchasing the entire gearbox.
Repair
Some components and operating units may break, and as a result, different brands of snow blower may malfunction. The device has its own individual characteristics and design. But repairs for all models of snow blowers will be carried out the same way.
To make renovations at home, you need to follow some tips. There are snow blowers whose discharge chute does not work well, that is, it cannot throw out snow. To repair it, you need to:
- check whether the safety bolts have been cut off;
- on the frame device, disconnect the bucket;
- pull out the gearbox, open it and check the worm located on the shaft;
- if the problem is in the shaft, then you need to buy new worm pairs and strengthen them.
How to do it yourself
Making your own gearbox involves using various components from other equipment. The fact is that the gearbox itself is a rather complex part, so making it yourself is quite problematic.
In general, a DIY snow blower gearbox will consist of several important components:
Gearbox housing, consisting of two halves
It is impossible to make it yourself, so you need to purchase them separately. Fortunately, the cost of one half of the case is about 700 rubles, which is quite cheap.
Gear
To manufacture them, you will need special metal-cutting equipment, but the optimal solution would also be to purchase ready-made spare parts (see here). For example, the gearbox of a Patriot snow blower, the price of which is about 3 thousand rubles, will be the optimal solution.
Oil seals
They are used as a seal to prevent lubricant from leaking out. They cost about 100 rubles apiece, so purchasing them won’t break your budget.
Bolts
Shear bolts located on the gearbox shaft. They can be made from ordinary bolts by turning grooves using a grinder.
Bearings
Enclosed roller bearings can be used.
For these purposes, a pipe made of grade 45 steel, which is quite resistant to stress, is perfect.
As we can see, most of the components of a homemade gearbox are purchased separately, because There is no technical ability to make them yourself. In any case, self-assembly will cost much less than buying a ready-made gearbox.
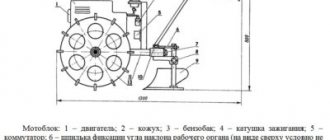
DIY rotary snow blower
The main components of a homemade do-it-yourself rotary snow blower are:
- internal combustion engine equipped with a muffler;
- fuel tank;
- throttle control cable.
To manufacture all elements of the snow blower, you will need a lathe. It is used to adjust all the parts of the mechanism to the required size. If such equipment is not available, the manufacture of a rotor can be ordered in a workshop according to the sketches you have.
Activities for constructing a rotary snow blower can be divided into several stages:
- assembly of the screw mechanism;
- rotor manufacturing;
- housing installation;
- frame device.
Having made each unit separately, they are assembled into one structure. To ensure that the snow blower has a presentable appearance, it is painted after assembly.
Structure of a homemade rotary snow blower: A - body; B — rotor disk; B - hub; G - scapula; D - ring; E - deflector; F - scraper; Z - bracket; And - knife; K - runners; L - handle block; M - strut; N - transverse bar; O - block for the engine; P - handle
Manufacturing of components for a rotary snow blower
The manufacturing technology of the auger mechanism is similar to the design of an auger for a snow blower made from a chainsaw. A dense (10 mm thick) conveyor belt can be used as screw blades. The dimensions of the screw assembly must correspond to the dimensions in the drawings.
The rotor is made of sheet metal 2.5-3 mm thick. Using a compass, you need to draw a circle of the required diameter on a sheet of paper and cut it out with a grinder. To make the blades, a blank part from an electric motor is taken as a basis. Blades are formed from sheet metal. They are welded at equidistant distances from each other to a steel disk connected to the hub. The number of blades must be at least four.
The frame for the snow blower is assembled by welding sections of metal corner into the frame according to the existing diagram. All components of the frame are attached using bolted connections.
To assemble a snow blower yourself, you can use available materials.
When all the components of the snow blower are ready, they begin to assemble them into a single unit. The auger shaft is mounted on the rotor mechanism. Then this entire mechanism is fixed to the frame using bolts and a pressure ring. The rotor is attached to the frame using a special bracket. A plastic pipe with a diameter of 100 mm is used as a snow thrower for a homemade rotary snow blower.
Advantages of combined models of snow blowers
Compared to auger units, combined snow removal machines are more efficient in operation, since the load is distributed between both the auger and the rotor. They have sufficient power and can cope with clearing an area of impressive volumes of snow. Among the advantages of homemade rotary snow blowers are:
- excellent maneuverability and high performance of equipment;
- depending on the engine used, the snow throw range can reach 12 m;
- the ability to adjust the width of the snow cover;
- the light weight of the machine (up to 20 kg) makes it possible to cope with cleaning the area around the house (including for women);
The process of clearing the local area from snow
- the ability to repair a snow blower yourself;
- low cost of materials for the manufacture of all components of the unit.
Making your own rotary snow blower is quite a complex and painstaking task. If you are not well versed in technology, do not have certain skills or do not have the necessary tools, and finances do not yet allow you to buy a factory model, you can make a snow shovel with your own hands.
How to properly change the lubricant - how to lubricate
Many people ask the question: how to remove the gearbox from a snow blower in order to carry out a scheduled lubricant change? This is not as simple as it seems at first glance, so we will describe this process step by step:
- We unhook the plastic belt protection cover, as well as the auger drive cable.
- We unscrew the bolts that are located behind the snow ejection snail.
- Next, you need to remove the auger drive belt from the pulley.
- Next you need to unscrew the bolts securing the auger shaft.
- Then you need to turn the snail to its natural position, after which we take the gearbox and pull out the screw mechanism with the impeller.
- We remove the shear bolts securing the auger to the shaft, and then disassemble it.
- The gearbox itself needs to be disassembled into two components.
How to disassemble a snow blower gearbox with your own hands - diagram
A reasonable question arises: how to disassemble a snow blower gearbox? The sequence of actions will be as follows:
- We clamp in a vice one of the parts of the shaft on which the gearbox is located.
- There are six bolts on the gearbox that connect the two halves of the housing. They need to be unscrewed.
- We take a hammer and tap the gearbox housing a little to make it easier to divide it into two halves.
The disassembled parts of the gearbox are cleaned in gasoline to wash away any remaining old lubricant.
If you have a snow blower purchased at a specialized store, then the question of how to lubricate the gearbox should not arise. All information is specified in the operating instructions for a specific model, and it is also written there what type of lubricant is recommended to be used for a specific gearbox.
However, it happens that it is quite difficult to find it. In such cases, gear lubricant is used for snow blower gearboxes from several manufacturers - Multifak, Litol, Tsiatim, etc.
To add a certain amount of lubricant to the gearbox, you need to do the following:
- Clean the gearbox and fitting from any existing dirt.
- Unscrew the fitting and then pump in the required amount of lubricant using a syringe.
- Screw the fitting back.
- It is important to understand that the presence of lubricant in the gearbox is a prerequisite for the quality operation of the entire snow blower. Therefore, it needs to be replaced before each new season.
By the way, some companies warn the owner of the snow blower in advance that the gearbox is not completely filled with lubricant, so it must be refilled after the first ten hours of operation of the unit. DIY gearbox, watch the video:
Repair of snow blowers, snow removal machines - do it yourself
Domestic snow blowers are used mainly in country houses and cottages. Their power is enough to clear snow masses from the local area, which makes life much easier for a person, because no one really wants to exercise with a shovel in their hands every day.
Of course, there is no need to argue about the usefulness of such equipment, but quite often unpleasant situations arise associated with certain problems in operation, as well as breakdowns of some working components of the unit.
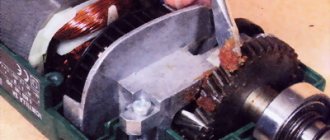
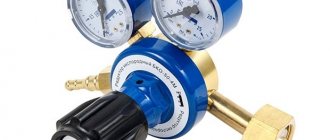
How does a snow blower gearbox work?
The gearbox is a very important element in a snow blower, because it receives the torque created by the engine, and the CV joint - a constant velocity joint - transmits it to the working parts of the machine (auger and rotor). The basis of the gearbox is the gear. The auger mechanism of a snow blower is secured to the surface of the shaft with several shear bolts, which are the first protection system of the engine, since they can only be sheared off if urgent repairs are required. Neither vibration, nor mechanical forces, nor attempts to unscrew them will lead to any result - only cutting.
The gear and other parts are located in the protective housing of the unit. In household snow blowers, it is made of an alloy of silicon and aluminum, and the body structure is two parts held together by bolts.
Structural elements of a snow blower
All snow blowers, no matter what engine is installed on them, consist of the following elements:
Engine
Snow blowers have 2 types of engines: gasoline or electric. The engine drives the snow removal unit, which includes either an auger or a rotor. Also, if the unit is self-propelled, then the wheels and tracks are driven by a drive connected to the engine.
It is also called the casing. It is installed in the front of the unit and serves as a housing for the snow removal mechanism. The bucket can be made of sheet steel or durable plastic.
Gutter
The main purpose of the gutter is to direct the snow thrown out of the unit in the desired direction. Also on some chutes it is possible to adjust the throw distance. The part can be made of durable plastic or metal.
The main working part of a snow blower is the auger. It is made on the principle of an Archimedes screw and is designed to capture and move snow to the center of the bucket. The screw is made of metal. The edge of the screw can be either serrated or smooth. Toothed augers cope better with icy and compacted snow.
Below are drawings of a screw snow removal mechanism that can be used when repairing this unit.
Rotor
Just like the auger, the rotor is the main part of the snow blower, but only of the rotary type. This part is made of metal and has the shape of a disk with two/several blades or the shape of a propeller with several impellers turned inward.
Below is a diagram of a rotary type snow blower.
Important! There are two-stage snow blowers that have both augers and rotors. In this case, the auger feeds snow to the rotor, and it then throws it out.
Wheels
The snow blower chassis has a standard design: a metal rim and a rubber tire.
For better traction of the wheels with the surface and to reduce their slipping, the tires have a “winter” tread pattern.
Caterpillars
To increase the maneuverability of heavy snow blowers, as well as medium-weight units, tracks are used instead of traditional chassis.
Thanks to the tracks, the unit becomes more stable, which allows it to be used on terrain with difficult terrain, for example, on slopes, steep descents and ascents.
Control knobs
Long handles are used to move the snow blower (not self-propelled) and to perform various maneuvers.
The handle may contain a start button (if the unit is electric) or a gas lever in the case of a gasoline snow blower.
Control Panel
On some self-propelled snowplows you can see a full-fledged control panel for the unit.
The panel may contain: ignition switch, wheel or track drive control levers, speed switch (forward and backward), chute rotation lever, auger control, engine controls, halogen headlight switch button.
The following is an electrical diagram of the ignition system of a gasoline unit, which is not complicated and is standard for this type of device. It can be useful when troubleshooting the ignition system yourself.
Types of gearboxes
Gearboxes in snow blowers are of the following types.
- Serviced. You can disassemble it yourself to add lubricant or replace worn parts. The elements of this mechanism are made of bronze, which explains their slow wear. This type of gearbox is rated as more reliable - it can work for a very long time with proper care. This is the mechanism used in European, Japanese and American models of snow blowers.
- Maintenance free. This gearbox requires no maintenance, but cannot be disassembled or repaired. The period of use of such mechanisms is limited. If the gearbox is broken, you should buy and install a new one. There are no other options here. Inexpensive Chinese and Korean models are equipped with this type of gearbox.
Gear selection
The gear is an important element of the gearbox; it can be made of various materials. The most common option in household machines is a bronze gear with a diameter of 19 millimeters and 20 teeth. Larger professional snow blowers use a 25mm diameter gear with 41 teeth.
If an unexpected blockage of the auger occurs, the gear can take on the resulting load of the mechanism and protect the engine. The bronze gear is a consumable item, so if it breaks, it is replaced with a similar one with the same diameter and number of teeth.
How to choose the right lubricant
In order for the moving gear mechanisms to work perfectly, they require high-quality lubrication. Snow blower manufacturers recommend using only gear oils. Litol and similar inexpensive liquids cannot be used as a lubricant, as they do not provide adequate protection and freeze at low sub-zero temperatures. The lubricant must have the following properties.
- Be frost resistant. This is an important quality, because snow blowers sometimes have to work at very low air temperatures. The structure of the lubricant must be maintained under the influence of severe frost.
- Have the necessary fluidity. This means that oil must quickly flow into all grooves and holes, since the lubrication of rubbing parts occurs continuously.
- Be viscous. The oil must have the thickness required for a particular device in order to cover the working mechanisms with a durable film.
Types of snow removal equipment for the home with your own hands
Snow removal machines use mechanical removal of snow in a designated area. This device should not only collect snow, but also throw it to the place where it was collected. Such equipment can be powered by either an internal combustion engine or an electric drive. Equipment serving these purposes can be divided into self-propelled and manual. Self-propelled equipment can use a tracked or wheeled chassis.
To assemble a snow blower, it is permissible to use an internal combustion engine mounted on saws or an electric power unit. Many country farms use walk-behind tractors, which, with some ingenuity, can be used as the basis for a snow blower.
Machines powered by electricity clean small areas, perhaps a porch, walkways, or garage entrance. But using it to clean large areas is not always advisable. In addition to this, it can be said that the efficiency of work will be reduced if ice dams or large accumulations of snow are noted on the existing territory. Equipment powered by electricity is small in size and easy to operate and maintain. But its operation is associated with mandatory compliance with electrical safety rules. In particular, a wire must be used that is suitable for operation at low temperatures. In addition, it is necessary to use special fittings.
To work in large areas, it is advisable to use self-propelled devices with gasoline engines. They have good maneuverability and are able to throw snow far from the work site. But, at the same time, equipment of this type has serious dimensions, but to control it does not require the application of large muscular efforts.
Before deciding to buy a snow blower, you need to consider the following - non-self-propelled devices are designed to remove freshly fallen snow, and they are highly effective at clearing garden paths, sidewalks and flat roofs. Yes, undoubtedly, these devices are distinguished by excellent handling, but when a dense layer of snow appears, it falls and the cars lose all their advantages.
How to quickly remove the gearbox
To perform a scheduled lubricant change, the gearbox must be removed from the snow blower. The algorithm for this process consists of several simple operations.
- Place the snow blower level and stationary.
- Remove the plastic protection from the belts and the auger cable that goes to the drive.
- Unscrew the screws located behind the “snail” (round body) for throwing out snow.
- Remove the belt that goes from the pulley to the auger. You should carefully pry it off with a screwdriver.
- Unscrew the screws securing the auger shaft.
- Turn the snail so that it is in its normal position until it clicks. Carefully remove the auger mechanism and impeller.
- Remove the shear bolts from the auger and remove the shaft.
How to make a snow blower for a walk-behind tractor with your own hands (drawings)
To make it easier to handle the snow blower, the working width of this design is 50 cm. A suitable size for cleaning garden paths in winter. In order for the snow blower to be driven into a garage or shed through the door, the overall width must be 60-65 cm.
To make the body of the snow blower auger, roofing iron was used. The sides are made of plywood (10 mm). Metal corners (50x50) were used in the manufacture of the frame. The handle was made from a half-inch pipe. The auger shaft is made of pipe (3/4″). A through cut was made in the middle of the pipe to install a metal plate (120x270 mm). When the shaft rotates, this plate will begin to throw away the snow.
The snow will move towards the plate thanks to a double-threaded auger made from a conveyor belt. There are also four rubber rings attached to the special plates.
Bearings are placed on the pipe. If the bearing's inner diameter is smaller than the outer diameter of the pipe, then the pipe needs to be ground a little. The drawing shows that adapters are used for the bearings.
To make the auger you will need 1.5 m of conveyor belt. The desired thickness is 10 mm. You need to cut out 4 rings from it, the diameter of which should be 28 cm. To do this, you can use two screws screwed into the board and rotate the tape in a circle. Or use a jigsaw.
To rotate the auger, you must use self-aligning sealed bearings 205. The bearings must be sealed to prevent snow from entering.
If the design includes an engine from a walk-behind tractor with an installed pulley, then the auger will be driven using a belt or chain. The pulleys, belts and bearings needed for this are purchased at car dealerships. At idle, the auger rotation speed reaches 800 rpm.
To prevent ice from getting into the auger, a safety pin is provided. When the auger jams, it will be cut off. If a belt drive is used, the pin will be an additional safety device, allowing the belt to slip.
The width of the auger is 2 cm less than the size of the housing. This is done so that the gap between the auger and the housing is small, and also to avoid the auger touching the housing. The design of the snow blower provides the ability to switch the engine to another equipment in just a couple of minutes.
For this purpose, the engine mount is made quick-release, which eliminates the need to use a tool when rearranging. The process of clearing snow from a snow blower will be much easier if you remove the engine. Because the main weight of a snow blower is the weight of the engine.
Gearbox disassembly process
To easily replace the lubricant in a removed gearbox, you need to disassemble it according to the rules. To do this you need to do the following:
- clamp one part of the shaft (the one on which the gearbox is located) in a vice;
- Unscrew the six bolts that secure the connection of the gearbox parts to each other;
- Use a hammer to gently tap the gearbox housing so that it can be more easily separated into two parts.
How to add new lubricant
After you have removed the gearbox and divided the housing into two parts, thoroughly rinse its interior to remove any traces of old grease. For this purpose, it is better to disassemble the mechanism and put all the parts in a container with gasoline for several hours or a day. After the specified time, all parts must be pulled out and dried well with a rag. Then the gearbox must be assembled and carefully placed in its original place in the snow blower. Then, without replacing the protective housing cover, unscrew the fitting and use a large syringe to pour new high-quality lubricant into the gearbox.
To ensure that the new oil can get into all the grooves of the mechanism and lubricate all the parts, start the snow blower engine, lift its front part and sharply press the auger drive lever several times.
Tips for use
To increase the service life of the snow blower gearbox, you should carefully read the advice of experienced professionals.
- Always use only high-quality gear oil for lubrication. If you lubricate the device with semi-synthetic analogues, the mechanism will quickly fail.
- Take ten-minute breaks after the snow blower has been running for an hour. This is necessary to ensure that the gearbox does not heat up too much and does not wear out prematurely.
- Clean the assembly regularly. Even when pouring high-quality oil, carbon deposits can accumulate on the walls, interfering with the ideal operation of the mechanism. If you use your snow blower regularly, you should wash it every two weeks.
- Be careful when pressing the auger drive lever. After all, with any pressing of the lever, the drive cable stretches. Therefore, pressing on the wire lever should only be used when absolutely necessary.
- Do not allow oil to leak from the gear housing. Check and replace all seals in a timely manner.
- Always inspect the snow carefully to ensure that foreign objects do not get inside the snow blower. They can damage the gearbox.
The gearbox of a snow blower is the most significant mechanism after the engine in the operation of the entire system. Always read the operating instructions carefully before using your snow blower. After all, if you take good care of the condition of the gearbox, your machine will operate without breakdowns much longer.
To learn how to replace a gear in a snow blower gearbox, watch the video below.
Equipment care - how to extend the life of snow blowers?
In order not to have to think for a long time about how to start the snow blower engine and why it constantly stalls, you should adhere to a number of preventive measures that will help extend the life of your household equipment. So, a very important rule is the correct preparation of the unit for storage in the spring and summer. The car owner is required to:
- Drain any remaining fuel and oil from the snow blower's engine and gearbox before storing it. Without doing this, the lubricants will dry out, as a result of which the walls of the oil and fuel tank may crack;
- Wipe all parts of the snowblower body dry with a rag. This will help protect the paintwork of the unit from corrosion;
- Immediately before starting the engine before winter operation, you need to reactivate the unit. To do this, you need to fill the appropriate containers with new fuel and oils. This procedure also includes a mandatory check of the spark plugs, drive belt tension and condition of the starter belt.
An important factor is the quality of the oil used. It is best to use a seasonal lubricant that does not have a high viscosity. Such a composition will be evenly distributed between important parts and mechanisms, and will retain its characteristics for a long time.