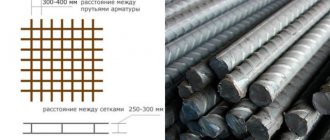
Types of miter box
The tool used for sawing wooden, polyurethane and plastic skirting boards at an angle has a simple design.
It consists of a tray with through slots made at an angle into which a hacksaw fits.
- a simple design for sawing material at an angle of 45 and 90 degrees, made in production or with your own hands, has several slots on the sides;
- the rotary miter box has a device for securing parts; a hacksaw is installed on it, which can be rotated manually at an angle of 15-135 degrees;
- The electric tool is an electric saw mounted on a rotating base.
The last two types are professional tools capable of sawing materials in two planes.
Types of miter boxes and their prices
Depending on the functional purpose, there are several types of miter boxes. As you can see in the photo, miter boxes differ in both the type of device, the material used, and the design. Professional and high-precision products include rotary and electric products.
Size
Based on the first feature, there are two standard sizes:
- standard. Designed for working with narrow parts: ceiling plinths, glazing beads, frame strips (for photos and paintings), etc.;
- big. The design of such devices does not differ from standard ones. The only difference is the length and width of the tool, as well as the height of the bars. The corners of the floor plinth, platbands, door frames, etc. are cut into it.
- wood;
- plastic;
- metal, mainly aluminum.
Material
On sale you can find miter boxes made of different materials:
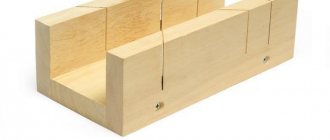
Tree. Wooden models of the tool have good performance characteristics: ease of use and cutting accuracy, which, together with an affordable price, have made this type of device for cutting materials at a given angle the most widespread. Adding advantages to a tool made from boards is the ability to make a miter box for the baseboard with your own hands.
Structurally, wooden tools are made of 3 boards, one of which is the base, the other two are side planks with slots at different angles. They can be dismountable - fastened with self-tapping screws and non-dismountable - the connection of the planks to the base is adhesive with the addition of self-tapping screws for rigidity.
The disadvantages include a short service life - when working with a hacksaw or a saw, the teeth of the cutting tool file down the sides of the slot, as a result of which the groove increases in size. A lateral displacement of 1-2o appears, which immediately affects the quality of the baguette joint in the corners. Therefore, for professional carpenters, tool models made from other materials are preferable. But for doing housework, this is an ideal option.
Plastic. Tools made of plastic, mainly PVC, have a budget price (polyurethane ones are more expensive), a variety of standard sizes and low weight. They are a one-piece construction with slots on the sides. It is used exclusively at home, since the service life is even shorter than that of its wooden counterpart: the slots increase in size much faster, exceeding the permissible standard.
Metal. Miter boxes made of steel or aluminum are tools for professionals. These are durable and easy-to-use products with high cutting precision. The price matches the quality: it is very high.
Design
According to the design features, miter boxes are divided into:
- to simple ones or, as they are also called, ordinary ones. They are templates with predetermined cutting angles. The classic version has three pairs of grooves: for the right and left baguette at 45o and for a cross cut. In some models you can find up to 11 pairs of slots. When working with such a tool, it must be fixed on the workbench using a clamp. The second clamp secures the workpiece, from which you need to cut off a corner according to a given template. Often you have to work without clamps. In this case, the plinth and miter box are held with one hand, and the corner of the fillet is filed with the other. If you work in such conditions carefully and do not rush, you can saw off a corner with the same quality as when using fixing tools;
- rotary _ Such tools are better known as precision miter boxes. It consists of a rotating platform and a disk segment on which degrees are marked, which allows you to cut any angle. A number of models can also be tilted, which makes it possible to cut the part at the end in two planes at once (called universal). It is convenient to work with such a device for a small number of operations - manual sawing is still exhausting.
A miter box for working in two planes at once.
- electric . These are the same rotary tools, but with a circular saw. They are used mainly by professional builders for mass filing of corners, although such a mechanism is also found among household tools.
Normal
This is the simplest and most common modification. If you wish, you can make a miter box with your own hands. It is recommended to buy for household needs, repairs, and a summer cottage. Most manufacturers produce such tools from plastic or wood. The design is a box and has a pair of side holes for a hacksaw. It is necessary to have slots at 45 and 90 degrees. With the help of a miter box it is convenient to work with baseboards, slats, platbands and beams. Pieces of drywall and plastic panels can be easily sawed. In some types it is possible to work with molding widths up to 120 mm.
The estimated cost of the model is 150 – 500 rubles. The advantages include low cost, the ability to fix on any surface, small dimensions and ease of transportation. Among the disadvantages are that:
- the dimensions of the workpiece are limited by the width of the wort;
- the smoothness of the cut is imperfect;
- inability to set the cutting angle;
- the number of slots laid usually does not exceed 7 pieces;
- You have to cut with short movements and the blade often jumps out of the grooves.
Rotary
The wort is equipped with a hacksaw made of metal or plastic measuring 29-60 cm. Thanks to this structure, it is possible to rotate the cutting surface by 15-135 degrees. The product allows you to change the angle in two planes simultaneously. This makes it possible to make a bevel on a workpiece of almost any size. Some craftsmen call the model precision. In addition to the saw, the kit includes an adjustable stand. The cost of the model starts from 2 thousand rubles. It is chosen for work of high complexity.
Electrical
In addition to the turntable, as in the previous model, the miter box is equipped with an electric saw. The most common type is a miter saw on an adjustable stand. This installation is often chosen for industrial enterprises and large production volumes. Non-standard devices include products that can be used to make dovetail fasteners. The models are compact. They are used as a template, located in the place of the workpiece where the groove is cut.
Universal
This miter box looks like a frame. It contains disks connected to each other. They act as guides. A saw is inserted between them and the angle is adjusted in two planes. Professionals rarely use this device. It requires additional configuration, and therefore time.
Magnetic miter box
The operating principle of the device is based on holding the hacksaw at an angle using magnets. On average, such an option will cost 400 rubles. More complex options are equipped with additional elements:
- A latch built into the body.
- Eccentrics. They look like holes into which fingers with tips resembling a rounded wedge are inserted. They press the workpiece tightly against the side.
- Inclined surface of the saw.
Terms of use
Anyone can cut material using a miter box. However, before starting work, you need to study the rules for using the tool and prepare materials that will help you in your work.
- a hacksaw with a tooth spacing suitable for the specific type of material being cut;
- to cut foam baseboards you will need a mounting knife;
- to mark the material you will need a pencil and a ruler;
- After sawing, you need to smooth out any rough edges and burrs with sandpaper.
Basic rule of work:
- the plinth can be fixed in the tool on the right, and the corner can be cut off on the left side of the product;
- We fix the left product on the left side, and cut off the corner on the right side of the product.
To prevent damage to the product when cutting, you need to purchase a hacksaw suitable for the material used.
Sawing material
Let's look at how to properly use a miter box for sawing skirting boards. If you need to cut the material at an angle of 45 or 90 degrees, you need to secure it in the body and rest it against the end wall.
Then we cut the material with a hacksaw. Using a professional tool, you can adjust the size down to the millimeter.
Templates must be made for each section, leaving a margin of 50 mm. The walls in the room are not always smooth, so before cutting the material, you need to check how they fit together.
- Mark the cut line with a pencil.
- We place the product face down in the miter box body so that the cut line mark is a continuation of the slot in the tool.
- We press the workpiece from the end of the body wall, insert a hacksaw into the slot, and cut off the material along the mark.
- We insert the second blank into the slot with the other side.
- We clean the unevenness with fine sandpaper.
Before installing the plinth, you need to attach it to the wall, align both parts with each other and check that the cut angle matches so that there is no gap between the parts.
Rules for using the device
To cut a workpiece at a certain angle you need:
- Secure the part by pressing it to the working platform with clamps or clamps that are present on the base.
- Set the angle at which you want to cut. To do this, use a side graduated scale. The bracket with a hacksaw is moved and secured at the desired angle.
- Sawing the part.
When working, you need to be careful: often inexperienced craftsmen make mistakes when calculating angles, as a result of which the workpieces have to be thrown away.
Expert opinion Dmitry Konstantinovich Levin To saw ceramic elements, you will need to buy a special string. They are made from hard alloys with a special coating.
How to cut material
When cutting, it is extremely important not to mix up the sides. In order to correctly cut the material at an angle of 90 or 45 degrees using a miter box, it is secured in the body and then rested against the end wall.
And only then the material is sawed. If the tool is professional, then you can adjust the size down to the millimeter.
A template should be made for each section, taking into account a margin of 50 mm. Since the walls in rooms are not always smooth, before cutting the material you should check how they fit together.
The cut should be carried out as follows:
- mark the cut line with a pencil;
- place your product in the miter box body with the front side so that the cutting line mark looks like a continuation of the slot in the tool;
- Press the workpiece from the end of the body wall, insert a hacksaw into the slot, then cut the material according to the mark;
- insert the second blank with the other side into the slot;
- We clean out any unevenness using fine sandpaper.
How to cut an arbitrary angle
Sometimes the walls are not connected to each other at right angles, then the sawing will need to be adjusted. This is done in two ways:
- Using thick paper or a homemade cardboard template. If the plinth is hollow from the inside, it is unlikely to stay vertical. In this case, you will need a homemade corner in which the product is placed, just like in a miter box. The corner is placed on a pre-prepared stencil so that it matches the template, then the product is cut according to the marks.
- Make marks on the material using a pencil. Cut two products at an angle of 90 degrees, then attach them to the wall and mark the junction line. Find the point of contact between the skirting boards, then transfer the markings to the material and make a cut.
Sawing off corners of floor plinths (internal and external)
The rules for sawing off the inner corner of a floor plinth are as follows:
- the miter box must be placed on the table parallel to itself;
- press the product to the side opposite to you;
- place the right plinth on the right, and the left one on the left, respectively, cut from the opposite side;
- align both parts of the plinth, you will end up with an internal corner, the top of which is located away from you.
As for sawing off the outer corner , here you need to adhere to the following rules:
- We place the miter box on the table parallel to ourselves, as in the previous case;
- press the baseboard on your side;
- we install the right product on the right, the left one - on the contrary, we bring it to a diagonally located line, sawing is carried out from the bottom up;
- Connect the parts, we get an outer corner with the vertex towards you.
Cutting an arbitrary angle
Often the walls are not connected to each other at right angles, and the sawing has to be adjusted.
You can do this in two ways:
- using a homemade template made of cardboard or thick paper. If the baseboard is hollow inside, it is difficult to keep it upright. In this case, you need to make a corner in which you can place the product, like in a wort. We lay the corner on a pre-made stencil so that it matches the template, cut the product according to the mark;
- We make marks on the material with a pencil. To do this, we cut both products at an angle of 90 degrees, apply them to the wall and mark the abutment line. We find the point of contact of the skirting boards and transfer the markings to the material and cut them off.
The quality of the junction of the skirting boards to each other depends on the correct marking of the product. It is recommended to cut the corner first and then adjust the product to length, this will make it possible to redo the discrepancy if the material was cut incorrectly.
We make a miter box with our own hands
Making a tool for forming an angle with your own hands is quite simple.
When manufacturing technology is carried out, the miter box will not be inferior in quality to store-bought models.
To carry out manufacturing work, you need to prepare materials and tools:
- board, when using pine wood its thickness should be 20 mm, if we use oak or ash material, a thickness of 10-15 mm is sufficient;
- hacksaw for wood and metal;
- vice or clamps;
- sanding paper or narrow needle file;
- confirmants and hexagon;
- drill and drill bits for confirmations and wood;
- Using a protractor, ruler and pencil, we will make markings before sawing. To learn how to make a miter box with your own hands, watch this video:
After preparing everything necessary, we begin manufacturing the product.
Box manufacturing process
First you need to make the side walls and bottom of the miter box box. To do this, we first prepare boards of certain sizes:
- the height of the sides will depend on the width of the product being cut, varies from 30 to 50 mm;
- the optimal length of the side walls is 15-30 cm.
- We cut out two parts of the same size, they will serve as sides, and the bottom is 150 mm wide.
- We sand the workpieces and align the corners at 90 degrees.
- Place the pieces next to each other and check that they are the same size.
Let's start marking the cuts on the side parts. For more detailed instructions on how to make a miter box with your own hands, watch this video:
Marking the cutting locations
To avoid errors when working with a miter box, you need to correctly mark the location of the slots:
- At the end of the sides we draw two lines, perpendicular to each other.
- We measure the width and thickness of the box, step back from the drawn lines by the size of the width of the box and make two marks to make a square.
- On two opposite sides we measure an angle of 45 and 90 degrees.
- Once again we check the correctness of the markings, only after that we cut the diagonal cuts. To make the cut perfectly even, we start sawing with a hacksaw for metal with fine teeth, then connect a hand saw for wood. The depth of the cut should be up to the top level of the bottom of the tool.
- Then we make a second cut perpendicular to the first cut, which is needed for even cutting of the baseboards.
- We clean the sawing areas with sandpaper.
- We connect the blanks together with glue and fix them with confirmants. We clamp the box with a vice, remove excess glue and leave for 24 hours until completely dry.
Read also: When cooling a steel part
If you want the tool to be dismountable, then we fix it with screws without using glue.
We looked at what a miter box is and how to use it. This tool is an indispensable assistant in carrying out repair work; it does not take up much space, but you cannot do without it if you need to cut a product at an angle.
The device is called a miter box.
The material used to make a miter box is often high-strength plastic, but there are also wooden miter boxes.
If you wish, you can make a miter box yourself, essentially these are three boards knocked together with cuts at a certain angle, the cuts are parallel.
In a miter box, or using a miter box, they cut wood or plastic products at an angle (there are also straight cut options).
More often these are baseboards, trims, cable ducts, baguettes (ceiling plinths), various moldings, etc.
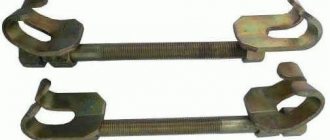
A more “advanced” version of the miter box, with eccentric clamps (clamps),
In principle, you can saw off the workpiece at an angle of 45 and 90 degrees without a miter box, you just need markings, for example, using a protractor.
The width and length of the miter box are different; it is selected according to the location, taking into account the size (mainly width) of the materials.
How to connect to a door frame
You know how to carefully make a corner on a plinth, but that’s not all. Most often, the room has doors. By the way, they must be installed before attaching the baseboards. So, you still need to correctly connect the skirting boards with the trim on the door. If you just cut straight, it turns out rough. There are plugs for plastic - not the most elegant way, but quite acceptable. Wooden ones can also be trimmed by cutting off the “face” diagonally. Also “not ice”, but already something. What to do with MDF skirting boards, since their timber is unpresentable? There is a way to create a beautiful connection to the jambs. You will need to make two cuts at an angle of 45 degrees (see photo below).
How to properly design the joint between the baseboard and the door jamb
If the edge is not even, first cut it strictly perpendicular. We make a cut at 45 degrees relative to the aligned edge. A small cut piece will be useful to us for decorating the junction. We make the second cut at 90 degrees relative to the first, but if we lower the perpendicular from the corner, we also get 45°.
How to make a neat connection to a door jamb
Now we take the first cut piece and apply it to the cut we just made with the long side. This creates a beautiful rounded cut. If there are chamfers or recesses on the baseboard, they match perfectly. In the case of a wood pattern, you cannot be sure that the lines match. All the same, such a junction of the plinth and door trim is much more aesthetically pleasing.
What is a miter box for?
A miter box is a hand-held carpentry tool for precise cutting of boards and other lumber at the required angle. When making a wooden frame, installing platbands and baseboards, or performing any other work related to cutting boards, you will definitely be faced with the need to create a perfect corner cut - the so-called miter joint. In order for the joints of the parts to fit tightly and have no gaps, the cutting angle must be as accurate as possible. Here a miter box becomes an ideal assistant.
There are several design options for this device. In our article we will dwell in detail on the main types of miter boxes, tell you how to choose and correctly use this hand tool to create a flawless burr.
Purpose and principle of operation of the miter box
Even when carrying out simple construction projects, a specialist is always faced with the need to create a perfect corner cut. The miter box allows you to accurately cut molded material at angles. In construction and repair work, the most popular are 90°, 60° and 45° vertically and 45° horizontally. It is the 45 degree angle that most firmly fixes the parts.
To quickly understand what a miter box is, it is better to look at the photo. There are many models on sale that allow you to achieve any given angle. The miter box is also used to create an internal corner of the parts to be joined. With its help it is easy to form a neat outer corner. The device is universal and is often used for:
- sawing boards, slats and other workpieces from various materials, including metal and plastic;
- formation of docking joints of the plinth;
- cutting glazing beads, platbands and baguette;
- connecting elements closely;
- production of frames and decorative elements.
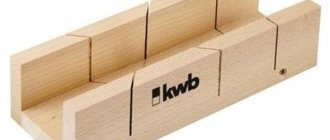
Box miter box
A box-type carpenter's miter box is the classic and simplest design, which is a box with saw grooves located at strictly fixed angles. The tool is used for cutting wooden and plastic blanks at the required angle and creating miter joints.
Modern box-shaped models are made of impact-resistant ABS plastic, less often wood and metal. They are equipped with adjustable clamps for fixing the workpiece, and they also often have a mount for installation on a workbench. The tool is universal. With it, you can make cutting angles in both vertical and horizontal planes. The standard model of a box miter box has grooves for creating angles of 22.5°, 45°, 90°, 135° (in the horizontal plane) and 45° (in the vertical plane).
Advantages : affordability, the ability to fix on any surface, small size and weight for ease of transportation, the ability to cut corners in two planes.
Disadvantages : the dimensions of the sawn workpiece are limited by the width of the miter box; The accuracy of the bevel is very mediocre, the smoothness of the cut also leaves much to be desired; it is not possible to set the required cutting angle value; Sawing occurs in short movements, which is why the blade often jumps out of the guides, and the work itself takes a lot of time.
Read also: Reasons for inverter welding machine not working
Despite all its shortcomings, it is advisable to choose such a tool for household purposes: repairs, household work in the country, etc.
What saws are best to use with a miter box?
Complete with a miter box, a special axing saw is usually used. Thanks to the steel backing, the saw does not bend during operation, which contributes to a more accurate and accurate cut. In this case, the saw blade itself acts as a limiter for the cutting depth.
You can cut with a regular hacksaw, but the quality of the cut in this case will leave much to be desired. The cleanest and most accurate cuts are provided by blades with fine teeth, a high number of TPI (teeth per inch) and minimal setting (or no setting at all).
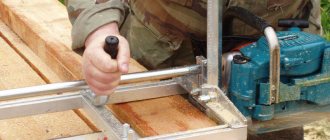
Rotary mechanical miter box
When there is a need for high precision cutting at any angle in the vertical and horizontal plane, the capabilities of a box miter box become insufficient. In this case, it is advisable to purchase an adjustable mechanical miter box - a precision hand tool for high-precision sawing of wooden, plastic and even metal workpieces of small and medium thickness.
A mechanical miter box consists of a metal frame, a rotary carriage and a saw, precisely fixed in the guides of the rotary assembly. Sawing occurs according to predetermined parameters. The clamping system rigidly fixes the workpiece to improve the convenience and accuracy of sawing operations. Precision miter boxes are equipped with back saws or bow saws, with the ability to adjust the blade tension. Provided that high-quality saw blades are used, a mechanical miter box provides a cut no worse than a miter saw.
Advantages : accuracy of sawing operations; long blade stroke, increasing cutting quality and speed; the ability to adjust the depth of cut and make cuts at any angle; ability to work with workpieces of various lengths and thicknesses; Cut quality comparable to that of a miter saw.
Disadvantages : by the standards of mass production, sawing operations on such a tool take a lot of time.
Criterias of choice
The range of tools is impressive, and at the same time complicates the task of choosing. Therefore, experts advise when purchasing a miter box to focus on the following criteria.
Manufacturer
The accuracy and evenness of the cut directly depends on the quality of the tool. Therefore, it is recommended to give preference to products from well-known brands:
- Matrix;
- Sibrtech;
- GROSS;
- FIT;
- STANLEY;
- KWB;
- Cobalt;
- BISON
Such devices will last a long time, making the work process much easier. Questions regarding tool breakdowns or adjustments can be easily resolved with the help of service centers.
What type
Box-shaped . This is a classic instrument with a simple structure. Outwardly, it looks like a box, in the walls of which there are grooves for a saw. They are placed at strictly fixed angles. This type is used to make cuts on wooden or plastic workpieces and create miter joints.
For the manufacture of box-shaped models, mainly impact-resistant plastic is used. There are also models made of wood and metal. They are equipped with adjustable clamps that secure the workpiece for subsequent cutting.
This tool makes cuts in a vertical or horizontal plane. Standard models have grooves made at angles: 22.5°, 45°, 90°, 135° (horizontal), 45° (vertical).
Pan-tilt . This type of tool is characterized by high precision in the design of cut angles. The adjustable mechanical device allows you to work with wooden, plastic and metal workpieces of small and medium thickness.
The design includes a metal frame, a rotary carriage and a saw. The cutting element is precisely fixed in the guides of the rotary unit. After setting certain parameters, the part is cut. High precision is achieved, among other things, due to the strong fixation of the workpiece.
Compact . These are simple devices that are not devoid of functionality. They are used mainly in working with wooden blanks.
The design consists of plastic or metal guides, which are adjusted during use of the tool. The cutting blade is attracted when passing through the grooves, which eliminates deviation from the specified line. This effect is ensured by magnets built into the guides.
Compact models are distinguished by their affordable price, minimal graduation pitch, and accuracy. The functionality of the tool is not inferior to a box-shaped miter box. The disadvantage of this type is low productivity and limited width of wooden blanks.
Cutting angle pitch
In adjustable models, you can set the angle in different steps: 1, 5 and 15 degrees. The smaller the step, the wider the scope of application of the tool.
Cutting angle in vertical plane
In a typical device intended for household use, there are angles of 45° and 90° located in the vertical plane. In a professional tool, the choice of angles is more varied: 15°/22.5°/30°/45°/90°.
Models are available in which the angle is arbitrarily adjustable. Thanks to this option, you can cut parts with a cutting slope from 15° to 135°. For precise cutting, it is recommended to choose a precision device.
What can be sawed
You can work with a miter box on wood and plastic. Some models can handle thin-walled metal workpieces. Among other materials:
- drywall;
- MDF;
- chipboard;
- polyurethane foam, etc.
Type of fixation
For convenient use, the tool is equipped with clamps. There are two types.
- Clamps are one or more movable elements mounted in the body. Their function is to press the material being processed.
- Eccentrics - they are also called “fingers”. These are oblong elements with tips, installed in holes on the horizontal platform of a U-shaped tool. During the turning process, they press the workpiece against the sides of the structure, thereby immobilizing it.
Their task is to hold the workpiece during cutting. This frees up your hands.
Material of manufacture
- plastic – models have an affordable price, but they are short-lived due to the gradual expansion of the slot during operation;
- wood is a classic that can be easily made with your own hands;
- metal - it is more often used in professional and expensive tools; due to its increased strength, the service life is extended, and it is easy and simple to use.
Cutting width/height
This parameter allows you to determine the size of the workpieces to be processed. The characteristics of each model indicate the width and height of the cut. The range of the first value is 35-213 mm, the second – 15-300 mm. And this is not the limit of the capabilities of professional models.
Additional functions
When choosing a miter box, it is recommended to carefully read the functionality. Some models have additional options in addition to the basic ones.
- Magnetic guide – the presence of this element eliminates inaccuracies when cutting the workpiece, deviation from the desired line corresponding to the selected angle.
- Smooth angle adjustment – this option improves the quality of the cut and helps you select the optimal amount of its slope.
When considering a particular design, it should be borne in mind that for home use it is not at all necessary to spend money on purchasing a professional model. A compact or box-shaped miter box will do the job.
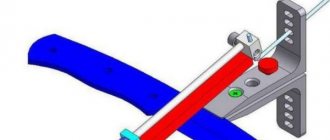
Compact magnetic miter boxes
Simple and functional devices for cutting wooden boards at a given angle. They are plastic or metal guides that can be adjusted. Magnets built into the guide attract the saw blade, ensuring its fixation during operation. How to cut an angle with the required number of degrees using such a miter box is clearly shown in the photo.
Advantages : low cost; compactness; accuracy not inferior to a box miter box; possibility of cutting at a given angle; minimum division step.
Disadvantages : working with boards of limited width; poor quality of cut compared to a rotary miter box; low productivity.
Despite all their shortcomings, such devices are optimal for domestic use. With them, you can always accurately cut trim, ceiling or floor plinths, without the need to purchase a full-size miter box.
What is a miter box and what is it used for?
A miter box is an auxiliary tool designed specifically for cutting parts at a strictly specified angle. Modern models are used to work with wood, plastic and other polymer materials. Most often, the device is used when installing ceiling or floor plinths, platbands, and baguette frames.
Cutting parts by eye does not allow for a tight fit between the connecting elements. As a result, aesthetic qualities suffer, you have to seal the cracks with putty, and come up with additional decor. There is no such problem when using a miter box.
When working with a tool, an important point is its fixation in order to avoid deviations from the line that determines the desired degree of inclination of the cut during the cutting process. To do this, the miter box is secured to a workbench or other stable surface using screws, screws or clamps. This approach ensures high quality cuts.
The first models of the device made it possible to make cuts on molded material at angles of 45 and 90 degrees. Modern miter boxes are equipped with regulators and clamps that make it possible to cut the workpiece at different angles. And when using a rotary type tool, you can make any cutting angle.
Options for using a device for making a cut at a certain angle:
- design of joints between plinth elements;
- cutting blanks from wood, plastic and metal;
- cutting platbands, glazing beads, baguette;
- production of decorative elements, frames;
- other connections made back to back.
Miter boxes for creating dovetails and straight tenon joints
A set of simple metal guides, secured with a screw clamp, will help you create a flawless dovetail joint. The devices allow you to make smooth and precise cuts much faster and with less effort. Magnets built into the body of the product keep the saw in contact with the guide surface, ensuring convenience and precision of cutting.
There are two varieties of such miter boxes: with an inclined guide surface for creating dovetail joints and with a right angle for cutting straight tenon joints. The wood between the tenons is removed manually using a sharp chisel.