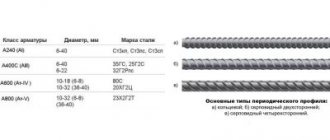
Selecting reinforcing bars of the required brand and diameter
Novice developers do not always have the correct idea of what kind of reinforcement is needed for a monolithic slab. When planning to assemble a reinforcement grid, you should familiarize yourself with the requirements of the state standard.
He classifies reinforcing bars as follows:
- rods marked A1, which in accordance with the previous classification were designated A240, are distinguished by a smooth surface;
- rods of class A2, corresponding to the former marking A300, have minor changes in the profile in the cross section;
- reinforcement with index A3 (“corrugated”), which was previously classified as A400, is distinguished by a profile of variable cross-section.
To ensure reliable fixation of the rods, reinforcement with corrugations should be used. The diameter of the reinforcing bars in the cross section is selected in the range from 1 to 1.4 cm in accordance with a previously developed sketch. The drawing of the reinforcing lattice and all necessary calculations should be entrusted to specialists who will take into account all the loads on the slab and provide for strengthening problem areas taking into account the percentage of reinforcement for specific brand of concrete.
For reinforcement, ribbed reinforcement with a diameter of 12-16 mm is used, which provides better adhesion
How to calculate the amount of tie wire
In addition to the question of how and with what to knit the reinforcement, any novice developer thinks about how much knitting wire to buy.
shusharuFORUMHOUSE user
I am making a slab foundation measuring 12.5x12.5 m. I need to tie the reinforcement in two rows of 200x200 mm. Along the perimeter and under load-bearing walls 100x100 mm. When ordering the reinforcement, I was told that it takes approximately 12 kg of wire to knit 1 ton of reinforcement. This is true?
To understand this issue, you need to know the source data. This:
- The diameter of the reinforcement to be tied.
- The length of the wire loop that goes into one knot.
- Wire diameter and weight.
- Knitting pitch and number of expected knots.
The fact is that in 1 ton of “tens” reinforcement there is one number of rods, and in 1 ton of “twelve” there is another.
Accordingly: the total length of the reinforcement and the number of ties change at the same pitch. For an average calculation, we assume that 1 knitting requires 250 mm of wire (the wire is folded in half, we knit reinforcement with a diameter of 10-14 mm).
Now we need to calculate the number of ties and how many meters are in 1 kilogram of wire. From here we will find how many kilograms of wire are needed for a given number of ties of reinforcement.
shusharu
To build the foundation, I took reinforcement with a diameter of 12 mm. The wire used is 1.2 mm in diameter. The wire is sold in coils of 80 kg or in cuts 40 cm long, with a “sheaf” weighing 5 kg.
Konstantin Y. FORUMHOUSE user
We calculate it as follows: a wire with a diameter of 1.2 mm weighs about 9 g per 1 meter. From 1 kg of wire approximately 440 strands are obtained (250 mm per strand). There are about 1100 meters in 1 ton of “twelfth” reinforcement. When knitting in increments of 20 cm, the result is approximately 2800 knots, which will require approximately 6.5 kg of wire cut into 250 mm pieces.
If we take the wire at the rate of 40 cm in length per 1 knitting, then too much wire will go to waste, because per 1 knot, on average, requires from 25 to 30 cm.
It is better to buy knitting wire in coils, and then cut the coil with a grinder into pieces of the required length.
Tools for tying reinforcement, technology for working with them
You can make a crochet hook for reinforcement with your own hands from wire with a diameter of 4 mm. For this purpose, welding electrodes are used as they are the most durable. The manufacturing procedure is as follows:
- A small loop is formed at one end of the wire. It will serve as a support for the handle. The loop is made carefully so that the end is rounded towards the rod. During work, this place should not cling to clothing.
- In the central part, the rod is bent at an angle of 30 degrees in the shape of a rocker arm.
- Several washers are threaded onto the rod until they stop with a loop. This place will fix the handle.
The handle can be made in different versions:
- Take 2 tubes, constituting 1/3 of the length of the rod. If the rod is 4 mm in diameter, then one of the tubes should have an internal diameter of 5-6 mm. It is put on a rod. The second tube should have a larger internal diameter. It is put on from above, and the entire system is riveted with a hammer.
- 1 tube is taken. Slides onto the rod. The washer is welded to the handle and rod for fixation.
- A handle with a hole for a rod is turned from dense wood on a lathe. Instead of wood, you can use a polymer pipe. A washer is welded for the stopper.
If you do not make a ring at the bottom, then you also need to weld a washer.
Regardless of the type of device, the knitting technology is the same. The work is carried out according to the following scheme:
- The cut wire is folded in half.
- It is stretched under the intersection of the reinforcement.
- The free ends of the wire are crossed.
- The hook is pulled through the wire loop and hooks the loose ends.
- Rotational movements begin, during which the wire is wrapped.
- The hook is removed and the knot is checked for strength.
When checking the strength of the connection, the rigidity of the structure is checked. She must be motionless.
The process of knitting with a screw product is the same. The difference lies in the finishing stage. When threading a hook into a loop, you do not need to wrap it yourself. Thanks to the worm mechanism, just pull the handle towards you and the rotational movements will begin automatically.
We suggest you read How to install a round door handle
Low carbon steel is used as wire material. To prevent rupture during knitting, it must be held over the fire. After cooling, it is ready for use. Its diameter can be 1 mm, 1.2 mm, 1.4 mm. Parameters are selected based on experience. A wire that is too thin will break, and a wire that is too thick will be difficult to work with.
Nobody does the work manually. It's practically impossible. There are special tools for this purpose that speed up and simplify the process. Each tool has its own characteristics of use. The following devices are available for tying reinforcement:
- Hand hook.
- Knitting gun.
- Screwdriver.
- Ticks.
Each of the tools has its own pros and cons, we will consider them, as well as the technology for their use, and based on these data and the opinion of an expert (a reinforcement specialist with 10 years of experience), we will summarize and choose the best option for tying reinforcement.
The peculiarity of the work is that it is done manually. At first, the process will be lengthy, as you need to get better at it. The hook is made of steel, and the handle is made of wood or plastic. The cost of such a hook is 1 thousand rubles.
There are even automatic hooks on sale, but reviews about them are mixed. Some note the short lifespan, others say that it is difficult to twist wire 2 mm or more thick.
Instructions for crocheting reinforcement
It is useless to knit the reinforcement with your bare hands - you can achieve the required force to tighten the wire only with the help of additional tools. Let's take a step-by-step look at the basic techniques for crocheting reinforcement.
Manual
To knit wire by hand you will need a hook. The wire is folded in half and hooked under the fixation point. The free end is threaded into a loop and crocheted until the wire is tightly tensioned.
Simple knot
To tie a wire with a simple knot, you will need to do the following:
- A wire 200 mm long is cut and bent in half.
- The bent section is pushed under the point where the two rods meet.
- The hook is inserted into the loop and catches the free end.
- A full revolution is performed around its axis. The free end must be held.
- Next, while tensioning the wire, the hook is turned several more times until a reliable connection is obtained.
You don't have to buy a hook at the store. You can easily make a convenient tool yourself by giving the required shape to a steel rod and putting a handle on the end.
Dead node
Before crocheting foundation reinforcement, you need to learn how to form a dead knot. This method is especially good for tying vertical rods for columns and beams.
- A piece up to 400 mm long is cut and bent in half.
- The segment is pushed forward by a loop from below the knot being fastened.
- The free end is passed through the top and again bent under the rods.
- The loop and the free end are aligned and then hooked with the hook tip.
- The hook is rotated with tension until the loop comes off.
To obtain a high-quality connection, you need to ensure that the wire is tightly laid on the surface of the reinforcement. The knitting process continues in a checkerboard pattern.
Screwdriver
The scheme of working with a screwdriver is reminiscent of the crocheting process, but instead of manual force, automation is used. Instead of a regular tip, a homemade hook is inserted into the screwdriver; usually a roofing nail is used for this purpose.
It is important to ensure that the speed of the screwdriver corresponds to the required force for tightening the wire. If you apply too much force, the wire will break, and at low speed you may end up with a weak knot.
Screwdriver device
Let's consider all the existing ways to connect reinforcement. Each of the options is good in some way, and is used by builders, depending on the type of building and design requirements. There are 3 ways to connect rods; with their help, a strong and reliable metal frame is created:
- Wire knitting.
- Welding.
- Plastic clamps.
These methods of tying reinforcement have their own characteristics. Each of them is correct and is applied depending on the requirements and the material used. When reinforcing a strip foundation for a private house, the reinforcement is often connected by welding rather than tied with wire. But which option is the best?
We invite you to familiarize yourself with a log bathhouse (152 photos): chopped log structures, a two-story log house-sauna, how to cut it with your own hands
Despite the fact that these are different technologies, the right choice can save money and time on construction, without sacrificing structural strength. The method of connecting elements by welding was previously considered one of the most reliable and effective. However, such technology is not always appropriate.
This method has some disadvantages:
- You need to have skills in working with a welding machine, otherwise you need to spend money on the services of a professional welder. In this case, the cost increases.
- Welding points are the weak point of the structure. There the strength of the frame becomes lower.
- The method is not suitable if you use fiberglass reinforcement. In addition, the A-400 (A-3) fittings, which are the most popular, cannot be connected by welding. Only rods with the index “C” are suitable for work, for example: A500C reinforcement.
Therefore, in modern monolithic construction, welding has been replaced by viscous welding. For private and residential houses, construction of a bathhouse, garage or other buildings, this is the best option for connecting reinforcement.
Why is this method so good? It has the following positive aspects:
- Speed of work completion. Knitting with wire takes little time, it is simple and does not require skills. However, if you do it manually, the process slows down. Next we will look at how to quickly knit reinforcement.
- Ease of troubleshooting. When working with welding, it will be more difficult to eliminate errors; you will have to take a grinder and cut the welding seam. The wire can be simply bitten off with wire cutters or unwound with a crochet hook.
- You don't need to be a professional to knit reinforcement.
- The reinforcement process can be performed in formwork.
- The cost of work is much lower.
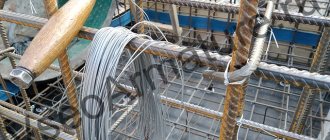
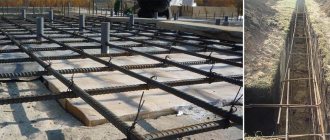
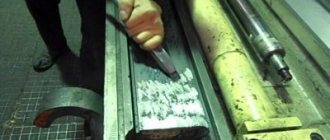
An example of knitting a mesh of reinforcement with wire.
If we talk about shortcomings, we note the precariousness of the finished frame. True, this is not a big problem. The structure will be strong, the only problem is that when the frame is moved into the formwork it begins to loosen, in this case it is possible to tack the reinforcement in several places by welding.
We suggest you familiarize yourself with How to set beacons from a profile
To solve this problem with fiberglass reinforcement, you need to attach several braces to make the structure more rigid and stable. By bending, the tension in the knitting areas changes, the frame moves. Therefore, you need to be careful when installing it in the formwork. It is better to knit the reinforcement in the formwork or above it if the strip foundation is being reinforced.
The main advantages of this method are that it does not require special skills, it has a high speed of work, and reliable fixation of the reinforcement. The disadvantages of this method are the following:
- Price. For large volumes, the wire will be more economical.
- Speed of work (when compared with other methods of knitting).
- Correction. You made a mistake somewhere, you will have to bite off the clamp, it becomes unusable, but the wire can be tied up.
- Reliability. It is not advisable to move around a structure connected with plastic clamps.
- Temperature. They burst at subzero temperatures.
A tool for tying reinforcement can be made using a screwdriver. A pre-prepared hook of the required length and shape is inserted into the screwdriver chuck. The work process is the same as when knitting with a manual device. The main thing is to choose the right operating mode for the equipment. The main parameter is the rotation speed.
When using an automatic gun, knot tying occurs at a speed of 1 knot per second. There is no need to cut the wire; it is cut automatically.
Automatic hook for tying reinforcement - gun
Naturally, technology has not stopped at mechanical hooks; there is a special tool that allows you to almost completely automate the process of tying reinforcement, and it’s called a tying gun.
The automatic hook (gun) is very convenient, the speed of tying with it is amazing - one knot per second, and the knitting wire does not need to be cut into pieces, you just need to insert it into the gun, and it, in turn, will wind it itself, tie it and will cut off the excess. It should be said that the gun runs on a battery and it is not necessary to have an outlet at hand.
An automatic hook for tying reinforcement has a significant drawback - its price, and in DIY construction, as you know, every penny counts. Its use will be justified only if you have huge volumes of work - thousands or even tens of thousands of knitting knots.
Crochet technology
Regardless of the type of device, the knitting technology is the same. The work is carried out according to the following scheme:
- The cut wire is folded in half.
- It is stretched under the intersection of the reinforcement.
- The free ends of the wire are crossed.
- The hook is pulled through the wire loop and hooks the loose ends.
- Rotational movements begin, during which the wire is wrapped.
- The hook is removed and the knot is checked for strength.
When checking the strength of the connection, the rigidity of the structure is checked. She must be motionless.
The process of knitting with a screw product is the same. The difference lies in the finishing stage. When threading a hook into a loop, you do not need to wrap it yourself. Thanks to the worm mechanism, just pull the handle towards you and the rotational movements will begin automatically.
Low carbon steel is used as wire material. To prevent rupture during knitting, it must be held over the fire. After cooling, it is ready for use. Its diameter can be 1 mm, 1.2 mm, 1.4 mm. Parameters are selected based on experience. A wire that is too thin will break, and a wire that is too thick will be difficult to work with.
When fastening reinforcement, it is expensive to use welding. A knitting device is the best option. It is easy to make it yourself from scrap materials. This device performs high-quality work and is inexpensive.
In monolithic construction, before pouring concrete, reinforcement is installed to form a reliable frame. To prevent it from changing its shape under the influence of concrete mortar, the rods must be secured together. The simplest and fastest way to connect is using a hook for tying reinforcement.
It consists of: a handle that is easy to grip, and a curved part that is used for fastening. The design allows you to develop good speed when forming knots. The hook part is freely located in the handle, so it turns in the desired direction. The knitting process is accompanied by movements similar to stirring paint with a wooden spatula. Knots are formed using wire. A simple device allows you to fasten several reinforcing bars into a single structure.
Types and applications
To connect the rods, devices of various designs are used. There are:
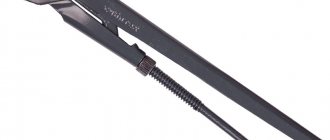
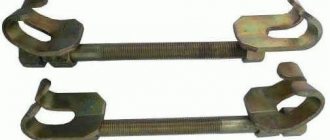
- A hand hook is a product consisting of a curved metal rod and a wooden handle. With its help, it is easy to grab the loop and tighten it, fastening the reinforcement rods tightly. High rotation speed is ensured by a special handle with a bearing installed in it. You can buy a hand tool for 190 rubles/piece.
- Knitting reinforcement with a screw hook allows you to increase productivity. The built-in worm mechanism comes into operation when a force is applied to the handle, resulting in automatic tightening of the assembly with wire. The tool handle has a rubberized base, and the working part is made of galvanized steel. The price of a reversible hook for tying reinforcement is from 600 rubles/piece.
The product is used for any work related to monolithic construction. Most often - the organization of a strip foundation, the construction of residential or administrative buildings. In private construction, tying reinforcement is necessary when forming a frame for a septic tank or outbuildings. For home use a homemade hook.
Advantages and disadvantages
When considering the capabilities of the hook, it is compared with alternative methods. These include welding, which does not provide a reliable fastening, or a tying gun, which is not suitable for hard-to-reach places.
The advantages of a hand-held device include:
- low cost;
- ease of operation.
Disadvantages include the tediousness of the process if you need to make many connections, and low productivity.
Knitting screw-type reinforcement has the following advantages:
- durability of the tool;
- ease of use;
- high speed.
No shortcomings were identified during application. These can only be attributed to the high cost when compared with a manual device. If you plan to work on a large object, then it is better to buy an automatic hook for tying reinforcement.
How to use?
As a rule, one kit with a hook also comes with detailed step-by-step instructions for use, thanks to which even a novice fisherman can easily tie the elements to each other. First, a fishing hook is inserted into a special slot located on the body of the product and clamped with a small screw.
At the same time, the fishing line is taken and threaded into the ring. Its remaining free end is wrapped around two clips, while keeping the thread taut. Then, gradually rotating the hook with your fingers, wrap the fishing line around the fore-end. In total you need to make 5-7 such turns of thread. After this, the free end is carefully thrown through the clip, which is closest to the edge.
Both clips are completely recessed into the body and gradually pull the sections of the leash. When the loops located around the shank are fully formed, you can slightly loosen the hook grip screw and continue to pull the line out again. This will release the fishing hook.
The formed joint is slightly moistened and pulled together with considerable force. The excess end of the fishing line can be cut off. At the final stage, the leash should be given its final shape; for this, a small fastening loop is made. If you correctly tie the elements using such a device, the connection will be as strong as possible.
Types of hooks for knitting frames
Depending on the type and volume of work the builder has to do, he will need one of three types of hooks:
- simple design;
- special screw crochet hook;
- a gun that is relatively connected with hooks.
Let's consider all types of products, their advantages and disadvantages.
Simple hook
The simplest type of tool designed for tying reinforcement. Its design includes a metal rod ending in a hook. Thanks to the final design, you can easily grab the required wire loop. The rod is usually also curved, and the handle has a built-in bearing. With the help of these features, the master receives an increased rotation speed of the tool. The result is a tightly tightened loop that clearly and firmly fixes the structural elements.
Screw hook
Unlike its simple analogue, the screw hook is a more mechanized version of the product. Its design involves the use of the same knitting method. The wire loop is tightened in the same way by rotating the hook located on the tip of the product. The main difference is that the rotation mechanism is based on the rotation of the tool, obtained due to translational force. The latter is transmitted through a worm gear.
The use of this type of automatic hooks can significantly increase the speed of creating knots. But it should be borne in mind that the cost of such a product will be significantly higher than that of a regular hook. Consequently, its purchase will only be required when large amounts of work are to be done.
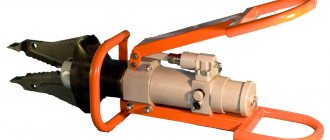
Guns for fastening reinforcing belts
Many buildings require the construction of large foundations. And then you will need to make fairly large reinforced frames. Especially if the architecture of the object includes a slab type of foundation. In this case, the number of knots required to create a reinforcing belt is in the hundreds and thousands. But often it is necessary to bandage not one, but two layers of reinforcing belt.
If there is such a large amount of work to be done, it is easier and more profitable to immediately buy a special gun designed for tying reinforcement. Its advantage is the complete automation of the knitting process. The operating principle of the device is as follows:
- The gun is loaded with a coil of wire, which will later be used to bind the reinforcement.
- Once the elements are aligned, a wire is wound around the assembly using an automatic tool, which is then pulled tight and twisted.
- Once the knot is completed, the excess tying wire is trimmed.
The negative point is the higher consumption of binder material. But this feature is compensated by uniform tension on all nodes, which is not always possible to achieve with manual work. Plus, using a gun significantly increases the speed of tying knots compared to conventional or mechanical hooks. Also, this device is much more expensive than the first two types of products, so their purchase is justified only when work is required on large objects.
Types of hooks
The structure and method of application of hooks can vary significantly. Among the varieties of devices for fastening reinforcement, three main types can be distinguished.
Simple hooks
A primitive product that consists of a rod ending with a hook at the end. The design allows for easy gripping of the wire loop. The tool rod has a curved shape, which, in combination with a bearing in the handle, provides the device with a high rotation speed.
Manual rotation of the device at a sufficient speed allows you to tighten the wire tightly. The simple hook design is suitable for small jobs in home construction. The advantages of such a tool:
- low market value;
- ease of operation;
- ease of use in hard-to-reach places.
Disadvantages include the inconvenience of use on large-scale construction projects.
Screw hooks
The semi-automatic tool tightens the wire by rotating the hook-shaped tip. The device has a different design from a simple tool, but at the same time makes the work of the master easier. During the knitting process, the rotational movement is ensured by the translational force of the tool, which is transmitted using a worm gear.
A screw hook for tying reinforcement provides high speed of work, but the cost of the device is slightly higher than a primitive tool. A device for knitting reinforcement is called differently - reversible. This tool has some advantages:
- long operation;
- ease of use;
- significant speed of knitting.
Purchasing tools makes sense for large volumes of work on a construction site.
Tying gun
The hook design is characterized by high performance, so it is mainly used on large construction sites. The device of the tool is automated and operates when connected to the network or with batteries.
The principle of operation of the gun is to dock with the tying element and press the release button. In a few seconds, the wire is wound and tightened into a strong knot with uniform tension.
To work with such a tool, wire with certain parameters and rigidity characteristics is used, otherwise the device will break.
The choice of the type of tool for the fastening procedure depends on the characteristics of the installation of the reinforcement and the purpose of using the gun. It is used for both metal and fiberglass reinforcement, for which annealed steel wire, plastic clamps or plastic fasteners are used.
Forming a reinforcement frame using a gun involves a lot of wire consumption. There are pistols powered by central electricity and batteries. The time spent connecting one node is 1 second.
At the same time, pistols have some disadvantages in operation:
- the need for an electrical outlet to operate the tool or to charge the battery;
- high cost of the device;
- The wire for knitting must be of the same diameter.
Make a hook for tying reinforcement with your own hands
Not always a product purchased at a hardware store will be ideal for the required type of work. Therefore, many craftsmen eventually switch to homemade hooks for knitting reinforced meshes. There can be many reasons for this:
- rod thickness is too small or too large;
- awkward angles at which the hook is bent;
- steel is of poor quality, which causes the hook to quickly unbend, etc.
Therefore, often you can not buy a hook, but can easily make it yourself. Moreover, in such a way that it would be convenient to work with it, and all its parameters would be adjusted to the master. Below we will look at a number of ways in which you can make a homemade hook that allows you to fasten reinforcement rods.
We suggest you read: How to make lathing in a steam room
What is a crochet hook
A tying hook is a device that greatly facilitates tying reinforcing bars together. It looks like a hook, that's why it's called that.
You can buy it in a store, or make it yourself from available materials.
It looks like a rod, usually metal, with a slightly curved tip to grip the wire during knitting. In a store, such a hook will cost between 100-300 rubles.
Don't assume that just because you bought a crochet hook at the store that it will be perfect for you. It often happens that the bends of the metal rod are not quite correct and it will not be convenient for you to knit with it, sometimes the rod is simply too thin and when the knitting wire is tightened, it will bend itself.
To ensure that the hook is ideal for you and greatly simplifies the knitting process, you can make it yourself.
Homemade hook
Electrode hook
The simplest option is to make a hook from a regular electrode with a thickness of 4 mm.
This hook is only suitable if you have a small amount of work to do and a thin knitting wire, because using such a hook can tire your brush very quickly. If you are knitting reinforcement for the foundation of a house or garage, then it would be more advisable to make a better and more reliable hook, for example, from reinforcement.
Rebar hook
The second option is to make a crochet hook from reinforcement or a metal rod with similar properties.
To make such a hook for tying reinforcement we will need:
- reinforcement, or steel rod with similar characteristics, 6-8mm thick;
- two nuts and two washers of a diameter suitable for the fittings;
- some kind of handle, for example, from a used roller, large screwdriver, trowel or something similar;
I think the process of making such a hook should not be described in detail, everything is clear in the photo, it is only necessary to clarify that the tip of the hook should be sharpened and the nuts should be firmly secured so that the handle does not jump out.
By the way, the hole in the handle must be larger than the diameter of the reinforcement, since it must rotate freely relative to the reinforcement.
This option is a little more complicated, but its use can significantly simplify and speed up knitting even compared to an electrode hook. This hook for tying reinforcement will serve you for a very long time, and its production requires virtually no financial costs.