Processes for installing floor and ceiling skirting boards, installing window and door frames, multi-profile glazing beads, plastic channels for electrical wiring, etc. associated with marking and cutting out corner joints of elements. It is too difficult to make an accurate cut without using special tools. There are ready-made, expensive devices on sale, but it makes no sense to buy them for temporary use. Knowing how to make a miter box, any home craftsman will be able to independently make a handy device that makes it easier and faster to cut parts at the required angle. The joining of adjacent elements, in this case, turns out to be as ideal as possible - without gaps and areas protruding beyond the boundaries of the structure.
What is a miter box and what is it used for?
A miter box is an auxiliary tool designed specifically for cutting parts at a strictly specified angle. Modern models are used to work with wood, plastic and other polymer materials. Most often, the device is used when installing ceiling or floor plinths, platbands, and baguette frames.
Cutting parts by eye does not allow for a tight fit between the connecting elements. As a result, aesthetic qualities suffer, you have to seal the cracks with putty, and come up with additional decor. There is no such problem when using a miter box.
When working with a tool, an important point is its fixation in order to avoid deviations from the line that determines the desired degree of inclination of the cut during the cutting process. To do this, the miter box is secured to a workbench or other stable surface using screws, screws or clamps. This approach ensures high quality cuts.
The first models of the device made it possible to make cuts on molded material at angles of 45 and 90 degrees. Modern miter boxes are equipped with regulators and clamps that make it possible to cut the workpiece at different angles. And when using a rotary type tool, you can make any cutting angle.
Options for using a device for making a cut at a certain angle:
- design of joints between plinth elements;
- cutting blanks from wood, plastic and metal;
- cutting platbands, glazing beads, baguette;
- production of decorative elements, frames;
- other connections made back to back.
Terms of use
Anyone can cut material using a miter box. However, before starting work, you need to study the rules for using the tool and prepare materials that will help you in your work.
You will need:
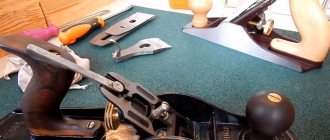
- a hacksaw with a tooth spacing suitable for the specific type of material being cut;
- to cut foam baseboards you will need a mounting knife;
- to mark the material you will need a pencil and a ruler;
- After sawing, you need to smooth out any rough edges and burrs with sandpaper.
Basic rule of work:
- the plinth can be fixed in the tool on the right, and the corner can be cut off on the left side of the product;
- We fix the left product on the left side, and cut off the corner on the right side of the product.
To prevent damage to the product when cutting, you need to purchase a hacksaw suitable for the material used.
Criterias of choice
The range of tools is impressive, and at the same time complicates the task of choosing. Therefore, experts advise when purchasing a miter box to focus on the following criteria.
Manufacturer
The accuracy and evenness of the cut directly depends on the quality of the tool. Therefore, it is recommended to give preference to products from well-known brands:
- Matrix;
- Sibrtech;
- GROSS;
- FIT;
- STANLEY;
- KWB;
- Cobalt;
- BISON
Such devices will last a long time, making the work process much easier. Questions regarding tool breakdowns or adjustments can be easily resolved with the help of service centers.
What type
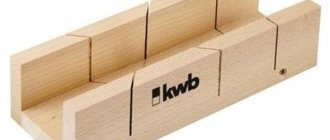
Box-shaped . This is a classic instrument with a simple structure. Outwardly, it looks like a box, in the walls of which there are grooves for a saw. They are placed at strictly fixed angles. This type is used to make cuts on wooden or plastic workpieces and create miter joints.
For the manufacture of box-shaped models, mainly impact-resistant plastic is used. There are also models made of wood and metal. They are equipped with adjustable clamps that secure the workpiece for subsequent cutting.
This tool makes cuts in a vertical or horizontal plane. Standard models have grooves made at angles: 22.5°, 45°, 90°, 135° (horizontal), 45° (vertical).
Pan-tilt . This type of tool is characterized by high precision in the design of cut angles. The adjustable mechanical device allows you to work with wooden, plastic and metal workpieces of small and medium thickness.
The design includes a metal frame, a rotary carriage and a saw. The cutting element is precisely fixed in the guides of the rotary unit. After setting certain parameters, the part is cut. High precision is achieved, among other things, due to the strong fixation of the workpiece.
Compact . These are simple devices that are not devoid of functionality. They are used mainly in working with wooden blanks.
The design consists of plastic or metal guides, which are adjusted during use of the tool. The cutting blade is attracted when passing through the grooves, which eliminates deviation from the specified line. This effect is ensured by magnets built into the guides.
Compact models are distinguished by their affordable price, minimal graduation pitch, and accuracy. The functionality of the tool is not inferior to a box-shaped miter box. The disadvantage of this type is low productivity and limited width of wooden blanks.
Cutting angle pitch
In adjustable models, you can set the angle in different steps: 1, 5 and 15 degrees. The smaller the step, the wider the scope of application of the tool.
Cutting angle in vertical plane
In a typical device intended for household use, there are angles of 45° and 90° located in the vertical plane. In a professional tool, the choice of angles is more varied: 15°/22.5°/30°/45°/90°.
Models are available in which the angle is arbitrarily adjustable. Thanks to this option, you can cut parts with a cutting slope from 15° to 135°. For precise cutting, it is recommended to choose a precision device.
What can be sawed
You can work with a miter box on wood and plastic. Some models can handle thin-walled metal workpieces. Among other materials:
- drywall;
- MDF;
- chipboard;
- polyurethane foam, etc.
Type of fixation
For convenient use, the tool is equipped with clamps. There are two types.
- Clamps are one or more movable elements mounted in the body. Their function is to press the material being processed.
- Eccentrics - they are also called “fingers”. These are oblong elements with tips, installed in holes on the horizontal platform of a U-shaped tool. During the turning process, they press the workpiece against the sides of the structure, thereby immobilizing it.
Their task is to hold the workpiece during cutting. This frees up your hands.
Material of manufacture
- plastic – models have an affordable price, but they are short-lived due to the gradual expansion of the slot during operation;
- wood is a classic that can be easily made with your own hands;
- metal - it is more often used in professional and expensive tools; due to its increased strength, the service life is extended, and it is easy and simple to use.
Cutting width/height
This parameter allows you to determine the size of the workpieces to be processed. The characteristics of each model indicate the width and height of the cut. The range of the first value is 35-213 mm, the second – 15-300 mm. And this is not the limit of the capabilities of professional models.
Additional functions
When choosing a miter box, it is recommended to carefully read the functionality. Some models have additional options in addition to the basic ones.
- Magnetic guide – the presence of this element eliminates inaccuracies when cutting the workpiece, deviation from the desired line corresponding to the selected angle.
- Smooth angle adjustment – this option improves the quality of the cut and helps you select the optimal amount of its slope.
When considering a particular design, it should be borne in mind that for home use it is not at all necessary to spend money on purchasing a professional model. A compact or box-shaped miter box will do the job.
Cutting an arbitrary angle
Often the walls are not connected to each other at right angles, and the sawing has to be adjusted.
You can do this in two ways:
- using a homemade template made of cardboard or thick paper. If the baseboard is hollow inside, it is difficult to keep it upright. In this case, you need to make a corner in which you can place the product, like in a wort. We lay the corner on a pre-made stencil so that it matches the template, cut the product according to the mark;
- We make marks on the material with a pencil. To do this, we cut both products at an angle of 90 degrees, apply them to the wall and mark the abutment line. We find the point of contact of the skirting boards and transfer the markings to the material and cut them off.
The quality of the junction of the skirting boards to each other depends on the correct marking of the product. It is recommended to cut the corner first and then adjust the product to length, this will make it possible to redo the discrepancy if the material was cut incorrectly.
How to use
To design a cutting angle of a certain parameter, in addition to the miter box, you will need:
- pencil;
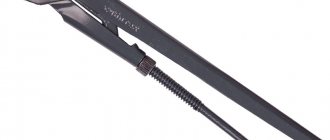
- hacksaw with fine teeth;
- roulette;
- ruler;
- sandpaper.
Before performing finishing work, it is recommended to try the tool on scraps to develop skills. At the same time, you should avoid a common mistake - poor fixation of the material being processed. During cutting, it moves, which leads to an oblique cut and injury due to the sliding effect.
How to cut corners on baguettes
Work with a miter box is carried out using special clothing and personal protective equipment. You will also need to focus on the process to avoid injury from the moving hacksaw.
When cutting the baseboard, you should adhere to the following order:
- place the workpiece in the device so that it fits well against the bottom and one of the sides of the body;
- check the correct position of the plinth in accordance with the selected angle;
- fix the part;
- make a cut with a hacksaw, reaching the very edge of the workpiece (this will prevent the end from breaking or splitting).
If there is a three-dimensional pattern on the plinth, it is important to make sure that after joining the sections there will be a smooth transition of image elements, lines and roundness.
The quality requirements for cutting ceiling products made of polymer materials are quite high, so saving time on preparation and cutting is not worth it.
Cutting a baguette is easy with a utility knife. The workpiece is passed through with a confident movement at a time. Before cutting, make sure that the markings are applied correctly. After placing the workpiece in the miter box, check that the marking line coincides with the corresponding gap on the body.
It is better to cut the plinth by placing both parts in the miter box body. At the same time, they are located in such a way that the front sides are adjacent to each other or are on the outer sides. The cut line should be perfectly straight. This is the only way to achieve a tight fit between the elements of the molded material.
How to cut a ceiling plinth without a miter box
To hide the uneven border between the walls and the ceiling, you can cut off the internal and external corners on the baseboard without a miter box. It would seem that there is nothing simpler in cutting off the edges of ceiling plinths: I made an angle of 45 degrees on each fillet and glued one to the other.
However, this is not true, because the angles in apartments, especially in old buildings, are not the same. One corner of the room can be 93 degrees, another 87, the third 91, etc. Due to the fact that the corners of the apartment are not the same, when joining the edges of the skirting boards cut at 45 degrees, gaps are formed between them, disrupting the harmony of the interior. To avoid gaps between the baseboards, you must strictly and strictly follow our advice.
To correctly cut corners without a miter box, you need:
- prepare a cutting tool. This could be a metal saw or a sharp knife. Take the ceiling plinth (otherwise called fillet) and place it in the corner of the ceiling in the same way as you will glue it;
- draw a line along the plinth on the ceiling and then remove the part;
- the next step is to place another fillet in this corner and draw a line along it. After removing the baseboard, you will see markings on the ceiling. The lines from the two baseboards will intersect at a certain point in the corner;
- Again, attach the first plinth to the ceiling along the markings and mark the intersection point on its inner part. Then remove the baseboard;
- From the marked point, draw a line to the opposite corner of the fillet. This will be the place where the baseboard will be cut. Do the same with the other baseboard. Next, use a sharp knife to cut the inner corner along the drawn line. Place the cut skirting boards one on top of the other in the corner of the room. If there are no gaps between them, you can stick them on. If the gap is still visible, then correct it with a knife.
If the angle in the apartment is exactly 90 degrees, then it is best to use the second method. You need to take cardboard and draw two parallel lines at a distance greater than the width of the baseboard. Next, mark the center between them and attach a protractor. Mark the angle at 45 degrees. Place the cardboard against the corner to check the markings are correct. Transfer the markings to the plinth, placing its bottom edge against one of the lines, and cut the corner on the fillet with a sharp knife. Do the same with the other baseboard.
The next option for cutting the inner corner of a plinth without a miter box is also simple and interesting, and does not require much labor effort. Measure the end of the baseboard and measure this distance from its edge. Draw a diagonal line between the bottom edge mark and the top corner of the baseboard. An angle of 45 degrees will be accurate. Cut the inner corner along the line. Cut the second plinth in a mirror image.
Sawing off the outer corner of the floor plinth
Rules for sawing the outer corner of the product:
- We place the miter box on the table parallel to the master;
- We press the baseboard from the master's side;
- we place the right product on the right, the left one on the left, bring it to a line that is located diagonally, saw off from the bottom up;
We connect the parts, we get an outer corner with the vertex towards us. We take into account that the ceiling plinth is cut according to a different pattern.