SHARE ON SOCIAL NETWORKS
FacebookTwitterOkGoogle+PinterestVk
Keeping a tool in good condition is a matter of honor for any professional or home craftsman. For cutting applications, perfect edge functionality is of paramount importance. A device for sharpening drills allows you to maintain it in the desired condition. It can be purchased ready-made or made independently. How to do this and what you need to know for this is in the materials of this article.
Drill sharpening devices are needed to maintain the tool in proper condition.
The main types of factory sharpening machines for drills
Any tool used in work requires technical support. This is the replacement of exhausted parts and consumables, preventive actions, restoration of the functional usefulness of elements. The bits used for drilling and cutting need to be sharpened, that is, their cutting part needs to be renewed.
Units for sharpening drills and other tools come in different types
Devices for sharpening drills can be divided into two types:
- with the ability to adjust parameters (angle, diameter);
- with established and fixed dimensional indicators.
The former are characterized by the strength of the body material, which is made of metal, stationary installation (the machine is fixed to the surface of the workbench with bolts) and wide functionality: it can be used to restore the cutting edges of drills of various diameters. Machines of the second type often have a plastic body, a small grinding wheel and a jig with holes corresponding to a specific drill size.
The industry produces a huge variety of sharpening machines. It should be noted that the specific design of these devices is quite understandable to skilled people. This is why many people prefer to use homemade tools for sharpening drills. There are several advantages to this approach:
- cost savings;
- use of unclaimed elements;
- the opportunity to realize personal abilities and gain additional experience;
- creating a device for specific purposes and tasks.
The most convenient are devices with adjustable diameter and angle parameters
It is about making sharpening devices with your own hands and their use that will be discussed in this article.
Tips for making tools for sharpening drills with your own hands
It is worth noting that drills used for working on wood, plastic, drywall and other materials that have a relatively low density (with the exception of hard trees: oak, hornbeam, white acacia, etc.) rarely need sharpening. A similar tool for metal behaves completely differently. Here, restoration of the cutting edge may be required frequently, depending on the intensity of work and the characteristics of the material being processed.
Oddly enough, but more often it is professionals who prefer to use their own devices. Sharpening a metal drill with your own hands requires certain professional skills:
- developed eye;
- knowledge of the features of electrical devices;
- understanding the specifics of metalworking specific products.
Manual processing is ineffective even with a high level of professionalism simply because it takes a lot of time. A homemade device must be mechanized. To manufacture it, it is necessary to make certain calculations, select an electric motor and additionally manufacture other structural elements that meet the technical requirements.
By making devices with your own hands, you can create exactly what you need in your work.
In order to ultimately get a device with the desired functionality, you should first complete a drawing. Today there are quite a lot of devices for sharpening drills. If difficulties arise in terms of design, you can turn to the Internet, where many schemes for homemade sharpening installations are offered.
Helpful advice! The drawing of the future sharpening device must contain the dimensions of all structural elements, including fastening devices.
Design of a machine for sharpening drills and recommendations for its manufacture
Special machines for sharpening drills are designed in such a way as to simultaneously solve two main tasks, which are to provide:
- feeding the cutting edge of the tool being processed to the flat side of the abrasive wheel at the required angle (for this, production machines and simple devices for sharpening drills are equipped with an angular radius scale, which allows you to set and control angles in the vertical and horizontal planes);
- the ability, after sharpening the main cutting edges of the drill, to backfill it (for this, a rotation axis must be present in the clamping mechanism of the drill sharpening machine).
Machines designed for sharpening drills have been in use for over 100 years. Of course, the sharpening machine of earlier times, when compared with modern models, looked like a simple sharpener, but the principle by which such devices work has not undergone major changes. Making such a device yourself is very simple.
The machine must ensure the location of the drill according to the sharpening diagram
Before making a drill sharpener with your own hands, you need to prepare the following consumables, equipment and tools:
- welding machine;
- electric drill;
- grinder;
- standard set of locksmith tools;
- corner with shelf dimensions 30x30 and length 10–15 cm;
- metal plates of various thicknesses (3–5 mm);
- a hairpin or a piece of steel rod with a diameter of 10–12 mm;
- washers, screws, bolts and nuts of various sizes.
Before making a sharpening machine, it is advisable to find drawings of factory models and use them as a guide during assembly.
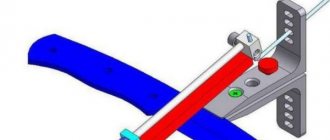
Drawing of a device for sharpening drills (click to enlarge)
The first thing to make is the frame of a homemade sharpening device, for which a steel plate is used, to which, based on factory drawings, a piece of steel rod with a diameter of 12 mm is welded. The angle at which the rod is welded to the plate should be 75°.
A washer is mounted on a rod welded to the frame, acting as an axis: it will be used as a support bearing. The angle through which the bed must rotate during sharpening of drills will be small, so there is no point in using a standard ball bearing as a support.
A stock for placing a tool that needs to be sharpened is made from a piece of angle iron. One of the sides of the corner profile, facing the grindstone, is ground at an angle of 60°. Based on the drawing, you need to weld a bracket to the stock, which will be fixed in the rotary unit of your machine. As a result, you will get a design whose angle relative to the surface of the grinding wheel, with the stock and bed in a parallel position, will correspond to the sharpening angle of the drill.
Complete machine
The sharpening machine of the proposed design has a fixed angle of inclination, but it is better if this angle is adjustable. In this case, you will have the opportunity to use the machine to restore the parameters of drills used in processing various materials.
After making a homemade sharpening machine, it is necessary to carry out its adjustment tests, which are as follows:
- The bed and the tool placed in it are installed in such a way that the tip of the drill is perpendicular to the axis of rotation of the grinding wheel.
- By rotating the stock by the appropriate degree, a backing cone is formed on the back surface of the drill.
- After the test sharpening is completed, its quality is checked both visually and using a template.
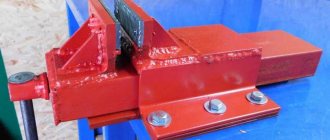
Securing the machine with a clamp
If the setup tests were successful, you can begin finalizing the machine:
- A guide is welded to the bottom of the stock along which the stop for the drill shank will move.
- Then you need to make the stop itself, for which you use a metal coupling and a piece of angle, connected by welding. The movable stop in the design of such a machine is needed in order to set the limit values for grinding the edges of the drill with its help. This ensures that both edges are processed evenly. The stop is fixed in a certain position using a screw.
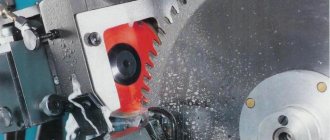
Sharpening a drill on a homemade machine
When using such a device, which has the ability to be rotated to any angle, the drilling tool can be sharpened both with the outside of the grinding wheel and its side (radial) surface.
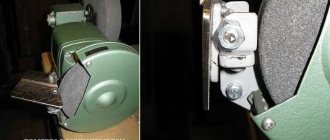
In order to be able to make precise adjustments, it is better to fix the device in question on the frame of the sharpening machine using a clamp, rather than installing it permanently. Despite the fact that the device described above has a fixed bed angle, this parameter can be changed. To do this, it is enough to place a wedge with the required slope under the frame.
A homemade sharpening machine for straightening drills can also be made in a different design.
- Next to the drive motor of the grinding machine, parallel to the axis of rotation of its shaft, a U-shaped portal is fixed, in the upper part of which a tool bed is installed, operating on a swing principle.
- When choosing the height of the portal, it should be taken into account that the working end of the tool placed in the stock must be above the axis of rotation of the grinding wheel.
- The bed in the sharpening machine of the proposed design can be rotated almost 180°, which allows it to be used for sharpening tools with both upper and lower pressure.
- The horizontal angle at which the stock and the sharpened tool placed in it can be rotated can also be adjusted and is selected depending on the type of drill.
- The stops for the drill shank in a machine of this design are made of bushings with clamping screws, which allows you to adjust the overhang of the working part of the tool with millimeter precision. Such bushings, which securely fix the drill and prevent it from moving horizontally, are installed in special grooves in the stock.
- To ensure the correct position of the drill in the sharpening plane, the thrust bushings are equipped with diametrical pins. Having fixed the drill in the required position using such pins, they first process one side of the tool, and then, turning it 180°, sharpen the second cutting edge. An indicator that the drill has been sharpened is the free movement of the machined end of the tool along the surface of the sharpening wheel when the bed is rocked.
The machine of the described design can be used to sharpen drills with a diameter of 3–15 mm. This equipment provides the same high quality processing as factory models for similar purposes.
Specifics of sharpening drills with different shapes of the cutting part
The first sign indicating that the drill needs sharpening is a characteristic creaking sound at the beginning of its operation. This indicator cannot be neglected, because it can have further negative consequences:
- the edge of the drill will begin to crumble;
- the engine will experience overload;
- burrs will appear on the treated surface.
First of all, the sharpening method will depend on the shape of the cutting part of the drill
The question of how to properly sharpen a drill will be discussed using the spiral version as an example. The sharpening method depends on the shape that needs to be given to the cutting part. The type of sharpening can be as follows:
- single-plane;
- two-plane;
- cylindrical;
- conical
During single-plane sharpening, the drill is simply placed parallel to the abrasive wheel and does not move. In this simple way you can sharpen drills up to 3 mm in size. Two-plane sharpening is performed in a similar way.
Conical sharpening is somewhat more difficult. The drill should be taken with both hands: with your left hand closer to the conical working part, with your right hand by the shank. The tool must be pressed against the end of the grinding wheel with the cutting edge and the rear plane. Use your right hand to rock the drill. Cylindrical sharpening is also performed in a similar way.
Sharpening of a conical drill is done from the end side of the grinding wheel
Helpful advice! If the action is being carried out for the first time, before sharpening drills suitable for use, it is better to do test processing on a used tool.
How to sharpen a drill correctly: possible mistakes and their prevention
Despite the large amount of information on how to sharpen drills for metal, even with sufficient theoretical and sometimes practical knowledge, many make a number of mistakes. It is not difficult to predict the consequences: during turning, the cutting edge crumbles, the tool overheats, the cut has dimensional errors, and roughness and unevenness are possible on the machined surfaces.
Typical errors when sharpening drills include the following deviations from the norm:
- Different cutting edge lengths. The drilling center is offset relative to the tool axis. A drill sharpened in this way will experience runout and it will become extremely difficult to hit the center exactly. Most often, such drills break during operation.
- Asymmetrical angles with a precisely aligned center. After such processing, the tool will have only one working edge left. The drill will heat up, and the hole it makes will acquire a diameter larger than that of the tool.
Not only beginners, but sometimes even professionals make mistakes when sharpening drills.
The errors listed above are most likely the result of an incorrectly designed sharpening device. And here again it’s worth returning to the drawings. A device for sharpening drills with your own hands must have a functional sharpening angle holder. Its use will ensure correct processing of cutting surfaces.
Indicators of sharpening angles for metal drills
Regardless of the device on which sharpening is performed, the process must be controlled. In this regard, the most advanced machines are electronically controlled. The possibility of adjustment on electromechanical devices also allows for high-quality processing.
A very important indicator is the sharpening angle. It is not the same for different materials, since the latter differ in the level of density and specific structure.
Table containing information about the correct sharpening angles for drills:
| Processed material | Sharpening angle |
| Steel, cast iron, carbide bronze | 115-120° |
| Soft bronze, brass alloys | 125-135° |
| Red copper | 125° |
| Aluminum and soft alloys based on it | 135° |
| Granite, ceramics | 135° |
| Wood of any species | 135° |
| Magnesium and alloys based on it | 85° |
| Silumin | 90-100° |
| Plastic, textolite | 90-100° |
It is convenient to control the correct sharpening of drills using templates.
Helpful advice! When purchasing or making your own device for sharpening drills, you should immediately take care of the availability of sample templates. Processing cutting surfaces with a focus on visual memory will most likely not bring the desired results.
Drill angle: individual approach to each material
Depending on the type of surface, requirements for processing quality and a number of other conditions, the shape of the drill can have a very different appearance.
The most common option is when its working part consists of two cutting edges twisted together in a spiral, forming a cone at the end of the drill, the height of which determines the sharpening angle of the drill.
Its value depends on the hardness of the material being processed and can have its own values for each material:
- carbon steels, alloys of cast iron and hard bronze - from 116º to 118º;
- products made of brass, soft bronze and copper – from 120º to 130º;
- aluminum and wooden surfaces – 140º;
- polymers and plastics – from 90º to 100º.
Conditions for a long and active drill life
If we exclude the thoughtless (or hopeless) option of using a drill without pobedit tips for working on concrete or stone (when the tool fails literally in a minute), then the cutting edges become dull most actively when drilling hard metals.
The service life of the drill in this case depends on the hardness of the surface being machined, as well as the rotation speed, feed force and the presence of cooling of the cutting tool. It is extremely easy to determine when the cutting qualities of a drill are deteriorating by the characteristic sharp whistle and the need for more pressure on the drill.
As a result, the drill heats up very quickly, drilling time increases significantly with a simultaneous decrease in the quality of the resulting hole, and the drill must be replaced to continue normal operation.
It’s better to lose an hour and then drill in five minutes
Since drills are considered consumables and have a relatively low cost in small sizes, many simply throw them away and replace them with new ones.
However, this approach can only be justified if the volume of work is small, the price of the part is low, and the proximity of a hardware store is close. It is much more economical and faster to sharpen a metal drill with your own hands.
There are a lot of devices for carrying out this operation, and, as a rule, the price of such equipment directly depends on the speed, versatility and quality of processing of the cutting tool.
The correct sharpening form is the key to effective work.
As a result of processing, the cutting edge of the drill is given a certain geometry, a priority for a particular diameter of the drill and the structure of the surface being processed.
To obtain the required shape, accordingly, different methods of sharpening the cutting edge are used. There are single-plane, conical, two-plane, screw and cylindrical types of sharpening.
At home, the first two methods are most often used as the simplest, and drills with a diameter of up to three millimeters are sharpened in one plane, ensuring a thirty-degree slope of the rear corner.
The disadvantage in this case is the high probability of destruction of the working part of the edge due to its thinning, therefore, for drills of larger diameter, sharpening in the form of a cone is usually used, forming an angle at their tip in the range of 118-120º.
Ways to achieve the desired sharpening quality
In principle, if you have certain skills, sharpening can be done without an auxiliary tool. The main thing is to maintain the required processing angle, as well as the equal length of the working surface of the cutting edges and their symmetrical inclination relative to the drill axis.
However, achieving this in practice is not so easy; a very small error in any of the listed indicators is enough, and your drill will not work properly. The use of special devices simplifies the process, but you must agree that it is not advisable to purchase an expensive machine to put a pair of metal drills in order.
In addition, a homemade device for sharpening drills will help you cope with this task, albeit with less comfort, but also not bad.
With all the variety of design options, the operating principle of all devices of this type is based on the formation of a rigid template or guide along which the tool to be sharpened is fed to the emery wheel in a certain plane.
A nut, a screw, a direction - that’s all the device
Perhaps one of the fastest and most affordable options is to make a device for sharpening drills from a nut. Its six faces form an angle of 120º on adjacent planes and can serve as an excellent template for setting the desired sharpening angle of the cutting edge of the drill.
The procedure for making such a device is quite simple and does not take much time. The nut, flat side up, is clamped in a vice and, using an angle grinder (grinder), longitudinal cuts are made along the line connecting the opposing corners of the hexagon.
On one side of the hardware you can make six recesses (according to the number of vertices), thus forming three guides.
The size of the nut, as well as the width and depth of the guide sample, are selected based on the diameter of the drill being sharpened. After this, the entire outer surface of this simple device is carefully processed with sandpaper or a file to remove burrs.
That's all, the simplest device for sharpening drills with your own hands is ready. Now the drill that requires sharpening is placed inside the guide (between two opposing corners) so that the edge being processed slightly protrudes beyond the top of the hexagon.
The device is clamped in a vice, tightly fixing the drill in the groove of the nut with the tip up, and using the same grinder, carefully grind off the protruding cutting edge, using the side surfaces of the hardware as a guide, forming a sharpening angle of 120º.
If necessary, the drill in the groove can be secured with a clamp, and instead of an angle grinder, a sharpening machine with an emery wheel is used.
There is never too much hardware: modernization of a nut device
This design can be somewhat improved by making deeper (depending on the diameter of the drill being sharpened) V-shaped cuts in the opposing vertices and welding a smaller nut on the same side of the device. In this case, the drill can be fixed with a clamping screw screwed into a nut welded on top.
Stand for sharpening drills: design features
Racks, like other devices for sharpening drilling tools, can be of industrial or household type. Industrial ones are distinguished by their large size and advanced functionality, allowing drills to be processed in various ways. Household ones are much more compact, but have fewer options.
Racks for sharpening drills are available for both industrial and household use.
Typically, racks come complete with sharpening machines. They are attached to the frame using bolts and nuts. The drill to be sharpened is fixed in the clamping device of the stand.
The main design elements are:
- base;
- a rod to which a drill is attached directly using mobile and stationary clamping devices;
- emphasis;
- carriage and feed adjustment screw;
- clamping screws and nuts.
By analogy with the factory version of the racks, craftsmen are trying to make a similar device for sharpening drills with their own hands. In such cases, special attention should be paid to two structural units and their functioning:
- the position of the drills is set using an axis and an adjustment screw;
- the required angle is created by the corresponding inclined position of the base.
Racks are sold independently or as a set with sharpening machines
The most difficult aspect when assembling a device yourself is ensuring accuracy of processing. In industrially manufactured racks, these functions are performed by a special scale that is part of the structure. In homemade designs, the most reliable way is to use templates.
Homemade device for sharpening drills from nuts
One of the simplest and most accessible devices for sharpening drills is a device made of nuts. The algorithm for its production may be as follows:
- You need to take two nuts of different sizes. On the larger one, measure 9 mm on three sides of one edge and draw it with a marker. Do the same on the opposite side. Then clamp the nut in a vice and cut out the marked fragments.
- Next, you should lay the drill and make sure that the sharpening angle of the tool, which is 120°, and the edges of the nut coincide.
- Using welding, weld the smaller nut to the larger one, placing it against the cutout surface.
- A bolt must be screwed into the smaller nut to secure the drill. You will get a self-made sharpening angle holder.
Helpful advice! When making a device for sharpening drills from nuts, you should not simplify the design by replacing the clamp with a bolt by simply fixing it by hand. This will significantly complicate the processing process.
The sharpening device can be made from two nuts and a bolt
The inserted and clamped drill is brought to the sandpaper and ground. The nuts hold the desired angle and do not allow you to grind off more than necessary.
There are many skeptical views on the functioning of this device. First of all, concerns are expressed that the metal of the nut will also be worn down when touched by an abrasive wheel, and quite intensively, since it is soft. As a result, the device will not last long.
Related article:
Knife sharpening tools: a quick and easy way to make your blade sharp
Main types and characteristics of devices. What materials are used to make sharpeners? How to sharpen different knives correctly.
Drill attachment for sharpening drills: basic elements
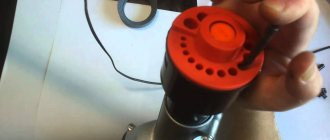
Almost all drill attachments for turning drills offered on the market have the same design. This is a plastic case in which a sharpening element of a certain shape is placed, allowing the cutting surface of the tool to be processed at the desired angle. The device is rotated using a drill. The connection to the shaft is made by a special coupling.
The housing cover has holes into which drills of appropriate diameters are inserted. The holes are made so that the cutting edge comes into contact with the sanding wheel only in the required places. The absence of such a cover-conductor greatly complicates the sharpening process, since the drill has to be held manually.
A device for sharpening a drill is a plastic attachment into which a sharpening element and a drill are placed.
There are quite a lot of demonstration videos “Drill sharpening devices” on the Internet. Before using the purchased attachment, you should refer to the video with instructions, this will help you avoid mistakes.
By analogy with factory ones, homemade devices are most often made:
- the body is made of metal;
- The drill chuck and the emery wheel are connected by a mounting ring;
- the sanding element is given a cone shape, which is usually created on a lathe;
- the lid with holes of different diameters can be made of wood, metal, polymer with additives.
The most difficult step when making a drill attachment with your own hands is creating the cover.
Sharpening products of other designs
In addition to twist drills, tools of other designs are used for metal processing. You can debug the following tools at home.
Cone gimlets
You can sharpen a step drill using a regular file. The cutting edge of the product is sharpened at a right angle.
If a cone drill becomes dull in a limited area, then sharpening should be done without going beyond the damaged area.
Video:
Crowned
When debugging hole saws, a special device is used and you need to know at what angle the metal should be removed from the cutting surface. Considering all the difficulties and time spent on performing the procedure, it is better to turn to experienced craftsmen for sharpening.
Video:
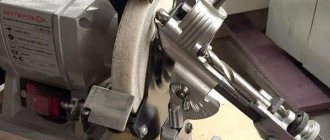
Device for an angle grinder: pros and cons of different options
A power tool that is successfully adapted for sharpening drills is a grinder. There are a lot of possible applications. There are two main ways:
- the drill holder is a separate structure;
- The guides and mount are fixed directly to the grinder.
The grinder device has both advantages and disadvantages
As for the first option, it should be noted that there are a large number of similar devices for sharpening drills with your own hands. Videos on the Internet containing instructions demonstrate the manufacturing process in detail and in an accessible manner.
The second method is less common. That is why it is worth talking about it in a little more detail. The device is fixed to the casing of the power tool. The guide is made of a metal angle; the position of the trailing edge is fixed manually. The device as a whole is compact, consisting of quite affordable components.
Like many homemade devices, this device has also been subject to serious criticism. The labor-intensive manufacturing method is noted. There are concerns that without adjusting the speed, the drill will overheat during processing. The most critical comments concern the destructive effect of sharpening on the sides of the wheel. Damage to the reinforcing layer can lead to the disc falling apart into separate pieces.
Important! Turning a working angle grinder towards the user is strictly prohibited by safety regulations.
What is needed for the procedure
To sharpen a metal drill yourself, you must first determine what tasks it will be used to solve. In production conditions, for sharpening drills, special devices are usually used to ensure maximum accuracy and productivity of such a process. When sharpening drills at home, you always have to look for ways to make the result of this process high-quality.
The minimum set for sharpening metal drills should include:
- emery machine;
- grinding wheels of varying hardness, selected depending on the material of the drill that needs to be sharpened;
- a container for coolant and the liquid itself, which can be ordinary water (or engine oil);
- devices that allow you to maintain the correct sharpening angles.
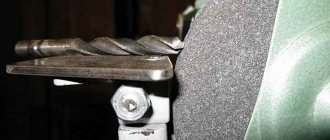
The drill stand is installed next to the abrasive disc and allows you to sharpen the cutting edge at a precise angle
When sharpening drills with your own hands, you need to pay attention to the following parameters:
- the angle between the plane of the front part of the drill and the base of its cutting edge (this angle, measured in the main cutting plane, is called the front);
- rear angle, which is measured in the same way as the front angle, but along the rear plane of the drill;
- tool tip angle measured between two cutting edges.
To sharpen drills for metal, according to all the rules, you must adhere to the following values of the above parameters:
- front angle of the cutting part – 20°;
- back angle – 10°;
- apex angle – 118°.
Table 1. Drill point angles depending on the material being processed
Table 2. Back and front angles of the drill
If you need to sharpen a metal drill in production or at home, you must strictly follow safety precautions. This process is accompanied by the formation of a large number of sparks, from the effects of which it is necessary to protect the organs of vision. In addition, since this procedure is performed with sharply sharpened metal instruments, it should be carried out using gloves to protect your hands.
A simple tool for sharpening drill bits from door hinges
A video demonstrating how to make a do-it-yourself device for sharpening drills from a door hinge has gained particular popularity. Although the process and result itself are considered technically imperfect by many, the idea deserves attention:
- The door hinge is shortened, one part is used for fixing to the handles, the second (cut off element) makes it possible to set the required sharpening angle.
- A corner is welded to the larger side of the hinge, a thread is cut in it, a bolt is inserted - this part of the structure will secure it to the hand rests.
- Next, a corner is set and welded, which will become a guide.
The design is complemented by a pin, which is fixed by welding, a nut and a washer. The nut and washer will allow you to firmly install the drill for turning.
The main complaints about this rather simple device for sharpening drills with your own hands are as follows:
- The drill is fed from top to bottom. This makes the back surface completely flat. Such a tool will overheat greatly during operation.
- The device serves solely to orient the drill. The quality of sharpening is questionable.
A device for sharpening door hinges is one of the easiest to make yourself.
This manufacturing method may well be improved, taking into account technical comments. A device made from scrap materials can acquire more advanced functionality.
Homemade device for sharpening twist drills
A sleeve can be used as a simple tool for sharpening twist drills. Its internal dimensions must correspond to the diameter of the tool.
Important! The drill installed in the sleeve should not wobble even slightly. A deviation of 1° from the required angle will already lead to poor quality sharpening.
It is better to immediately prepare various copper or aluminum tubes, the diameters of which will correspond to the sizes of the drills available in the home workshop. Guides for turning tools can be made much simpler - from a wooden block. This device was used back in the last century. With some improvements, it can still be used today. Holes in wood must be made at a certain angle, allowing the drill installed in them to take the position necessary for proper sharpening.
When sharpening a twist drill, it is important to strictly adhere to the desired angle
A homemade device for sharpening drills with your own hands must have a tool:
- it ensures the correct position of the drill in relation to the grinding wheel;
- serves as a support for the tool being processed.
When installing a sharpening device, you should pay enough attention to the choice of the grinding wheel. Most drills are made from high-speed steel. The most suitable abrasive is silicon carbide wheels (marked 64C) with a grain size of 8H-16H. Such sharpening stones can become very hot, so the contact between the sharpener and the drill should not be prolonged.
Practical recommendations
An emery machine equipped with a sharpening wheel is a universal device that allows you to sharpen a drill for metal with high quality even at home. Using such a device, the technological operation should begin with processing the back surface of the tool. The drill to be sharpened is held in relation to the grinding wheel so that its cutting part is parallel to the surface of the wheel. Sharpening performed using this method is optimal for metal drills whose diameter does not exceed 10 mm.
To efficiently sharpen drills with a diameter greater than 16 mm (including those equipped with carbide plates), it is best to use an emery machine with a special device. The use of the latter allows not only to control the sharpening angle of drills of significant diameter, but also to carry out this process with maximum safety.
Accuracy of sharpening in a special device is achieved by precise fitting and reliable fixation of the drill in the mandrel
Sharpening machines equipped with additional accessories are recommended for use in cases where it is necessary to sharpen drills of the following categories:
- used for drilling blind holes, which is characterized by a decrease in axial cutting force;
- universal, characterized by increased strength;
- used for drilling deep holes and characterized by a small point size.
The main task that devices that allow high-quality sharpening of a metal drill on a sharpening machine solve is the correct orientation of the cutting part of the tool in relation to the surface of the abrasive wheel. That is why the design of such a device has a special base plate. The machine itself, the motor that rotates the grinding wheel, and the rotary column on which the tool being processed is fixed are installed on it. The use of such a column allows you to sharpen drills in almost any spatial position, positioning their cutting part in relation to the surface of the grinding wheel at the required angles.