Why do you need a dehumidifier in your apartment?
The most unwanted and unexpected guests in our home are mold and mildew. Their spores are constantly hovering around, but most of the time they are in a state of hibernation, because they need certain conditions to activate:
- humidity;
- high room temperature.
A temperature above 20 degrees Celsius with a relative humidity of 80% is enough for you to see with the naked eye the growth of colonies of mold and fungi on the walls of rooms. Why, in this case, for example, does your neighbor not have similar troubles? The answer is simple: the air temperature in all apartments is most often the same, but the humidity can vary significantly.
In the fight against the effects of dampness, you can, of course, significantly lower the temperature in the apartment. But who wants to live in constant cold? In this regard, the best option is to install a dehumidifier.
Among other things, he will guard the health of the apartment residents. The body's immunity is directly dependent on the humidity of the surrounding air: the drier it is, the more difficult it is for harmful bacteria and microbes to multiply.
Dehumidification will also eliminate perspiration from the windows.
Use of dehumidifiers for basements
Basements are often exposed to dampness resulting from high air humidity. The accumulation of condensation on the ceiling and walls of the room leads to the appearance of rust, as well as fungus and mold. Therefore, it is necessary to purchase a dehumidifier that will reduce the humidity level.
Dehumidifying your basement can be a DIY project that can save you money.
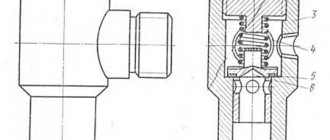
Operating principle
Modern dehumidifiers come in many models, which can differ significantly from each other. The first difference is the working volume, that is, the amount of water filtered from the air by the device. This parameter is measured in liters per day (24 hours).
To choose a device with the optimal volume, consider the size of the room in which it will be installed. Pay attention to the price of the equipment. The larger the volume of the dehumidifier, the more expensive it is, but such a device will require less maintenance.
Dehumidifiers can be portable or stationary. The first ones are mobile, you can use them in different rooms if necessary. Stationary ones are mounted on the wall, they cannot be carried, but they have greater productivity.
The operating principle of the dehumidifier is based on changes in humidity due to condensation. Air is drawn from the room using fans into the device. There it passes through an evaporator, which is a radiator whose temperature is lower than the air temperature in the room. Moisture condenses due to this temperature difference.
The simplest air dryer circuit
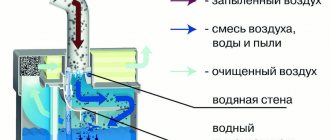
Drops of condensate flow down and are collected in a special container. After passing through the evaporator and cooling, the air is heated and supplied to the outlet, from where it goes back into the room already dry and warm.
Note! When using such a dehumidifier, you need to make sure that the building has a high-quality forced ventilation system that supplies fresh air to the room and removes mixed air.
Condensation air dryer diagram
Such dehumidifiers are often used in the following cases:
- to prevent indoor windows from fogging up;
- to improve the comfort level of everyday life;
- during repair work.
Any finishing materials during repairs will dry much faster when using a dehumidifier. And the technology does not suffer at all: the temperature in the room remains the same.
Algorithm for creating a device with your own hands
Air dehumidification is achieved by three simple principles:
It would seem that heating is the easiest way to dry the air in a room. But in reality, no one likes to constantly be in an apartment that is too hot. Therefore, we will consider the following two options: adsorption and condensation of moisture. You can make dehumidifiers based on these principles yourself.
Desiccant type dehumidifier
Perhaps the simplest option that does not require large financial and time expenditures.
- Take 2 plastic bottles. The volume of each is at least 2 liters.
You will need 2 liter plastic bottles
Use silica gel as filler
You can use a processor cooler as a fan in such a dehumidifier.
Example of connecting parts of desiccant bottles
Thus, you will get a low-noise and fairly efficient device that can easily be powered from a USB connector or mobile phone charger. The fan creates an inflow force and forces air through the silica gel, and the dried flow comes out of the perforations at the bottom of the structure.
Condensation type dryer
This device is more complex than the previous one, but the basis of the necessary design is easy to find in every modern home. Roughly speaking, such a dehumidifier can be made, for example, from an old refrigerator.
Example of a refrigerator dehumidifier
- Remove the door from the freezer and refrigerator compartments by disassembling the hinges. This is easy to do, since most models are equipped with removable doors.
- Based on the dimensions of the removed doors, measure the plexiglass plates at least 3 mm thick.
- At a distance of 30–40 cm from the edge of the plate, cut a hole into which the fan will be mounted. Its dimensions must match the protective grille of the pressure unit.
- Mount the fan and secure its grille with self-tapping screws. The device should work as a supply pressure unit, blowing a flow of air into the refrigerator.
- Drill a series of holes in the top of the plexiglass plate. Their total area should be equal to the area of the fan opening.
- Put in order the standard system for removing condensate from the housing or modify it. To do this, connect the external pipe above the compressor to the storage tank with a polymer hose.
- Secure the plexiglass with self-tapping screws in the place where the refrigerator door should be. To seal joints and insulate them, use self-adhesive tape or silicone.
Homemade adsorption dehumidifier for home
Connecting plastic bottles when making a desiccant
The adsorption dehumidifier is the easiest to install. To successfully complete the task you must:
- take 2 plastic bottles with a capacity of 2 liters;
- using a hot thin metal knitting needle, make many small holes in the bottom of one bottle;
- cut the bottle with the finished holes in half;
- in the upper half, in the lid, also make small holes;
- insert the second part into the first half of the bottle, neck down;
- pour 200 g of adsorbent into the finished structure;
- cut off the bottom from the second bottle;
- the second bottle is inserted into the first container with adsorbent;
- the joint is fixed with tape or adhesive tape to ensure tightness.
Silica gel, which has high moisture absorption rates, is ideal as an adsorbent. In addition, it can always be dried in the oven, ensuring the material is reusable.
Important! To increase the functionality of the plastic bottle dehumidifier, install a computer fan at a distance of no more than 10 cm, which will supply moist air to the device.
Humidity control
How to solve the problem with humidity control? Factory dehumidifiers are equipped with built-in sensors to control air temperature and humidity. But what about a homemade device? You can use a thermometer, but it is not necessary and will not tell you anything about the humidity level.
Use a hygrometer. It can be arrow or digital. You can buy it in many specialty stores. In addition, such a device is often included in the design of some modern watch models.
A hygrometer will help you control indoor air humidity
When using a homemade dehumidifier, do not forget that too dry air can be harmful. After all, in addition to pathogenic organisms, there are also beneficial bacteria around us that also need moisture. A hygrometer will help you determine if you need to use a dehumidifier. If the humidity in the apartment has reached a critical 80%, at which mold and fungi begin to actively multiply, feel free to turn on the device. Pay attention to weather conditions: in some cases it may be necessary to use a humidifier rather than a dehumidifier.
As you can see, you can easily make a dehumidifier yourself. This solves another problem - using an old refrigerator, which is a pity to throw away and has nowhere to put it. Share with us your experience in dehumidifying the air in your apartment. Easy work for you and comfort for your home!
Mini dehumidifier for an apartment: features of the model range
Schematic diagram of the dryer device
Ballu BDH-25L
Processes 210 m3 of air in 24 hours of uninterrupted operation. It eliminates up to 25 liters of water, is equipped with a hydrostat and electronic control. With its help, you can reduce humidity levels to the required parameters in 2 hours. The device has automatic control and turns off when the tank is filled with liquid. Its main disadvantage is the small tank volume of 6.5 liters. At high humidity levels, it fills within 12 hours;
Timberk
Able to adjust the intensity of drying the room to the humidity levels in it. It works autonomously. With constant operation, the device increases the temperature in the room by a couple of degrees, which is especially unacceptable in the summer. Its main disadvantage is noise;
Hyundai
It is distinguished by its compact size and aesthetic appearance. It is capable of eliminating no more than 10 liters of water in 24 hours, which allows it to be used in a room of up to 20 m2.
Important! When purchasing a product, you should pay attention to the noise level of the device, which, in accordance with sanitary standards, should not exceed 40 dB.
But it is not at all necessary to purchase an expensive device in a store. You can make it yourself from scrap materials with very little effort.
How to make a dehumidifier with your own hands
Any climate control equipment is quite an expensive item. Desiccant is no exception. For a family budget, spending several thousand or even tens of thousands of rubles can be a significant blow. The presence of this device in the apartment is an important condition for maintaining a favorable microclimate throughout the year.
An air dehumidifier is equipment necessary to maintain a favorable microclimate. You can make the device yourself
If you don’t have enough money to purchase equipment in a store, the way out of the situation is quite simple. You just need to know how to make a dehumidifier with your own hands.
Harm from high indoor humidity
It is known that the concentration of moisture in the air has a significant impact on human health. Excess moisture is harmful not only to people and pets, but also to buildings, furniture, equipment and other items.
What harm does excess moisture in a room cause in practice?
- The appearance and spread of mold and mildew.
- Decreased immunity, increased frequency of colds.
- Deterioration of breathing, development of allergic processes.
- More severe exposure to high temperatures in summer.
- Destruction of wooden furniture and leather goods.
- Peeling of wallpaper from the walls (mold and mildew develop under it).
- Damage to floor coverings.
- Destruction of finishing materials, plaster, drywall.
- Breakdowns of household and computer equipment.
For mold and mildew to actively spread, a combination of two factors is needed: high humidity and high temperature. This microclimate is typical for many houses and apartments, and such conditions can be maintained all year round. At this time, there is a lot of precipitation and there is a high probability of heating the room, through natural exposure to the sun or using heating devices.
Fungus and mold most often form on walls. Favorable conditions for their rapid spread are temperatures above 20 degrees and humidity around 80%. In such conditions, the formation of new foci of mold and the growth of old ones on the walls occurs rapidly. These processes are visible to the naked eye.
Design and principle of operation of a household desiccant
Today you can find a wide variety of models of household and industrial dehumidifiers on sale. They differ in functionality, degree of efficiency, reliability, durability and cost.
There are portable and stationary dehumidifiers. Mobile devices are easy to use, as they can be quickly installed in the desired room without any problems. But stationary devices have higher performance. They are most often mounted on the wall.
A typical desiccant consists of the following parts:
- Fan powered by an electric motor.
- Evaporator (cold heat exchanger) – a radiator with a low surface temperature. Coolant (freon) circulates through the radiator.
- A container for collecting condensate that accumulates and flows down the walls of the evaporator.
- Drainage tube for removing liquid from the device.
- Condenser (hot heat exchanger). Located at the “outlet” of air from the device. Raises the air temperature to the required levels so as not to “freeze” the room.
- A control panel that regulates the intensity and level of condensation, and the temperature of the outlet air.
Working principle of a dehumidifier
The operating principle of dehumidifiers is based on the condensation of moisture from the air. The device works as follows:
- With the help of fans, air from the room enters the device.
- Air enters the evaporator. Due to a sharp temperature change, moisture condenses (transitions from gaseous to liquid state).
- Drops of the resulting liquid flow down the evaporator tubes into a special collection container. When a certain level is reached, water is removed from the dehumidifier using drainage pipes.
- The dried air passes through a high-temperature radiator and is heated to the desired temperature before entering the room.
- The room is saturated with dry and warm air.
Homemade dehumidifier options
To make a dehumidifier for an apartment with your own hands, you need to understand the principles by which the device works. The workflow is ensured thanks to one of three principles:
- Heating is an increase in air temperature.
- Absorption is the physical process of concentration of dissolved water at the contact surface of two phases (gaseous and solid/liquid).
- Condensation is the process of transition of a substance from a gaseous to a liquid state.
To make a homemade dehumidifier, you need to create a system that can create one of the specified processes. It would seem that the easiest way to remove moisture from a room is simple heating. But elevated temperatures and dry air will create problems no less serious than high humidity. Therefore, it is worth considering options with condensation or absorption.
A homemade device can be effective, but you should carefully monitor that the moisture concentration in the air does not drop to critical levels.
If factory dehumidifiers have humidity control sensors, then when making the device yourself, you should take care to resolve this issue.
The best way out of the situation is to buy a hygrometer. This device, designed to measure the moisture level in a room, will allow you to reliably control the situation.
Making your own absorption dehumidifier
To make a simple device for removing moisture using absorption, you will need the following items:
To make an absorption desiccant you will need silica gel
- Two plastic bottles, each with a volume of at least 2 liters.
- Nail, knitting needle, awl or needle.
- Lighter or matches.
- Gloves.
- Knife, scissors.
- Absorbent substance. The best option is silica gel. These dried gel fractions perfectly absorb moisture. The advantage of silica gel is repeated use without loss of properties. After use, the substance is dried and ready for use again. For a bottle dehumidifier, about 250 grams of absorbent is enough.
- Fan. A USB fan or cooler used in computer cooling systems is suitable. The fan can be powered by a USB drive or a mobile phone charger. There are options for arranging the working mechanism on a battery or batteries. It all depends on the available materials, capabilities and skills.
- Holes are made in one of the bottles using a heated nail. You should be careful when heating the nail, to avoid accidental burns you should use fabric gloves.
- A bottle with holes is cut into two equal halves with a knife.
- The other half is placed in the bottom half of the bottle with holes so that the neck is pointing down. A cap with numerous holes must be screwed onto the neck. A heated awl or needle is suitable for this.
- The existing absorbent is poured into the upper half of the bottle.
- The bottom of the second bottle is cut off.
- A small fan is placed in the container, which will drive air towards the cut bottom. The fan is placed at a distance of 8-10 cm from the cut bottom. The cap is screwed off the neck to ensure air flow to the fan.
- The container with the fan is carefully placed on the bottle with the absorbent. The joint is carefully rewound with insulating tape to seal it.
The homemade dehumidifier is ready. A homemade bottle dehumidifier will allow you to remove moisture from the air quietly and efficiently.
Technical characteristics and additional “buns”
Our homemade dehumidifier can extract about 8 percent of the moisture from the room atmosphere. The fact that we used the refrigerator as a basis has a certain effect on the temperature in our room, namely the ambient temperature drops by about 4-5 degrees. That is, if in the room where the dehumidifier is located there is 20 degrees of heat, then at the exit we will get about 15 degrees, which, let’s say, is so fresh. You can leave everything as is, the second option is to install a heater. In fact, this is what is done in store dehumidifiers; the air is preheated before being released back into the atmosphere.
Technically, we can perform a similar operation by attaching a room heater. That's why we suggested you use two fans. If the air comes out of the dehumidifier simply through the holes, then the pressure of one fan will simply not be enough.
So how do we heat the air? A small heater is mounted either on plexiglass or on top of the unit. It is important that the flows from the blowing fan and our heater intersect. That's all, our dehumidifier is ready. Aesthetes can decorate it, for example, by doing decoupage.
Making a condenser dehumidifier from a refrigerator
This method is more complicated, but you can also easily find the necessary components for it. The basis of the design will be an old refrigerator. It must be in working order.
The design of the condenser dryer is based on an old refrigerator.
- Old refrigerator.
- Plexiglas sheets (thickness not less than 3 mm).
- Fan. A power of about 100 W is sufficient.
- Pressure plastic grille.
- Self-tapping screws.
- Screwdriver.
- Screwdriver.
- Cutter or hacksaw for metal.
- The doors are carefully removed from the freezer and refrigerator compartments of the refrigerator. Most models have the ability to remove the doors, so these steps will not be difficult.
- Plexiglas sheets are measured and cut according to the size of the doors.
- A hole is cut at a distance of 35 cm from the edges of the plexiglass plate. It will serve to install the fan. The dimensions of the hole must correspond to the dimensions of the pressure plastic grid.
- The fan and grille are installed. Self-tapping screws are used for fixation. The fan should be positioned in such a way that air is blown through the grille into the refrigerator.
- Holes are drilled in the upper part of the plexiglass. The total area of the holes should be equal to the size occupied by the fan.
- Plexiglas is mounted in place of the doors. Silicone or electrical tape is used for sealing.
After completing the work, all that remains is to turn on the refrigerator and fan. The air will be drawn by the fan into the compartment with the operating compressor. Here the air is dried and discharged through holes in the plexiglass.
When properly installed, such a device can reduce indoor humidity by 10%.
In addition to dehumidification, such a refrigerator device works well to cool the air in the room.
Purpose, principle of operation and types of air dryers
When deciding how to dehumidify the air in a room, you can follow the path of least resistance and regularly ventilate or turn on the heaters. But these traditional methods have disadvantages:
- heaters burn oxygen and can dry out the air;
- when ventilating, you can bring moist air from the street into the room;
- opening windows during cold periods leads to heat loss;
- drafts can harm both people and production.
A modern way to combat excess humidity is air dehydration devices. They are classified according to several criteria shown in the table:
| Application area | Principle of operation | Design features |
| industrial household | condensation adsorption assimilation | mobile landline |
- in rooms where there is a production process that requires a certain level of humidity;
- in warehouses, archive rooms, elevators;
- in museum halls, storerooms, libraries;
- in healthcare institutions;
- in gyms, bathhouses and swimming pool complexes, water parks;
- on construction sites.
A modern range of devices allows you to purchase a dehumidifier for any need with a different budget. In addition, you can design a desiccant with your own hands.
Assembling an air dehumidifier with your own hands: diagram and principle of operation
Excessive humidity is just as bad as very dry air. It negatively affects a person’s well-being.
In addition, there are other consequences: the environment deteriorates, things deteriorate, as well as elements of supporting structures.
As a result of excess humidity in the room, parquet floors swell and wallpaper warps, doors swell, walls become covered with huge spots of mold, and after a while things begin to become damp and smell unpleasant.
In addition, furniture with paintings can deteriorate, various musical instruments, and parts made of wood are affected by harmful microorganisms. The house is filled with mold microspores and acquires an unpleasant odor.
Working principle of a condensation dryer
A condensation type dehumidifier works on the principle of condensation of water vapor contained in the air. The operation of this method is carried out by the functioning of the refrigeration circuit, interacting with the condenser and evaporator, located close to each other. It is considered the most effective from an economic point of view.
The air in the room is dehumidified as follows:
- Thanks to the engine, moist air is pumped into the system of the device.
- Then the evaporator cools it with the help of a refrigerant.
- The dehumidified and cooled air is passed through a hot condenser and returned to the room.
Condensation dryers have several advantages:
- mobility,
- autonomy,
- compactness,
- wide range of models.
They are great for:
- household premises, which are characterized by a small cubic capacity,
- water parks,
- rooms with swimming pool.
The efficiency of their operation decreases significantly with a sharp drop in ambient temperature, and at temperatures below +10°C it is useless to use such devices.
Yes, it's a refrigerator!
The closest device to an air dehumidifier is a refrigerator; we will use it when making the device ourselves, but more on that later.
Just like in one of the main kitchen appliances, freon is responsible for cooling in the dehumidifier, with the help of which condensation is achieved. In a store dehumidifier there are two heat exchangers, the first of which is cooled by a substance, when room air enters it, it also changes its temperature, resulting in condensation. After this, the air, having lost some of the moisture (it has settled on the walls), is sent to the second heat exchanger, which, unlike the first, is hot. Here the air is heated to an initial or set temperature, after which it is returned back to the room. As you can see, the process is not tricky. Let's try to reproduce it using improvised means.
DIY refrigerator dehumidifier
You can make a condensation dehumidifier for humid air yourself using available materials.
To make the device you will need:
- an old freezer that is in working order;
- a small piece of organic glass with dimensions matching the parameters of the camera;
- products for fastening - self-tapping screws;
- sealant – silicone glue;
- two fans;
- electric heater;
- hollow rubber tube.
First you need to dismantle the door of the selected freezer.
One fan should be securely attached to the bottom of the piece of plexiglass so that it blows into the freezer. To do this, you need to make a mounting hole of the appropriate size in the organic glass. Self-tapping screws are used for fastening, and each joint is carefully treated with sealant.
Another fan needs to be attached to the top of the glass . It is designed to exhaust hot and dry air back into the room. It is unfolded so that it blows out the air flow.
Then you need to install a hollow rubber pipe . Its role is to remove condensed moisture from the dehumidifier.
For installation, a small hole must be drilled in the bottom of the device. A hose is inserted into it, after which the edges of the hole are treated with silicone glue. A capacious vessel is placed under the tube to allow the condensate to drain there.
At the last stage, organic glass with fans is installed in the freezer instead of the old door.
For more information on how to make a device from a refrigerator with your own hands, watch the video:
How to get rid of dampness in an apartment: other methods of drying
Today there are three main ways to dry humid air:
- Assimilation means that cold air contains relatively less water vapor than warm air. It is considered not very efficient for two reasons: moisture may not be absorbed all the time and only in limited quantities, consuming a large amount of electrical energy;
- The adsorption method is developed on the sorption properties of special substances called sorbents. The device contains porous material, but the efficiency of the sorbent decreases significantly as it becomes saturated. Its disadvantage is the energy consumption in huge quantities, as well as a short service life. In this case, it is better to use silica gel on a fiberglass carrier;
- The condensation method is based on the condensation of water vapor contained in the air.
Humidity in a room can be measured using several instruments:
An adsorption-type air dehumidifier is a device that removes excess moisture from the air, which is explained by the properties of adsorbents.
To manufacture this equipment, it is necessary to prepare a special rotor, which should be filled with an adsorbent made using a fiberglass carrier. In addition, silica gel and zeolite with activated aluminum oxide can serve as an adsorbent.
Types of dehumidifiers
High humidity in the house can be dealt with using such a classic method as ventilation, or you can use a modern dehumidifier for the apartment.
Advanced equipment works on the basis of various physical principles that help reduce humidity in the room, as well as constantly maintain the conditions of a particular environment at an appropriate level.
Nowadays, there are four main types of household dehumidifiers for the home:
- adsorption moisture absorber;
- compression or evaporation;
- a device created based on the Peltier principle;
- rotary adsorption.
The first type functions thanks to the adsorbent , which is contained inside and perfectly absorbs moisture.
An evaporative dehumidifier works by directing moist air onto a cold surface, where it condenses and flows into a special compartment.
The third type is equipment containing a Peltier element. It is based on the cooling effect of several semiconductor structures as a result of the passage of electric current through them.
A rotary adsorption dryer is an improved class whose operating principle combines the previous two.
Installing a metal-plastic water supply system on your own, see the link for detailed instructions.
What harm does water with a high iron content cause to the body? Analysis and purification of water from a well from iron.
Air dryer or lyophilizer, installed in
- private houses and city apartments,
- bathroom or toilet,
- kitchen,
- rooms containing a swimming pool or a huge aquarium,
- greenhouses,
- storerooms,
- cellars,
- rooms intended for drying clothes,
- sports locker rooms,
- basements,
- garages,
- in the attics.