Causes of damage to aluminum radiators
Aluminum radiators are not durable compared to bimetallic and cast iron ones. In apartment buildings, they most often leak due to pressure drops in the system and water hammer.
Changes in water or coolant temperature also affect the condition of the batteries. If a liquid hotter than 100 degrees circulates in the heating system, it can damage the gaskets and sealant.
When water or coolant boils, the pressure in the central heating system (central heating system) can rise significantly. This often results in damaged sections. In some cases, an aluminum radiator may simply burst.
Sometimes problems are due to incorrect installation. Moreover, an aluminum radiator can leak several years after installation. In this case, you can only rely on yourself and hope that the other batteries were connected correctly without violating the installation standards.
If you have cheap aluminum batteries installed, there is a risk of manufacturing defects. No one is immune from this and it cannot be determined in advance. Therefore, before you buy a radiator, think about it: isn’t it easier to pay a little extra and buy a good battery than to fix problems?
Sealants for eliminating leaks in the heating system
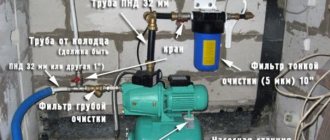
One of the modern methods of sealing leaks is the use of special sealants. If there is no pressure in the heating system, then a thick cloth impregnated with silicone waterproof sealant or liquid glass is wrapped around the defect.
Epoxy glue or cold welding are also suitable for this purpose, but you need to ensure that no water drips during the work. In the context of an individual heating system, this is not difficult to organize. There are liquid compounds on sale that fill leaks in pipelines and joints from the inside. Such sealant is pumped into the system, only you must first remove all the mesh from the mud traps and drain part of the coolant.
It is clear that the amount of water drained must be equal to the volume of the composition being poured. Afterwards, the heating is heated to a temperature of 50-60° and maintained for several hours (indicated on the packaging). At the end, the pipelines are emptied, washed and filled with new coolant.
Locate the leak
When an aluminum radiator leaks, the most difficult thing is to determine the location of the damage. Believe me, it's not as easy as it seems.
When you see a puddle on the floor under the radiator, you can determine which section the water is coming from. But the shape of the sections is such that it is difficult to look under the outer feathers; the gap between them is usually 4-6 mm. Therefore, you will not be able to determine the real cause and location of the damage.
First of all, inspect the joints at the top of the radiator. They are visible through the gaps between the feathers that remove air. If there are drops of water on the connection or it is wet, you are in luck.
and you are deprived of most of the problems with “making a diagnosis”. You can proceed to the section “How to fix a leak between sections of an aluminum heating radiator.”
The lower joints are difficult to inspect, since you cannot get close to them. You can feel them with your fingers, but it’s better to be smart. Use a small mirror to examine them.
Tip: To better see the inside of the radiator through the mirror, shine a flashlight on it. The light reflected by the mirror will fall on the inner parts of the sections.
If all connections are dry, then the problem is more complex and a crack has appeared on the side wall of the radiator. In this case, water drips onto the floor from one of the feathers.
The easiest option is to simply remove the damaged section. But if you don’t want to do this, you will have to find the leak and fix it.
How to properly disassemble an aluminum heating radiator and put it back together – Stroim24.info
Here you will learn how to disassemble an aluminum heating radiator with your own hands: the pros and cons of aluminum heaters, as well as the sequence of actions when assembling and disassembling battery sections.
Aluminum radiators first appeared on the global heating equipment markets in the 80s of the 20th century. Next to the heavy ribbed “monsters” made of cast iron, they looked elegant and stylish.
Naturally, the demand for them was huge, but only a decade later the first aluminum batteries showed their shortcomings.
To date, manufacturers have significantly improved the performance of aluminum batteries, so they now have much more positive qualities than before. The assembly of aluminum heating radiators has also been simplified and now they can be installed or disassembled without the involvement of specialists.
Pros and cons of aluminum heaters
Aluminum radiators have become frequent “guests” of private houses and apartments in houses with centralized heating.
This was made possible thanks to the qualities that have won the hearts of consumers around the world:
- Aluminum is one of the best conductors of heat , releasing it into the surrounding space in two ways: radiation and thermal convection. This feature is especially in demand in heating systems with unstable media pressure.
- Assembly of aluminum radiator sections is possible without the use of additional forces. Since their light weight allows you to do everything yourself. They are easy to both transport and install.
- These batteries are capable of withstanding pressure from 16 to 25 atmospheres , which makes them desirable in places that were occupied by cast iron “accordions”. There are 2 types of aluminum radiators. One of them is suitable for autonomous heating systems, where the load rarely exceeds 10 atmospheres. The second is for batteries connected to central heating, where differences of up to 15 atmospheres occur.
- Aluminum radiators are much lower in price than their steel or bimetallic counterparts. This is one of the most important factors that attracts consumers.
- They are easily adjustable , which allows you to create the necessary microclimate in the room and save money on heating.
- They have an attractive design that easily fits into any interior.
These qualities have made aluminum batteries in demand all over the world, despite the fact that they have minor disadvantages:
- Aluminum is not resistant to corrosion, but modern radiators are treated with special means that prevent its occurrence. But even after treatment, it is better to keep such heaters filled with coolant, which is difficult to do in a centralized heating system, where water is discharged after each end of the season. This is why aluminum batteries are more in demand in autonomous systems where there are no such discharges.
- Batteries of this type are prone to airing , so at the beginning of the heating season, excess air must be vented from them.
- The threaded connection in aluminum models is weak and if there is a strong water hammer, a leak may appear at the joint. This defect can be eliminated only by knowing how to assemble an aluminum heating radiator using additional gaskets.
This type of radiator is available in two types: solid and sectional. The second is most common in private houses and apartments.
Segmentation
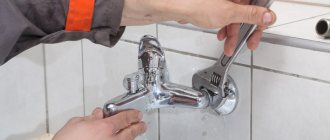
To properly disassemble an aluminum radiator, you will need a special tool - a nipple wrench, which is made specifically for this job. As a rule, it is not available in stores, since it is a product of the mind and labor of plumbing workers. You can get it in two ways.
The first is to try your luck at the local market (if there is one), where various used tools and other useful household items are sold. It is likely that you will find what you are looking for there, and at an affordable price. The second option is to contact any plumbing workshop and ask them to rent a nipple key.
Article on the topic: Why is ventilation in a suspended ceiling needed, and how to do it yourself
When your search is successfully completed, you can proceed directly to disassembling the equipment. There is a specific order for this procedure.
- The first thing to do is turn off the water in the riser to which the radiator is connected and drain the coolant from the system. If you own a private home, you can do it yourself. If you are dealing with a centralized heating system, then such issues can only be resolved through the organization that manages the building. To do this, you need to write an application and then wait for a specialist to arrive. By the way, if you live in an apartment building, you can carry out such work only during the period when the heating season is already over. Otherwise, you simply will not be able to obtain permission, since stopping the centralized heating system will bring cold not only to yours, but also to your neighbors’ apartments.
- After you have dealt with turning off the water in the system, place containers under the junction of the radiator and the main lines to collect the remaining coolant that will flow out during the separation of the equipment.
- Unscrew the fittings connecting the battery to the main line. At the same time, check their condition. If you notice any defects - cracks or “smoothed” threads - then it is better to replace these elements with new ones. Just keep in mind that not all metals are compatible with aluminum radiators. For example, fittings made of brass or copper should absolutely not be used, as this may cause an electrochemical reaction, which will lead to the onset of corrosion processes.
- After disconnecting, remove the radiator from the brackets holding it.
- Now it’s time to use the very tool that you worked hard to obtain. The nipple key must be inserted into the battery exactly to the place you are going to dismantle. Then you need to get the end of the tool into the hole intended for this on the connecting element. Once you have succeeded, turn the nut half a turn in the desired direction. In general, for this stage it is advisable to invite an assistant who will fix the radiator in one place while you fiddle with the connections. So, turn the nut half a turn, go to the one located on the opposite side, and repeat the same operation there. Thus, by gradually unscrewing each element in turn, you can completely separate one section from the other. Be careful and patient - each nut needs to be turned little by little, about 5-7 mm. Otherwise, the section may become severely skewed, resulting in damage to the radiator elements and the need to replace them.
- After unscrewing the necessary nuts, remove the segment, and then check all the gaskets included with it. The quality and condition of rubber seals plays an important role. Deformed gaskets can cause leakage. Therefore, if there is the slightest doubt about their suitability, it is better to replace these elements with new ones. Moreover, it is advisable to purchase gaskets made of paronite, since this material has proven itself best. If this is not possible, then try to find at least silicone seals. It is not recommended to install rubber ones, as they quickly fail.
Checking the side walls of aluminum radiator sections
Now comes the hardest part...
The problem is that 95% of leaks occur only when water or coolant is under pressure in the radiator. It won't work to remove a section, fill it with water and see where it comes out from.
Unfortunately, at this stage you will have to work hard. To find out exactly where the aluminum radiator is leaking, you will have to dismantle the sections.
If your radiator is installed and connected correctly, then there are taps on the lower and upper pipes, and they are connected to each other via a bypass. You need to do the following:
- Close the valves on the supply and return pipes;
- Open the bypass;
- Drain the radiator.
To drain the water from the battery, first unscrew the top plug, then the bottom one. When the water has completely drained, you can begin dismantling the sections.
If there is no bypass or taps, you will have to turn off the entire heating system. This is not difficult to do in a private home. In an apartment building, for this, contact the employees of the housing office, housing and communal services or a regular plumber. In some houses (especially new ones) you can turn off the heating only in your apartment.
Options for leaks and searching for section damage
In this situation, two options are possible (see figure).
If an aluminum heating radiator leaks from the side of the section that is located further from the supply pipe, you must do the following:
- Using a nipple wrench, unscrew the nuts located between the leaking section and the intact one located further from the pipe (see figure) >; Places for unscrewing the nipple nuts of the section located further from the water supply.
If a leak appears from the side of the section located closer to the supply pipe, proceed as follows:
- Using a nipple wrench, unscrew the nipple nuts located between the leaking section and the intact one located closer to the pipe (see figure) >;
- Unscrew the damaged section;
- Turn it so that the wall on which there is a leak is located further from the pipe;
- Install the damaged section using a nipple nut and wrench.
After these manipulations, you need to completely seal the radiator:
- Screw the bottom plug;
- Install the Mayevsky tap in the upper hole of the radiator and unscrew it two turns;
- Open the water supply and close the bypass slightly.
After this, the radiator will begin to fill with water, and the air will exit through the Mayevsky tap. When water comes out instead, turn off the tap. There is now fluid in the radiator that is under pressure.
At the site of a crack or break in the radiator wall, water will begin to leak out. It's done - you've found a leak.
Important! If the joints between the nipple nut and the radiator were treated with sealant, you also need to use it. This also applies to the places into which the plugs and Mayevsky tap are screwed.
How to fix a leak in an aluminum radiator
As a rule, problems with radiators become known at the most inopportune time, namely during the heating season.
The main problems are battery leakage, cold sections and clogging, which require urgent intervention to eliminate them.
Repair of aluminum radiators includes various methods of eliminating problems and, depending on their scale, can be done with your own hands or require the intervention of professionals.
Battery Features
Despite all its attractiveness, this type of heater is in the least demand among consumers due to the prevailing opinion that the service life of aluminum radiators is short, and they have many shortcomings and “claims”.
This is not entirely true. Aluminum heating radiators have a number of attractive features that have won the hearts of many customers.
Among them:
- They are able to withstand pressure drops of up to 20 atmospheres and above. If they are intended to be installed in a house with centralized heating, then you should carefully study the operating system and, when choosing radiators, familiarize yourself with their technical characteristics specified in the data sheet.
- Aluminum radiators weigh little , so they are easy to both transport and install.
- Their device is so simple that, if necessary, it allows you to repair aluminum heating radiators with your own hands if you have the necessary tools .
- High heat transfer ensures rapid heating of the room while saving energy resources .
- A small volume of coolant provides almost instantaneous heating of the entire radiator area.
- Aluminum radiators have a stylish design and fit perfectly into any environment.
Such a number of advantages could make them leaders in sales on the heating systems market, if not for the fact that they “feel” best in individual heating systems.
This is due to the fact that aluminum is susceptible to corrosion in the absence of a coolant for a long time (as is known, in centralized systems it is drained in the warm season) and its purity and alkaline balance.
If with autonomous heating the quality of the media can be monitored and left in the system, then in an apartment building with central heating it is very difficult to do this.
If aluminum batteries are installed correctly and operated in the conditions required for them, then their service life significantly exceeds the warranty (10 years) from the manufacturer. Repairing an aluminum heating radiator will not be as difficult as adding additional sections.
Causes of breakdowns
As in the case of the sleigh in the famous saying, the heating system should be prepared for the new season in the summer.
The main causes of problems are:
- Low heating of the aluminum battery when there is no air in it.
- Noises and knocking are heard in the system.
- The aluminum radiator was found to be leaking.
- Plaque appeared at the joints of system elements.
In houses with autonomous heating, these problems can be easily identified by running the system at maximum operating mode. Higher pressure will show the integrity of the structure and allow you to see possible defects in it. In houses with centralized heating, it will not be possible to carry out such work on your own, but you can submit a request to the management service that their specialists have carried out the necessary work.
If during testing the system showed its best side, but problems began at the height of the season, then emergency dismantling of the radiator is required.
To do this you need to do the following:
- The shut-off devices are closed, as is the riser (the media must first be drained from it).
- A container for draining the coolant is installed under the bottom connection.
- Unscrew the lower ball valve so that the water (antifreeze) remaining in the battery drains out.
- The top valve is also unscrewed and the battery is removed from the brackets.
If the question arises of how to repair an aluminum heating radiator if it does not heat, then you should look for the reason for this condition of the device:
- The first thing you need to do is bleed the air from the system and wait until the batteries warm up.
- If nothing has changed, then you will have to dismantle the radiator and check for the possibility of clogging . Sectional aluminum radiators do not hold much coolant. By pouring water into the removed heater, you can calculate whether its quantity corresponds to the parameter stated in the data sheet. If not, then it is not necessary to repair the aluminum heating radiator, but to flush it , for which you should pass water under high pressure through the structure until it brightens.
- If the flow of water did not “cope” with the task, then you will need knowledge of how to disassemble an aluminum heating radiator into sections and do the same work with each element separately . Sometimes, when very dirty, a brush (not metal) is required to rid the battery of thick dirt.
Sometimes the only way to return the batteries to a hot state is to replace the aluminum radiator section or extend them. With the lateral type of connection this will not be difficult, whereas with the bottom or diagonal method you will have to increase or shorten the length of the pipe.
How to disassemble?
After the battery has been safely removed, you can begin disassembling it into sections.
The sequence of actions is as follows:
- The first step is to unscrew the nipples, for which the right one is turned counterclockwise with a wrench, and the left one is turned clockwise. This procedure must be carried out very carefully, since the nipple could “stick” to the radiator, and if you tear it off with a careless movement, you can throw out 2 sections at once.
- Unscrew the nipples on all sections one by one in the same way.
- Movements with a wrench are carried out in successive turns, and removing the nipples one by one will save the structure from distortions.
Source: https://chevroletcars.ru/info/kak-ustranit-tech-v-aljuminievom-radiatore/
No heat supply and leaking
First of all, you need to understand where the source of the leak is. This is not at all difficult, it can be seen with the naked eye. If you select it, a white coating will appear at the place of the thread where there is a leak. And as soon as the heat supply starts and the central heating system starts working, the radiator will work, but its heat transfer level will be significantly lower, and you will immediately notice it. What is the reason for the breakdown? Let's highlight the main common causes of breakdowns:
- The installation in the place where the threads connect was not done correctly.
- High acidity level of water, which causes corrosion to occur faster.
- Large and frequent pressure drops in the central heating system.
- If poor quality water is put into the central heating system, a white coating may form. It is this that will begin to clog the radiator from the inside, which will reduce the passage for heating.
- Just normal wear and tear on the gaskets and battery cells.
- And the very last thing - this type of battery is not suitable for a central heating system.
Inspections of the apartment can be carried out at the discretion of the management company. They are produced for the purpose of prevention and maintenance of heating devices.
How to fix a leak in an aluminum radiator?
It is impossible to imagine every modern engine without a car cooling system. Cooling systems began to be installed at the dawn of the automotive industry. The first systems were air-cooled, but now all cars work with a liquid cooling system. The main heat exchange element in this system is the radiator.
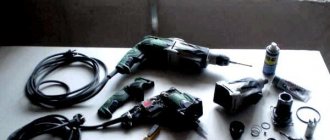
Necessary tools for repairing aluminum radiators
The most important thing before starting work is to remember that all repair work is carried out on the floor. If it is necessary to rinse, it is done in the bathroom or outside. Before you begin, the place where the repair will be carried out needs to be covered, so as not to damage the floor surface, with newspapers or something else.
If the bathroom is being washed, it must also be protected. You can wrap the bathtub with a protective film that specifically withstands mechanical damage.
In order to begin repair and installation work, you will need:
- wrenches (and of different sizes);
- spare gaskets;
- special construction lubricant;
- nipple key;
- sandpaper.
You can also take the nuts with you in the kit. It’s better to take more, since during work, additional tools and things often come in handy.
A little advice. It is best to carry out these repairs on weekdays. They are not so loud that they disturb the neighbors. The bottom line is that if you do this on the weekend, you may suddenly need spare parts. And just on weekends, many construction stores are closed.
Also, do not forget that if you are going to carry out this work, you will need a large additional container for draining water. It is always drained after cleaning.
Assembling the radiator structure
Radiator assembly does not begin until parts are checked for availability and suitability for further use. You should not skip this moment, otherwise you will not be able to avoid disassembling the device again.
Minor mechanical damage and malfunctions of aluminum radiators can be repaired at home. Such as minor leaks, cleaning contaminants or replacing various auxiliary materials. In case of more complex damage, or if you are not sure that you can repair the device on your own, you need to seek help from a specialist.
YouTube responded with an error: The request cannot be completed because you have exceeded your quota.
- Related Posts
- What are the best radiators for central heating?
- Characteristics of infrared heating radiator
- What characteristics do central heating radiators have?
- How do solar panels work for heating a home?
- Which central heating batteries to choose?
- Is it possible to install aluminum radiators on central heating?
Dismantling the heating radiator
Checking, cleaning and repairing the battery is possible only after removing the product from the wall .
The low weight of aluminum radiators allows even one person to easily, but carefully, disconnect the structure from the pipes and remove it from the brackets . But this needs to be done step by step:
- Stop coolant circulation and relieve pressure.
- During the heating season, wait until the radiator cools down completely. The structure is disconnected from the pipe system by removing the couplings at the inlet and outlet.
- The coupling is moved away from the section along the pipe, and the battery is removed from the holders.
- Completely drain the water remaining inside. The structure is placed on the prepared fabric with the outer side up.
- Take out the filter and wash it with water and soapy water.
The next stage of installation will be disassembling the radiator into its components . The most important point is the correct disconnection of the nipple. When the part is unscrewed, the section for which it is responsible begins to smoothly move apart.
Often the manufacturer indicates the direction of the thread - D (right side) or S (left side) . You need to start unscrewing it with a key carefully and slowly. If the torsion is too strong and incorrect, it is easy to break the thread not only on the nipple, but also on the battery itself.
Attention! As soon as the nipple has turned half a turn , you need to move to the nut on the other side of the section. Gradual weakening on both sides will protect the section from failure and possible mechanical damage.
After disassembling the sections, you need to remove and wash the metal gaskets . In case of severe damage, it is recommended to purchase spare parts. Silicone gaskets must be changed after disassembling the battery.
Cleaning at home
Clean the radiator from accumulated dirt after the end of the heating season.
Professional cleaning devices are not easy to obtain, and they are expensive.
In the bathtub, the structure is washed as follows:
- Using hot water. From one side, pour water using a funnel, or by unscrewing the nozzle from the shower hose. When the battery is full, shake it. If it is too heavy, then the structure is slowly turned over. Both plugs must be open to allow dirty water to flow out freely. You need to repeat the procedure several times.
- Using a cleaning product. The radiator is filled with a solution from a cleaning agent, after installing the plugs. For the procedure, use citric acid diluted in water. Leave the device for several hours so that the cleaning solution removes all dirt. If there is no citric acid, use a universal cleaner or liquid to remove rust and heavy dirt.
- Final rinse. After 2 - 3 hours, knock on the battery with a plastic or rubber hammer to remove large pieces of rust and other dirt from the inner walls. After this, wash out the cleaning agent until its traces are completely eliminated (if a soap composition is used, wash until any remaining foam disappears).
When choosing a cleaning agent, you should remember that aluminum “does not tolerate” alkaline compounds , but reacts well to acids.
What to do during assembly
The radiator is assembled starting with checking all the parts . Particular attention must be paid to this, since missing one small element can lead to malfunction of the entire structure.
Photo 1. The process of assembling an aluminum radiator. In order to assemble the device, a special key is required.
Exact battery assembly plan:
- First, check the condition of all connecting elements . They should not have chips, cracks or other damage.
- Before assembly, the nipple is screwed in and out several times.
- Checking section joints. If paint is present, remove it with medium-grit sandpaper.
- The glued silicone gaskets are removed with a sharp knife (they become visible after removing the paint).
- Metal gaskets are washed with soapy water.
- Then put the nipple on the section , but without twisting it. After this, tighten the silicone gaskets.
- On the other side of the nipple, attach the next section so that it fits tightly to the junction.
- with a wrench 2 times. Screw the part on the other side in the same way.
- The nipples are tightened using a lever , but without unnecessary effort, so as not to damage the thread.
- Repeat the steps with other sections.
Sometimes during the repair process, leaks are discovered and sealed with a special agent.
Fighting holes: how to seal them
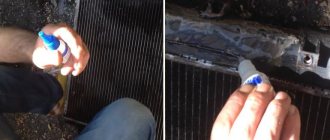
When replacing the gasket, in some cases cracks and holes are found that need to be repaired. For this, epoxy glue is used. The leak area should first be cleared of plaque and paint.
Important! To clean the inside of the pipe in the damaged area, use a metal cable .
Epoxy glue is applied on top of the damaged area and a thin strip of fiberglass is applied. A second layer of material is glued on top. The procedure is completed by installing a metal clamp.
Photo 2. Epoxy adhesive Moment from the manufacturer Henkel. They can be used to seal holes in a heating radiator.
How to repair severe damage
In an aluminum radiator, severe damage requires a complete replacement of the section, even if professional instruments and methods were used for repairs:
- cold welding;
- aluminum solder (for minor damage);
- argon welding.
These methods can only temporarily delay the final breakdown of the product; as a result, a complete replacement of the section will still be required.
Dismantling works
Only after the battery is removed from the wall can you begin repair work. Radiators made of aluminum are not very heavy and therefore one person can easily remove them from the wall. Before removal, it is necessary to unscrew the nuts and dismantle the radiator. Everything is done in the following steps:
- the circulating pump stops and the pressure in the system is released;
- The radiators are cooling down. The structure is disconnected from the pipe connections. The couplings are being removed;
- remove the battery from the brackets;
- the remaining water is drained into a previously prepared container. The structure is laid on woven material;
- The filter elements are pulled out and washed with a soapy water solution.
At the next stage, disassembly work into elements begins. The most important point will be to disconnect the nipple. When twisting it, the section moves away.
It is worth paying attention to the letters S and D near the threaded connections. Where the first means left-handed thread, and the second, respectively, right-handed. Do not unscrew with a tearing motion, otherwise you can easily break the threads. Everything is done as carefully as possible. If the threaded connection is difficult to unscrew, it is better to increase the lever.
Disassembly of threaded connections is carried out in stages on both sides. We turn the nipple a turn or two, then do the same with the nut of the opposite side. By gradually weakening both sides, the section will be protected from unexpected breakdowns and other damage.
Sections have been dismantled. The metal seals are removed and washed. If severe mechanical damage is found anywhere, then it is worth replacing spare parts. The silicone gasket must be replaced.
We recommend: What is the normal temperature of water in central heating radiators?
Replacing sections
Such work can be performed in several ways, which, in particular, include replacing the seals in the radiator. Such work requires dismantling the battery and disassembling it into separate sections. If we are talking about eliminating a leak in the battery during the heating season, then the most effective solution would be to use so-called cold welding if it is not possible to completely replace the damaged radiator or change the leaky section in it.
Small defects can be eliminated using solder for tinning non-ferrous metals, but such manipulation requires tinning skills and is a temporary measure that only allows you to “hold out” until the end of the heating season.
If the consumer has a qualified gas-electric welder and the appropriate equipment, you should use argon welding to repair aluminum radiators, which is undoubtedly the best option.
When working with such radiators, you should remember the significant softness of aluminum and handle it especially carefully. At the same time, with proper installation and careful adherence to the operating rules of these elements of the heating system, the problem of their leakage should not arise in principle.
Types of heaters
In modern residential premises there are several types of radiators that effectively cope with their task. The main difference between them is the material used. It is common to use the following types:
- Cast iron. Affordable, but heavy. They are used more often in apartment buildings.
- Aluminum. In demand in low pressure systems. They do not tolerate pressure changes and water hammer.
- Bimetallic. They have a long service life. They are quite expensive.
- Steel. They have good thermal conductivity, but are susceptible to rapid corrosion processes that reduce their service life.
In most cases, repairing heating radiators is effective with cast iron sections.
Fault criteria
Homeowners usually start to worry when the radiator leaks, and not when the first problematic symptoms appear. To reduce the likelihood of radiator failure, you should pay attention to the behavior of the system as a whole and its individual sections:
- repair of cast iron batteries or other materials may be necessary if the pipe diameters are incorrectly selected, the pressure is incorrectly set, or the temperature of the coolant is inappropriately selected;
- with a large number of undesirable impurities in the coolant composition, physical and chemical destruction of the material occurs from inside the radiator;
- heating batteries will require repair when plaque forms at the joints between sections of radiators, clogging the passage of coolant through the system;
- Damage to threaded nipples leads to repair of heating radiators;
- when a heating radiator makes noise in an apartment, this does not always indicate a malfunction, but you can call a repair team to check this process;
- Heating radiators make noise, including from formed air pockets that arise due to leaking pipes.
Leak in a cast iron radiator
Problematic radiators cannot be ignored, as this can lead to material or physical damage, because the temperature of the coolant inside the system is very high.
Elimination of depressurization
The appearance of leaking areas is usually observed during peak loads on the heating system. If the heating battery is leaking, we will tell you what to do next. It is easy to notice a leak by protruding droplets in a hot area or a small wet area under one of the sections.
Self-repair of a cast iron battery will be effective in a private house or apartment with individual heating. In apartment buildings, it is recommended to involve specialists from the management company in the process, since the system has higher pressure and it is not always possible to independently disconnect from the central heating.
The best solution is to replace the old radiator with a new one
Before work, it is necessary to reduce the pressure and temperature in the pipes, since eliminating leaks in a hot cast-iron heating radiator can be problematic. Several repair methods are used:
- If the heating battery is leaking at the junction, and you don’t know what to do, then just take a medical bandage and epoxy glue. Wrap the leaking seam with a bandage soaked in glue. The dried surface holds paint well, so after painting it does not stand out in color.
- What to do if the battery leaks? You need to visit a hardware store and buy special clamps there. They are a metal frame with rubber gaskets. The parts are held together with a pair of bolts.
- When the heating radiator drips, you don’t know what to do, and there is no time to look for epoxy glue or clamps, then any piece of rubber or silicone (a piece of a bicycle tube or a medical tourniquet) will do. It is advisable to choose a heat-resistant (can be checked by pressing it against a heated area of the radiator for a while) and sufficiently durable material. We place it on the desired area and fix it as firmly as possible with available materials (a piece of wire, an unnecessary cable or lace).
- Cold welding is also used for cast iron batteries (similar to children's plasticine). It is advisable to purchase this material in advance if the house has cast iron radiators. And if the battery has already leaked, you will know what to do next. We break off a piece of “plasticine” and knead it in our hands until it becomes plastic. Next, apply to the desired area and wait for it to harden. Cold welding for heating pipes is a temporary solution, and very dangerous, since at any moment it can fall off under pressure, and then the neighbors will be flooded.
It is better to weld a hole formed as a result of corrosion or mechanical damage rather than using cold welding. For cast iron, separate electrodes are used, and for ease of repair, you can remove the section by first shutting off the riser with water.
Restored heaters
Restoration work must be carried out after the heating has been completely turned off for the season. If the sections are built into a niche and are not intended to be dismantled, then they must be at a sufficient distance from the wall. With dismantled elements, restoration of cast iron batteries is usually carried out in a horizontal position. The second method is preferable. Remains of the coolant are removed from the cavities and the plugs or fittings are removed.
When unscrewing radiators, it is worth considering that the plugs have a left-hand thread, and the fittings have a right-hand thread.
We combine the working head of the wrench with the nipple in the section. We install a stop under the key so as not to bend it. Next, we begin to disassemble the sections. If the rusted thread does not give in, then this place must be heated with a burner or autogenous gas, turning the fire around the thread. Having replaced the problematic section, we return the radiator to its place.
It is advisable to prevent the occurrence of corrosion on the outside of radiators. To do this, it is recommended to paint them regularly. The surface is first cleaned with a metal brush or sandpaper.
Separately, a few words need to be said about paint for radiators. You should choose a special non-toxic coating, designed to withstand temperature changes, with protection against corrosion and cracking, so that no toxic substances are released when heated.
Radiator screen
Increasingly, in apartments and houses you can find unconventional design of radiators. Most often we are talking about protective screens - an aesthetically designed panel that covers the radiator, but at the same time it does not interfere with convection. Much less often, batteries are painted in different colors. And although this is still rare in our apartments, it always looks very original and fresh.
VIDEO: How to repair a radiator without draining the water from the riser
Types of leaks and their elimination
There are several classifications of heating pipe failures. Each of them is affected by different reasons and provides individual ways to eliminate the problem. Let's look at the main types of breakdowns associated with heating batteries:
Radiator section leaking due to a crack
Is your heating battery leaking? Such a leak occurs due to the constant load on the heating pipes: maintenance work, heating supply, hydraulic measures. All this creates a threat of destruction of the integrity of the pipe and subsequently leads to the appearance of cracks.
This problem can be easily eliminated using a welding machine, if you have one at hand. You can learn how to solder copper pipes or how to solder polypropylene pipes from our articles.
You need to wipe the battery very well so that the radiator is dry. Then use cold welding, clamping the accident site and holding this point until it is completely glued. After half an hour, the problem will be eliminated, and the heating pipes will become operational again.
Loss of tightness at the junction of the riser and radiator pipes
The reason is the incorrect factory assembly of the battery itself. For example, significant differences in the size of pipes when they are connected. Incorrect threads can also cause pipe failure and leakage. Also the cause is the deformations that occurred as a result of using the radiator.
Under no circumstances should you place any objects on the battery, sit down, or exert any other physical force. This also leads to a similar kind of breakdown.
To eliminate the accident, a clamp is needed. It is sold in hardware stores, so in case of an emergency it is better to buy it in advance and put it at home. If such a product is not available at home, you can use a bandage made of small wire and rubber. This auxiliary tool can be used as a tourniquet, which should be used to tighten the section of the battery where the leak has occurred.
The appearance of “tears” in places where heating pipes are connected
It's all due to corrosion. The appearance of rust on the pipes that connect to the radiator leads to the destruction of the equipment and the appearance of a small amount of water at the leak site. As soon as a small amount of liquid is detected leaking from the hole in the battery, appropriate measures must be taken immediately.
The most common problems and their symptoms
Although cast iron perfectly tolerates the imperfections of the central heating coolant, and the radiators made from it have wide enough channels so that debris does not accumulate in them, problems can arise even with them. And this despite the fact that there is no wear to this metal. The following factors may be to blame for a cast iron battery bursting or a fistula appearing in its walls:
- Everyone knows the heavy weight of radiators made of this metal. If during installation of the structure, insufficiently strong brackets were used, or there were not enough of them, over time it may sag under its own weight and tilt. Even a slight deviation of just a couple of millimeters will reduce the efficiency of the device, and if the distortion is not corrected, then after a few years corrosion will appear in the place where the coolant is missing. At first it will look like a small brown spot, which will grow with each heating season until a fistula forms in its place.
- The reputation of “long-living” is characteristic of both old and new models of cast iron radiators, but provided that they are installed in the contour of an apartment building no higher than six floors. If the heating network is reliable and does not suffer from strong water hammer, then they can be installed in nine-story buildings. Otherwise, under strong water pressure, the cast iron battery may leak at the joints of the sections. In the event that a cast iron battery leaks during the heating season, you need to know in advance how to repair it. Today there are a lot of sealants that will help the device “hold out” until warm days.
- The internal structure of domestic batteries is such that the cast iron from which they are made has roughness that is completely absent in imported analogues. That is why a lot of debris is deposited on the walls over time, which fills the water in the heating network. Suspensions, particles of rust and metals, all settle and make the wide channel so narrow that it is no longer able to easily pass coolant under high pressure. In this case, the structure may burst anywhere, and then you will have to urgently decide how to eliminate the leak in the cast iron battery.
- Nipple gaskets and threads are the weak “link” of heating devices . If cast iron does not have a statute of limitations, then the same cannot be said about the parts that make up the battery. In order not to lead the situation to the point where repair of the cast iron battery is required, the connections must be checked after each heating season and the gaskets on them must be periodically changed.
As practice shows, most often it becomes known that something is wrong with the heating system when repair of cast iron radiators is already required. To find out about a problem in advance, you need to listen for “help signals” that indicate the presence of defects.
The first signs of trouble
There are a number of factors that indicate that something is wrong with the heating circuit or batteries. These include:
- Feeling of coolness in the room. In this case, it is worth asking your neighbors how warm it is in their apartment. If everything is in order, then you can start looking for problems in yourself. The reason may be simple contamination of the channels, misalignment of the device, or the presence of fistulas. In the first case, it is enough to wash the batteries, in the second, fasten or change the brackets and check the correct installation with a building level, and in the third, provide assistance to the “sick” radiator.
- If an incomprehensible coating appears on the battery, visible to the naked eye, then the reason for this is worn out gaskets. You will have to turn off the system, remove the batteries and install new ones, for example, from paronite.
- The leak is immediately noticeable. If it is small, then you can get by with a clamp or cold welding, otherwise you will have to completely change the device.
It should be remembered that even small defects can develop into a big problem if they are not eliminated in time. Don't rely on temporary clamps and patches. Only heating network specialists can determine the reliability and tightness of the heating circuit and its elements.
Elimination of fistula
For any breakdown there are a number of reasons accompanying it. A fistula on heating system pipes or on a radiator is no exception. If a small brown spot appears on the elements of the heating network, you should not think that it is paint coming off. In fact, this is the beginning of an often irreversible process, but knowing how to repair a fistula in a cast iron battery, you can stop the destruction and extend its service life. Causes of corrosion:
- Taking into account the frequent increases in the cost of utilities, some craftsmen are cunning and, in order to save energy, connect a neutral cable to the heating circuit. The currents that begin their “journey” through the pipes through the coolant are what cause the formation of corrosion. You can identify a dishonest neighbor if there are several fistulas and they appear with a certain regularity. Calling the appropriate service to identify the intruder and repairing cast iron batteries yourself will help save the situation.
- Too much acidity of water can harm even corrosion-tolerant cast iron.
- The batteries have expired or deposits on the battery walls have damaged the metal. In this case, even a small fistula or crack under the influence of water pressure can cause the battery to burst and a stream of hot water to flow from it.
Any of the options requires urgent intervention. If the cast iron battery leaks only slightly, then you can do without disconnecting the circuit and dismantling it. A clamp can save the situation. If the water only drips, then a one-sided clamp will do, but if it runs in a thin string, then it is better not to risk it and use a double-sided clamp.
In the event that the coolant ruptures the place where the fistula was located, the question immediately arises whether it is possible to weld a cast iron battery . As a rule, cold welding becomes an emergency solution, but even if it has restored the tightness, it is necessary to call specialists from the heating network to check the condition of the heating system.
Advice from professionals
A few tips will help you carry out an effective repair:
- After repair, the radiator will have to be painted. If it is hidden behind a decorative screen, it is advisable to choose dark paint. A cast iron battery will transfer heat better.
- The hanging brackets are positioned so that the gap between the radiator and the window sill is 10 cm, and the gap between the floor is 12-15 cm.
- To reflect heat, the wall behind the cast iron radiator is sealed with foil material.
Heating efficiency depends on the number of sections on each radiator. This requires competent calculations, which experienced specialists will help you perform.