The foundation of a house will not stand if protection from water and moisture is not thought out. When developing a building project, architects calculate in advance both the drainage system itself to protect the supports and the entire house in the complex.
The saying is correct: water wears away any stone. In terms of construction, she is certainly right. Even a solid and very strong foundation of your home can be easily destroyed by water. If the groundwater level is high in the area where the house is built, then external waterproofing without comprehensive drainage will not be able to prevent flooding of your basement. In this case, an entire underground system of channels is developed that will keep the foundation dry and withstand the load on the foundation.
With proper drainage, your home will remain dry and mold will never form in your basement or basement. The price for this type of work in specialized offices is high, but you can do the work yourself and cheaper.
To install drainage for your foundation, use a special type of pipe . By draining the foundation, you will extend the life of your home by several decades.
There are a number of cases when installing drainage is simply necessary:
- if the design of your building includes a basement or ground floor;
- if geodetic reconnaissance indicated that the area under the foundation is characterized by increased soil curtailment;
- if the height of groundwater is equal to one to five shovels;
- if your basement has a system that needs moisture protection at any time of the year.
Types of drainage
As for the existing types of drainage, the following options can be distinguished: • Perfect type drainage - it is located on an aquifer and collects water from above and from the sides; • Imperfect type drainage is located above the aquifer and collects water from above, below and from the sides.
There is also a gradation according to the types of drainage from the foundation: • ring drainage; • wall-mounted; • reservoir. It is worth familiarizing yourself with each of them in more detail, so that all materials used in the work are used for their intended purpose, without inflating volumes and estimates.
Foundation ring drainage
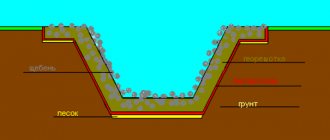
Ring drainage will protect the basement from flooding, which is inevitable on sandy soil. Water easily passes through grains of sand, so protecting the basement in the form of a ring drainage is mandatory. You need to know the following about such drainage: ⊕
the inside of such drainage is waterproof, which does not allow water to penetrate into the basement;
⊕
ring drainage is not necessary if water enters the basement only from one side - in this case the drainage circle can be made open;
⊕
perforated pipes for collecting water are located below the basement floor level;
⊕
the distance between the ring drainage and the building is approximately 5-8 m - in this case there is no need to worry about weakening the soil.
For pile and columnar foundations
Drainage of pile foundations, as well as columnar structures, is carried out according to the following scheme.
- A ditch is laid along the entire perimeter of the building, into which sand and crushed stone are poured (the total layer thickness should be about 20 cm).
- Drainage pipes are being laid.
- The pipes are covered with a layer of crushed stone (about 30 cm), and geotextiles are laid on top.
- The entire structure is covered with earth and compacted.
It should be emphasized that the blind area in this case is not mandatory. The advantages of this system include the simplicity of its design and the ability to do it yourself.
Such drainage can be done in the shortest possible time. It should be noted that such a system periodically needs to be thoroughly cleaned.
Wall foundation drainage
Wall foundation drainage is relevant for clay and loamy soils through which water penetrates rather slowly. Features of this type of drainage: ⊗
such drainage can be arranged as a preventive measure against flooding of the basement if the source of groundwater is mixed;
⊗
the drainage system is laid outside the building at the closest possible distance from the foundation;
⊗
the drainage system is located below the level of the base of the foundation; moreover, if the basement is too deep into the ground, then the drainage system must be located below the base.
⊗
taking into account the fact that groundwater on clay soils contains a significant amount of tiny particles, to increase the service life of the system it is recommended to use drainage wells with enlarged sand traps.
How to make drainage around the house with your own hands.
Step-by-step instructions for installing closed drainage
- Determine the location of the closed drainage system, which can be implemented in two options:
- pass only near the foundation, i.e. around the house (wall drainage), preventing water from penetrating directly into the house.
- be located throughout the site, thus protecting the basement of the cottage, as well as plantings and other outbuildings.
Drainage of groundwater from the foundation of the house.
Closed drainage device (solid, wall).
The drainage diagram around the house is shown in the photo.
Drainage system around the house.
- Mark the location of drainage ditches on the site. Typically, devices such as a laser rangefinder and a level are used for this. But, you can make it simpler, trace where the water grooves remain after the rain - that’s where drainage trenches should be laid.
- Dig trenches. When digging, be sure to observe the height difference. After all, water should flow to the drainage well, and not accumulate in pipes.
Trenches for house drainage.
Digging a trench for drainage of a country house site.
Advice. To check the “operability” of the trench, it is better to wait for heavy rain and see if there are any places of significant accumulation of water.
- Lay a layer of geotextile. Its role in drainage is to filter water from impurities that could clog the drainage pipe perforations.
Laying geofabric drainage.
Laying geotextiles at the bottom of the trench for drainage.
Advice. If you have clay soil, geofabric is a must; if you have crushed stone or sand, then it is not necessary.
You can use any geotexyl, the main thing is that it allows and filters water well. It is better not to use dense needle-punched geotextiles, because... it does not pass water well.
- Fill the bottom (bottom) of the trench with gravel.
Perforated pipe for drainage.
Laying perforated pipe.
Lay a perforated pipe - the basis of the drainage system. Pipes can be ceramic or plastic. But any type of pipe must have perforation to receive water (perforation can be done independently, using a drill). The pipes are connected to each other using a cross or tee.
Advice. The pipe perforation should be smaller than the size of the smallest gravel particle.
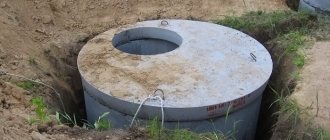
- Lead the ends of the pipe into inspection wells. Such wells are installed at all turns so that the system can be maintained. For example, clean a pipe with water pressure or evaluate changes in water level.
Advice. Collecting pipes over a large area of the site must converge into a main pipe (with a diameter of more than 100 mm), which will carry the collected water to the drainage well.
Lead the ends of the pipe into the drainage well. This is the last component of a closed drainage system.
Drainage device, inspection wells.
Exiting pipes into inspection wells.
According to their functional purpose, drainage wells are divided into two types:
- accumulating _ This well has a sealed bottom. Water is accumulated in it and then used for irrigation;
- absorbing . A well without a bottom, the water in it gradually disappears into the soil.
- Fill the geofabric with crushed stone without reaching the top ground level of 200mm.
- Fill the drainage pipes with crushed stone to a height of 300mm.
- Wrap the pipes with geotextile overlapping and secure the joints with rope.
- Fill in sand, soil and/or lay turf.
Drainage of water from the foundation of the house.
Absorption well and drainage pipe wrapping with geotextile.
Advice. A surface drainage system (storm drainage system) can be installed on top of a closed system and also drained into a drainage well.
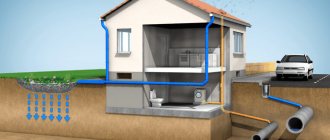
The finished drainage system is shown in cross-section in the photo.
Sectional view of the drainage system.
Sectional diagram of the drainage system.
Which of the listed types of drainage is right for you can only be determined by knowing the characteristics of the site. In general, you should choose the drainage around the house whose cost of installation and operation is the lowest, and of course, which you can do yourself. At the same time, it must perform the role of drainage efficiently and reliably. After all, according to experts, proper drainage around the house will extend its service life by more than 50 years.
Reservoir foundation drainage
Reservoir drainage is most often combined with ring or wall drainage. It is worth knowing the following about such a drainage system: • such drainage is chosen regardless of the type of soil in the presence of a large amount of groundwater, it may also be needed as a preventive measure for flooding on clay or loamy soils; • reservoir drainage is located through the entire foundation of the building and interacts with the outer walls or ring drainage. • drainage pipes located in the water-bearing horizon collect only excess groundwater, thus maintaining the natural level of soil moisture throughout the entire area. • if there is local, pronounced soil moisture in the area, which can be seen by the more saturated color of plants, or their generic composition, the arrangement of reservoir drainage is vital.
What you need to know when organizing drainage
- It is necessary to carefully consider the location of wells for collecting water. On average, six pieces are enough for a private house, two of which are reception rooms, and four are observation rooms. It is most convenient to place the wells in the corners of the future building.
- When calculating the slope of the drainage system, it is necessary to take into account where the main well is located. The slope should have the following direction: from the far observation point, located in the corner, to the central receiving one.
- Cleaning methods must be provided. This is a prerequisite for the full functioning of the drainage system and high-quality protection of the foundation from moisture.
How to arrange a classic drainage system
The drainage system must be understood as a closed system of special perforated pipes. It is located below the lowest point of the building, and its constituent pipes (drains) are laid at a slight slope so that water naturally flows down into a special tank. Such a tank is also called a drainage well - this device allows you to gain access to the drainage and, if necessary, assess its condition and even clean the system using special equipment. Groundwater entering the pipes flows into a well, from which the water can be drained outside the site using a gravity system or a forced one using a pump. Drainage of water from the building allows you to avoid the appearance of moisture in the basement, however, it is not always possible to achieve the expected result 100%; at least, waterproofing the foundation should be an additional element of drainage.
How to drain groundwater from the foundation of a private house with your own hands?
The foundation of any house, and especially a private one, is subject to the negative influence of ground water. They contain components that can destroy the concrete base. Even if the house is carefully waterproofed and equipped with supports, this does not guarantee protection from the influence of groundwater and further destruction. Only foundation drainage can provide such protection and ensure drainage.
Drainage.
Installation of drainage around the foundation of the house.
The main stages of creating a closed drainage with your own hands:
- Digging a trench half a meter wide and half to one and a half meters deep. You should dig with an inclination towards the ditch into which the water will drain.
- Filling the trench bottom with sand and further compacting it, taking into account the angle of inclination of the bottom.
- Laying drainage pipes on the sand (if there are no special perforated ones, you can make them yourself: by drilling holes in ordinary plumbing pipes in a 180-degree sector).
- Sprinkling the pipes first with large and then small crushed stone and compacting a layer of earth on top of the crushed stone.
- An inspection well must be installed in the bend of the drainage system, to which pipes with holes for drainage are attached. The pipes must lead to the very boundaries of the site.
Now we need to organize water drainage outside private property:
- we dig a trench again;
- we make a slope and cover it with sand;
- we install pipes without holes (here there is no need to collect water from the lawn);
- we fill up the pipes and put the soil and turf in place.
Thus, foundation drainage is an operation, before which it is not recommended to engage in direct construction of the house. Drainage provides protection around the foundation, removal of excess moisture from it and, therefore, long-term operation of the building.
Let’s make a reservation right away: drainage and waterproofing are different concepts and one of them does not exclude the other. Drainage around the house (drainage system) allows you to remove or reduce the water level in the area.
The danger lies both outside (precipitation, flood waters) and inside (groundwater). Waterproofing protects the foundation of a building from water getting inside.
But even a foundation that is well insulated from water will not protect the foundation of a private house (basement) and basement from water ingress for a long time. After all, if water presses constantly, it will find weak spots in the waterproofing. And on the contrary, if you take her away in time, your home or dacha will be safe.
Drainage around the house.
Do-it-yourself drainage around the house.
Installation of foundation wall drainage
This type of drainage system is the most budget-friendly, since the cost of materials for its arrangement is low. At the same time, wall foundation drainage allows for control over the groundwater level - if the building stands on a shallow or normally buried foundation, then you can choose the wall option. In general, the drainage design looks like this: √ drains are laid in trenches dug around the building; √ the drainage well is placed in the lowest place near the house; √ connect trenches into a single system; √ pipes are brought into the well. Step-by-step instructions for arranging wall foundation drainage with your own hands are as follows:
Protecting the foundation from moisture using a special blind area
To drain rain and melt water, a foundation blind area is installed. First of all, it is necessary to determine the depth of the blind area, then dig a trench starting from the foundation. The width of the trench must be at least one meter. All plants are removed from it, the bottom is covered with sand, which must be compacted, watered with water, in order to give density. Maintain a layer of 100 mm. If you use the blind area as a path, lay an additional layer of gravel. The surface is poured with concrete. The blind area should also be sloped so that precipitation drains and the foundation is protected from water.
The following rules will help you install the blind area correctly. It should be uniform around the entire perimeter, without damage. Be sure to observe the slope. To ensure that concrete has water-repellent properties, its surface is coated with cement or waterproof glue.
The blind area allows precipitation in the form of rain and melted snow to be removed to a safe distance, but it is not capable of protecting the foundation from underground and groundwater. Therefore, to obtain an excellent result, it is necessary to install both a blind area and a drainage system. Together, these systems will do their job perfectly.
Special blind area and foundation drainage photo:
Foundation blind area
Installing the systems listed above is not such a difficult job. These recommendations will allow your home to stand for many years, and you will not need to repair or restore the foundation and other parts of the house.
Materials for arranging foundation drainage
In order for the drainage system to be effective and function for a long time without failures, it is necessary to use high-quality materials. The arrangement of drainage for the foundation of a house must comply with building codes, which allow the use of pipes made of the following materials: ♦ ceramics; ♦ plastic; ♦ asbestos cement. Plastic pipes, which are used in 98% of cases, have optimal technical and economic characteristics. They are superior to building materials made from ceramics and asbestos cement in a whole list of indicators, among which are: ⊕ Low cost. ⊕ Wide range on the construction market. ⊕ Easy installation. ⊕ Reliability and durability. In addition to pipes, for installing a drainage system you will need all kinds of fittings, tees and couplings - these connecting elements allow you to combine drains into a single system. High-quality drainage allows you to protect a building from moisture penetration, regardless of its origin, be it groundwater, melt water or precipitation. Therefore, we recommend that you contact specialists who will help you arrange turnkey foundation drainage on your suburban area, starting with geodetic work and ending with a ready-to-use groundwater drainage system.
Ring system: features of material selection
Often, the shortcomings of the site chosen for construction emerge after the construction of the house. The basement regularly floods, the house is constantly damp, and the foundation is exposed to moisture. It's time to take action, namely create a reliable drainage system.
The basis of ring drainage is perforated drains. Previously, ceramic, asbestos-cement or metal pipes were used for this purpose. All of them have a number of disadvantages, which is why they have not been used recently. The best choice for foundation drainage is perforated PVC pipe. Several varieties go on sale:
- two-layer with geotextile;
- single-layer with geotextile;
- drainage pipe with coconut fiber filter;
- HDPE with and without geotextiles.
A two-layer pipe has the best consumer characteristics; it can be laid to a depth of up to 8 m, however, in a private home this is too much. Other varieties are designed for operation at a depth of up to 3 m, which is quite sufficient. It is recommended to choose drains with an additional filter and always with stiffeners, this will protect against premature failure of the system.
Advice! Regarding the diameter: it all depends on the degree of water saturation of the soil. Most often, 100 mm pipes are chosen for storm sewer systems, and 165 mm for a ring or layer system.
Drainage wells will also be needed. The optimal material for them is plastic. Products made from it are durable, not subject to clogging, and are easy to maintain. Wells of this type, in addition to collecting moisture, provide the ability to monitor the condition of the system and, if necessary, clean it.
In addition to the main parts, you cannot do without all kinds of corner joints, tees, and plugs. All this is purchased separately, based on the drainage configuration.
Step 1: Preparation
Drainage pipelines are laid around the house, therefore, to calculate the amount of material, you need to measure the length of each side. The distances from the walls of the building are 1.5–3 m, it all depends on the area of the house and the depth of groundwater.
In order not to make a mistake, it is worth making a small drawing, a diagram of the future drainage system. Draw the outlines of the house by hand, indicate the location of the wells and collector tank. Using the finished diagram, it is easy to calculate the length of the pipelines and make a list of the necessary connectors.
On a note! The depth of the drains depends on climatic conditions; they must be below the freezing point of the soil, otherwise the durability of the system is not guaranteed.
The number of drainage wells is selected based on the saturation of the layers with moisture. The best option seems to be four in the corners of the building. The collector must be located at a distance of at least 3 m from the house. Regarding its material, you can purchase a ready-made plastic product and bury it, you can dig a fairly deep well and ensure its waterproofing.
Step 2: excavation
Once everything you need is prepared, you can start working. First of all, you need to dig a trench. Using a tape measure, the diagram is transferred to the site. Using pegs and rope, they mark the route of future drainage.
It is better to start excavation from that part of the site where the depth is minimal, therefore, from the highest point of the system being created. Gradually increasing the depth, they dig a trench around the house and make a branch to the collector well.
During excavation, it is important to control the slope so that water does not stagnate in the pipe. Its optimal value is 2 degrees.
In addition to the trench, at the same stage, recesses for water collectors are prepared. Their depth should be 20–30 cm greater than the height of the well, and be sure to leave space at the edges for subsequent filling with crushed stone.
Step 3: pillow
The perforated pipe must lie on a reliable base, which also allows water to pass freely. The best option for a pillow is sand. The bottom of the trench is filled with a layer of approximately 50 mm and compacted thoroughly.
Geotextiles are laid on the sand; this is a material characterized by strength, retaining small particles of soil, but allowing water to pass through. The sheets are laid overlapping and temporarily secured with pegs made of wire or damaged electrodes.
The substrate is covered with crushed stone. The layer thickness should be within 10 cm. In order for the system to serve for a long time, it is recommended to rinse the crushed stone with running water.
Step 4: connecting system elements
Wells are installed and drainage pipes are laid. Pipelines are inserted at a height of at least 20 cm from the bottom of the well; this will protect the drains from clogging and ensure ease of maintenance - if necessary, the contents of the well can be quickly pumped out using a conventional deep-well pump.
Step 5: Shutdown
After making sure that everything is done correctly, close the system. The pipes are wrapped with geotextile; it will protect the system from silting without preventing water from getting inside. The result is a plastic pipe wrapped in a cushion of crushed stone and fabric.
The soil removed during excavation work is poured into the trench and leveled, leaving only inspection hatches for the wells and collector on the surface.