One of the reasons for toilet failure is water leakage from the cistern. The nature of this phenomenon has various causes, but in most cases you can eliminate water leakage yourself by carrying out repairs on your own. Indeed, in most cases, malfunctions are of a typical nature, which allows you to quickly find the problem and promptly fix it.
| 1. Water flows in the toilet after filling the tank 2. Water flows into the toilet after flushing 3. The tank leaks in the places where the bolts are attached 4. Leaks between the toilet and the tank mount 5. The tank flows on the sides or from the bottom to the floor 6. The toilet tank leaks from button 7. What should I do to prevent the tank from leaking? |
Water flows in the toilet after filling the tank
The design of toilet flush tanks is based on the principle of filling the vessel with tap water until the water supply valve is activated, which blocks its flow into the tank.
One of the safety devices in this system is the overflow mechanism: when the tank is filled, if the shut-off valve does not operate and water continues to flow into the cavity, the excess volume of water flows by gravity into the toilet. The situation when, for some reason, the inlet valve does not close is not the most critical, unless you take into account that even with the toilet not working, water consumption increases to an average of 100 liters per day.
The reasons for water overflow can be:
Incorrect adjustment of the float mechanism of the flush tank
Overflow due to improper adjustment of the float mechanism is the most common problem in flush tanks. The float chamber, pushed by the volume of water through a metal rod or plastic guide, presses on the valve and thus stops the flow of liquid into the tank. If the metal guide is bent or the adjustment screw on the plastic guide is loosened, the float chamber moves and the supply valve simply does not shut off the supply.
The method to solve the problem is simple: remove the tank lid and adjust the position of the float relative to the upper water level. For most toilets, the float is adjusted so that the water level does not reach the overflow neck by 1-1.5 cm.
Float chamber malfunction
If the float is damaged, the supply valve simply does not close. A float filled with water does not float up and thus the supply valve is simply constantly in the open position.
The simplest repair method is to replace the float or drain the water from it and seal the leak.
Water supply valve diaphragm malfunction
For diaphragm water supply valves, the supply is closed by pressing the plastic rod onto the rubber membrane, while the supply hole on the reverse side is tightly blocked by the rubber. Over time, a groove forms on the rubber at the inlet hole, through which water first begins to simply seep through, and after a while it simply flows unhindered into the tank. The repair method is membrane replacement.
Drain mechanism malfunction
This problem begins to manifest itself gradually when the tank itself, after a certain time, begins to fill with water. In this case, it is necessary to disassemble the drain mechanism, clean it of deposits and change the rubber seals.
Poor water quality
The reason for the tank overflowing is often associated with poor-quality tap water - a large amount of iron oxide, lime or mechanical inclusions form a coating on the walls and mechanisms, which over time acts on the rubber seals as an abrasive, literally eating the surface. In this case, it is necessary to install a filter system and replace rubber gaskets, membranes and seals.
Repair technology
The toilet is one of the most important plumbing devices in the house; if it breaks, it instantly causes discomfort. If water does not flow well into a toilet cistern with a button or lever, you must take immediate action; this is not just an annoying inconvenience that you can put up with, it is a harbinger of serious problems.
Repairs should begin with an inspection of the tank and parts of the drainage system. Correct identification of a breakdown will protect you from wasted expenses and guarantee proper results in the shortest possible time.
Important! Before undertaking serious repairs, you need to make sure that there is water in the water supply. It’s hard to believe, but in the vast majority of cases the tank does not fill due to low pressure, lack of water in the system, or an accidentally closed valve.
Float misalignment
One of the common problems of the drain tank is the skew of the float or a change in the geometry of the rods. The situation looks like this: the tank is completely empty, the float lies at the bottom, but the valve regulating the water supply does not open. At the same time, if you move the mechanism or simply hit the body with your fist, the feed resumes.
The opposite situation is also possible - water constantly enters the tank and flows out through the overflow protection system. The supply can only be stopped manually by raising the float. This is an even more serious breakdown if the water does not stop flowing - there is an overrun, and there is a possibility that the overflow will not cope with its task.
Repairing a toilet flush tank if the water does not stop or the tank does not fill completely is not difficult; as a rule, it is enough to manually bend the float rod. It may be necessary to replace the traction axis; during operation, salts accumulate on it, which interfere with the normal operation of the mechanism.
Damage to the supply hose
A common problem that causes water to slowly fill into a toilet cistern with a bottom connection is the unsatisfactory condition of the supply hose. Most of the auxiliary parts for connecting plumbing that can be found on sale are not of high quality. The rubber flakes off, reducing the effective cross-section of the pipeline. To this we can add the poor condition of old water pipes, which means rust and scale.
If water flows from the taps with good pressure, but the tank fills extremely slowly or does not fill at all, it is worth checking the supply hose. It’s not difficult, just turn off the water and unscrew the fitting on the side of the tank. Direct the hose into any container and open the tap. The absence of a leak is a sure sign of a breakdown. There is no point in trying to clean or repair the hose; it needs to be replaced.
Advice! You need to buy components only in specialized stores, and you don’t need to look towards the cheapest parts. Of course, a high price does not guarantee quality, but a low price is a sure sign of its absence.
Valve contamination or failure
The valve that regulates the water supply to the tank may be damaged. Sometimes it fails completely, but more often than not it's a clog. The main reason for this is the low quality of water in the system.
You can clean the inlet using a thin wire. You should not take hard steel ones; as a rule, valve parts are made of plastic, they are very easy to damage. The valve must be cleaned when the water supply is shut off, opening it periodically. If after the next check the water begins to flow normally, the repair was successful.
In particularly advanced cases, simple cleaning will not help; the valve will have to be replaced. It should be borne in mind that some models of tanks do not imply the replacement of such a small part. Then you will have to buy the entire mechanism, or even the entire tank. It is better not to bring the device to this state, use filters and monitor the condition of the plumbing.
Many modern models of flush tanks, which are installed in monoblock devices and designer installations, use membrane-type valves. Its main part is a flexible plate that shuts off the water and regulates its flow. Such a system is distinguished by speed and accuracy of operation, but the membrane often fails. The valve will have to be removed and a new one purchased to replace it.
Blockage in the drain
There are times when water enters the tank, but does not reach the required level; it simply flows down the drain due to a leak. The cause may be a foreign object that has fallen under the bulb, its natural wear, or plaque formed on the body. Any of the listed malfunctions must be corrected immediately.
You should start with something simple - pull out the pear and carefully inspect it and the seat. If foreign particles are found, remove them. Next, wash the valve itself and its seat.
Important! Sedimentary deposits can be removed with strong chemicals designed for cleaning plumbing fixtures. When working with household chemicals, it is important not to forget about protecting your hands and respiratory organs. Carry out the work according to the instructions for the drug.
If the cause of drainage is natural wear or loss of elasticity of the material, the bulb is replaced. In order not to make a mistake in choosing a new part, it is better to select according to the sample.
Other Possible Problems
If, just a few days after installing a new device, water does not flow into the toilet cistern with a bottom water supply, the reason may be poor quality work, namely an incorrectly screwed hose. It is worth loosening the clamp and checking whether a piece of FUM tape or part of the braid has gotten into the hole.
Another common reason for the failure of a new drain system can be poor quality parts. This can be expressed by the spontaneous appearance of various problems and their unexpected disappearance. The only thing that can protect you from such a situation is purchasing devices from trusted manufacturers.
The drain activation button may sometimes get stuck. Of course, this is typical for toilets with push-button release. The main reason is contamination of the button itself or its socket. To solve the problem, you need to use chemicals.
Incorrect operation of a tank that has been in use for several years may be caused by natural wear and tear of its components. Here, most likely, you cannot do without completely replacing the drain mechanism, but first you should completely disassemble it and identify the weak point; perhaps, to correct the situation, you can limit yourself to replacing one or two parts.
Water flows into the toilet after flushing
The problem associated with water leakage after flushing occurs both in old-style systems with cast-iron wall-mounted tanks and in new “compact” systems. The reason for this phenomenon is the improper operation of the flushing mechanism.
When you press a key or button, water is discharged and the drain hole opens as wide as possible. At this time, the locking and adjusting mechanisms are in a suspended state - when the button is pressed, the valve or weight with the gasket cannot lower, but as soon as the button is released, the mechanism returns to the lowest position and closes the drain neck.
A sudden release of the button causes the locking mechanism to move along the guides under the influence of the water flow. At the same time, the deterioration of plastic parts becomes more and more visible, this leads to distortions and “freezing” of the mechanism itself. The result of such a defect is the following: the drain neck is skewed and incompletely closed; the water entering the tank is simply immediately drained into the toilet.
The method of troubleshooting is to completely replace the drain mechanism and then adjust its operation:
One of the additional causes of the problem may be increased water hardness and the natural aging processes of plastic.
How to fix a toilet float
The malfunctions associated with this part are that the water supply either does not stop at all or is interrupted. The culprit of the situation may be the float itself or the valve.
Water entering a depressurized float can disrupt the operation of the system. Sealing the cracks with plastic or placing the float in a plastic bag will help restore the functionality of the part. The system's functionality will be restored for a while, but it is recommended to replace the old float with a new one.
if the float is shaped like an inverted glass, then the reason for the disruption of its normal functioning is usually the accumulation of sediment and mucus on it. To fix the problem, simply clean the surface of the part.
As for adjusting the float, it is not difficult to do. After filling the tank with water, you will need to monitor its level. Ideally, its border should be 4-5 cm below the level of the side holes. If they are absent in the design, then you should be guided by the body of the drain device - the water should cover it.
You can change the liquid level by raising or lowering the float:
- when raised, the mass of water will increase;
- when lowered, it will become smaller.
A special screw is used for adjustment; inexpensive models of plumbing fixtures can be equipped with an adjustment rail.
We invite you to watch this useful video:
The tank is leaking where the bolts are attached
Installation of compact type toilets is carried out using a bolted connection between the tank and the toilet. In this case, the most common bolts are made of metal with a zinc coating to protect against corrosion. Rubber gaskets and universal silicone sealant are used as sealing. In more expensive models, the bolts may be made of brass or bronze, but in most cases it is galvanized metal, which is still susceptible to corrosion.
Leakage at bolted joints begins with a small amount of water seeping in, and gradually the leakage will increase. The following can be suggested as preventive measures:
- Shut off the water supply.
- Drain the water from the tank.
- Carefully loosen the thread.
- Remove the bolts.
- Remove rubber gaskets.
- Clean the surface of the rubber gaskets from silicone and dry them.
- Clean the ceramic surfaces where the bolts are installed.
- Apply a layer of silicone sealant and install rubber seals.
- Again treat the seat of the bolted connection with silicone, install the bolts, add 2-3 metal washers from below and tighten the connection with a nut.
If the leak cannot be stopped, the entire fastening system must be replaced, from bolts to rubber seals. In this case, there is no point in trivializing; everything needs to be changed.
How to turn off the water in an apartment building
Water enters the living space through a pipeline that comes out of the floor and cuts into the ceiling. The exception is housing located on the upper floors. The water supply does not reach the ceiling. The resource is cut off in the bathroom or toilet, although in some older houses the water supply and fittings are installed in the kitchen.
How to turn off the water in a toilet riser
Cold and hot water enters the house through the water supply system, so there are 2 risers. But if the water is heated by a gas water heater, then there will be only one water pipe. So that residents can turn off cold or hot water without problems at any time, it is recommended to use ball valves on risers.
In houses, fittings are installed at 1 inch, ¾ inch, ½ inch. If the valves are older models, with difficult-to-turn mechanisms, then it is necessary to replace them, this will help to avoid serious problems when the valves fail.
In most houses, there are valves on each riser, turning which allows you to shut off the cold or hot water supply. In order to find the tap, you should examine all the pipelines protruding from the floor.
You can determine the hot water on the riser by its heating. After turning the knob to the right or left, the water is shut off and stops flowing to the mixer. Periodically, apartment owners should check the condition of the equipment, since over time its elements wear out and the valves may fail. This is especially noticeable in homes where the water quality is poor and rust accumulates much faster.
If the hot water is shut off due to the fault of the management company, then the consumer can contact the head of the organization with a request to recalculate for the lost water supply services.
How to turn off the water in one apartment
In a situation where you only need to turn off the water at your place, you should shut off the riser with hot or cold water. Most often, valves are located in the bathroom or toilet. For indoor use, experts advise installing only high-quality, expensive taps made in Germany or Italy. If you don’t have a lot of money, then it’s better to buy a cheaper bathtub or toilet, and don’t skimp on taps, since installing low-quality fittings can lead to dire consequences.
When you turn off the water at home using a valve, only one apartment will be de-energized; at this time, your neighbors must remain with water.
How to block risers in the basement
If major renovation work is planned, then the water must be turned off in the basement.
But, in most cases, when the water in the basement is shut off, the heating features and the confusion of the pipeline lines create problems with finding their branches.
In order to find the right pipeline, you can ask your neighbor to knock on the pipe a little. Based on the sound reaching the basement, you can determine your branch.
After discovering your pipes, there may be a problem with shutting off the water if the equipment is outdated. In this case, you will need to shut off the water supply to the entire house. This operation will allow you to check and repair your valves. There is no point in delaying the work so that the neighbors do not complain to the Criminal Code.
Cast iron valves are installed in basements. The water will be shut off if they are turned in the direction of the clock. If after turning the water continues to flow, then you should use a gas wrench to tighten the engines. If these efforts do not lead to success, and water does not stop flowing into the apartments, then it is recommended to turn on the tap and turn it off.
If no methods of shutting off the water work, then you need to contact the management company, where plumbers will come, shut off the water and fix the problems that have arisen.
Leak between the toilet and the cistern mounting
At the junction of the toilet tank itself, a leak can be the result of several defects:
- incorrect installation of the tank on the toilet;
- failure of the rubber seal;
- defect of the tank and (or) toilet.
A leak at the installation site due to a violation of the installation technology may occur due to:
- improper installation of the rubber gasket;
- the fit between the tank and the toilet is not tight enough;
- aging rubber seal.
Installation of compact type toilets with a flush cistern attached to the toilet is done by installing a rubber gasket between the toilet and the cistern. The gasket is pressed tightly with bolts. A distortion made during installation will certainly lead to a violation of the tightness of the gasket and the beginning of water leakage when the tank is full.
In models where there is a ceramic cistern pipe that fits into the toilet opening, leakage due to a leaky gasket is unlikely. Most likely, the appearance of water here is due to a crack in the body of the pipe or tank. For some time, you can seal the crack with silicone or silicate (office) glue. But this is only a temporary measure for 2-3 months; in the future, the operation will have to be repeated more and more often. Therefore, it is recommended to immediately start looking for a new tank or completely replace the entire set.
Why does water flow?
The toilet flush system has several weak points. These are units with moving elements, as well as sealing zones of various kinds. In a modern tank the problem can be caused by:
- float valve system, which is responsible for water supply and shutting off;
- the place where the drain mechanism is attached to the bottom of the tank;
- sealing zone at the outlet of the main water flow into the toilet.
If water does not leak outside the tank, most problems can be solved. This will require attention and a few simple tools.
The tank leaks from the sides or from the bottom to the floor
Quite often, a tank leak is confused with the presence of condensation on its surface. Filling a container with cold water in a room at normal room temperature automatically causes dew drops to appear on the outer walls. It’s another matter when marks characteristic of a constant flow are visible on the sides. Rusty or calcareous marks left after water flow indicate a defect in the internal mechanism or cracks in the ceramic bowl itself.
Problems associated with the presence of traces of leaks can be classified as follows:
- presence of traces of water jets from technological holes;
- traces starting below the holes, appearing in places of microcracks;
- presence of traces at the bottom of the tank.
In the first case, when water simply overflows through the technological holes, the cause of the defect may be a malfunction of the overflow mechanism or the absence of a special hose attached to the filler pipe.
If the mechanism malfunctions, water overflows and finds a place to exit through the mounting holes. Solving the problem is quite simple - adjust the mechanism, check the drain neck and install plugs on the unused hole for connecting the hose.
A fallen tube on the inlet pipe of the valve is not a critical malfunction; simply, under the pressure of water, a large amount of splashes with an unpredictable trajectory is formed in a confined space, as a result of which a certain amount of water simply splashes out. Flaw correction method:
- Shut off the water supply.
- Remove the cover.
- Place the fallen pipe onto the pipe and secure it with a clamp.
If the ceramic or plastic bowl of the tank is mechanically damaged, a leak may occur on the walls at the fracture site. It is useless to repair visible cracks that threaten the integrity of the structure; the constant process of filling and draining water systematically affects the walls and breaks the seam, no matter how strong it may be. In this case, you just need to replace the tank.
If no visible cracks are visible, but water seepage still occurs, it is recommended:
- Shut off the water supply.
- Drain the water from the tank.
- Mark places where water leaks.
- Dry the tank outside and inside.
- Using silicone sealant or silicate glue, treat microcracks inside and outside the walls.
- After finishing the treatment, fill the tank with water.
Filling microcracks with sealing compounds will ensure sealing of the walls for a fairly long period, but this is provided that the walls are not subject to mechanical stress that can turn microcracks into real faults.
Tanks with bottom hose connections most often leak at the hose connection. The defect can be eliminated by tightening the hose nut on the fitting or removing the hose and reinstalling it using fum tape or tow.
How to turn off the water?
This can be done in a separate apartment only if there are special valves in the bathroom. But this method is appropriate only when minor work is planned. For example, repair a faucet. If you plan to install plumbing in a toilet/bathroom or other labor-intensive work, you must shut off the water along the entire length of the riser. This design is a pipeline. The riser is intended for 1-2 apartments.
If there is a valve in the bathroom, you should turn it clockwise until the end. What to do if the apartment is old and there is no valve? In this case, you will inevitably have to contact a specialist from the housing office. The plumber will not be able to turn off the water in a single apartment, only in the entire entrance.
In the event that a main pipe bursts, the entire house is shut off. This work may even affect several buildings.
The pipes in the bathroom and toilet located in new buildings usually have valves. Using them you can easily turn off the water in a separate apartment. In other cases, there is even a special sensor on the pipes that automatically detects problems and turns off the structure.
Related article: Toilet cistern shut-off valve
How to turn off the water in the toilet riser?
The riser is usually located in the toilet or kitchen. Its main purpose is to supply water. It can be overlapped only if there are valves on the structure. If they are not there, you need to think about installing the elements. The best choice in this case would be ball valves.
If old elements with defects are installed on the pipeline, it is better to think about replacing them, because in the event of an emergency they may fail and you will flood your neighbors. It is better to entrust their installation to a specialist. A plumber will be able to determine what diameter of the product is required specifically for your riser.
After installing the valves, you must not forget about the importance of preventative maintenance. Once every three months it is recommended to shut off the risers and then turn them on again. This is necessary so that the elements do not stagnate and cope well with all their functions. It is better to prevent their breakdown, because in an extreme situation the valves may fail, and you will not be able to do anything about it. If any problems arise, it is better to call a technician who will check the condition of the valves and carry out the necessary repair work.
In conclusion, we can say that turning off the water is easy only if a person takes care of it in advance. If the valves have not been installed, it is almost impossible to turn off the valve in one apartment. For this reason, it is better to get ahead of the occurrence of further problems and install them, because shutdown may be required not only during repair work, but also in the event of emergency situations.
Leaking toilet cistern with button
Models equipped with a button, in addition to all the listed diseases, may have another problem unique to them - the development of the mechanism and the weakening of the release spring.
The appearance of this defect is associated with the mechanism of operation of the drainage system - when you press the button, the drainage process begins, the button is restored to its original position after the mechanism has completely drained the water and released the spring.
Solving the leakage problem in this case is quite simple:
- Shut off the water supply.
- Remove the cover.
- Adjust the mechanism and slightly stretch the spring.
- After this, check the functionality of the mechanism and, if necessary, make adjustments again.
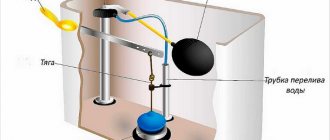
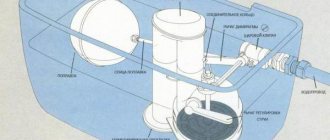
The design principle of the cistern
Of course, for successful repairs, you must first become familiar with the principle of the drain tank and find out what parts it consists of. The main mechanisms of the design are a device for draining water and collecting it into the tank.
The design and principle of operation of the toilet cistern
Flushing is done by pressing a lever or button; they can be located either on the side of the tank or on its lid. Some designs involve placing the water container slightly higher than the toilet. In such cases, pipes are used to connect the elements of the system; the use of this option is justified by a significant increase in the flow force of the flushing water.
To give the bathroom a more aesthetic appearance, decorative screens are sometimes used to hide the structure itself. But differences in configuration do not mean that changes have also been made to the design of the device; the principle of its operation remains the same.
The serviceability of the toilet can be judged by the following parameters:
- water should be automatically drawn into the tank, its supply is limited to a certain level;
- when you press a button or lever, the drain device should be activated and release water, partially or completely.
The operation of the mechanisms is ensured by the efficiency of the float fixed at the end of the lever. When you press the button, the float moves, revealing a hole through which water flows. After the water rises to a predetermined level, the float will return to its original position and block the channel intended for the flow of liquid.
The best option is tank designs in which water is supplied from below. The advantages of such tanks are silent operation, but the design of such devices is more complex, and therefore the cost is higher.
Older models of tanks have a rubber bulb or valve in their design that blocks the water drain hole.
To control the structure, a lever is used; it protrudes beyond the structure itself; it is attached to the body with a chain. To trigger the drain, you need to apply pressure on the lever, which will open the hole.
Let's watch a video about adjusting the operation of the drain tank:
What should I do to prevent the tank from leaking?
There are few recommendations in this case. First of all, you need to install the toilet correctly and be sure to secure it with mounting screws. A skewed toilet or a toilet with play will itself cause leaks in connections and gaskets.
The second point is related to the need to use modern means of cleaning the tank. Chemical agents allow you to remove lime and rust deposits, which means the mechanism will work longer.
The third thing worth remembering is the need to promptly replace them at the first signs of destruction of rubber gaskets.
A leaking toilet tank is a common problem that has many causes. Finding out why the breakdown occurred and then trying to fix it is the correct sequence of actions.
How to find the cause of overflow?
So, as mentioned above, first you need to correctly identify the cause of the plumbing failure. Of course, for this you need to know the location of the parts and their names. This is perhaps the most important rule. Ignorance of this can lead to problems with troubleshooting. You simply won’t know which part needs to be replaced, what to screw in and where, how to install it correctly, etc. It is important to pay special attention to the gaskets; they ensure the safety of water flow. The better this gasket is made, the better the result itself will be.
Operating principle of the cistern
What should you do if the water in the toilet tank overflows? In order to find out the reason, you should press on a special bell. Let's say the water no longer flows. This means that the nut in the tank simply unscrewed. In this case, it needs to be returned to its previous position, that is, tightened. To do this, you need to remove the shelf. But there is also a situation in which the nut is located at the very surface of the tank, that is, sticks to it. Then the overflow should be carried out clockwise, so it will take the desired position.
Related article: Toilet cistern design
And it also happens that everything is fine with the nut, that is, it does not stick to the surface of the tank, but the water still flows. Then you need to follow these steps:
- This is done when the nut is completely unscrewed. You should turn off the water supply and allow the toilet tank to dry. Afterwards, dismantle the overflow itself. Next, carefully wrap some kind of seal onto its threads. Please note that it should fit very tightly into the hole through which the water drains. Then you can put everything back in its original place. You need to coat the repair area with paint and let it dry, this is necessary so that the repair’s tightness is better. Everything is ready, enjoy.
- This technique is performed if this part is not completely unscrewed, but there is still a gap. Carefully turn off the water, after which the tank should dry thoroughly. You need to wrap tow in the resulting gap, after which you need to paint this area well. It is important to use quick-drying paint so that it dries well. Everything, repairs have been made, the toilet is in working order.
Please note that the overflow hole itself must be open; it must not be blocked under any circumstances. If the hole is clogged, water can overflow from the tank directly onto the floor and ruin not only your renovation, but also harm the neighbors below.
This unpleasant situation can also happen when the overflow is free through. This means that the installation of the toilet tank is faulty. This violation was committed specifically in the fastening of the toilet and shelf, namely, the bolts were loosely screwed on. As a result, the overflow occupies a position above the walls. It happens that the bolts cannot be tightened securely due to their corrosion, then the overflow level should be shortened somewhat. All you need to do is a special recess, which will be located from the edge of the overflow to the desired level. It is quite easy to do it yourself, since there is nothing complicated here. So-called wire cutters are well suited for this; if you don’t have them in your toolbox, you can use a knife, but it will need to be heated well. It is not advisable to use other objects, since only wire cutters and a knife can do this work without damaging the part at all.
Conclusions and useful video on the topic
The author talks in detail about the structure of the drain tank and shows with an example how to repair the shut-off and overflow valves. Also from the video you can learn about the causes of the breakdown and how to fix it:
The master shows how to eliminate a tank leak using improvised means. It is shown how to adjust the drain valve and install an additional part:
The author offers his own method of repairing a float. He shows in detail how to find out the cause of the leak and repair the fittings:
As you can see, there are no complex elements among the components of the tank. Therefore, if desired, everyone can handle the repairs. The main thing is not to rush and outline a preliminary work plan.
But if you are not confident in your abilities or were unable to fix the problem on your own, then you should contact a plumber.
Would you like to tell us how you corrected the situation with a tank that did not hold water with your own hands? Do you have information about technological subtleties that may be useful to site visitors? Please write comments in the block below, ask questions, post photos on the topic of the article.
>
Valve system
This system consists of:
- the valve itself, onto which the water supply tube is screwed;
- float transmitting force to the rod;
- the main gasket is a membrane located inside the valve and is responsible for shutting off the water.
In such a system, a whole series of problems may arise. To make sure that water is flowing in the toilet due to poor valve operation, you should carry out an easy test: raise the float with your fingers as high as possible. If the water continues to flow or has stopped, you need to begin repairs.
Float
The float may be the cause of the valve not closing tightly. If its walls are damaged, water enters. As a result, the part does not float to the required level, and the liquid overflows over the edge of the emergency outlet tube.
The problem can be neutralized this way: you need to find the place of damage and seal it. If it is significant (for example, a long crack), the float can be replaced or placed in a durable plastic bag. If there is no damage or water inside, it is reasonable to try to move the floating block lower along the adjustment bar.
Place of attachment to the rod
The adjustment bar on which the float is fixed transmits force to the rod. The parts are connected with a plastic pin. It may split and fall out, and the hole where the fastening element is located may also be severely damaged.
A worn pin can be easily replaced; you should not use rusting wire; a piece of plastic or a small wooden chopstick will do. If the mounting hole is badly broken and it is not possible to achieve reliable shutoff of the water, it is easier to replace the valve.
Valve membrane
If during the initial check (moving the float upward with your fingers) the water supply does not stop, the valve will have to be replaced completely , since the membrane cannot be repaired or replaced. Over time, it cracks and loses flexibility, which can cause leaks.
It’s worth going to the store with the valve removed, because today there are such a variety of options that you can only accurately guess the right model by direct comparison.
Dismantling is carried out as follows:
- you need to turn off the water supply,
- unscrew the underwater hose,
- remove the plastic clamping nuts,
- remove the float
- After this, the valve can be pulled out without difficulty.
Cracks may appear in a plastic system. Expensive tanks with a brass assembly do not experience such problems. Let us note right away: gluing, trying to melt, or using another method to eliminate damage to the valve body is useless; the part must be replaced.
Fixing a problem in a flush tank with a button
When you press the cistern button, water flows into the toilet bowl. The float, after releasing the water, sinks to the bottom. At this time, the valve that closes the hole for water inlet also lowers. Water enters the tank, the float gradually rises, moving the lever. Having risen to a certain height, the float with the lever takes a position when the valve tightly closes the opening of the pipe.
The cover with one button is removed in the following order:
- Unscrew the locking ring around the button. Don't press too hard - most rings are made of plastic and can break.
- Remove the cover and begin repairs.
Advice! Be extremely careful when removing the reservoir cap. If you damage it, it will be extremely difficult to buy a new one.
If water does not stop flowing into the tank, the cause may be one of two problems.
- Incorrect float position. The problem can be easily resolved - remove the cover and adjust the float.
- If water constantly flows into the toilet, most likely there is a loose seal blocking the drain pipe. To check, simply press on top of the bulb. If the water flow stops, the reason is guessed correctly. Fixing this breakdown is very simple - hang any weight on top of the pear.
- The rubber bulb on the valve is worn out and does not provide a tight seal. It needs to be changed. Lock the float in the upper position. Unscrew the nut that connects the drain tube to the tank and remove the entire mechanism. Remove the old bulb, buy a new one of the same size, choose the softest one, and install it.
- You need to rinse the water out of the tank and remove any remaining residue.
- Unscrew the union nut between the float valve and the flexible connection and the bolts that secure the shelf to the toilet ears. With a little effort, tilt the cistern with the shelf back and release the rubber cuff between the toilet and the cistern.
- Unscrew the broken bolt and its paired one and remove it - both bolts need to be replaced, even if one has not yet lost its integrity. New bolts should be of similar size and made of stainless steel or brass.
- Remove the earthenware under the seat of the pear and clean it thoroughly; you also need to do the same with the surface of the shelf and tank. Coat the pear with silicone sealant. Due to the fact that plastic loses its elasticity over time, you will not be able to press the bulb tightly again after installation. If you do not want to change this part, the sealant will solve the problem.
- Assemble the tank and tighten it with new bolts, avoiding distortions. Do not apply too much force to avoid breaking the earthenware.
If the bolts holding the pear saddle are damaged, they need to be replaced.
Water flows out of the tank through the overflow
The way to solve the problem will depend on the cause of its occurrence.
- If adjusting the float lever does not bring any results, check the integrity of the pin that holds it. Replace the damaged pin with copper wire of the same thickness. Do not use steel wire; it is susceptible to corrosion.
- If the pin hole in the plastic valve has changed from round to oval and is worn, remove the valve. Take it with you to the store as a sample for size and model, buy a new valve and install it.
↑ back to contents
The consequences of condensation on the toilet cistern
If condensation collects on the toilet cistern, then this cannot be left unattended. This phenomenon causes discomfort and can lead to serious troubles:
- condensation drainage - you have to constantly wipe the plumbing and the floor, sometimes whole puddles form;
- moisture getting into crevices, cracks, and other hard-to-reach areas, over time an unpleasant odor and mold will inevitably appear;
- increasing indoor humidity;
- reduced service life of plumbing fixtures and shut-off valves - metal parts will rust and small cracks will appear on the tank.
If there is strong condensation on plumbing fixtures and pipes, there is a risk of flooding your neighbors.
The most dangerous factor in the formation of condensation is high humidity in the room. It causes the following consequences:
- rotting of wood and other materials - floor and wall coverings, interior items, major repairs will be needed much faster;
- the formation of fungus and mold - the presence of cracks in plumbing only aggravates the situation, the surface deteriorates faster, and an unpleasant odor appears;
- metal corrosion, this applies not only to toilet parts, but also to water supply pipes, furniture elements and other items, especially in a combined bathroom.
Important! Mold and mildew are dangerous to the respiratory, circulatory, and musculoskeletal systems. There is a risk of allergies, headaches, nausea, asthma and a number of other serious illnesses.
Causes of tank leakage
To find out the exact location of the breakdown, you need to carefully inspect the fittings. Move from checking one part to another until you eliminate the cause of the leak. Prepare the toilet for use. You need to turn off the water using a shut-off valve. It is mounted on the water pipe leading to the toilet.
If there is no such valve, then shut off the water on the pipe leaving the drain. Then remove the cap from the tank. To do this, remove the button or lever. Sometimes it is enough to gently pull the cap and disconnect it from the shut-off valve.
If the button is decorated with a ring, you need to unscrew the system from it counterclockwise. Or pry it with a sharp object and remove it. It’s easy to remove the double button: you need to press on the small, then on the large halves of the mechanism and twist, without removing the pressure, counterclockwise.
Reason No. 1 – breakdown of key valve components
After opening the tank, proceed to check the fill valve. To do this, lift the float lever. If after this water continues to flow into the tank, then the mechanism can no longer hold it. There can be several reasons for the breakdown: either the rubber gasket has worn out, or there is debris under the valve itself, or the valve itself is broken.
Let's move on to troubleshooting:
- turn off the water and rinse;
- then remove the shut-off valve itself;
- thoroughly clean it and the drain hole, wipe and dry;
- inspect the rubber gasket;
- if it becomes unusable, then replace it;
- When completed, you can install the mechanism in place.
If after these manipulations water still flows, then you need to replace the shut-off valve with a new one. Before purchasing, take an old part and try to find a copy or analogue.
To replace it, you should:
- Use a wrench or an adjustable wrench to unscrew the part connecting the valve to the water supply.
- Then remove the float lever, nuts and pull out the lever itself.
- Dry the nuts and lever, if necessary, clean them with sandpaper.
- Install the new valve and all parts in place.
Check your work. Very often the cause of a leak is the float. Let's look at the most common cases.
The float has become depressurized . Because of this, the system cannot stop the flow of incoming water in time, which will subsequently overflow and end up on the floor. This happens if an empty plastic float is used in the toilet for a long time.
Over time, it may wear off and water will begin to flow into it. The ideal option is to install a new element. If this is not possible, then we offer two temporary measures. You can wrap the float in thick cellophane or polyethylene. Or seal the holes with plastic.
Repair of a cistern with a bottom water supply
Most often, a side water supply to the cistern is used. But the pipe sticking out from the side does not look aesthetically pleasing. In order to hide the tubes, they use the method of bottom water supply. This method is justified if the area of the room simply does not allow installing a tank with a side supply.
Important! When installing a tank with a bottom supply, very carefully check the reliability and tightness of the connections. Leaks in these places are the most common problem.
There are several problems typical for tanks with a bottom water supply:
- The pressure in the water supply system is too low and water constantly flows into the tank. This problem occurs if a diaphragm fill valve is installed. If the water pressure in the system is less than 0.05 MPa, it simply does not work. The best way out of the situation would be to replace the diaphragm valve with a rod valve, the operation of which does not depend on water pressure.
- The cause of problems with draining water or filling the tank may be hidden in the incorrect position of the inlet fittings. None of its elements should touch the walls of the tank. Carefully inspect the mechanism and adjust its position.
- Water enters the toilet bowl through the overflow hole if the float is not adjusted correctly or the height of the float is not correct. Tighten the adjusting screw and lower the float.
In case of serious damage to the cistern, you must call a plumber. You may have to change all the trigger fittings. But at least for a while, you can fix most of the problems in this simple mechanism yourself.
Any breakdown of the toilet is a real stress for the owners, as it is associated with unexpected expenses, unpleasant emotions and loss of time. If the drain tank does not hold water, and you don’t know what to do in such a situation, then read our tips.
We will tell you how to determine the cause of the problem. We'll show you how to fix the problem yourself step by step. The article we have proposed describes in detail the types of damage that can cause the container to stop holding water, and ways to solve the problems.