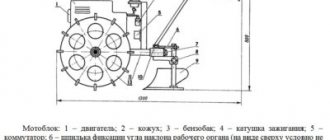
Design Features
The blade belongs to the category of attachments. Attach it to any brand of walk-behind tractor. However, the size of the bucket is selected taking into account the power of the unit. If you attach a large shovel to a weak walk-behind tractor, its motor will overheat during operation and will fail faster.
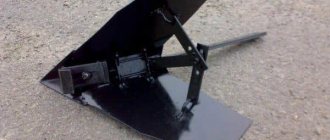
If you take a closer look at the photo, a homemade blade for a walk-behind tractor consists of three main parts:
- snow bucket;
- main frame of attachments;
- bucket rotation angle adjustment unit.
Factory-made dumps have a similar design.
Important! The blade can be used not only with a walk-behind tractor. Attachments are used with mini-tractors and can even be attached to a passenger car. The blade belongs to the category of attachments used with walk-behind tractors, mini-tractors and other equipment
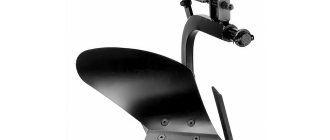
The bucket or shovel is the main working unit. The curved shape allows you to capture a large amount of snow. However, it is difficult for the walk-behind tractor to push it in front of you when you have to clear thick drifts. An adjustment unit connecting the shovel to the frame of the attachment allows you to reduce the load on the engine. It has three bucket alignment positions:
- turn left;
- turn right;
- directly.
The first two positions allow you to move the captured snow to the left or right. The walk-behind tractor does not have to push a large mass in front of itself. Typically, the angle of rotation of the shovel does not exceed 30 degrees. The bucket is set to the “straight” position when removing a thin layer of snow or clearing an area where it is not possible to move it to the side.
Blade manufacturing rules
The main rule that must be taken into account when drawing up homemade drawings is the correspondence between the scope of work and the power of the unit. Overload can lead to increased wear of components and mechanisms, their breakdown and failure of the machine.
When planning to make a blade for a walk-behind tractor with your own hands, you must adhere to the following criteria:
- Strength. The knife must have a sufficient resource to serve for at least 5 years. All its parts and mechanisms must be made based on the maximum permissible load and strong impacts.
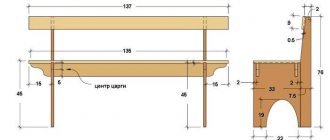
- Dimensions. A homemade shovel should not be excessively wide or high. The optimal dimensions are considered to be width - 80-130 cm and height - 30-50 cm.
- Availability of a lifting mechanism. The blade for the walk-behind tractor can be raised hydraulically or using levers. This option allows you to remove snow from the yard or use the unit as a loader in the summer.
- Possibility of mounting a swivel joint. Using such devices, you can control the knives by tilting them up or down, right or left. Selecting the angle of attack allows you to better shovel snow and debris away from the path.
- Mandatory installation of a shock-absorbing strip made of dense rubber on the bottom of the bucket. This device is necessary to protect the walk-behind tractor from impacts, the bucket from deformation or breakage, and the road surface from mechanical damage.
- Quick installation and removal. Since the walk-behind tractor is a multifunctional device, all manipulations on its equipment must be carried out quickly and without the use of complex equipment.
Read also: How to connect wiring to a double switch
The layout of the blade involves installing it on the front bracket, under the body or at the rear of the unit. The most optimal is the front location of the blade. This position provides the best quality cleaning.
The made bucket can have a horizontal or vertical orientation. The second option is chosen in cases where you have to work in cramped conditions.
Advantages and operating principle
The main advantage of mounted snow removal equipment is fast snow removal. The main load falls on the walk-behind tractor, not on the person. In a short time, the device makes it possible to clear a large area or a long section of the road from drifts.
If we consider a homemade blade assembled with our own hands for a walk-behind tractor, another advantage is cost savings. Factory-made attachments are expensive. A homemade blade will cost less, even if you have to buy metal to assemble it.
If sheet metal, pipe cuttings or profiles are available, the manufacture of snow removal equipment will cost free
The operating principle of the attachment is simple. The blade is connected to the towbar of the walk-behind tractor. The unit may differ depending on the brand of the unit. Select the position of the shovel rotation angle. The operator starts the walk-behind tractor engine and begins to move. As wet snow sticks, periodically clean the bucket to reduce the load on the motor. Since for most walk-behind tractors the optimal shovel width is 1 m, a strip of the appropriate size will be cleared in one pass. If the bucket is installed at an angle, the parameter will be slightly smaller.
Important! For a powerful walk-behind tractor, the width of the shovel can be increased, but this will reduce maneuverability in difficult areas.
How to make a blade for a walk-behind tractor with your own hands
When making your own attachments, you first need to carefully study its structure. The presented photos and do-it-yourself drawings of a blade for a walk-behind tractor give only a visual idea of the design. It is optimal to first consider the snow removal device in reality. To do this, you can visit a retail outlet or ask a friend of the equipment owner to take measurements from the dump. When this is not possible, you need to be prepared for the fact that errors may arise during work that will have to be corrected.
Do-it-yourself blade drawings for a walk-behind tractor
You can find a lot of diagrams on the Internet or thematic literature, but they are all almost similar to each other. This is due to the simplicity of the shovel design. There is no need to invent anything extra here. For example, the do-it-yourself blade drawings for the Neva walk-behind tractor will be similar to those for the Zubr and Zirka. Minor changes may only be made in the design of the coupling.
The drawing will help you make a shovel with a hydraulic lift. In the absence of hydraulics, the lift is made using a lever, for example, from a spring.
Factory models
Any company that manufactures walk-behind tractors can also offer a range of snow plows. There are popular models on sale from such manufacturers as Centaur, Neva, Zirka, etc. The only big advantage of a factory design over a home-made one is that they are made of high-quality steel and are more difficult to damage. Moreover, such models last longer than homemade ones. But, on the other hand, they cost a lot.
There are a lot of options for factory dumps, so you should check before purchasing whether this model is suitable for your existing walk-behind tractor. At the factory, snow plows are not equipped with spring mechanisms due to the low speed of movement. If the speed of the walk-behind tractor is low, then the protective mechanisms for contact with the ground lose their meaning. Moreover, the factory models do not have mechanisms for lifting and turning the unit. In this regard, the price of the factory design is reduced.
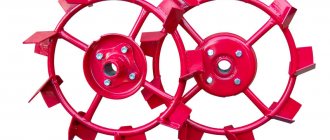
For higher performance, it is recommended to replace conventional rubber wheels with factory or homemade lugs. This will speed up the work process.
Prices for snow blowers may vary. Basically, the cost of these varies from 4 thousand to 6 thousand rubles.
How to make a blade for a walk-behind tractor from a barrel
An old metal barrel makes a good material for a shovel. However, the thickness of the metal should be at least 2 mm, and preferably 3 mm. Thin sheet metal will simply bend under the load. To obtain the required oval blank, the barrel is cut lengthwise into three equal segments with a grinder.
The next step is to measure the length of the workpiece, on which the width of the shovel will depend. If the barrel was about 1 m high, this will be enough. When there is low capacity available, the length of one piece is not enough. The cut segments are welded together. The blanks are overlapped and the joints are welded on both sides. To strengthen the seam, you can drill holes and put rivets.
If the segments cut from the barrel are small, they are welded together to obtain the required shovel width
To ensure that the self-assembled blade for a walk-behind tractor from a barrel cleans the snow well and does not scratch the sidewalk surface, the shovel is equipped with a knife. In its lower part, along the edge, a metal bus with a thickness of at least 5 mm is fastened with rivets or bolts. Additionally, holes are drilled at 100 mm pitches for bolts for fastening the conveyor belt strip. The rubber pad will prevent the metal tire from leaving scratches on paving slabs or asphalt.
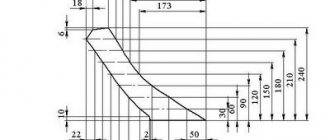
The next step is to manufacture the frame of the towbar and the adjusting unit for rotating the blade. First, the middle is found by the height of the shovel. At this point, a piece of profile pipe with a cross section of 40×40 mm is welded over its entire length. A semicircle cut with a grinder from metal 8 mm thick is welded in the center of the jumper. Three holes are drilled in the plate: one in the center and two indented so that the bucket rotates sideways by 30 degrees.
The frame of the towbar itself is welded from a profile pipe of a similar cross-section. The bracket is shaped like the letter “G”. One side of it will be connected to the walk-behind tractor, and the other will be connected to the turning adjustment unit. So that a homemade shovel on a walk-behind tractor for snow removal can be adjusted in height, an adjusting screw lever is adjusted. One side of it is attached to an L-shaped bracket, and the other is inserted into the hole in the profile pipe of the tow hitch.
The principle of working with a snow plow for a walk-behind tractor
The mouldboard shovel of a walk-behind tractor must be installed correctly before performing its functions. She turns with her hands to the right or to the left at an angle of up to 30°. The process of adjusting the position ends with setting a suitable angle and fixing the shovel in the chosen location using cotter pins. The gripping area of a snow plow for a mobile power unit is usually one meter (individual modifications may have other values) with a shovel material thickness of 2 to 3 mm. In industrial conditions, these devices are made from high quality steel.
Read also: Plasma cutting of metal photo
Homemade blade for a walk-behind tractor from a gas cylinder
Instead of a barrel, a gas cylinder will serve as material for the shovel. The principle of manufacturing an attachment for a walk-behind tractor is similar, but there are a number of nuances:
- If there is residual gas in the cylinder, bleed it off by unscrewing the valve. However, no less dangerous condensation may still remain inside. The bronze valve is completely unscrewed from the cylinder with a key and, turning it over, the remaining liquid is drained.
Attention! The condensate from the cylinder is poisonous, flammable and has a pungent toxic odor. You need to think in advance about how to dispose of the liquid.The end caps are cut off from the cylinder and dissolved into two parts
- Water is not filled to the top of the container a little. Using a grinder, cut off the top semicircular plug. The water is poured out, after which the bottom plug - the bottom - is cut off.
- The resulting pipe is cut lengthwise into two halves using a grinder. The semicircular segments are welded together lengthwise.
Further work on assembling a snow blade on a walk-behind tractor with your own hands is based on performing the same actions as with a barrel: making a knife, a frame and a turning mechanism. The only difference is that the metal from the cylinder is thicker and stronger. The reinforcing jumper made from a profile pipe does not need to be welded. Instead, holders for the frame are welded at an equal distance from the edges on the back side of the blade. The connection between the lugs and the elements of the coupling device is done with bolts. The rotary assembly of the shovel can be placed directly between the hitch with the walk-behind tractor and the main blade frame.
How to make a snow shovel on a walk-behind tractor from sheet metal
When only sheet metal is available, the blade design will depend on the thickness and size of the sheet. The easiest way is to make a shovel from a single piece of rolled steel 3 mm thick, about 1 m long and 500-700 mm wide. The workpiece is given a slightly oval shape, and the same actions are performed as with a barrel or cylinder.
The reinforcing blade frame is welded from a profile pipe
When only small pieces of sheet metal are available or its thickness is about 2 mm, in order to make a snow shovel for a walk-behind tractor, you need to weld a reinforcing frame. The material used for its manufacture is a profile pipe. You will need 4 vertical elements for the bucket. They are given an oval shape. This can be done on a machine or by cutting the pipe with a grinder in several places and welding them. The vertical elements are welded together with three horizontal jumpers. Their length is equal to the width of the shovel.
When the blade frame is ready, the outside is sheathed with sheet steel. A knife made of a metal tire and a conveyor belt is attached to the bottom. On the rear side, a rotating unit and a coupling device are adjusted exactly as they did in the example with a barrel or cylinder.
Attaching a homemade snow blade to a walk-behind tractor
Typically the weight of the blade does not exceed 20 kg. You can hang it on any walk-behind tractor. Depending on the model of the unit, the manufacturer provides for connecting the hitch to the front or rear. In the second version, the steering column of the walk-behind tractor has the ability to rotate 180 degrees.
To connect attachments, each unit is equipped with a hitch. It can be horizontally adjustable or non-adjustable. The hitch also differs in configuration for each brand of walk-behind tractor. Examples of the most common models are shown in the photo below:
- Walk-behind tractor "Zirka-41"
- Motoblock "Neva"
- Walk-behind tractor "Zirka-105"
- Motoblock "Bison"
- Universal hitch with lifting mechanism
If we talk about the lifting mechanism, it can be manual or hydraulic. In the first option, adjustment is made using a lever. The hydraulic lift is powered by a hydraulic pump.
Each walk-behind tractor manufacturer describes in the instructions the nuances of installing attachments. The recommendations should be followed.
Features of manufacturing a snow plow
Let's consider another option for making a shovel, which is not too different from the previous one. For the blade itself you will need a 3 mm steel sheet, and for the racks that provide additional rigidity, you need to take thicker steel. It is necessary to make holes in the racks for attaching the shovel to the rods. It is very important to ensure vertical placement of homemade attachments in relation to the front of the power unit.
- shovel;
- rods;
- bracket for attaching the rods to the walk-behind tractor;
- craving.
Read also: Tap with right-hand thread
Scheme of a walk-behind tractor with a blade
Advice from professionals
When assembling a blade blade for a walk-behind tractor with your own hands, experts advise using sheet steel 3 mm thick. Thin sheet metal will bend under load. Thick metal will increase the weight of the hitch, which will create additional load on the walk-behind tractor engine.
Rubber for the knife is a must. It is attached so that the edges touch the edge of the metal bus. With this arrangement, the rubber wears off less and prevents the steel blade from destroying the hard paving surface.
When clearing snow drifts, anti-slip chains or lugs are placed on the wheels of the walk-behind tractor.
A walk-behind tractor with a mounted blade is optimal for removing snow drifts more than 50 mm thick. If there is not enough snow, instead of a shovel it is better to use another attachment - a brush. To prevent the wheels from slipping, wear anti-slip chains. When cleaning an area without a hard surface, instead of transport wheels, you can install metal devices - lugs.
During cleaning, do not allow the walk-behind tractor engine to overheat. Periodically it is given time to cool down. If the snow is wet, the shovel quickly sticks. It needs to be cleaned more often. In case of damage to the blade or towbar, work continues after the defect has been eliminated. Otherwise, when some parts are bent, the entire attachment will become distorted, which will lead to serious damage.