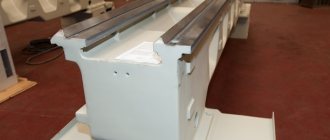
Faceplate for lathe chuck
Universal lathes are indispensable when processing workpieces of various purposes, sizes and complexity. Fastening of small cylindrical elements is carried out in a standard machine chuck. Non-standard and large-sized parts require the use of special tools. Centers and rests are installed when turning long workpieces. The faceplate for a lathe chuck is used in work with large diameters, as well as when turning the surfaces of non-cylindrical products.
Purpose of the part
Installing a faceplate on a lathe is done in cases of working with parts that simply cannot be clamped into the chuck. These can be large forgings, flat blanks or irregularly shaped parts. Such a device is indispensable when processing products offset from the spindle axis, as well as products whose side surface may be damaged by the mechanical action of the chuck jaws.
To hold the future part, it is pressed against the plane of the equipment, or fastened using special devices. After installation, it is necessary to align the axis of the material being processed and the spindle, since this method does not provide guaranteed centering.
Faceplates are also used when it is necessary to use non-standard cartridges or devices. In some versions, it is not the materials being processed that are attached to it, but the cutting tool.
General description and design
The typical faceplate design is the same for metal and wood machines. In general, it is a disk on which workpiece fastening units are made. The material used for manufacturing is cast iron or steel. Other materials are used less frequently.
The equipment is attached to the spindle using threaded holes or conical hubs. Their parameters are selected for the specific dimensions of the output end of the shaft. If the fixture is equipped with a cylindrical hub, it is clamped directly into the machine chuck.
The workpiece is secured using clamps, crutches, clamps or other clamping devices. Often a lathe chuck is used for this purpose. It can be mounted on the faceplate along the axis of rotation or offset.
When using faceplates, increased attention is paid to work safety. Large dimensions, non-standard fastenings, and non-cylindrical shape of the surfaces being processed pose an increased danger to the turner and others. Before starting work, all structural elements of the equipment should be secured and balanced in order to avoid destruction of the structure and scattering of individual components.
Using a lathe
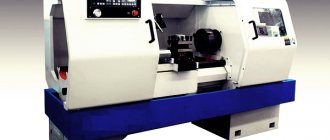
A lathe, which was one of the first to appear in the line of equipment for processing parts made of different materials, including metal, allows you to produce products of various shapes and sizes. Using such a unit, you can turn the external and internal surfaces of the workpiece, drill holes and bore them to the required size, cut external or internal threads, and perform knurling to give the surface of the product the desired relief.
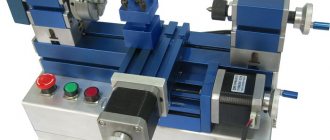
A serial metal lathe is a large device, which is not so easy to operate, and its cost is very difficult to call affordable. Using such a unit as a desktop equipment is not easy, so it makes sense to make a lathe for your home workshop yourself. Using such a mini-machine, you can quickly turn workpieces made not only of metal, but also of plastic and wood.
Such equipment processes parts with a round cross-section: axles, tool handles, wheels, structural elements of furniture and products for any other purpose. In such devices, the workpiece is located in a horizontal plane, while it is given rotation, and the excess material is removed by a cutter securely fixed in the machine support.
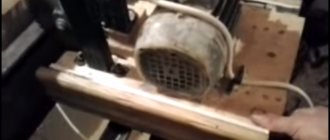
Grooving a brake disc on a homemade lathe
Despite the simplicity of its design, such a unit requires clear coordination of the movements of all working parts in order for processing to be carried out with the utmost precision and the best quality of workmanship.
Types of faceplates
The simplicity of the faceplate design and wide range of use have given rise to a large number of ways to secure workpieces. However, the device is not completely universal. Different situations may require several different modifications.
Faceplate with T-slots
On the surface of such equipment there are T-shaped grooves, similar to those used on tables of milling machines. Special stops or fastening nuts are inserted into these grooves. The workpiece is pressed to the plane using screws. The design of the device allows you to fasten almost any product. The arrangement of grooves on the surface of the disk is usually orthogonal. Depending on the purpose, the number and frequency of grooves may vary.
Faceplate with through grooves
This type is distinguished by the presence of grooves milled through the part. The workpiece is secured by installing screw clamps. In some cases, the part is simply screwed on from the reverse side. Grooves are most often located along a radius. There are also modifications with ring-type through grooves.
In most cases, grooved faceplates are used for metal lathes. Other turning devices can be easily installed on their surface.
Faceplate with holes
The working surface of the disk of this device has a number of holes located according to the dimensions of the workpiece being fixed. The central hole is threaded, necessary for direct fastening to the spindle shaft. The presence of threads in the mounting holes allows for fastening with standard screws. In other situations, the clamp is performed similarly to the previous option. When using a similar faceplate for a wood lathe, the future part is secured through the holes with ordinary self-tapping screws.
Drive faceplates
When installing a workpiece between two centers, it is necessary to ensure the transmission of torque from the spindle shaft to the workpiece. For this purpose, leash tools are used. Structurally, they are a disk with a slot or hub on the edge. A clamp is put on the part, interacting with the hub, and thereby ensuring rotation of the product.
Faceplates with squares
When processing products with low rigidity, modifications with squares have been used. The workpiece in such devices is mounted on a separate flat or prismatic base. The base itself is made in the form of an angle, the second edge of which is attached to the surface of the washer. In order to maintain the integrity of the workpiece, its fastening is provided at several points over a large area.
Universal and special faceplates
Universal options are suitable for performing a large number of operations and are a combination of several previous modifications. They are based on a base washer, to which replaceable devices are attached - squares, cams, centers and other elements.
Despite its versatility, standard equipment is not always able to provide reliable fastening of unique parts of complex shapes. In this case, the design and manufacture of special machine tools is carried out. The faceplate drawing can be very complex. Another version of special devices, on the contrary, is involved in mass production. To fasten a part of the same type, there is no point in using universal machine tooling. A device designed for a specific task is quite sufficient. To increase overall performance, such a faceplate can be equipped with additional fastening and centering devices.
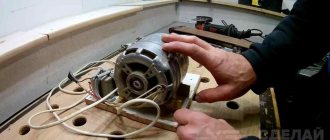
A simple homemade mini-faceplate from standard hardware and options for its use
Having constructed a wood lathe, I spent some time entertaining myself with simple turning of centers. Over time, the need arose to process more diverse workpieces. I had to use my brains to make the appropriate equipment using improvised means, without access to a third-party lathe (for metal). One of the designs turned out to be very inexpensive, convenient and in demand.
The fastening equipment was often made up of two parts - a universal small metal faceplate and a specialized wooden part. The metal faceplate can also be used as usual - by fastening it to the workpiece with self-tapping screws.
What was used.
Tools.
The wood lathe itself, cutters for it, a set of metalworking tools. You can’t do without a cutting machine (grinder); it’s better to use a small one - it’s more convenient and safer. Headphones as for shooting and safety glasses or a shield. Also, you can’t get out without welding, so you need a small inverter and accessories. Electrodes 2.5mm. Hot melt adhesive is often used. What is needed is a drilling machine that is more convenient and accurate, of course.
Materials.
Actually, just the right number of nuts and washers. It’s better, of course, to paint the finished piece of hardware, then plus paint and paint. A little wood for “narrow specialization”; I often use dry birch firewood with even layers.
So. The spindle of my lathe ends with an M16 thread, which allows the use of standard hardware. In this case it is an “extension nut”. It is cut in half right on the machine, turned on, rotating. Angle grinder. Cutting should be done carefully. First, with the machine turned off and with the grinder not working, carefully try it on so that it is comfortable, your elbows are positioned somewhere and so as not to fit into anything rotating.
The machine turns on and, having taken a previously tested position, with the grinder turned on, we strike the felt-tip pen mark in the middle of the rotating nut. Be especially careful at first until the edges are sawn, then the sawing becomes smoother and the pressure can be increased a little.
After some time of our efforts, the wall of the nut is sawed through and the half falls off. The height of each half, taking into account the width of the cut, turns out to be slightly larger than its standard non-extension sister. The length of the thread on the spindle of my machine does not allow the use of a regular nut - it sticks out from under the finished faceplate and causes a lot of inconvenience later during work.
The next step will be welding. From the standard range of hardware, I take a “reinforced washer”, in some stores it is called a “body washer”, of a suitable diameter. Usually, this is almost the largest of those available in the offered assortment. You need to check if the nut is falling into it. The nut should be positioned with its edges in the center of the washer hole. The cut nut will stand better - there will be no chamfer on one side, this should be taken into account when trying on a new one in the store.
We weld the cut half to the washer. Neat. It’s very good to first tighten them with a clamp, but usually it works out well this way. The ribs are welded in the following order - any, then the opposite. The workpiece is rotated 90 degrees, again either of the two, then the opposite. This way there is less chance that the nut will slip off the washer. Actually, in the first copies, I tried using the same grinder to create a “groove” on the rotating half of the nut for a sure fit in the hole, but an angle grinder is not the tool that can do this job well - often, due to the not very smooth edge of the “groove” , the nut turned out to be very misaligned with the washer.
After the workpiece has cooled, as usual, we break the glass crust of slag and place the workpiece on the machine spindle, while rotating we evaluate the runout, if they are within reasonable limits, we correct it with the angle grinder turned on.
It is possible, for aesthetics, on the reverse side. Here, by scratching with a pencil in the desired place on the rotating workpiece, we mark the diameter along which the holes will be drilled. To use the future faceplate with relatively large objects, you can drill more of them, up to six, if for small things - three, four.
Afterwards, it would be good to paint it while there is no rust - a layer of zinc, partially burnt, partially worn off. Below, I sprayed “ocher” from a spray can, in two layers, although I’m usually lazy.
In the photo, the finished faceplate is mounted on a sanding disc made of thick plywood. Medium-sized sandpaper on a rag base is glued to the disc under pressure with PVA glue. Through a layer of newspaper so that the licked paper can then be torn off.
For sharpening tools, adjusting small pieces of wood before gluing.
A similar thing, but smaller in diameter and glued together from birch blocks in two overlapping layers. For sharpening turning tools. At the end there is the same sanding paper; a leather belt will be glued along the diameter of the circle for finishing with GOI paste.
And finally, the use of our faceplate for current work. Like the usual one, our small one is convenient to use where it is necessary to fasten the workpiece by one edge, without a rear center. In this case, it is very convenient to glue the workpiece to the intermediate block. A piece of board is attached with short self-tapping screws and ground to a convenient diameter, and the workpiece is glued to it. Hot melt adhesive.
In the photo there is such a “cartridge”, with the trim remaining from the workpiece. Before gluing the next one, the faceplate is placed in the machine, and it is “butted” with a cutting tool, cutting off the remnants of the glued one. At the same time, it is worth capturing part of the old adhesive layer so that it (the glue) does not accumulate too much.
The workpiece is marked, and, among other things, using a compass, a circle with a diameter slightly larger than the “block” on the faceplate is drawn. This allows you to orient it quite accurately when gluing.
I lubricate both surfaces to be glued with hot glue, not necessarily completely, a circle around the perimeter is enough, stepping back a centimeter from the edge.
Initially, until complete “dumbing”, it is better to press the workpiece with the rear center, then, when there are no shock loads, it is removed.
The beauty of such an installation is that through a block of wood, it is a much more economical use of workpiece material; moreover, when turning, you do not need to constantly remember how long the screws are, so as not to climb into their depth with a cutter.
And for dessert, there are several available options for more specialized equipment based on the manufactured faceplate.
For example, this one required something machined very precisely around an existing center - as easy as shelling pears.
Or, for example, a part of a candlestick made of 6mm plywood or a thin birch plate. To clamp and process it, the following equipment was made.
A sharp nail prevents the workpiece from turning. Assembled, pressed in at the rear center.
When making a candelabra, a number of small parts were required, sort of navels, and I had to make a simple wooden collet cartridge.
Despite its somewhat limited capabilities, it also has a number of advantages, namely, ease of manufacture and low cost. When processing miniature parts, near the very “jaws”, you don’t have to be too afraid of catching the “chuck” with the tool, which in the case of using a metal factory analogue, sometimes has fatal consequences. Yes, again, safety is a minimum of protruding parts; they can be reduced even more if you replace the metal worm clamp with annealed steel or copper wire or even make a small taper on the outside of the jaws and stuff a ring for clamping. Metal or wood.
When making a collet chuck, first the cylinder is turned out, the central hole is drilled (drilling machine), the holes on the side are marked and drilled. Then the future clamp is sharpened in a lathe - thin jaws are formed. Lastly, I made cuts for the collet blades.
Become the author of the site, publish your own articles, descriptions of homemade products and pay for the text. Read more here.
Types of faceplates for lathe chucks and their use
Any turning work is performed on various types of machines. Before you begin processing a particular workpiece, you need to securely fix it to ensure safety during turning operations.
What is a faceplate for?
You can secure the part in several ways, for example, in a regular chuck or using a special faceplate, which you can buy in a specialized store. In this case, the element being processed can be located in any position depending on the type of unit. For example, a rotary lathe has a clamp that is mounted on a horizontal table.
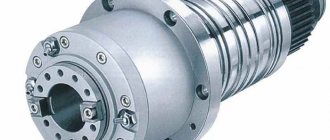
The faceplate for a lathe is a steel or cast iron disk that serves to secure the workpiece on a particular machine. In its center there is a hole for installation on the spindle. In this case, products subjected to various types of processing are fixed using special pads, clamps, bolts or so-called corners.
Faceplates on machines are often used when turning large parts and those with complex shapes. To fasten products of irregular configuration, in some cases, washers are equipped with four or even six T-shaped grooves and have additional through holes. Sometimes simple cartridges are used as this element.
The difficulty of installation and alignment relative to the spindle axis is the main disadvantage of using faceplates on machines. However, when processing many parts they are necessary.
Part characteristics
A faceplate is a cast metal disk that has a threaded center hole for attaching to the spindle of a wood lathe. The workpiece is secured in the faceplate with metal screws. They pass right through its holes and are securely screwed into the wood.
When sold, a woodworking lathe is equipped with a faceplate with an outer diameter of 100–150 mm. Additionally, specialists can purchase similar products of any size, with a different arrangement of mounting holes and working thickness.
When purchasing for home use, you must choose a faceplate with the maximum outer diameter. It must correspond to the basic size of the bottom of the workpiece being processed.
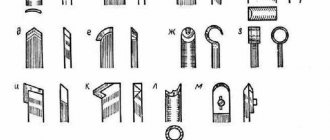
Overview of popular types of faceplates
There are various types of parts available on the modern market. The following groups can be distinguished from the most frequently used in production:
- smooth;
- washers equipped with a leash;
- with simple threaded holes;
- with grooves, circular or radial holes.
Regardless of the type, the requirements of GOST 4082-69 apply to all steel products. Cast iron ones are more preferable because they have relatively low prices and are not very sensitive to temperature changes.
Most often in production, the workpiece is fastened to a lathe either in a chuck or in a smooth type faceplate. The latter is used when turning a part in the form of a stepped or simple ring. In this case, alignment is performed using a surrounding structural element placed on the flange.
Reliable fixation in the machine and immobility of the part itself is ensured through a clamp in the center or using clamps. As a rule, they are made very simply and consist of a pair of washers, a nut and a screw, which allow you to secure the workpiece without much difficulty.
In the event that the workpiece installed in the lathe needs to be fixed with racks or corners, but there is nothing except a smooth faceplate, then after centering these elements are mounted directly on it.
In order for the spindle to work for a long time and without failure, it is very important to carry out high-quality centering of the washer every time.
Faceplates with a leash
Driver or, as they are also called, gear products have a number of important design features. Their body has two parallel T-shaped profile grooves. One of them contains a leash, and the other contains fixing clamping elements.
The clamps themselves, which are adjusted with specially provided screws, also have corresponding recesses in which the cams are placed. With the help of the latter, the part is directly fixed before processing on the machine. They move freely in the grooves, so they can be adjusted on the surface of the workpiece itself.
Using this type of faceplate, the machine is also very easy to set up. First, the workpiece is installed strictly in the center. Then each of the clamping elements located on different sides is tightly attracted to it. To do this, tighten all the screws one by one. In this case, the cams are located on the surface of the part in order to better grip it.
In addition to all of the above, the reliability of fastening the workpiece is additionally ensured by the T-shaped grooves located on the clamps. Thanks to this design, it is possible to process even complex products consisting of several stages on the machine.
Faceplates with threaded holes
This type of washers differs from others by the presence in the center of a special hole for a threaded connection directly to the machine spindle. Fastening is carried out without using a flange.
On such parts, as a rule, there are three holes into which special cams or clamps are screwed, which serve to fix small-sized forms.
In some cases, washers are mounted on homemade threaded bushings, which are fixed to the machine shaft by welding. This kind of modification is used by enterprise employees in order to ensure a more reliable fastening. Ideally, it is better to immediately buy a faceplate with threads pre-designed into them.
Faceplates with circular or radial grooves
Using faceplates on universal lathes
In conventional jaw chucks, workpieces of various shapes can be placed, symmetrical about the axis. Various numbers of jaws and multiple design options ensure the versatility of the chucks. However, there are parts whose placement in cartridges is inconvenient. These include parts that are asymmetrical about the axis: levers, housings, connecting rods, etc. Special devices are used for them, including faceplates.
rear view (cam lock attached to spindle)
The faceplate for universal lathes has the form of a steel or cast iron disk with a flange for fixing to the spindle. On the front side there is a base surface for fastening the workpiece or equipment; the grooves are used for preliminary alignment of the workpiece. There are also several radial grooves for fixing the workpiece during processing. Stiffening ribs may be located at the rear. The base surface of the faceplate fits onto the conical or cylindrical seat of the spindle; fixation is carried out depending on the type of spindle end. When using a faceplate, the manufacturer discusses the maximum permissible speed of rotation of the faceplate.
The following types of faceplates are distinguished:
- smooth,
- with threaded holes,
- with radial grooves,
- with circular grooves.
- leashes.
Installation of parts on the faceplate of universal lathes
The parts are fastened to the faceplate using strips and bolts. The bolts used can be pressed or screwed into cams to move and secure into the grooves.
Axisymmetric parts are secured with clamps or a central clamp. Fastening asymmetrical parts relative to the axis is much more difficult. To do this, use low pads or higher thrust posts, which allow you to raise the slats above the faceplate. The height of the racks should be the same as the height of the walls of the part. The clamping bolts that hold the strips in place are located as close to the part as possible. The slats must be parallel to the faceplate, otherwise the part may jump out during rotation. The correct installation of the workpiece on the faceplate is checked with a thickness planer. Checking the location of the first workpiece from a batch is carried out in the same way as in a four-jaw chuck.
Parts processed on a faceplate often have a center of gravity offset relative to the central axis of the machine. Therefore, a counterweight of the required mass calculated for a specific part is placed on the faceplate, which returns the center of gravity to the central axis. Without a counterweight, the spindle will run out and vibrations will occur on the machine, reducing the life of the cutting tool and spindle head bearings.
Rice. Fastening the part to the faceplate using a counterweight: 1 – faceplate; 2 – square; 3 – workpiece; 4 – counterweight
Balancing is done by manually turning the faceplate. If it does not change its position after stopping, then the weight and position of the counterweight are chosen correctly.
You can consider the fastening of a part using the example of a connecting rod - an elongated part, which consists of two bushings of different diameters connected by a jumper. The part is installed in the faceplate to machine the inner surface of a larger hole. For fastening, two strips with pads and a square are used. The planks are clamped with bolts inserted into the holes of the faceplate. Centering is carried out using squares installed in T-slots. A counterweight is placed on the faceplate on the opposite side of the connecting rod.
Do-it-yourself faceplate for a wood lathe
The faceplate for a wood lathe is a part in the shape of a steel disk with holes for attaching a dimensional workpiece. There are many types of faceplates, differing from each other:
- material of manufacture;
- disk thickness;
- size and configuration of mounting holes;
- manufacturing method;
- heat treatment;
- availability of additional accessories.
Turning is often encountered when working with concave planes of workpieces; the processed parts have a large cross-section and thickness. It is problematic to secure such materials on other machines; the bending makes it difficult to grasp the necessary part of the workpiece.
Part characteristics
A faceplate is a cast metal disk that has a threaded center hole for attaching to the spindle of a wood lathe. The workpiece is secured in the faceplate with metal screws. They pass right through its holes and are securely screwed into the wood.
When sold, a woodworking lathe is equipped with a faceplate with an outer diameter of 100–150 mm. Additionally, specialists can purchase similar products of any size, with a different arrangement of mounting holes and working thickness.
When purchasing for home use, you must choose a faceplate with the maximum outer diameter. It must correspond to the basic size of the bottom of the workpiece being processed.
Prerequisites for using faceplates
When turning wooden products, situations often arise when the turner is required to perform jewelry processing of the edges; the accuracy of such manipulations is impossible to perform on a standard unit. Especially if the part has large dimensions and uneven corners. The workpiece is fixed to the faceplate using hooks.
The blank used for turning the bowl must be secured very carefully, otherwise the part will break from its place of fixation and the work will be ruined.
There is a high risk of serious consequences and accidents if a heavy workpiece falls off the machine spindle. Many professional wood turners make special fastening devices with their own hands.
Universal holders and special chucks can provide a reliable way to fasten wooden workpieces, especially if the machine is made by yourself. But for all highly qualified turners, the safest is considered to be a homemade faceplate, made by a master for personal use. The product costs much less than purchased ones, but in terms of reliability, durability, and quality it far surpasses them.
The dimensions of the unit itself are small; it can fit in a small workshop or garage of a private house. There is no need to provide forced ventilation in the room where the equipment will be operated. Many craftsmen install the machine between two windows, this allows for increased natural ventilation.
Faceplate at home
To assemble the unit at home, the master must know the work schedule; this will simplify the installation of all parts and allow the machine to be used for a long time. The technique is quite simple, but all points require specialist attention and dexterity. Step-by-step instructions for making a homemade faceplate:
- Take a flat steel sheet 10 mm thick.
- Steel, undamaged corner 50x50 mm, M8x30 bolts in the amount of 8 pieces, flat washers and nuts for them.
- Carefully consider how a homemade faceplate for a wood lathe will be attached to the spindle of the unit. Buy or machine a threaded bushing.
- Mark the steel plate with a circle of the required diameter. Draw two axes so that they pass through the center and intersect at an angle of 90º.
- Using a jigsaw, make a circle along the marked line and carefully sand it.
- Wet the through grooves along the central axes, not reaching 3 cm from the border of the part, moving a few centimeters away from the center. It is better to pre-drill holes of a slightly larger cross-section than the prepared bolts.
- Saw off four identical segments from a solid corner. Drill one flange of each segment with the same drill as the plate.
- Cut M8 threads in the other two corner flanges. Screw the bolts into it.
- Weld a threaded bushing for fastening to the shaft to the plate.
- Screw the corners through the washers to the faceplate using bolts.
- I made my own faceplate for a lathe. It is necessary to attach it to the spindle of the unit and begin work.
Attach the faceplates to the spindle
To fix the workpieces with such a washer, the corners are moved to the required position and secured with nuts. Each part is securely clamped using bolts; they are screwed into the shelves with an angle bracket with an M8 thread.
Related video: How to make a faceplate for a TV-4 lathe
promzn.ru