This master class was published in the magazine “Wood carving “Tatyanka” No. 15 in the “Tools” section along with other master classes on making mallets and a review article describing different types of mallets and their advantages. From our Encyclopedia you can find out that “A mallet is the same as a carpenter’s hammer or sledgehammer.
It is used in manual processing of wood or stone for advancing chisels and chisels - in the so-called “percussion technique”. In one hand, the master holds the chisel suspended, moving it across the material, and with the other hand he holds the mallet, hitting the handle of the chisel with it. Mallets are used when working on hard wood or when large amounts of material need to be removed.
The mallet consists of a handle and a striker - the part with which the chisel handle is struck.” You can buy a mallet:
... but it’s much more interesting to make a mallet with your own hands. The author of this master class is Marco from France, website www.lamortaise.com The master class is published with the permission of the author.
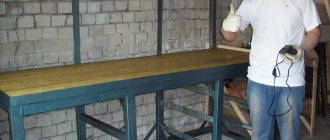
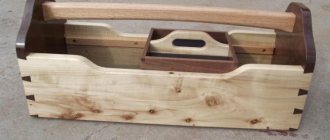
Step 1: I used three maple scraps for the mallet head and black walnut for the handle (you can use hardwood like beech or pear). The combination of a striker and a handle of this size is optimal - the mallet is not heavy, not bulky, and gives greater freedom of movement. I'm glad these scraps came with a pattern: if you can make an instrument look beautiful, do it!
To ensure that the handle fits tightly into the center of the striker, take one of the three bars, place the handle in the middle of it, trace it along the contour and precisely cut it with a band saw. First of all, I planed all the scraps and brought them to the same thickness - 2 cm. It is very important that the handle and the two adjacent narrow bars had the same thickness and so that, when folded together, they were the same width as the two wide bars of the striker.
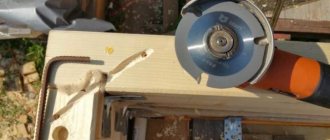
Step 2. I glued all the bars together with wood glue.
- Step 3. Clamped with clamps
Step 4. When everything was well glued, I marked the rounded profile of the top of the striker (with a compass from the center of the striker) and the bevels of the narrow sidewalls (at the bottom of the striker, step back 1.25 cm on each side and connect points A and B).
Step 5: I trimmed off the excess with a band saw. I rounded the handle a little to make it fit more comfortably in the hand, and drilled a hole in the handle for easy storage.
Step 5 and 6. After sanding the entire mallet, I soaked it in tung oil. That's all. A good tool is ready - in just two days and with virtually no financial costs.
Source: https://www.tatianka.ru/clubs/blog/woodcarving-all-over-the-world/247.html
§ 3. Technological documentation
Technological documentation refers to graphic and text documents that define the manufacturing technology of a product.
A technological process is a part of the entire production process that contains targeted actions to change the shape, size or properties of materials when making products from them.
The technological process is carried out on various technological equipment (machines) using technological equipment, additional equipment, fixtures, and tools.
A technological operation is a complete part of a technological process performed at one workplace or machine. For example: turning on a lathe, drilling on a drill press, planing parts with a sherhebel, a plane or jointer on a workbench, etc.
Often, when performing technological operations, it is necessary to reinstall and refasten the workpiece. Such actions are called installation. For example, if you need to plan a board on both sides, then you need to perform two settings - plan one side first, then turn the board over and plan the other.
A technological operation consists of various technological transitions. A technological transition is a part of a technological operation performed by the same tool. For example, planing with a sherhebel is the first transition, planing with a plane is the second transition, planing with a jointer is the third.
The main technological documents are maps: technological, operational, route, etc.
A technological map is a document that records the entire process of processing parts and products, indicating technological operations, transitions, materials used, design documentation, tools, technological equipment and accessories.
An operational map is compiled for each operation and contains a list of transitions and settings for processing the product and the tools used.
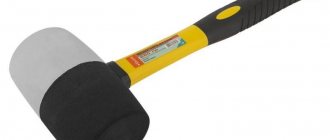
Rubber mallet
One of the most common tools in history is the hammer. Its application lies in the field of shock labor; due to its simplicity and reliability, it is widely used in construction. Like many other hand tools, this one has received quite a large number of different varieties over time. One of the most common analogues is a rubber mallet. It is characterized by quite a large number of features, which we will discuss in more detail later.
What is a mallet?
When considering why a rubber mallet is needed, attention should be paid to the fact that not in all cases during work it is necessary to destroy and deform the material. Some areas of work require a soft approach to the issue. An example is that a rubber mallet or a wooden mallet is used when assembling furniture, processing metal plates, when installing ceramic tiles and in many other cases. The first versions of the product appeared before our era, but the need for it remains to this day.
The common rectangular plastic mallet is characterized by the following features:
- In appearance, the product resembles a hammer with an enlarged working part.
- When making the striker, not metal, but plastic is used. Even wood and rubber options have become widespread.
- The working part can be made in rectangular and cylindrical form.
- In most cases, the handle is made in the shape of an oval, but when creating a small version, a round shape can be used.
- A large mallet is used to perform a variety of jobs. In this case, the classification is carried out by weight, since there are options on sale from several hundred grams to several kilograms.
Today, an inertia-free rubber mallet is an integral part of almost any workshop. The wooden version is found in the field of roofing work; some models are used in furniture assembly.
A white mallet, which is manufactured in accordance with GOST, with a wooden striker, is often used when working with metals. The main task in application is to perform strong impacts that do not damage the surface.
It is not recommended to use a mallet for working with fragile materials, as even a slight blow can cause deformation.
Download GOST 19645-74
Device and characteristics
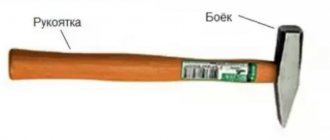
The mallet consists of two elements: a handle and a striker.
Essentially, it is a wooden hammer that has a non-standard square shape and a wide striking surface. The assembly drawing of the tool clearly shows what it looks like.
You can create such a product yourself if you use a drill, plane and sanding paper. Its shape can be any: oval, circle, rectangle, etc. The technical parameters of the product contain the dimensions and main structural elements.
Striker and handle material
The handle is made of wood, metal, plastic and fiberglass. In some cases, a special pad is placed on it so as not to damage the hand and not slip during operation. The wooden handle is made from birch or other hardwood. Different types of wood for the handle and striker reduce recoil when performing work. The top of the product is covered with drying oil to prevent drying out.
Striker manufacturing materials:
- Tree. Dense, sticky species: elm, hornbeam, birch.
- Fluoroplastic. High impact resistant plastic. It does not react to the use of chemicals and is not destroyed by water or other solvents.
- Rubber. Solid types are used. Used for easily bendable materials, has a softer impact.
This part of the mallet comes in various modifications.
Striker shape
It depends on the purpose of the tool:
- Rectangle. The mallet is designed for impact work. Often used in conjunction with a chisel for roofing and folding. Her other partner is a chisel.
- Square. Used when working with metal, when laying roofs.
- Circle. The form that has the softest effect on the material is used to straighten the work. Also suitable for installation, installation of paving slabs.
The striking surface can be flat, blunt or wedge-shaped.
Carpenter's hammer
The carpenter's hammer has become very widespread. A similar carpentry mallet, rubber or wooden, is designed for working with decorative materials. At the same time, the characteristics have increased significantly due to the use of more modern materials.
A rectangular mallet is used when working on forming and straightening metal. Rubber and wood are used in production. Among the features we note the following points:
- The work involves performing strong blows.
- The working part is made of elastic material, so no serious defects appear on the surface.
Rubber or wooden tools have become very widespread. However, do not forget that working with fragile material is prohibited. Even a slight mechanical impact can cause serious defects.
Tile mallet
One of the most common finishing materials is ceramic tiles. A lot of force must be applied to such material at the time of installation work. When laying paving slabs or paving stones, a rectangular plastic mallet is used. The version with a steel working part is not suitable; it is best to choose a rubber one. There are quite a large number of different options for making a rubber mallet for tiles. Among the application features, we note the following points:
- When using the tool, the adhesive composition is compacted.
- Thanks to the product in question, the work can be significantly simplified.
- The rubber working part eliminates the possibility of damage to the finishing material at the time of work.
In general, we can say that a tile mallet is an almost indispensable tool at the time of installation of such material. There are a variety of designs available on sale, which are characterized by a certain weight and shape of the working surface.
Area of application of the mallet
Working with a mallet is very common due to the fact that such a tool can be used for a wide variety of work. Among the features we note the following points:
- Most often, a rubber mallet is found in carpentry, where it is also used in conjunction with a chisel and chisel. However, dimensions and weight in this industry can vary significantly.
- In some cases, a hammer design is used, which resembles a turning mold. This design option is widely used in the wood cutting industry.
- The product is also found in metalworking. In this case, a wooden version with a round striker is used. In this case, the rubber striker is characterized by less efficiency in use, since due to increased rigidity the impacts become less clear. Therefore, in most cases, preference is given to a wooden striker.
- In the field of furniture assembly and dismantling, a similar tool has also become widespread. The working part can be represented by a rubber or wooden striker.
- A rubber mallet significantly simplifies the procedure for compacting the adhesive composition at the time of laying the tiles. It is worth considering that such work cannot be done without such a tool.
The information above indicates that the mallet is quite common and can be used for a wide variety of tasks.
Making a mallet
Below are instructions for making a tool with a rectangular striking part with your own hands. The simplest and most versatile option is a wooden mallet.
When choosing wood, you need to be puzzled by its quality characteristics. Only durable species are suitable for the striker: birch, pear, maple. You can successfully use beech and oak.
The best option for a wooden handle: rowan, ash. Maple, elm, and birch are also used. Next, prepare a drawing of the mallet with a detailed description of the dimensions of all parts.
The materials required are 4 bars. Dimensions:
The tools you will need to use are a carpenter's saw, special glue, a clamp, and a vice for clamping in the process.
Stages of making a mallet:
The process of creating a mallet with your own hands is simple. Knowing about its structure is useful even for those who do not intend to make the instrument themselves. Work must be carried out in accordance with the sketch.
The most common mallets on the market are models with a rubberized black head and a wooden handle. If the striker is poorly coated, it can leave marks on the surface being treated and spoil it. Therefore, the wooden version, if it does not require specific abilities, is preferable. A wooden handle can withstand greater loads than other materials. As an option, buy a mallet with a white rubber head if you have to work with glass or other fragile material.
The tool has not lost its relevance for centuries. Its performance has only improved over the years thanks to the variety of materials used in its construction. In this case, the mallet simply assembles on its own. You can make an individual universal tool that fits the owner perfectly, does not rub your hand and has a comfortable weight.
Technological map of the mallet
On the Internet you can find a drawing of a mallet. It is worth considering that such a hammer can have a wide variety of shapes. An example is a rectangular, round, oval or cylindrical working part. Each master can make the tool independently, and a drawing of the mallet is developed in accordance with the assigned tasks. Among the features of the created technological map, we note the following points:
- A drawing with basic dimensions is being created.
- A table is created in which the main elements are indicated.
To make the main elements, a wood lathe is required. Maximum similarity with the drawing can only be ensured by using different templates.
TECHNOLOGICAL MAP of TC by type of work
Technological maps of the Labor Code in construction are developed for all types of construction and installation work:
- preparatory period - preparation of permits, admission of personnel to the site, geodetic alignment of axes;
- dismantling of buildings and structures, their structural parts;
- zero-cycle works: excavation work - soil development (excavation), backfilling with compaction (compaction) of trenches and pits, backfilling and filling of utility networks; installation of strip, bored, columnar, monolithic, screw and pile foundations, grillage; horizontal and vertical waterproofing of reinforced concrete elements from corrosion using coating compounds and pasting with roll materials;
- concrete work - preparation of concrete, reinforcement, concreting, installation of formwork for foundations, grillages, beams, columns and monolithic floor slabs;
- welding work - welding of metal structures, pipes;
- installation of utility networks - water supply, drainage, heating, heating, sewerage, ventilation, electricity;
- installation, installation and dismantling of building structures - metal structures, reinforced concrete elements (coating slabs, floors, columns), wooden structures (rafters, roof sheathing), enclosing structures made of sandwich panels, brick (stone) masonry, foam blocks, gas blocks, installation roofs made of corrugated sheets, membrane type with thermal insulation with mineral wool slabs;
- finishing work - plastering, whitewashing, painting walls and ceilings, installing floors made of polymer materials, concrete.
How to make a mallet with your own hands?
The information above indicates that you can make your own mallet. The task at hand is quite simple and can be accomplished using the following technology:
- Before you assemble the tool yourself, you should choose the most suitable materials. In most cases, the head of the mallet is made of wood, for example, oak or beech, pear or maple; in some cases, it is rubber. The work requires a wood saw, wood glue, a vice and some other tools. The easiest way to make a tool is from wood, since such material can be processed better.
- After selecting and cutting a suitable workpiece, the surface is cleaned. Even a minor defect is not allowed.
- A hole for the handle is created in the central part of the tool.
- The main part is attached to the handle using an adhesive composition. Today, modern glue can withstand quite serious impact; while it dries, the tool must be clamped in a special clamp.
- The next step is to create the handle. This requires a special tool, but you can get by with an ax and a chisel. After which cleaning is carried out with sandpaper.
The individual parts of the wooden mallet must have precise dimensions, otherwise serious problems may arise with their connection.
A rubber mallet is much more difficult to manufacture, since plastic is characterized by a lower degree of workability compared to wood.
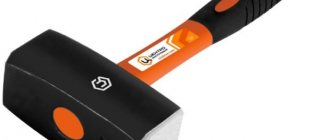
Rubber mallet – both convenient and safe!
Even such a simple tool as a mallet has many different incarnations, of which the most popular are wooden and rubber products of various shapes. The main purpose of the mallet is to be the “engine” of chisels in the process of cutting parts. This happens as follows: in one hand the master holds a chisel, applying it to the point of the desired cut, and in the other hand he holds a mallet, with which he hits the end of the chisel handle, giving it the force necessary for cutting. The lightness of the material allows you to avoid severe hand injuries and is gentle on the instrument itself.
There are two types of mallet in shape - a lathe mallet, which is turned from a single piece of wood, resembling a pin or a small bat, and a hammer mallet, which is shaped like a sledgehammer, but is made entirely of wood. The advantage of the first is its convenience, because whatever point of the mallet you hit will be correct, which significantly reduces the load on the hand. A mallet-hammer allows you to deliver stronger, more concentrated blows, although you should be very confident in holding the tool in your hands and monitoring the position of the head in relation to the chisel.
Therefore, the former are still more popular, although it will not be possible to make such a tool without a special workbench.
Features of the manufacture and use of a rubber mallet
When considering how to make a rubber mallet, attention should be paid to the fact that such material becomes more plastic when heated. The work also requires a sketch. Among the features we note the following:
- You can change the shape by heating and casting previously prepared rubber. There are also various blanks, the shape and dimensions of which can be changed during machining.
- You can also change the degree of smoothness by using special sandpaper.
- The production of certain elements in most cases is carried out using mechanized equipment, for example, a machine. The handle is obtained by turning a cylindrical workpiece.
- To connect individual parts, only special adhesives can be used.
- You can eliminate the possibility of the striker falling off during operation by using a special fastening element, since the glue may not withstand the impact. The fastening element is selected depending on the size of the product.
The production of rubber mallets is very difficult, since such a material is characterized by a relatively low degree of workability.
How does the instrument work?
The mallet consists of a striking part (the striker) and a handle (handle). The firing pin comes in a variety of shapes and is made from different materials depending on the application. The handle is attached to the through hole of the head, which has the shape of a cone, so that the striking part does not fall out during operation. Most often, the mallet handle is made from the following elements:
- hardwood trees, for example, rowan, birch, ash, maple, elm;
- strikers are made of dense viscous wood, for example, elm, hornbeam;
- durable rubber or fluoroplastic (highly resistant polymer).
Criteria for choosing a rubber mallet
There are simply a huge number of different versions of rubber mallets on sale, which makes it difficult to choose. The most important parameters are the following:
- Weight - with an increase in this indicator, the force of the strike increases significantly. Do not forget that a tool that is too heavy requires a lot of physical effort when performing the work. Light versions include rubber tools weighing 225-450 grams, heavy ones 900-1100 grams. Due to the infusion of lead into the central part, the weight of the product increases significantly.
- Length is another important parameter, which is selected depending on the type of work being carried out. Recently, fiberglass has been used in its manufacture, which is considered more durable and does not lose its shape during long-term use.
- The size of the striker is one of the main selection criteria. For delicate work, a version with a small striker is required; for rough work, a large striker is suitable.
Also, when choosing, attention is paid to the type of material used in manufacturing. Today, the firing pin is often made from different types of wood, which significantly reduces the recoil at the time of operation. Cost can also be called an important selection criterion; an economical version costs 100-250 rubles; the most in demand is a tool in the price range from 350 to 650 rubles.
Description
A mallet is a percussion instrument that is made of durable wood with a high level of density. The history of the creation of the mallet goes back to ancient times, when the Slavs used a large wooden tool to caulk residential and commercial buildings, as well as boats before launching them into the water. The modern name of the device comes from the Slavic word cue. Professional craftsmen use this product when working with fragile materials, the integrity of which can be damaged by strong blows from a regular hammer.
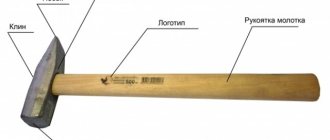
The mallet consists of the following parts:
- lever;
- striker
To make the handle, manufacturers use dense wood, as well as plastic, metal and fiberglass. To prevent the tool from slipping during operation, some models have rubber pads. The main design feature of the tool is the mounting of the handle on the front side of the striker in the place of the through hole. The cone-shaped shape of the handle at the point of fixation prevents the head from coming off during operation.
To produce the impact part, dense, viscous and hard wood, hard rubber and polymers that have a high chemical density are used. The polyurethane head, which has improved properties and parameters, is in great demand. To increase the service life of wooden parts, manufacturers coat them with special protective agents, as well as drying oil. The mallet is used to perform the following types of work:
- straightening metal sheets;
- straightening the car surface;
- installation of roofing materials;
- folding of metal edges;
- Furniture assembly;
- laying tiles and paving stones;
- wood carving;
- laying laminate flooring.
This tool is used in conjunction with a chisel and chisel. Due to its wide range of applications, the mallet has several shapes of the bike head:
- round - typical for a tool intended for straightening and installation work; it is also used when laying paving slabs;
- rectangular - designed for chiselling work, for example, paired with a chisel or chisel, roofing work and folding;
- square - it is mainly used for folding and roofing work;
- wedge-shaped.
The maximum weight of one tool can reach 1 kg, and the size of the product does not depend on its weight. The length of the handle determines the force of impact, as well as the purpose and model of the tool.
Modern manufacturers produce several types of mallets.
- Wooden is a traditional tool that is used to assemble, disassemble and shape various structures. Advantages – universal purpose, affordable price.
- Rubber is a special product for working with fragile materials that have a high level of sensitivity to mechanical stress. The tool is usually equipped with a wooden or metal handle. Advantages - the ability to work on painted surfaces made of copper, aluminum or galvanized. Body work is performed with just such a mallet, since the increased elasticity of the rubber prevents the formation of chips in the paintwork.
- Inertia-free is a unique tool that allows you to avoid chips and cracks as much as possible. A striking example is furniture assembly. The main feature is that inside the striker of such a tool there is an elongated cavity with a metal ball or shot, which upon impact prevents the striking part from rebounding.
Advantages and disadvantages
For many years, the mallet has been used in construction, repair and decoration. Therefore, it’s time to highlight its positive and negative sides:
- A large variety of tools. There are models on sale that differ in weight even by tens of grams. Therefore, you can always choose the variety that best meets your requirements. It is because of this that workers always have a whole set of mallets, one for working with tiles, another for roofing, and a third for laying porcelain tiles.
- Affordable price. For up to 1000 rubles you can find a quite decent tool that will perform the task and will not break. There are more professional, balanced options that cost up to 5 thousand rubles, but it is not advisable to buy them for your home.
- They do not damage the material when working with it. Of course, in many respects everything depends on the quality of the purchased product and the ability to work with it. But, if you purchased a quality product, then be sure that no traces will remain after processing. There will be no stripes or cracks, no scraps of handle or striker. The absence of cracks depends on the ability of the striker material to absorb impact upon impact. On the contrary, if depreciation is not needed, then you can choose a special option, which is actively used when assembling furniture.
- High strength. You should not take into account the cheapest options, where the handles are made of fragile plastic and wood. Products whose manufacturers do not save money do not have metal handle fatigue, no cracks in the wood when drying out, and no other defects or damage during operation. If products with wooden handles begin to dry out, which leads to loosening, then they should be placed in water so that the wood swells. They do the same with ordinary hammers.
- There are universal options, but they are few. For example, the same mallets for installing plastic windows. They have a rubberized base on one side and a metal base on the other. This allows you to make the product universal, heavy, weighty, and easy to use. On the one hand, we use this mallet during installation, on the other hand, we hammer the dowels into the wall with it.
- You can make it yourself. This allows you to create your own mallets. As a rule, only wood products are suitable for this option. The main thing is to center the handle when connecting so that the blow is balanced, otherwise the handle will quickly break at the base.
Like any other tool, a mallet has its drawbacks. These include:
- Not being repaired. This happens mostly with wood products. They dry out and then begin to loosen. You can put it in water, but this will solve the problem only for a while. A broken metal handle also cannot be repaired, since, to make it lighter, it is often made of non-ferrous metals or a steel alloy that cannot be welded at home.
- Not suitable for use as a hammer. Despite the fact that the shape is similar, they cannot be used to hammer nails and other objects. This will cause the firing pin to break or become deformed, ruining the product. At most, with such mallets you can hammer plastic dowels into the wall, into pre-prepared holes. A paver mallet is only suitable for this job, despite its size.
- Few universal options. This makes it necessary to spend more money, buying a different version for each type of work.
- A good tool is expensive. Well-known manufacturers, whose brand many are chasing, supply products to the market at a cost of 1,500 rubles. Many people don’t want to spend money, so they buy analogues made from cheaper steel.
Criteria for choosing a rubber mallet
Each rubber mallet may differ from another hammer not only by the manufacturer, but by a number of other technical parameters:
- weight - the greater the weight of the tool, the more powerful the blow delivered by the hammer. However, it should be noted that a fairly heavy rubber mallet will require greater physical impact force. This can lead to rapid worker fatigue. Lighter mallets include hammers weighing from 225 to 450g, and heavier ones - from 900 to 1100g. At the same time, a small mallet will not necessarily be light. In some cases, it is additionally made heavier by pouring lead into the center of the striker;
- length – depending on the type of work being carried out, mallets may have a run-up in the length of the handle. As a rule, it is believed that the longer the handle, the stronger the blow. Here, each specialist must individually select the length of the mallet with which he will be comfortable working;
- handle - some manufacturers make the handle from a special material - fiberglass. It is considered more durable, does not lose its shape over time and does not dry out under the influence of various organic solvents;
- striker size - small heads are used for more delicate work, large heads for rough work;
- material – it will be an advantage if the handle and striker are made of different types of wood. In this case, the impact on the hands from the blow will become softer.
The weight of the mallet determines how powerfully the blow will be applied to the tile. The larger it is, the greater the pressure exerted by the user.
The most modern models of rubber mallets from German manufacturers can be purchased in construction stores at prices ranging from 350 to 650 rubles. Economical options will cost from 100 to 250 rubles.
Disadvantages of materials
All materials have their own specific advantages and disadvantages that must be taken into account. Wood is often used in production. It is characterized by the following features:
- Relatively low cost. Wood is much cheaper compared to other materials; blanks can be found almost free of charge.
- With prolonged use, cracks and other defects may appear. Temperature effects and changes in humidity cause cracks and chips to appear in the structure, which significantly reduce the strength of the material.
- For the manufacture of rubber tools, a material without defects is required, since even minor knots can reduce the service life.
- Some types of wood are difficult to process and are much more expensive, while others will not last for a long period.
Rubber is characterized by higher performance characteristics. An example is that it does not respond to temperature changes and exposure to high humidity.
The rubber tool does not change its basic performance characteristics throughout the entire period of use.
In conclusion, we note that the instrument in question is almost impossible to replace with analogues. Using a regular hammer may damage the material. An example is that if the impact is too strong, cracks appear in the tiles, and serious dents appear in the wood.