Anyone who has ever tried to work with electric welding has probably encountered “sticking” of the electrode.
The reasons for this phenomenon: the quality of the electrodes, the settings of the device. The result is the same - the electrode sticks to the part so that you can’t tear it off.
But even from such an unpleasant phenomenon, engineers were able to benefit by creating a device for car body repair.
So, what is a spotter, what is it for, how it works, everything about it. Is it possible to make it yourself? All this will be discussed in the article.
What it is?
The device is based on the principle of spot or resistance welding. Its basis is the supply of electric current at one or several points of the connected elements .
For the described connection, two electrodes are used that supply current while simultaneously compressing the parts.
However, when repairing especially complex spatial structures, for example a car body, especially wing elements, this is not always possible.
The solution was a welding spotter capable of working only on one side of the elements being welded.
The name of the device itself comes from the English spot - point. In the English technical dictionary this is the name for all types of spot welding machines.
In the post-Soviet space, the name was assigned to equipment used for straightening cars.
What is a spotter and how does it work?
In traditional spot welding technologies, the workpieces to be welded are located between two oppositely placed electrodes, which, when closed, form an electrical circuit. Its energy power is sufficient for local melting of the metal and the formation of a welding point (spot).
The body repair spotter is not a two-point, but a single-point portable welding machine. For this purpose, one of the contacts of the device is connected to the structure being restored (“ground”), and the second is included in the spotter circuit. Depending on the circuit, spotters are divided into inverter and transformer ones, with industrial designs most often using a transformer circuit, and homemade ones using an inverter circuit.
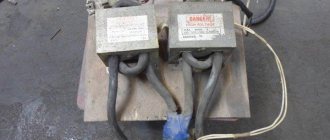
Spotter components:
- Pneumatic pliers, with the help of which the welded elements are pressed. In some versions of spotters, the pincer clamps act as electrodes.
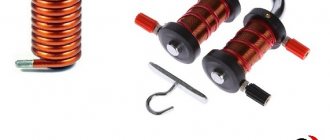
- A set of fastening devices - loops or wire clamps (hooks for a spotter), as well as consumables, in particular, replaceable electrodes of different diameters.
- Reverse hammer that performs straightening.
- Device for indicating and monitoring the progress of the process.
- Connecting copper cables in insulating braid.
Some manufacturers of spotters increase their functionality by equipping the device with a puller - a straightening device that allows you to mechanically straighten local defects on the surface of products up to 2...2.5 mm thick. The spotter puller can have a mechanical or lever clamp.
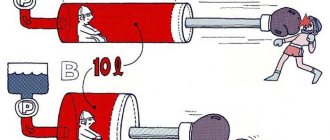
This is how the spotter works. In single-sided designs, the parts to be welded are attached to each other with hooks or loops, after which the inverter/transformer is turned on and electric current is supplied to the closed circuit. Its limit value is adjusted depending on the tasks. If you only need to perform straightening, the heating of the surface should not exceed 780...850ºС, at which the metal already begins to soften intensively, and the rate of scale formation is still low. For spot welding, you will need to bring the temperature at the contact (contacts - for double-sided spotters) to 1500...1550ºС.
When the connection point is heated to the specified temperature, straightening is performed using a reverse hammer, puller or spotter clamp. After forming the connection, the gun is removed from the welding site, the current is turned off, the pliers are unclenched, and the quality of the operations performed is checked.
https://www.youtube.com/watch?v=cw2B_tMmvjw&t=177s
How does it work?
The main difference between a spotter and a transformer or inverter welding machine is of a pulse current of 1500 - 3000 A.
This is an advanced machine for spot (resistance) welding, featuring a large number of customizable parameters.
Among other things, components for a spotter make up a whole class of devices. This includes consumables, as well as tool attachments: straightening washer holders, copper and graphite electrodes, magnetic contacts.
If one contact creates the spotter electrode, then the second, grounding, is a special washer or simply “ground”. It is attached to the same part on which the spotter himself is working.
Grounding is located as close as possible to the place of impact by the spotter. It is not allowed to install it on an adjacent body element, even if connected by welding.
Let's look at how the spotter works. The design of the device is simple. A transformer is installed at the input, providing the current of the required strength and voltage. The alternating current from the transformer is rectified by the diode bridge and then applied to the capacitor, charging it.
Another welding transformer generates a welding pulse. Current is supplied to it by a control button that opens the thyristor. The pulse creates a discharge of the capacitor, and its strength is regulated by a variable resistor.
Pulse duration is adjustable from 0.01 sec to 1.8 sec (warm-up during annealing).
Moreover, if at the input of the device the current is 50A at a voltage of 160-230V, then at the output the pulse is 2500-3000A at a voltage of 50-60V.
The schematic diagram of the spotter is shown in the figure:
Making a spotter with your own hands
Such a device is very expensive, so many people make a spotter with their own hands.
Required materials for this:
- welding transformer;
- drive 12V;
- diode bridge;
- contactor 220 V;
- thyristor for voltage 200 V;
- relay 30 A;
- button.
Before you start making a spotter with your own hands, you should protect yourself from accidental electric shock, so use a rubber mat and follow safety rules.
The welding machine is the ideal basis for a DIY spotter
It is important to change it so that it supplies at least 1500 A at the output
The spotter is assembled as follows:
- The secondary layer is removed from the apparatus.
- After this, you need to find out how many turns may be required for 1 V. To do this, you need to wrap an insulated copper wire around the primary winding, and then measure the number of volts. The resulting figure is divided by the number of turns of wire. The final result determines the required number of turns.
- A bus is made from the removed secondary layer so that the cross-section is 160 mm2, no less, and the voltage is 6 V.
- If the cross-section is less than this value, it is divided into several parts and secured with fabric tape. The number of parts depends on the initial indicator. For example, if the cross-section is 40 mm2, then the tire should be divided into 4 parts.
- You will need 2 tires wrapped with masking tape and electrical tape. It is best to carry out insulation as follows: first there will be a layer of electrical tape, then adhesive tape and then again electrical tape. Open edges must be riveted.
- The resulting busbars are wound on a transformer. This is quite difficult, so you will need a helper and a hammer. It is not necessary to achieve a tight connection between the transformer and the primary. The main thing is that the tire is level and does not have any damage.
If there is enough power, then the device is almost ready with your own hands. All that remains is to make the starting device.
There is a button on the handle of the spotter through which the 12 V drive controls the relay. This relay is necessary to shut off a wire with a voltage of 220 V. With such a device, spot welding is carried out easily and safely.
The welding gun is made from a semi-automatic device, but small additions must be made to it, necessary for attachment to the straightening device. A brass axis is fixed inside the semi-automatic device.
Under the pliers, use a regular 20x20 mm pipe. The power wire connecting the transformer and the gun must have a cross-section that is identical to or larger than the cross-section of the bus. The operating cable connecting the transformer and the gun is usually made of thermally insulated commutating wire. Be sure to take into account the fact that when heated, this layer begins to shrink.
Choose
Repair by a spotter has a narrow specialization . Apart from the car service industry, it is practically not in demand, except in rare cases of repairing damage to the body of household appliances.
Today, the Russian spotter market includes more than a hundred models from different manufacturers, differing in power, price, and operating parameters. Of these, three main ones:
- Devices made in China, Japan, South Korea.
- Devices from Western European manufacturers.
- Domestic devices.
The lower and middle price groups are represented mainly by Chinese instruments. Their advantages include the tendency of increasing quality at a stable price .
If relatively recently the purchase of a Chinese instrument was justified by its cheapness, today even professionals buy it. Among the domestic devices, there is the Russian “Spotter Pilot” line .
The company produces products in both the household and professional segments. Has a number of patents and supplies products to the markets of Canada, the USA and Europe. In the segment of professional models, European manufacturers are leading . In many respects, superior to similar Chinese and domestic models, the devices are distinguished by build quality and successful ergonomics. A significant disadvantage is the high cost.
When choosing, pay attention to consumables. Typically, Chinese spotter models for spot welding are more fully equipped, however, as a rule, in order to save money, some of the electrodes are not copper, but copper-plated, which reduces the service life.
For serious professional body repair work, it is better to choose a model from European or domestic devices of the corresponding class.
Main components for assembly
To assemble and test a homemade spotter, you need the following components and consumables:
- Frame. Sheet metal box structure with front and back panels. Ventilation holes and a ground terminal are required.
- Power supply. In its simplest form, it is a do-it-yourself transformer with a circuit breaker in the primary circuit.
- Power cables. The welding cable must have a terminal for connection to power and a threaded contact for connection to the gun, and the ground cable must have a terminal and contact pad for welding connection to the body part.
- Control circuit. The minimum version includes a switch button on the gun, an input voltage cut-off relay, control wires and a control circuit power supply.
- Welding gun. At one end there is a contact threaded connection for connecting electrodes and adapters, and at the other there is a socket for connecting a welding cable.
- Equipment. The basic version includes electrodes for washers and pins, a return hammer and an adapter for connecting a carbon electrode.
Provided that all components are made without deviations and nothing has to be adjusted or altered, for DIY assembly you will need ordinary plumbing and power tools. Measuring instruments you may need are a tape measure, a caliper and a multimeter.
Assembling a reverse hammer (inopuller) with your own hands
In order to assemble a reverse hammer with your own hands, you need the following parts:
- steel rod 60 cm long, 17 mm in diameter, with threads on both ends;
- steel bushing with a through hole with a diameter of 15 mm, a length of 15 cm and a diameter of 40 mm;
- return spring;
- travel stop nuts and washers;
- adapters for attaching electrodes.
First, a washer is put on the end of the rod intended for fastening into the gun and the nut is tightened tightly. The rod is then passed through the bushing and return spring. The final step is to attach a washer and nut to the bottom threads, and then screw on the electrode adapter. During operation, the massive bushing will be repelled by the spring and perform reciprocating movements between the two washers.
Making a working pistol
Branded spotter pistols are usually produced in the form of devices with a pistol grip. Much of what folk craftsmen make with their own hands can only conditionally be called a “pistol.” Often it is just a cylinder with a button and a terminal for connecting a cable at the end. This is because the spotter gun consists of only three parts: the body, the contact rod and the switch. The contact rod is usually made of brass. At one end there is a thread for attaching a reverse hammer, and at the other there is a clamp for connecting power. For those who make such devices with their own hands, whether to place it in a pistol case or use it as is is a matter of personal preference. At the same time, despite the low welding voltage, it must be insulated: these are the requirements of safety regulations.
Transformer for spotter
Any transformer is suitable for making a power source for a spotter. Videos of the manufacture of spot welding machines based on transformers for microwaves and other household appliances are distributed on the Internet. At the same time, the authors of these crafts do not report what current their devices are designed for, and this is very important, since the penetration of the metal surface during the operation of the spotter should occur in a fraction of seconds, without appearing in any way on the back side of the part. Factory devices have a power of 3÷5 kW with an open circuit voltage of 7÷8 V (welding voltage - 1.5÷2 V).
For a spotter assembled by yourself and intended only for body repairs, a power of 1.5÷2 kW is sufficient. It is not difficult to calculate how many turns there should be in the secondary winding of a transformer. To do this, the number of turns of the primary winding (new) must be divided by the quotient of 220 divided by 7 ÷ 8. Usually it turns out just a few turns.
If the number of turns in the network winding is unknown, then the secondary voltage can be selected experimentally by unwinding or adding turns. It should be noted that for the ground and the gun, cables with the same cross-section should be used, corresponding to the maximum current of the secondary winding.
Control unit diagram
There are quite a lot of electronic circuits on the Internet that are labeled as spotter control units. Some of them refer to industrial designs of spot welding installations (including old ones), others are replete with electronic components and have redundant parameters, and a number of circuits are not at all related to our topic. Many of the proposed devices implement adjustments to the open circuit current and voltage, as well as control of the duration of the welding pulse. Their manufacture requires a certain skill, and the parts used are not that cheap. Choosing one of these schemes is advisable if you plan to make a spotter for commercial use in a small auto repair shop. And for devices that are made by hand and used at home, there are simpler solutions.
What's good?
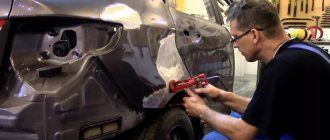
In order to straighten a dent using a spotter and accessories for it, you do not need to disassemble the components and assemblies of the body . In some cases, it may not even be possible to remove the trim at the site of damage.
In addition, compared to conventional spot welders, it is capable of:
- perform local heating of body elements, which makes it possible to eliminate bulges and jams made during the straightening process;
- restore elements of body trim fasteners that were cut or crumpled in an accident, damaged during the straightening process;
- weld nuts, fastenings for self-tapping screws, threaded rods, bolts.
Compared to gas welding machines, the equipment does not require bulky cylinders, hoses, or fragile pressure gauges.
Compared to conventional electric welding, the spotter does not overheat the metal at the attachment point, weakening it. During operation, the device does not create a powerful arc that can damage the eyes .
How the spotter works
A puller for body work using a spotter is a device used for quick drawing. With its help, you can quickly and efficiently level car bodies and other deformed surfaces.
The extraction device straightens a small area of the metal surface, while the area of the part surrounding the dent remains in place. If the spotter tip is simply welded to the deformed area, then the adjacent space along with the hole will rise up, forming a bulge on the body. The puller holds the surrounding surface, pulling only the point to which it is attached.
The work is performed by moving special levers. To remove large dents, a manual straightening device is used.
Features of straightening
Let's look at what a straightening spotter is and how to use it. The principle of eliminating damage is the same for dents, regardless of their size:
- Cleaning and preparing repair areas.
- Installation of the ground terminal.
- Fixing the tip of the electrode of the equipment or the consumable washer on the dent.
- Pulling metal using lever systems, pullers, blows of a reverse hammer, as well as other methods
- Subsequent finishing.
For small dents, a lever puller is sufficient .
With its help, damage is eliminated in one step. Dents that occupy a large area and have a complex shape are straightened using a reverse hammer.
Repairing serious damage, such as deep longitudinal dents, requires the use of additional consumables.
Spotter, its application and design
This tool is used to level out car dents when repairs from the outside are not possible. It can heat up part of the metal, and the damage to the body will be minor.
In particular, it is used for the following purposes:
- body straightening;
- leveling the surface of the body without the need to disassemble it.
The enormous and irreplaceable benefit of this device lies in its use for leveling body parts when access to certain parts is limited due to the specific structure of the car. When straightening damaged parts of the body, a special device fastener is welded to the deformed surface and then pulls it out. It should also be noted that the spotter is capable of heating the metal during operation, and this facilitates rapid leveling, obtaining rigidity and the desired shape.
The work of this design consists of point-by-point pulling of the damaged part according to the principle of a hammer.
It looks like this:
- the return hammer of the device is fixed to the body using a welding pulse;
- The handbrake of the device must be pulled along the guide towards you, while the support washer remains in place.
The simplest spotter has 2 modes:
- temporary, when a ring is fixed to the surface;
- welding - light welding of the electrode to the surface is used when the device is attached to the car.
Basic recommendations for work
Before you start working, familiarize yourself with how to use the spotter, and most importantly: what not to do in the instructions supplied with the device.
In addition, some points that will be useful for beginners:
- Before connecting, make sure that the network can handle the power consumption of the device.
- Do not lengthen the standard cables of the spotter; the longer they are, the greater the drop in power, which means the worse the quality of the connection.
- Thoroughly clean both the grounding installation site and the areas to be straightened.
- When installing long consumable fasteners (zigzag wire, combs), start with the end farthest from the ground to avoid a shunting effect.
- When straightening large dents, move from shallower to larger depths in a spiral (similar to how lines of equal heights are drawn on a map). If you immediately start pulling out the deepest places, you are guaranteed to get excessive stretching or a “slammer” - an unstable surface that can “snap” back again.
In addition to conventional devices, there are also aluminum spotters. Their device is not much different in principle, but its settings and consumables are completely different. Such devices cannot be used for working on steel and vice versa.
Homemade spotter body and other components
Even if you make a spotter with your own hands, you need to take care of the body for it. First of all, you need to make a base for your equipment, for which you can use a plate of dielectric material. It is important to make the dimensions of the finished base such that all the components of the spotter can be placed on it, and convenient access to the places where installation will be carried out is provided. To do this, you can first prepare a drawing, drawing to scale all the structural elements of the device.
To protect all the internal elements of your homemade spotter and give it an aesthetic appearance, it is convenient to use a casing from an old microwave oven or welding machine. If you plan to frequently carry your spotter, then you need to evenly distribute the weight of its internal components and provide reliable fastenings for a belt or portable handle. In addition, small wheels can be mounted on the lower part of the base of the device, which will also make the device more mobile.
Option for the body of a homemade spotter
After you make a spotter with your own hands, you need to equip it with additional components, which include:
- a pistol, which is the working part of the apparatus;
- two welding cables;
- inopuller, which is also called a reverse hammer.
When choosing welding cables, it is very important to choose the correct cross-section. To do this, you can make a simple calculation: for 10 A of the maximum permissible current that the spotter produces, there should be 1 mm 2 of cable cross-section. For the mass, you should use a cable whose length does not exceed 1.5 m, for the worker - no more than 2.5 m. If you neglect these requirements and use longer cables, this will lead to significant losses in the welding current, which will negatively affect the quality performing welding work.
The connecting elements must be securely fastened at the ends of the cables. These can be terminals for threaded connections or devices that provide quick connection with the corresponding terminals on the device itself and its working part - the gun. On the reverse side of the cable for ground, you can install a quick-clamping element (crocodile) or equip it with a terminal for threaded fastening.
Assembling a homemade product and its components. Device diagram
As we have already said, the basis of the spotter is a regular spot welding machine. Finding a suitable scheme on the Internet will not be a problem. But before that, it’s worth looking around.
You may already have some of the components of the future unit. In this case, it will be rational to start from their presence. First of all, you will need two transformers .
It is not difficult to select a power supply for all electronics; any one with an input of 220 V and a voltage on the secondary winding of 12 V will do. It is more difficult to find a sufficiently powerful welding one.
As a basis, you can use transformers of powerful household appliances, say microwave ovens. But most likely it will have to be rewound.
As a last resort, you can wind the welding transformer yourself by selecting a suitable core.
All other electronics: thyristors, capacitors, diodes, variable resistor, etc. are not a problem to purchase in a specialized store or on the radio market . Their values depend on the scheme you choose.
Everything else is relatively easy to do or purchase.
Frame
A suitable sized metal box from old equipment is used as a housing.
It’s even better to purchase a sheet of thin sheet metal, galvanized or powder-coated, from which you can cut and bend a suitable casing.
Rivets and screws are used for fastening. As an option, placing a ready-made spotter on a temporary chassis, use resistance welding to make the casing.
Pistol grip holder
For the main holder with a pistol grip, an old instantaneous soldering iron will do . It is good for having a place for a control light (LED) and backlight.
As an option, use a syringe gun for silicone gluing. It is easy to assemble a crude holder from several getinax plates, cut and bolted together. But still, if you are not against purchased products, it is best to purchase a ready-made holder, even a used one. Especially if you have to work quite often.
Puller and inopuller (reverse hammer)
Two main working devices: a puller for a spotter, and a reverse hammer - an inopuller. The first is a miniature jack. How to make a puller for a spotter with your own hands? To make it, an old lever syringe for working with tubes of silicone or glue is suitable .
The tube mount itself needs to be cut off, and the rod turned in the other direction so that when the lever is pressed, it does not come out, but rather moves in.
Additionally, the turner will have to order a copper collet holder for the electrode, a support sleeve and the stop itself with a platform in the form of a ring with two posts and an upper half-ring where the puller sleeve is inserted. Stops of various sizes are sold separately at welding supply stores.
The production of the puller is shown in detail in the video:
The reverse hammer is an important, but fairly simple piece of equipment.
It is a rod along which a load slides - the striker .
A thrust nut is screwed onto the front of the rod and a slot is made for the triangular electrode. A spring is placed between the nut and the weight to soften the possible impact of the striker.
The back side is used to accommodate an impact stop, a handle with a clamp, or a mount for a pistol holder.
From a welding machine
If you have a manual welding machine, manufacturing or rather modifying it into a spotter will not be a big problem. The task boils down to adding to the device a block that creates a current pulse and makes it possible to adjust its parameters .
If you tinker, it is possible to create a device capable of switching to both the mode of a conventional welding machine and a spotter.
How to make a puller
DIY microwave spotter
Spotter welding is effective for recreating a flat surface on damaged car bodies. But this requires some accessories. One of them is the puller. This is an exhaust device that allows a small area of metal to be drawn out, leaving the surrounding part in place. If you simply weld the spotter tip to the dent and pull it back, then the entire area will give way along with the dent. You will get a bulge on the body. This accessory allows you to hold the surrounding surface and draw out only a point.
You can make your own homemade puller from a caulk gun. It can be purchased at a hardware store. When purchasing, you should choose a model with thicker handles, as this will affect subsequent operation and service life. Next, several manipulations are performed, clearly shown in the video, in the following steps:
- Disassembling the pistol. The sealant container is removed from it. The front stopper and the seals under the tube are unscrewed.
- Several rings of different diameters must be cut from sheet iron with a wall thickness of 3 mm. To save on material, they are drawn in one circle, in descending order. The width of the ring varies from 20 to 30 mm. The smallest ring should fit freely, but without unnecessary play, onto the receiving socket at the handle of the glue gun and pressed with the factory nut.
- Two squares of sheet iron with a wall thickness of 3 mm and side dimensions of 20 x 20 mm are welded to a small ring. One hole is pre-drilled in them.
- From circles of larger diameter, supports are made on the body for dents of various sizes. To connect them to the main structure, strips of metal with parameters 15 x 150 mm and a thickness of 3 mm (2 pieces) are taken. One of their edges is welded to the opposite sides of the large circle, and the second is bent at 90 degrees inward. Holes are drilled at these edges, identical to the fastening on the smallest circle. With a bolted connection, the structure is assembled together and resembles a cone.
- A homemade puller must be attached to a power source from the spotter. To do this, take a brass cylinder, in which the turner drills the middle to the exact diameter of the rod from the silicone gun. A hole is drilled in the side of the cylinder and a thread is cut to secure the contact.
- A welding tip is fixed at the end of the cylinder.
A puller can also be made from pliers. You will need a rod, a system of rings to create a stop, and a powerful narrow spring to return the compressed handle. The rod is welded to one of the working sides of the pliers, a spring is attached to it and a stop is attached. The current from the device can be supplied through the terminal on the top end or on the side of the brass cylinder. Such accessories for a spotter may not look very presentable, but they serve their purpose well.
Accessories and consumables
The device itself can't do much. The main work is based on additional components and consumables for the spotter .
We have already described some of them—the reverse hammer and the poppler. There are also various lever jacks, devices that use hydraulics to pull. Accessories include devices for carrying components, transporting the spotter itself - various cases and carts.
Finally - consumables. Their set includes repair washers of various shapes, simple or copper-plated, corrugated wire, pins, etc. Consumables are distributed over the area of the dent, and then hooked with a puller, lever jack or other similar mechanism, a hood is produced.
Equipment Feature
The spotter is a device that has changed all previously existing ideas about the principle of removing dents. Its use helps eliminate defects from the outer surface of the vehicle.
The design of the device can have several different attachments, as well as operating modes. Its working elements can be called:
- Frame.
- Reverse hammer.
- Hook.
- Electrodes.
- Sucker.
- Adapters.
The basis of the spotter is an inverter welding machine, like a microwave oven, which is capable of producing two types of current:
- constant;
- variable.
Depending on the type of movement, equipment can be of two types:
- compact - have a small size, which makes it possible to carry them in your hands using a comfortable handle. These devices can be classified as non-professional;
- portable is professional equipment that is moved using a special stand with wheels.
On the front of the case there is a panel that is used to configure and adjust the workflow. Regardless of the spotter model, the master has the ability to set the required level of power and current of the device. To do this, there is a toggle switch on the panel with the possible operating modes indicated on it.
The welding process is carried out as a result of the closure of the electrical circuit. In this case, the master fixes the mass on the surface of the vehicle body. In addition, you must first remove the battery from the car.
The choice of attachment that is inserted into the end of the gun depends on the type of operation being performed. As a result of the supply of current, the working surface heats up, and after some time it melts. This area is small in area, but sufficient to be able to correct the existing defect. In this case, the surface does not overheat.
Working spotter pistol
As mentioned above, the main working part of the spotter is the pistol. If you plan to constantly use a homemade spotter in your work, then it is better to purchase a factory pistol. If you need such a device for occasional use, then you can assemble a working element for it from improvised means.
Spotter gun assembly with return hammer
As such improvised means, they usually use an assembly glue gun or the working part of a semi-automatic welding machine. You can make a comfortable and reliable handle for a homemade pistol from getinax or textolite with a thickness of 12–14 mm, cutting out two identical rectangular parts from them. In one of these parts a recess is made in which the bracket necessary for attaching the electrode is placed. Here you can also place a light bulb, a button to turn on the backlight and a switch responsible for sending an impulse.
You should take a very responsible approach to the manufacture of the bracket in which the welding electrode will be mounted. This bracket is made from a copper pipe of square or rectangular cross-section. The electrode itself is made of a solid copper rod, the diameter of which should be 8–10 mm. It is very convenient if the design of your homemade gun is such that you can replace the electrode in it without disassembling it.
To connect the gun to the spotter itself, you must use a welding and control cable, which should have 5 cores with a cross section of 0.75–1 mm 2 each. Three wires of the control cable are connected to the “Impulse” switch, two - to the light bulb responsible for the backlight and its switch. The end of the welding cable is carefully stripped and sealed into the hole in the bracket.
For argon and plasma welding
Torches for semi-automatic welding are also often called pistols due to the presence of a button on the handle. When the device is turned on, welding wire and shielding gas are supplied to the welding area.
For a semi-automatic machine, you need to set the welding parameters correctly. The performer only needs to move the gun along the joint and maintain a normal arc length; the result will be a high-quality seam. When using a fireproof tungsten electrode in the gun, the welding wire is fed separately.
In plasma welding, the welding gun is called a plasma torch or cutter. In it, when an electric arc is formed and gas or water is supplied, a plasma jet is formed, which melts and cuts the metal. If welding is required, welding wire is additionally used.