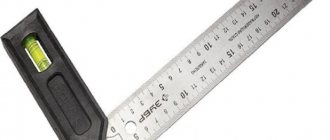
Do-it-yourself small goniometer
A goniometer is a fairly affordable tool that can be bought at almost any hardware store, but the master does not always have time for this, and the device may be needed urgently. In this case, you can do it yourself. To do this you will need:
- A block of wood from which the block will be made. A small piece of up to 30 mm will do.
- A piece of plywood, the thickness of which should be more than 3 mm. It is better not to take plywood thicker than 5 mm. The moving part of the device is made from this material.
- A bolt and nut can be used as fasteners.
- Using a drill, you need to drill a hole for the bolt.
You need to start assembling the goniometer from the block. To do this, measure 10 cm on the workpiece and saw off the required length. After this, you can proceed to making a slot for the feather, which will require cutting the block from the end.
The feather of the instrument is made of plywood, and if it is not available, then you can use a material of similar size - for example, a sheet of plastic. Marks of 20-40 mm are made on the sheet: these will be the dimensions of the pen itself. They can be changed at your discretion. If you did everything correctly, the feather and the cut in the block will form an acute angle when folded. The parts are bolted together at an angle of 90 degrees; the pen must be able to move. The excess needs to be cut off and cleaned.
Malka is a tool that will help you measure the desired angle
If this is your first time encountering a new device, you cannot avoid the question: what is it and how to use it? As already mentioned, this device helps to measure angles, and let's take an angle of forty-five degrees as an example. We take such numbers for a reason, but mean cutting wood at the most popular angle. You can also choose any other value that interests you. Technically , a malka is a tool that can measure an angle from zero to one hundred and eighty degrees . So, let's start taking measurements.
- To begin with, we can find the angle we need already in the finished version and take measurements. You can also use a special device to set the angle to the degree you need.
- Next, fix the result obtained with a fastening bolt, preferably as firmly as possible.
- Afterwards, we apply the resulting angle to the part and draw a line with a pencil.
- Using a wood hacksaw or electric jigsaw, cut the corner according to the markings.
In this example, we assume the marking of a wooden board or the marking of a door frame. This method will be much faster than marking with a regular square.
Instructions for using the goniometer grinder
Often, when a simple tool falls into the hands of a specialist, the question arises of how to use it correctly. One of these tools is a grinder, which is better known as a protractor or surface planer. The material describes the process of measuring slopes using the instrument in question. But what else can you use such a simple and uncomplicated tool for, which you can make easily and quickly with your own hands.
What a malka is and why a protractor is needed is explained in detail in the material. It remains to understand the potential of the tool and find out what actions this device is capable of. Without exaggeration, the possibilities of the tool can be called limitless, since with the help of the device you can measure any angle and find out its exact values. This can be not only a window slope, but also an arch or greenhouse structure, the manufacture of which is carried out by a specialist.
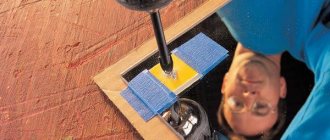
If you don’t know how to use a protractor correctly, then it’s time to look into this issue in detail. To learn how to work with a small spoon, you need to follow an example. So, recently the issue of insulating the walls of a house with polystyrene foam or expanded polystyrene has become relevant. Why might you need a protractor when working with polystyrene foam? Everything is banally simple. If you need to stick foam plastic on the wall of a house that has a triangular or uneven shape, then in this case you will need to use a small tool. This is not necessary, but it will greatly simplify the work.
- To avoid having to measure the angle of inclination of the wall, you need to take a small piece of wood and apply it with one part to a straight angle, and the other to an indirect one.
- After this, you need to fix the moving part in the installed position by screwing the thumb in the central part of the tool
- Attach the protractor in a fixed form to the foam sheet and make a mark with a pencil or marker
- The radius of the corner is known, so all that remains is to use a rule or level to apply it to the resulting mark and draw it to the edge of the foam sheet
- Pick up a cutting tool for cutting foam plastic, which can be not only a construction knife, but also a metal blade. Few people know, but you can also cut polystyrene foam or polystyrene foam with the attachment of a hair dryer. How to cut a sheet of foam plastic if its thickness is greater than the length of the blade of a construction knife. To do this, you can take a special attachment on a hair dryer and make a cut along the mark
- Now the foam plastic in which the corner is cut can be applied to the wall and make sure that the procedure is performed correctly and with maximum accuracy
This is an example of the use of a screed, but the construction sector is not limited to the use of a screed. The device is also used in furniture making, when an irregularly shaped tabletop is made to order.
Often such a tool must be used when carrying out welding work, for example, when it is necessary to make metal posts for an arch or greenhouse with the same deflection angle. Whenever there is a need to cut an angle of the corresponding degree, you will need to pick up a protractor.
It is always convenient to work with this simple and uncomplicated device. Moreover, you don’t need to buy it, because it’s easy to make it yourself. If you set out to buy a small one, then you don’t need to go to hardware stores for this. For this, there are online stores where you can choose a suitable tool of good quality and at a low price. If you don’t yet know how to use a malka, then it’s time to learn, especially since it’s easy and simple.
As a result, it is important to emphasize such a factor as the effectiveness of the goniometer. Without such a tool, making an accurate measurement of an indirect angle would be very difficult. This would require a protractor, which would calculate the angle and then transfer it to the projected plane or workpiece. The video provides a detailed report on making malka with your own hands.
When performing construction or carpentry work, there is often a need to measure angles. For such purposes, a tool called a malka was invented. In the construction industry, this device allows you to speed up and facilitate the execution of work, ultimately achieving excellent results. We will learn in more detail how to use the small tool correctly, as well as the features of measuring angles.
How to make malka at home?
Of course, today all the necessary tools, in our case a small tool, can be bought at a hardware store. But sometimes situations arise when a device is needed now, and there is no time for it, or the necessary tool is simply not available for sale. Let's try to figure out how to make malka with your own hands from available materials. And here is what materials we need for these purposes:
- Wooden beam measuring 20 by 30 mm. We will make a block from it.
- Plywood with a thickness of 3 to 5 mm, it will be the moving part of the tool, the pen.
- Fastening element in the form of a nut and bolt.
- Electric drill and drill bit that matches the diameter of the fastener.
Purpose of the goniometer and main tasks
The tool in question can be found in carpentry shops and workshops, where it is simply impossible to do without a protractor. When finishing premises, this tool is used by specialists who know that without it it is impossible to measure an indirect angle with maximum accuracy.
Digital small: an irreplaceable thing
A mill or protractor is a device that makes it possible to determine and fix oblique angles and transfer them to the required workpiece. In construction, the adjustable bevel is used when installing window slopes, window sills, and door slopes. Not every builder knows why a piece of wood is needed, which was confirmed by experiments conducted among vocational school students with a degree in carpentry.
Goniometers come in metal and wood, and even plastic. Wooden markers are more popular because they do not damage the surface of the products being measured. Metal baits are mainly manufactured with a length of 300 mm and with a built-in digital display. Plastic products are the cheapest, as they are less resistant to physical impact than the first two types.
Such tools are called digital, and they are used mainly by professionals, where maximum accuracy is important when carrying out work. The instruments under consideration, despite the material used to make them, consist of the following elements:
Digital protractors are extremely accurate, but they have a significant drawback - their high cost. Analogues of digital instruments are protractor minis. These are instruments that are designed with a conventional protractor.
How to use a small tool using the example of constructing slopes
Let's now test the little thing you made in working conditions, and it will be tested on the installation of window slopes. Our tool will help you carry out proper plastering based on existing standards. As you know, window slopes have a certain angle; builders call it the “dawn angle.” But according to the rules, all angles must be the same and symmetrical; if these rules are not followed, then different slopes will be visible to the naked eye. Here are instructions on how to use a grinder to get uniform angles.
Using powder for plastering
With this small tool you can easily and efficiently perform not only plaster, but also putty.
Malka in the process of work
First of all, you need to form the same “dawn angle” for all slopes. We install the block on the edge of the window frame, for example, and use a pen to determine the angle along the edge of the slope adjacent to the wall. We secure the resulting result with a screw.
Now you need to check the entire slope around the perimeter of the small wall. The result should be the same everywhere. If there are deviations somewhere, then we remove the excess and check again. You may have to change the angle on the fry a little if there are large errors. The malka we made using a simplified scheme works in a similar way.
The next stage is preparatory work and plastering, puttying the slopes. The entire sequence is described in detail in the article plastering slopes. Here's a device for you - it seems like a very simple tool, but when used, the slopes are formed quickly and efficiently with a given opening angle, symmetrical and even.
I offer a short video where the small one is a very simple template made with your own hands.