What it is?
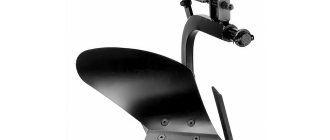
An adapter for a walk-behind tractor is a trolley, the main elements of which are a seat, a brake, a brake handle, footrests, a coupling mechanism and a frame with structural parts attached to it.
The brake of the device is located near the foot rest. Typically, such a device is equipped with two wheels, and the seat often has a lifting lever. The design of the adapter can be either universal or special: some of these varieties provide for additional fastening of various canopies.
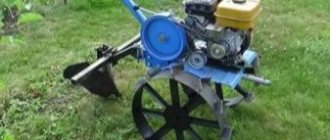
Equipping the walk-behind tractor with an adapter practically turns the working unit into a mini-tractor with a seat that increases operator comfort.
Application area
If we consider in general the purpose of adapters for walk-behind tractors, then their purpose is to relieve the user and make his hard work easier. Depending on what type of auxiliary equipment is attached to the walk-behind tractor, its scope of use can expand significantly.
For example, in addition to plowing, weeding, hilling and harvesting root crops, it will be possible to remove hay, clear some types of surfaces from snow, and level the soil surface. In addition, it will be possible to transport oversized cargo.
What types of adapters for walk-behind tractors are there?
Externally, the adapter design is a small frame with two wheels, a platform for feet, a drawbar and a seat for the operator. By equipping a walk-behind tractor with such a “new thing”, you will actually turn it into a mini-tractor - working will become much more convenient, faster and easier, and the ability to adjust the seat will make the work process more comfortable.
There are several types of adapters for walk-behind tractors. In order to buy or make the most suitable option for you, you should familiarize yourself with all types of this equipment.
Based on the type of clutch, adapters are divided into adapters with steering and movable joints. Depending on the location - on the front adapters and rear ones.
Adapters can also be classified into a separate classification based on the purpose of use: with an extended drawbar for powerful large walk-behind tractors, with a shortened drawbar for small, lightweight units.
Adapter with steering
This type is on a rigid joint with a walk-behind tractor. The steering is represented by a separate unit, and options with both rear and front wheels are possible.
The walk-behind tractor becomes practically a self-propelled machine, which is quite simple and easy to operate, practically no different from motorcycles or cars.
Adapter for walk-behind tractor - drawings, DIY assembly steps
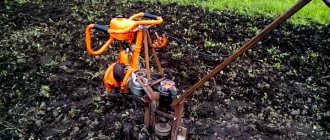
A modern walk-behind tractor is a high-tech machine for high-quality soil cultivation. Its use significantly saves the energy and time of its owner. Many units are subject to modernization through the use of additional structures and canopies. These include an adapter for a walk-behind tractor.
Adapter design features
In fact, the adapter looks like a trolley, significantly increasing the functionality of the walk-behind tractor and making it easier to use.
The adapter design consists of the following parts:
- A durable frame with all structural elements attached to it;
- Footrest, near which the brake pedal is located;
- A manual brake lever, when lowered, the wheels are finally fixed;
- Wheelbase of two wheels of medium size;
- Seats with lift lever.
The hitch, which allows you to attach the adapter to the walk-behind tractor, is located in front or behind the device. The standard type is a single design that includes two main elements. The first is a connecting link, the second is a regulator.
Separate adapters with a universal double hitch, allowing additional attachment of various awnings.
Types of adapters for motorcycles
Adapters for walk-behind tractors are divided depending on the method of their attachment.
The following types of devices are distinguished:
- Rear adapter for walk-behind tractor. The hitch is located at the front of the device, so after connection the adapter will be located at the rear of the unit;
- Front adapter for walk-behind tractor. Accordingly, traction occurs from the rear. The adapter is located in front of the motorcycle and will definitely have a steering wheel for control. Devices with steering control have a more complex design type, and therefore their price on the market is much higher.
Depending on the area of use, the following adapters are available:
- Shortened . Small in size, which can be used with a light walk-behind tractor. The low weight allows the adapter to be attached directly to the wheel of the unit;
- Elongated. Copes with heavy-duty agricultural machinery. They are distinguished by their significant dimensions and relatively large mass.
Depending on the presence of the body, the following designs are distinguished:
- Bodywork. The existing body allows you to transport various cargo over long distances. They are actively used for everyday tasks and harvesting;
- Bodyless. They are used only for connecting to a walk-behind tractor.
When choosing an adapter, you need to pay attention to the design features of the device. It must fully meet the needs of the owner.
Preparatory stage of adapter manufacturing
The adapter has a simple design, but its manufacturing procedure cannot be called simple. Initially, you need to take into account the drawings and dimensions, which will help you create a device without any defects.
You need to acquire the following materials and tools:
- Electric drill;
- Welding;
- Electric hacksaw;
- File;
- Square;
- Sheet of steel with a thickness of 5 millimeters;
- Several square pipes with a diameter of one inch;
- A set of fastenings.
Key structural elements are manufactured as follows:
- Hitch. Installed on the frame and secured with bolts. The coupling is two welded pieces of square pipes and a piece of water pipe. The latter is inserted into the rod with a welded tee;
- Wheel fixation unit. Two pieces of pipe 10 centimeters long are welded at right angles. The horizontal section is inserted into the mounting pipe and securely fixed with a bolt. An axle and bearings with wheels are attached to a vertical blank.
When all the tools are prepared and the main parts are made, you can assemble the adapter.
How to make an adapter for a walk-behind tractor with your own hands?
After familiarizing yourself with the drawings, you can begin the step-by-step assembly of the adapter. It is important to strictly follow the described algorithm.
If an adapter with a seat is used, the walk-behind tractor turns into a mini-tractor. The chair is selected at your own discretion, but products with built-in shock absorbers are more suitable so that you do not have to install springs.
The frame is assembled in a certain sequence:
- A shank is welded to a piece of pipe with a diameter of about 6 centimeters. A rotating bracket will be mounted on it, fixed with a pin;
- The frame is welded perpendicularly to an angle cross member with dimensions of 5 * 5 centimeters;
- A steel sheet, three millimeters thick, is welded to the frame with a corner;
- The side edges of the sheet, about one centimeter long, are bent down to protect against cuts;
- The wings are bent and welded. Fender flaps are welded to the upper part and are equipped with reflectors.
The main frame must be equipped with an additional retractable frame, the thickness of which is 5 centimeters. They are fastened together with a bolt.
It is better to supplement the design with a trunk, which is made according to the following scheme:
- The frame is being assembled. The required central water pipe with a diameter of 1 inch and several pipes with a smaller diameter (½ and ¼ inch);
- The central pipe is strengthened with additional pipes for support, the structure is welded to the trunk;
- The support pipes are connected to the block rod and the gearbox.
The height of the supports depends on the location of the trunk. It cannot be located above the instrument panels, fuel and oil tanks.
The rotating bracket is manufactured following the following diagram:
- A pipe blank with a diameter of 5 centimeters is welded and bent. Two steel bushings are welded to the upper part, which ensure the device swings along and across the axis;
- One side of the bracket is fixed on the shank, and the other on the walk-behind tractor itself;
- For free installation and removal of the bracket, a handle can be welded.
You need to take care of the rear view mirror (suitable for a car or moped). The part is installed on the handle of the unit or secured to the rear of the trunk.
You need to purchase a ready-made mechanism - a brake system.
It is installed according to this scheme:
- The rod of the locking unit is dismantled, the thread on its surface is extended using a special die;
- A strong steel stop is created;
- A hole is drilled in the rod, the diameter of which is in the range of 3-10 millimeters;
- A powerful return spring is installed and secured.
At the last stage, the axle with wheels is installed. Suitable parts from old equipment: motorcycle or moped. The axle may be too long, so it is shortened with an electric hacksaw.
In addition to detailed drawings, it is worth considering the proposed videos on making the adapter.
A homemade adapter according to the schemes described above can be used with the following brands of walk-behind tractors: Salyut, Agro, Neva, MTZ.
Design and principle of operation
Essentially, the adapter is presented in the form of a trolley that is attached to the walk-behind tractor. After which the structure turns into a mini-tractor. The main details of such a unit:
- a frame to which other constituent elements are attached;
- driver's seat with lift lever;
- 2 wheels;
- clutch device;
- wheel axle.
In this video we will analyze the front adapter:
Frame
It is one of the most important elements of the device, since other elements are connected to it. Therefore, it must be made of high-quality and durable materials.
Driver's seat
One of the main advantages of the adapter is a comfortable seat for the operator.
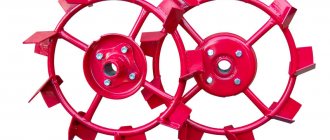
Wheels
There are 2 types of wheels available - metal and rubber. The former are used for heavy types of work in the field. The latter are designed for driving on dirt roads.
Clutch device
The hitch is responsible for connecting the attachments and the mechanical unit itself. This fastening is defined as one of the most important, therefore it is made of high-strength metals - steel or cast iron.
The length of such a device is about 2 meters, width – 80 centimeters.
Depending on the clutch, the following design options can be considered:
- with movable clutch. This device is the lightest. The clutch here is located in the front, but control in this case is more difficult, since it is necessary to deploy the entire power unit;
- with steering. The clutch here is rigid, and control is achieved through a mechanical steering unit. This control is easier to use, but more difficult to produce.
There are different adapters for walk-behind tractors of different performance. For mechanisms with low power - with a short mount, for powerful ones - with a long one.
Features of hatches in the underground under the laminate
The floor hatch in the basement under the laminate is not only a beautifully designed entrance to the underground, but is also part of the floor, which must meet a number of requirements:
- fit into the interior;
- have an attractive appearance;
- feature reliable and hermetically sealed locking;
- be equipped with a high-quality locking mechanism;
- do not create difficulties when opening the door (even with large hatch sizes);
- have a simple design (thin square lid and a handle for lifting it);
- suitable for equipment with electric drives or other automatic devices with a cover weight of 10 kg or more;
- correspond to the dimensions of the basement shaft and manhole cover (otherwise there will be difficulties during installation work);
- the hatch should not protrude above the floor surface;
- must have high strength characteristics (withstand loads from people walking).
Regardless of the type of basement floor hatch, neither dampness, nor mold, nor other pathogenic microorganisms should penetrate into the living space. This requirement applies to both simple and complex structures.
Important! For comfortable use of the hatch in the floor under the laminate, you need to maintain an opening angle of 90°. This approach allows you to make the descent into the basement safer; you can lean on the lid in a vertical position, since it is held in place by spacers and clamps.
Advantages and disadvantages of a floor hatch under the laminate
Among the positive aspects of creating a hidden hatch under the laminate are:
- relative ease of manufacture;
- a sufficient degree of tightness through the use of silicone or rubber seals;
- high level of security;
- good strength properties;
- quick access to the basement;
- limitations in terms of installation (choice of location) are excluded;
- many design options;
- flat floor plane;
- ease of use;
- presentable appearance.
Despite the whole list of advantages, the invisible hatch under the laminate also has its disadvantages, which should be taken into account to obtain the desired result. Of these we can note:
- Large weight of the structure. This is due to the presence of a metal frame.
- You can't do without using gas shock absorbers. They are needed to simplify the process of opening the hatch to the basement, given that in addition to the metal frame there are laminate slats on top, laid on a substrate. Thanks to the high performance characteristics of gas shock absorbers, the cellar hatch under the laminate does not create difficulties during operation, but it will require a hex key or a special magnet. In this design, the entrance to the basement will no longer remain secret, it will be visible.
Types of hatches for laminate floors
There are many models on the market, differing in both sizes and types. All available hatches can be divided into 3 groups according to the method of opening the door:
- Swing design. The principle of making a basement hatch for a laminate floor is similar to the process of creating an entrance door. On one side there are 2-4 loops, and on the other there is a lock (latch).
- Removable model. This version of the hatch is inexpensive and easy to install. The door is made as an independent element and installed on an equipped shaft.
- Sliding hatch. The sliding variety is used for arranging street cellars. The entrance to the basement is opened by moving along the guides.
Advice! If the hatch in the floor is finished with laminate, it is recommended to use infillable structures made of aluminum or steel.
The model is presented in the form of a shallow rectangular container, which, after being determined, is poured into place with a concrete mass, and after drying, it is lined with laminate.
How to make a hatch in a laminate with your own hands
In order to properly arrange the entrance and install laminate flooring on the hatch in the floor, you need to think through all the details in advance. This is especially important when carrying out installation work yourself. First of all, you need to make a drawing and decide:
- With hatch location. When opening the door, the entrance to the basement should not touch interior items or things on the floor.
- Dimensions of the future structure. The minimum internal opening is 75x75 cm.
- Material. The selected option should have high strength characteristics and be relatively light in weight.
- A way to ensure tightness and thermal insulation qualities.
Advice! When installing a hatch in the floor, it is most convenient to use a smooth opening/closing system and a locking mechanism; this is especially necessary if there are children and pets in the house. It is good to use an electric drive to restrict access to the basement.
To make a metal floor hatch, you will need the following materials and tools:
- steel sheets (thickness 3-4, 0.5-1 mm);
- corner (40-50 mm);
- door hinges;
- foam sheet;
- rubber compressor;
- Bulgarian;
- cutting wheels;
- welding machine;
- electrodes;
- fasteners;
- drill with a set of drills.
Instructions for making a metal hatch:
- Take measurements of the width of the opening, the place where the hatch will be installed, and also determine the thickness of the floor slab. To avoid the appearance of problem areas and defects in the future, measurements must be taken with maximum accuracy.
- Create a drawing that takes into account the dimensions of the opening, the parameters of consumables and flooring. You should not make a container (trough) that is too deep for the laminate; it is enough to make it the total thickness of the screed, base and lamellas.
- Using a welding machine, you need to make a frame (frame) for installation in the opening and install gas shock absorbers.
- Check the quality and strength characteristics of the structure. If gaps appear in those places where they should be excluded, after a while they will stand out against the general background and spoil the appearance of the entire floor. Clean the metal frame from rust, debris, burrs, prime and paint. After the paint has dried, the hatch is completely ready for installation in the opening.
When making a metal hatch with your own hands, you should consider the following points:
- the parameters of the steel sheet should be slightly larger than the dimensions of the entrance opening;
- When arranging a hatch, you need to place the corners at a distance of 8 mm (on average) from the edge of the sheet;
- installation of stiffeners should be done only in the center of the frame;
- Welding of structural components must be done without gaps.
For ease of use of a lightweight hatch, door hinges are often used, but if the structure consists of metal, then you simply cannot do without a reliable option. For heavy structures, conventional hinges are not suitable; they may not withstand such a serious load. It is best if the lid is equipped with a smooth move. There are several effective ways:
- Spring hinges from a car hood. They are installed on a light metal lid or wooden door.
- Gas shock absorbers. This is an excellent option for doors made of heavy material.
Advantages and disadvantages
Adaptive steering of a walk-behind tractor is convenient because:
- eliminates the need to walk behind motor vehicles;
- the traction potential of the walk-behind tractor is fully realized;
- the functionality of agricultural equipment increases;
- transportation of the unit to a specific processing area is simplified;
- easier control - no longer requires a lot of operator effort;
- the structure can be disassembled if necessary;
- sufficient balance is achieved on all axes.
The disadvantages include an increase in fuel consumption, which after modification takes one and a half times more. However, these losses are justified by the ease of management and saving a colossal amount of time that the gardener spends when working with the land.
Working on a walk-behind tractor with steering control
Let's say a few words about the control features of a walk-behind tractor with a steering wheel, and why it is recommended to use this option during assembly. It’s not for nothing that this type of conventional and home-made machines is so popular, because it has a lot of advantages:
- the operator will not have to waste his energy walking behind the mini tractor;
- the traction potential of the equipment is realized one hundred percent;
- such a mini tractor is more maneuverable and functional;
- Now, in order to cultivate a plot far from home, you will not have to additionally transport a walk-behind tractor - you can simply drive it, like a regular car or tractor;
- control is more lightweight and convenient than other types;
- Now you don’t need to hold the entire mass of this heavy and bulky device in your hands,
- it becomes possible to quickly assemble and disassemble the unit;
- control parts are not significantly modified during rework;
- good balance in weight along the axes.
We will not mention here the noise of operation and other characteristic features of, in principle, all tractors . Let's just talk about one characteristic drawback - not very reliable stability, which is associated with a movable coupling. However, the advantages are, of course, more impressive.
Varieties
Adapters with steering can be classified according to the type of wheel arrangement. The steering gear is performed in the format of a separate unit. The steering wheels can be located at the front or rear.
As for the position of the steering gear, this depends on the design features and spare parts, because during operation it is impossible to avoid repairs and replacement of worn parts.
Models in which the adapter is located at the front are called front-steering varieties. In such modifications, the engine is a kind of tractor for the entire unit.
If the adapter is located at the rear, and the walk-behind tractor has to pull it behind it, such a device is called rear-wheel drive. In other words, if the adapter is located in front of the walk-behind tractor, it is a front-type product, and if at the back, it is a rear-type product.
The choice of one or another option is made by the buyer himself, based on his own preferences.
For example, the front version is more suitable for loosening and plowing the cultivated soil. Here, in addition to the power of motor vehicles, there is no need for an overview of the site. If you need to hill up the crop being grown, then the rear analogue is better suited for such purposes.
However, you can take a closer look at the option where the adapter is located closer to the drive axis. In this case, the operator’s weight will create additional load, preventing the walk-behind tractor from jumping out of the ground while the equipment is operating.
Based on the variety, adapters can be classified into body and bodyless. The former involve the transportation of goods, the latter are more suitable for cultivating the soil. Depending on the power of the unit, the adapters are connected to the walk-behind tractor using a long or short drawbar. The first modifications are used on heavy equipment, the second are used on light equipment.
Manufacturing process
Such a canopy of any kind is not just a seat, but a whole device consisting of several parts. Depending on the type of adapter, these parts are attached to each other in different numbers and in different orders. Thus, the rear and front units are manufactured almost identically, but differ in the method of final fastening and the method of coupling itself.
With steering
This homemade adapter is made even faster than its previous version. But it is worth knowing that this option involves the use of a larger number of different corners and pipes. And one more thing - such attachments are made on the basis of a frame with a ready-made fork and bushing. It is its presence that will allow the walk-behind tractor to rotate freely in the future from steering input. The sequence of actions will be as follows.
- The frame is made of steel of the selected length and thickness. Using a grinder, blanks of the required size are cut out of the sheet, and then fastened together with bolts or self-tapping screws.
- The creation of the chassis should be based on where the motor of the unit itself is located. If he is in front, then the main criterion is the size of the main wheels. That is, the track size should be based on it. The wheels are attached only to the rear. Weld them to the axle. If the engine is at the rear, then the distance between the wheels should be wider. Here the standard ones are removed from the walk-behind tractor, and the same ones as on the adapter are installed in their place.
- The axle itself is made from a pipe, and bearings with bushings are pressed onto its ends.
- The steering wheel is either like a car or like a motorcycle. There is no fundamental difference. Experienced craftsmen recommend removing the finished steering wheel from the vehicle and attaching it to the adapter base. Making a steering wheel yourself is quite difficult, especially for a beginner. It is worth noting that a motorcycle steering wheel creates great inconvenience when reversing the walk-behind tractor. And this factor must be taken into account.
- If an all-metal frame is used, the steering control will be connected to the front of the unit itself. If you make a special additional support - articulated, then the control will rotate the additional frame completely. In this case, two gears are used: one is installed on the steering column, and the second on the upper half-frame.
- The next step is installing the seat. As in the case of manufacturing the previous type of adapter, it can be either ready-made or made by hand. It must be secured with a welding machine to the rear frame of this attachment.
- If in the future the modernized walk-behind tractor is planned to be used to install replaceable attachments, it is necessary to attach another bracket with a welding machine. An additional hydraulic system should also be created. The easiest way is to remove it from any type of small agricultural equipment and weld it onto your own walk-behind tractor.
- A towbar must be welded to the rear of the main frame. It is necessary in cases where you plan to use the walk-behind tractor to transport some small cargo. If you do not plan to use a trailer or semi-trailer, then this step can be skipped.
- The final stage is the coupling. To do this, small holes are drilled in the steering column into which screws and brackets are inserted. It is with their help that the hitch itself is attached under the steering column.
Perhaps a step-by-step description of making such a device with your own hands may seem complicated. However, with detailed diagrams and drawings, this problem completely disappears. In order for the created adapter to be functional and durable in use, it is necessary to correctly weld all the main elements and pay special attention to the normal operation of the brakes.
How to install?
Let's look at the principle of installing an adapter with a steering wheel using the example of a model for a KTZ walk-behind tractor with a steering column. Connecting the adapter to the walk-behind tractor begins with installing the trailer on the pin of the walk-behind tractor, which is located in its front part. The knot is secured with a cotter pin.
After this, you need to move the gas to its place under the seat, carrying it with the original cable. To do this, use a 10mm wrench and a screwdriver, remove the throttle control lever, remove the top plug under the seat, and lay the cable. If necessary, change the bolt, since depending on the adapter model, it may be larger than necessary.
Next, tighten the bolts with a 10mm wrench. When moving the gas, make sure that the cable does not interfere anywhere. Remove the steering wheel from the walk-behind tractor and unhook the clutch and gearbox release cables.
Next, remove the steering wheel using a stand for ease of use. Having removed the steering wheel, remove the support and begin installing the pedals. At this stage of work, use a cable with an adapter plate, which is included with the adapter.
The plate is installed on the wing of the walk-behind tractor and secured with a bolt and nut. The lever screwed to the cable is placed in place of the roller bracket. After this, install the second cable, secure it and attach it to the installed bracket, fix it until the moment allows the cable to move.
Now you need to set the forward gear to the right pedal. There is no need to remove it for this. At the same time, adjust the components, checking the forward tension . After this, reverse is installed.
Instructions for making the adapter
Now we’ll tell you how to make a front adapter with steering for your small tractor yourself.
To produce an adapter for a walk-behind walk-behind tractor, you will need the following materials:
- Two identical wheels on an axle. The radius of the wheels ranges from 15 to 18 inches. Even wheels from an old Soviet Volga might work.
- Bearings for steering wheels and columns.
- Steel for the frame (channel, pipe or angle).
- Fastening elements (washers, bolts, nuts).
- Lubricants (litol or grease).
- Consumables (drills, electrodes, discs for grinders).
- Set of wrenches.
- Bulgarian.
- Welding machine.
- Drill.
Before starting work, it is important to consider that the wheels should not have a very large or small radius.
Algorithm of actions
We begin to manufacture attachments for the walk-behind tractor.
First of all, you will need drawings, in accordance with which all parts will be fastened and manufactured.
a drawing of the adapter circuit for a walk-behind tractor from MTZ yourself, especially if you have the proper skills.
If you are afraid of making an error in your calculations, you can refer to materials on the Internet on specialized sites or forums. Based on them, according to reviews and practice, it is quite possible to independently make the most simple adapter for a walk-behind tractor. Important! Before you start working on the drawings, be sure to check the compliance of the dimensions and numbers.
To make a steering adapter for a walk-behind tractor, you will need a frame with a bushing and a fork. This will ensure free rotation of the walk-behind tractor using the steering wheel .
- Everything will start with making the frame. It can be done from cut pieces of selected steel of the required length. The metal can be separated with a grinder and the elements can be fastened with electric welding or bolts.
- Next we build the chassis. If the motor of your walk-behind tractor is located in front, therefore, the track size must be determined by the main wheels. The rear ones are mounted to the frame using an axle. It can be created from a piece of pipe of suitable width. At the ends of this pipe we press bearings with bushings. The wheels will be installed on them. If the walk-behind tractor engine is located at the rear, then the track width must be larger, otherwise the minitractor will not be able to move normally during operation. In such a situation, it would be best to remove the base wheels of the walk-behind tractor and reinstall it, but on a more spacious axle.
- To make a steering wheel for the unit, you do not need to additionally remove the handles from the car or motorcycle. Stop using the handle. In other words, the operator will have the opportunity to control the minitractor with a steering wheel that looks like a motorcycle. However, with it the operator will not be able to reverse normally. That is why it would be preferable to mount the steering column on a mini tractor.
- When using an all-metal frame, the steering will be integrated with the front axle of the walk-behind tractor. You can make an articulated support, then the control column will rotate the entire front half-frame. To do this, the technician will need to attach a gear to the front half frame. The second gear is installed on the steering column.
- The seat, which can be previously removed from a passenger car, must be welded to the frame of the slide. The technician needs to make sure that it is adjusted, especially when controlling the front adapter attached to the walk-behind tractor.
- If you intend to use the minitractor to work with plows and cultivators, then you will need additional welding of the bracket. An auxiliary hydraulic system must be installed to operate the attachment. The pump for it can be easily removed from agricultural machinery. If you have to work with semi-trailers, then you need to take care of additional welding of the towbar to the rear of the frame. It can also be successfully borrowed from a passenger car.
- You can do the fastening (coupling) yourself. To do this, you will need drawings, which are easily found in articles based on the top results of the desired topic. And we will talk about how exactly to carry out the coupling.
Homemade adapter
An adapter for Neva walk-behind tractors can be purchased at an agricultural equipment store from. It is available on the market as the Neva APM 350 cultivator adapter for walk-behind tractors.
It is important to pay attention to the fact that it is also compatible with other agricultural equipment from this manufacturer. For example, the adapter can be used as a rotary adapter for a Neva motor-cultivator mower.
However, a homemade adapter helps save money. Moreover, it is much more pleasant to use and can be repaired at home at any time of the day.
There are several types of adapters to the Neva
Homemade adapters for Neva walk-behind tractors come in two types:
- Heavy, which, in turn, are divided into long and short.
- Lightweight (installed on cutters).
There are also front and rear devices, depending on the drive.
More detailed information regarding the drives is provided below.
Front
In the case of a front adapter for a walk-behind tractor with or without steering, the unit is placed behind the walk-behind tractor and is controlled in the same way as a motorcycle. This model is the most popular due to its ease of use.
This design is easy to use and easy to transport.
Rear
If you decide on an adapter for a rear-wheel drive Neva walk-behind tractor, you need to make it in front of the entire device.
This arrangement is very convenient for performing various types of work in the garden, when you cannot do without attachments from the back or front.
Full
This device also comes with all-wheel drive.
In this case, the unit can be located in front or behind. However, a significant difference in characteristics from the above-mentioned varieties is that four wheels are simultaneously involved in the work. This design is more reminiscent of a miniature tractor.
Important! This adapter drive is the most powerful, although not popular.
The most powerful adapter - complete
DIY lifting mechanism for walk-behind tractor adapter - Special equipment
- 1 Adapter for walk-behind tractor: device and characteristics, how to make it yourself
- 2 How to make an adapter for a walk-behind tractor with your own hands, drawings, videos, photos
- 3 Do-it-yourself homemade adapter for a walk-behind tractor: video, drawings, photos
- 4 Adapters for walk-behind tractors
- 5 Adapter for walk-behind tractor - types, sizes and designs
- 6 Adapter for walk-behind tractor - design, do-it-yourself, elements
Cultivation of agricultural areas involves quite labor-intensive work. Owners of private farms and gardens, as a rule, resort to manual labor or means of small accessible mechanization to make this process simpler and faster. Such a technical device as the front adapter for the Neva walk-behind tractor makes it possible to significantly facilitate absolutely any agricultural work, and this sets it apart from other similar devices.
The walk-behind tractor can be used separately, as well as connected to a wide variety of additional equipment, such as:
- cultivator;
- harrow;
- mower.
Such devices can significantly increase the possible range of work that a walk-behind tractor can handle. In addition to this, you can use a mini-tractor as a means of transportation if you prepare a special block adapter for it in advance.
This device makes it possible to sit quite comfortably on the seat with which it is equipped, and then perform exactly the same work, but with an incomparably greater degree of comfort.
For example, in specialized stores you can purchase an additional unit with steering control for the Neva walk-behind tractor, or you can make it yourself.
Fortunately, there are plenty of drawing materials on the Internet, which greatly simplifies the assembly process.
Motoblock device
In terms of its design, the 4x4 adapter, which is designed for the Neva walk-behind tractor, is a rather simple device. It includes several fundamental parts:
- frame structure on which other components can be installed;
- driver's seat;
- wheelbase, including wheel axle;
- the mechanism for connecting the walk-behind tractor, including.
In other words, the adapter is an ordinary cart with a seat that is connected to a walk-behind tractor.
Motoblocks come in different brands and designs. Russian users know, for example: Cayman, Foreman, Viking, Crosser, Texas, Patriot and others.
After coupling the walk-behind tractor and the adapter, the resulting device can be compared in functionality to a mini-tractor, however, such a comparison is somewhat arbitrary, since the power will remain the same, because there is still only one engine, and it comes from the walk-behind tractor.
Moreover, you can attach auxiliary attachments to the adapter, which will further expand the potential range of work. Some types of adapters are equipped with special sections where you can place some loads. There are also models that are equipped with a lifting lever, which greatly simplifies the work with the additional device.
Adapter for motor blocks
Most often, the adapter has two hitches - one is used to attach additional attachments, and the second makes it possible to attach it to the walk-behind tractor. For example, you can connect the following additional elements to the adapter:
- seeder;
- plow;
- hillers;
- harrow and other equipment.
The wheelset and axle in the adapter are quite durable structures that allow the walk-behind tractor to be used even on the most difficult areas of the earth, as well as for transporting quite heavy loads.
It is important to understand that transporting goods on public roads using such a unit is prohibited, for this reason they are used only in rural areas.
However, despite a certain structural similarity between all adapters, they are also endowed with some significant differences.
For example, rear steering adapters, all-wheel drive adapters and front units are available for sale.
Steering devices
Such devices make it possible to rebuild the walk-behind tractor into a full-fledged mini-tractor; the only difference, as already mentioned, is the preservation of the power of the engine used in the unit. It is attached to the walk-behind tractor using a hitch, which is placed in front of the adapter. This block is perfect for motor engines such as Sadko, Don, Plowman, Forza, Huter, Champion, Profi.
In particular, such an adapter includes: steering; pair of wheels; clutch; brake and gas pedal; driver's seat; frame structure.
Behind such an adapter there is a special lifting mechanism, to which it is possible to connect additional trailed and mounted equipment.
As for the steering adapter specifically for the Neva walk-behind tractor, the cost of which, as a rule, is approximately 45 thousand rubles, it has the following technical characteristics:
- wheel track - 60 cm;
- total weight - 105 kg;
- ground clearance - 35 cm;
- speed indicators are about 15 km/h.
Front adapter
Structurally, it is similar to the previous type of adapter, but its coupling mechanism is located at the rear. This means that we get a full-fledged front adapter for the Neva brand walk-behind tractor. The presented design is completely disassembled, which greatly simplifies its subsequent transportation. Naturally, the cost of any additions to the unit is determined separately.
Front adapter specifications:
- length - 190 cm;
- width - 81 cm;
- height - 140 cm;
- ground clearance - 30 cm;
- wheel track - 75 cm;
- speed indicators - approx. 10 km/h;
- total weight - 65 kg.
The cost of such a device is approximately 27 thousand rubles.
How to make it yourself
Of course, purchasing a ready-to-use adapter for a walk-behind tractor is the best and easiest way out of the situation. With all that, they really cost quite a lot, so not every farmer or just a summer resident is ready to afford to purchase them. It’s no wonder why many people wonder how to make an adapter with their own hands.
This is, of course, possible, and you can find quite a lot of recommendations on the Internet that relate to making adapters yourself. Moreover, there are many drawings that make it possible to examine this device more clearly and in detail.
Using them, it is quite possible to create such a unit at home, using a minimum of tools and materials. To produce a homemade adapter you will need:
- welding machine;
- pair of wheels;
- steel angles and sheets;
- driver's seat;
- fastening connections; iron pipes.
Before work on the manufacture of the device begins, it is necessary to at least generally consider the finished circuit. It must take into account and indicate the load levels for various parts of the frame and the overall dimensions of the device. Now you can proceed directly to the production of the structure.
All work will consist of several steps:
- We take a square metal profile, approximately 1800 mm long. We weld the same piece of iron across it, only smaller in size - approximately 600 mm. Wheel stands will later be attached to this profile sheet, the height of which should be about 300 mm.
- After this you need to attach the braces. They are attached to the central frame and to the wheels. The angle of the wheel hubs relative to the frame is allowed to be whatever you want. A beam is additionally welded to the metal profile. This is necessary to strengthen the frame.
- The frame for additional equipment is welded from channel No. 10.
- It is combined with the wheel axle using a piece of square pipe, and the seams are welded with a welding machine.
- Now we weld a control lever with three bends (200, 350, 550 and millimeters) to the frame.
- We attach another one to the lever (size 800 mm), it will regulate the force.
- The levers are connected to each other with ordinary bolts.
The first stage has been completed. Let's move on to the next one.
Working with the adapter design
Now it starts working with the adapter . To do this, perform the following steps:
- A piece of 300 mm pipe needs to be welded to the central frame - this will be a stand under the driver's seat.
- On top, perpendicular to this stand, we weld 2 pieces of pipe in the same way. This is required so that the seat does not come off during operation and is more stable during shaking during operation. The seat can be ready-made, or you can make it yourself from a piece of plywood and foam rubber, this is at the discretion of the master.
- We attach the seat to transverse pieces of pipe, which we weld to the stand itself, as well as to the stand under the seat. We use ordinary bolts as fastening elements.
- We weld the coupling mechanism to the walk-behind tractor at the front, after which the work can be considered complete.
As you can see, this matter is quite simple. The main difficulty lies only in the need to have at least basic skills in working with a welding machine, since there is simply no other method of connecting each component.
Recommendations for use
Regardless of the type of assembled and connected product, you need to start working with it by taking into account safety regulations. Before starting the engine, you need to conduct a visual inspection of the equipment to eliminate visible damage and malfunctions. Do not add fuel to the fuel tank while the engine is running.
If you hear an unusual noise when you turn it on, you need to stop the engine and identify the cause of the problem.
Do not use gasoline of inappropriate brands or fuel mixed with oil and other impurities. Before each start, you need to check the oil level, since this is often the reason the engine stops.
In order to extend the service life of motorcycles, a new product must be run-in. It will contribute to the trouble-free functioning of the walk-behind tractor.
During this process, the working surfaces of the parts are usually worked out. The duration of running-in, as a rule, varies for products of different brands and modifications. In some varieties it can be up to 20 hours or more. At this time, you should not load the equipment to the maximum extent.
One recommendation is to change the oil after the first five hours of operation. As for warming up the engine, this should be done at medium speeds without load for about three minutes.
Based on the modification of the walk-behind tractor, for the first hours of its operation it is necessary to operate the unit in first gear (with the gas lever in the middle position). It is important to try to avoid not only maximum, but also minimum speed . At the end of using the equipment, you need to check the tightness of the threaded connections.
As for the cultivated soil, it is better to cultivate simple soil in the first hours. In addition, you need to take into account that rolling in is not done on rocky and clay soil.
Before work, you need to inspect the area and remove stones and large debris. In general, when working with motorized equipment, you need to constantly monitor its cleanliness and check the fastening strength of the accessible elements of the adapter and walk-behind tractor, including attachments.
Don't forget to tighten any loose fasteners. You also need to remember about timely maintenance.
Commissioning
Before immediately performing any agricultural work using a self-improved walk-behind tractor, it is necessary to perform several final checks:
- make sure the seat is securely installed;
- check the quality of all welds and reliable fastening of bolts and screws;
- start the walk-behind tractor and make sure that the engine is running normally and smoothly;
- install, if necessary, mounted gardening tools and try them in action;
- Be sure to check the operation of the brakes and make sure they are in good condition.
If, after performing all these simple works, no problems were found in the operation of the walk-behind tractor, it is necessary to bring it into proper appearance. To do this, a self-created adapter is primed and painted in any color desired. This stage not only gives the walk-behind tractor a beautiful appearance, but also protects the metal from corrosion.
To learn how to make an adapter for a walk-behind tractor with your own hands, see the following video.