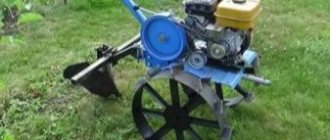
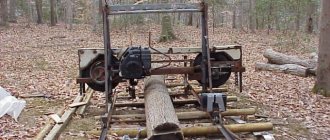
Description of a walk-behind tractor with a chainsaw engine
So, we have a chainsaw that is not used very often or is completely lying around. In this case, having made some calculations and prepared the necessary materials, our saw turns into an excellent walk-behind tractor. The principle of assembling homemade agricultural machinery, depending on the brand of the manufacturer, may vary, but the general principles are as follows:
- The most important step is the preparation of a drawing, guided by which you will assemble the required structure. You can create drawings and diagrams of a walk-behind tractor using a chainsaw yourself, or by downloading ready-made calculations from the Internet. Finding them will not be difficult, just enter a query into a search engine and select the assembly option you like.
- The drawings have been found, which means it’s time to assemble the frame for our motor cultivator.
- Once the frame is ready, the saw motor and its gas tank are attached to it.
- Lastly, additional system elements are installed that are responsible for controllability and other functionality.
In this video we’ll look at the friendship chainsaw motor cultivator:
To implement the idea, prepare the following materials:
- Motor from any existing chainsaw. The Druzhba and Ural saws are best suited for this.
- A handlebar removed from a moped or motorcycle.
- Welding machine.
- Pipes and sheets of metal, in the quantity necessary to assemble the walk-behind tractor frame.
- Wheels from non-working equipment.
- Transmission.
Having prepared all the structural elements and assembled them in accordance with the drawing, you will receive a device with the following characteristics:
- Powerful. Some homemade designs have a power of 9 horsepower.
- Lung.
- Small-sized.
- The motors used in chainsaws have a large margin of safety, which allows you to work on a homemade installation for a long time.
- Economical.
As an example for assembly, we will consider 2 engine options taken from Druzhba and Ural chainsaws. They are considered the most suitable for our venture, and here's why.
Friendship
Chainsaw Friendship has the following characteristics:
- Motor with a power of 3.5 horsepower.
- Weight – 7 kilograms.
- The volume of the gas tank is 0.55 liters.
- The volume of the oil tank is 0.26 liters.
For assembly, it is recommended to use the 4th generation Friendship model.
Ural
Products manufactured under the Ural brand have different characteristics from Druzhba. The differences are in the following details:
- The power of the Urals is higher than that of Friendship, and is 5 horsepower.
- The engine produces a lot of soot during operation.
- The gearbox installed on the saw tends to jam from time to time.
- Small specks, getting into the Ural saw engine, burn out without causing any special damage to it.
As you can see, each model has its pros and cons. It’s up to you to make a walk-behind tractor from a Ural chainsaw motor or construct a homemade walk-behind tractor from parts of a Friendship chainsaw.
Communities › This is interesting to know. › Blog › Friday chainsaw crafts!
Light weight and solid power combined with compact dimensions allow this “lumberjack’s dream” to be combined with an ice auger and a bicycle, a sawmill and a winch.
Anyone who can confidently work with a welding machine, an angle grinder, and, if necessary, can even use a lathe, can make interesting homemade products from a chainsaw with their own hands.
In this case, knowledge of the basics of design and drawing will be very useful, since the accuracy of all dimensions and quality of assembly are the main conditions for the normal functioning of a unit driven by a chainsaw.
Without going into technical details, we will consider the most interesting designs using it.
Options for homemade chainsaws
The first thing that comes to mind when you think about what can be done with a chainsaw is its use as a sawmill. Many developers had to split logs onto beams with this tool.
In this case, the log lies motionless and is neatly sawn along its entire length without wobbling or oblique seams. If you equip such a mobile carriage with four lifting screws, you can accurately set the thickness of the sawn timber.
A lightweight homemade snowmobile made from a chainsaw is more complex in design than a sawmill, since here you need to move the gas and clutch to the steering wheel, and also take care of the shock-absorbing suspension of the supporting frame.
To increase traction, a “traction” gear is placed on the caterpillar drive shaft, the diameter of which is larger than the size of the chainsaw drive sprocket.
There are usually no problems with the steering mechanism, since it is taken from a regular bicycle or scooter and modified so that the central axis moves the rods that turn the skis. The snowmobile engine power must be at least 5 horsepower, so it is better to use a Ural chainsaw for this purpose.
The winter line of homemade vehicles will be complemented by snowmobiles
from chainsaws, which are structurally simpler than a snowmobile. The driving force is provided by a large diameter screw, which directly rotates the gasoline engine.
Those home inventors who would like to make a backpack-type helicopter from a chainsaw should know the same thing. Such a machine will require not one, but at least two engines operating in a coordinated mode.
This vehicle is most often made for the sake of principle rather than practical use. The main driving force of its creator is the desire to test his strength as a mechanic and prove to others the original use of this cutting tool.
The basis for the design is usually my grandfather’s old Druzhba chainsaw and an equally ancient bicycle, with which you can carry out any experiments on converting the frame for mounting the drive.
Power is transmitted here through a gear pair using a bicycle chain, and the start of such a homemade product is reminiscent of preparing for cutting firewood.
Less common are more advanced models, the basis for which is a mountain bike equipped with reliable brakes and shock absorbers. This chainsaw moped is equipped with a gearbox with a gear ratio of 18:1 and a CVT transmission, which allows you to comfortably move on it at the speed of a regular bicycle.
This option for using a chainsaw is quite simple, since the task here is to transfer torque from the saw motor to the propeller. A homemade outboard motor does not need to install a transmission. For it you will need to make a reliable adapter on a lathe from the saw drive gear to the propeller shaft. The propeller can be used from a standard outboard motor.
Motor pump
A homemade motor pump is very close in design to a power plant, the only difference being that instead of a generator, a centrifugal liquid pump is installed
It is important to arrange the design in such a way that when connecting the hoses to the pump, the motor and gearbox do not flood
Homemade products made from the Ural chainsaw indicate its great capabilities. Originally created as a tool for sawing wood, it, in combination with additional attachments produced by the industry, has become multifunctional. However, craftsmen never cease to amaze with their ingenuity, creating new original devices.
Today, industry produces convenient, functional and advanced devices for working with wood. For this reason, still functional Soviet saws became undeservedly forgotten. But as it turned out, new saws cannot be used again, and old ones, on the contrary, open up the possibility of widespread use for other purposes. Most often, Druzhba or Ural brand chainsaws, which were once used to prepare firewood, can be seen in villages. Now savvy minds have adapted the old units for other purposes.
The Ural chainsaw was created on the basis of the Druzhba saw, which for a long time helped lumberjacks cut down trees, and surpassed it in quality and performance. Its main components are a drive with a two-pin or four-pin motor, a cutting bar and a handle. The universal drive allows you to use the saw in various ways. An important fact for variation is its design features:
- engine of sufficient power;
- light weight and compactness;
- ability to withstand extreme conditions;
- autonomy.
The clutch eliminates overload and damage to the working parts due to its leak-tight design.
Thanks to these qualities, the chainsaw has found application in the widest spheres of the national economy. Homemade products from a Ural chainsaw can be made both simple and complex. Simple ones include:
- mowers;
- cultivators;
- walk-behind tractors;
- boat engines;
- pumps;
- winches;
- ice axes;
- Bulgarians.
Complex inventions include the following homemade products:
- snowmobiles;
- snow blowers;
- sawmills;
- snowmobile;
- power plants;
- helicopters.
Homemade chainsaw gadgets
Many products are made from chainsaws, and are used in numerous homemade products.
Many have heard about the story of how one prisoner made a helicopter out of a chainsaw and escaped from the zone by flying over the fence. Why a bike? Yes, because the power of a chainsaw is not enough to lift a person into the air.
Here are the most interesting of them that I found by searching the Internet.
Motoblock.
Such a walk-behind tractor made from a chainsaw is very practical, because you can not only plow the land, but also, after disassembling it a little, cut firewood or something else. After all, the unit itself is quite easily disconnected and the chainsaw is ready for direct work.
Motokosa.
It is also a practical device and very useful. The main thing in it
the fact that its production does not require alteration of the chainsaw, but is an attachment. You can always detach the saw and cut as needed.
Motor winch.
It is also a very practical device and there are many applications for it, from agriculture to construction sites for lifting loads.
Boat motor.
This is a more major modification, but the chainsaw can also be used for its intended purpose, and although the power is rather weak, it is quite suitable for a rubber boat.
Generator.
The generator turned out to be compact; for a small house or in places where there is no electricity, it is quite useful and it is easy to transport; it does not take up much space.
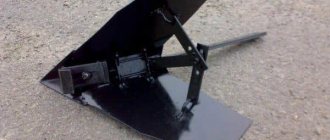
Blade for walk-behind tractor
The blade is a necessary device, which is needed at any time of the year. The front blade is used to clear snow, plan terrain, dig holes and move bulk materials. Such equipment for the Neva walk-behind tractor is of good quality, but not everyone can afford it. Do-it-yourself dumps require minimal financial investment. By installing the front blade on the Neva walk-behind tractor, you can solve many household problems. If there are levers and hydraulics, a homemade shovel can also be used as a loader.
To make a blade you will need the following tools:
- roulette;
- welding machine;
- electric drill;
- Bulgarian;
- spanners;
- acrylic paint;
- barrel 200 l;
- reinforced rubber;
- sheet steel 5 mm;
- profile pipe 40x20 mm;
- paint and brush;
- bolts and ties.
Before making a blade, it is necessary to calculate the compliance of the power of the walk-behind tractor with the dimensions of the bucket. Excessive load leads to rapid wear of parts and mechanisms of the unit. Depending on the weight and power of the machine, shovels are made 60-100 cm wide and 20-30 cm high.
Do-it-yourself snow removal for a walk-behind tractor is made in the following sequence:
- Applying markings to the barrel, sawing it into 3 equal parts vertically. Cutting 1 piece into strips 5 cm wide.
- Fastening 2 workpieces using bitumen and rivets. Aligning the edges of the product. Reinforcement of the bucket with transverse racks.
- Fastening strips of tin along the edges of the shovel. This is done by welding or bolts.
- Drilling holes for bolts. Attaching a strip of rubber to the bottom of the bucket.
- Making a hitch for a shovel. It is made by welding a piece of pipe and a semicircle of sheet metal to the blade. Holes are made on the sector to adjust the angle of attack. A homemade snow removal device is attached to the bracket of the walk-behind tractor with an adapter made of a profile pipe.
The finished product needs to be cleaned and painted. All bolted connections must be lubricated regularly to prevent corrosion.
What are they, how do they differ?
The walk-behind tractor is a universal device to which you can attach different attachments for work. Attachments are attached to the main part of the walk-behind tractor - depending on its type, the purpose of the walk-behind tractor is determined. Removable attachments are often supplied complete with the main unit and motor, so the owner can independently choose what to do.
The walk-behind tractor has a pulley and a shaft, this allows it to take power and regulate it. The device is heavy because it has a reinforced gearbox, frame and control handles built into it. Transportation occurs via pneumatic wheels.
A motor drill is used for drilling holes in the ground or holes. It can be controlled by one or more people. The design is also heavy, the screws are replaceable, so you can choose the hole diameter yourself. The motor drill can drill holes up to 20 cm in diameter and up to 1.5 meters in depth. Such a tool will be auxiliary when making a trench manually on the site.
The main difference between the two devices is their design and purpose. If a walk-behind tractor is a basic piece of equipment on which various attachments are attached, then a walk-behind drill is a ready-to-use device for creating wells and holes. Both devices can be used to dig a trench.
When and why is digging using mechanisms used?
Digging trenches often requires a bulldozer or manual labor.
In what cases is this technology suitable:
- small amount of work;
- a narrow and deep trench is required;
- the trench is long;
- I want to save energy and time;
- The soil for digging is dense and it is impossible to work with a shovel;
- the walls of the trench must be perfectly vertical.
A motor drill is perfect for the initial stage of work. It will help you dig deep holes, after which you can complete the process using a walk-behind tractor. With the help of a walk-behind tractor and attachments for it, it is easier to dig a trench: if you purchase an attachment - a trencher, then you can cope with difficult soil in a few hours.
Both methods are best used when it is not possible to call specialized equipment. At the same time, digging with a shovel is also not suitable due to the volume of work.
To dig a narrow trench, it is ideal to use a power auger. He makes deep holes, vertically removing the main layer of soil. If you attach a special bar mechanism to the walk-behind tractor, the work will speed up several times.
Description of trencher brand TKMG-1200
This manual small-sized trencher is a device that does not require registration with the State Technical Supervision Authority. In the manufacture of this model of equipment, foreign components are used, including a Japanese gasoline engine. The drive of the working body is hydraulic.
Among the main advantages of this model are:
- durability;
- operational reliability;
- stepless speed control.
You can adjust the rotation of the cutting chain yourself. It should also be mentioned that this equipment has higher power due to the hydraulic drive. The gasoline engine works exclusively to rotate the hydraulic pump.
The manual trencher TKMG-1200 has an acceptable cost. It is quite often compared with analogues produced in England, the USA and Germany. However, foreign analogues, although equipped with a hydraulic drive, are much more expensive. The advantages of this installation are not only the cost, but also the presence of additional options in the form of the ability to install winter chains. They provide anti-slip properties. The installation can be supplemented with a trailer for transportation to the work site.
Types of trenchers
To dig a trench with a walk-behind tractor, you should use an attachment such as a trencher. It is attached to the unit and helps to carry out the required excavation work. These devices are divided into several types, they differ in the method of attachment to the unit and functionality.
Chain mounted trencher
This trenching attachment looks like a giant chainsaw and is designed for digging foundations and large trenches and is ideal for work in rural areas. The equipment is intended for retrofitting mini tractors and is suitable for walk-behind tractors Neva, Oka, Agat and others. It is attached using special couplings and can have different sizes and power.
- can have different sizes of booms (earthing devices), due to which trenches of the required volume are dug;
- equipped with a variety of cutting chain elements for efficient excavation work;
- compact structures can be used near foundations;
- the ability to adjust the depth of digging trenches;
- possibility of automatic adjustment of chain tension.
Trencher with gear wheel
The equipment works on hard and soft soil, it is also suitable for processing heterogeneous (crushed stone) or homogeneous areas. The advantages of the trencher are its affordable cost and ease of operation.
Micro trencher
This variety is intended for work on sidewalks, narrow streets, and pedestrian paths. The equipment is equipped with a small cutting disc and has compact dimensions.
Portable trencher
Maneuverable and easy-to-use equipment is used to implement the most daring ideas for landscape design and professional installation of communications.
The technique can not only dig trenches, but is also useful for:
- tree planting;
- cutting out soil blocks;
- loosening the soil;
- removing the road surface.
When choosing a ditch digger for a walk-behind tractor, you need to take into account its operating power, size and how deep it can dig holes. Mounted trenchers depend on the productive capacity of the walk-behind tractors to which they are attached. Therefore, you should also take into account which unit is used in the work.
Pros and cons of homemade design
Having analyzed the results of this homemade product, based on reviews from owners and videos of operation, the conclusion suggests itself that the design is effective. With a competent approach to business, a walk-behind tractor with an engine from Druzhba is not much inferior in its characteristics to its factory counterparts.
The main advantage of homemade products, of course, is saving money. You can find the necessary parts and materials by simply rummaging around in your garage or shed, or you can purchase them for a small amount of money.
Also among the advantages of a homemade unit are:
- sufficient power of the resulting device – up to 4 hp;
- compactness, small dimensions of the walk-behind tractor;
- light weight, maneuverability, mobility;
- economical fuel consumption;
- the Druzhba engine is not whimsical in terms of the choice of fuels and lubricants;
- The walk-behind tractor is capable of performing various operations.
The engine used in chainsaws, especially in the Soviet “Druzhby” chainsaws, is durable and capable of withstanding long-term loads.
The main disadvantage of a homemade walk-behind tractor from a Druzhba chainsaw is that with any design you won’t be able to get a real walk-behind tractor. The power of the walk-behind tractor is enough to cultivate areas with good soil. There are also restrictions on operations. It will most likely not be possible to use the entire arsenal of attachments on a factory walk-behind tractor.
Trencher for walk-behind tractor - attachment or homemade version
Attachments on walk-behind tractors for digging trenches are also used by owners of personal plots and landscape designers in cramped environments, when the maneuverability of mechanisms, productivity and low cost of work performed are important.
What does it represent?
Walk-behind tractors for trenchers have a reliable wheeled or tracked base and are equipped with specially designed cutting elements.
Manufacturers are striving to expand the functionality of the trencher and provide for the installation of various cutters, blades, plows that provide trench digging at depths of up to two meters...
What is it used for?
- digging ditches, holes, trenches;
- loosening the soil;
- tree planting;
- arrangement of foundations;
- drainage, reclamation...
Digging a trench with a walk-behind tractor is not difficult. In addition, after the ditch digger, neat trench walls remain, which reduces the risk of landslides, soil shedding and allows you to dig a trench with a walk-behind tractor in the ground: frozen, weakly stable...
The operation of a ditch digger is accompanied by:
- minimal volumes of soil after constructing the trench;
- absence of significant surface damage;
- neat cuts of the edges of the trench, without collapsing the soil;
- compactness;
- reasonable price;
- ease of maintenance.
The attachment to the walk-behind tractor for digging trenches makes the work easier and does not require removal of the excavated soil. The soil loosened by the augers can be easily returned to the trench after completion of the laying work.
Selecting the right model
Two types of ditch diggers are practiced:
- Trenchers, which are created as a single, integral mechanism with an aggregate. In practice, the most common brands are: Laski TR 50/TR 60, TKG-1200, Barreto 912 HM. This technique is very expensive and is designed for professional use.
- Mounted ditch diggers. They are produced by factories for certain types of power units. Selecting a ditch digger for a walk-behind tractor is very difficult.
In the countries of the former Soviet Union, the Trench It attachment, developed by Quick Attach, is used, which is assembled with specially designed couplings, with units from John Deere, Case, Yanmar, Daewoo, Yanmar.
How to make a trencher for a walk-behind tractor yourself?
The design is based on a homemade bar for a walk-behind tractor. There is nothing superfluous. Each part of the mechanism plays its role to facilitate the operator’s work. For these purposes, road milling cutters, homemade teeth, a factory chain, a moldboard shovel or auger, and protective covers are used.
Trenchers can be equipped with walk-behind tractors from Neva, MTZ, Kaska, Agro with a power of at least 8 hp. With.
The attachment to the walk-behind tractor for digging trenches is installed as follows:
- A homemade bar for a walk-behind tractor with cutting cutters is mounted on the front suspension.
- A homemade auger or mouldboard shovel is mounted on the rear suspension to clear trenches and remove soil.
- The cutting mechanism and chain drive must be covered with a protective casing to avoid injury.
Trencher in action
Of course, a homemade device for digging a trench with a walk-behind tractor makes the work easier, saves time, effort, money, and turns ditch digging into a routine procedure.
Chain sharpeners
It doesn’t matter what kind of chainsaw you have, homemade or factory-made, in order for it to cut wood like clockwork, you need to regularly sharpen the chain. To do this, you can use various auxiliary devices
For example, for the convenience of sharpening a chain, we recommend using a fairly easy-to-make device - a homemade stand with a clamp for fixing the bar.
This chainsaw clamp is U-shaped and the ends of the legs are pointed. This makes it possible to use the device even in hiking conditions, installing it in a place convenient for you.
We also recommend reading how to make your own chain sharpening device, which can be used both in the home workshop/garage and outdoors.
To make this homemade product, you will need a minimum of materials: strips of metal of different widths, nuts and threaded rods. You will need a standard tool: drill, angle grinder, welding.
Manufacturing of other hanging structures
The walk-behind tractor can be equipped with a variety of useful devices - a plow, a rake, all kinds of shovels, mowers, skis, brushes. Desire, clear diagrams and descriptions of work will help you replicate store-bought analogues of hanging elements and even improve them, since they will meet individual requirements and conditions.
So, to cultivate the land you need a plow that can overcome virgin soil, overgrown with grass, wet or stale soil. To make it you will need a steel plate about 5 mm thick. Using rollers, the plate is bent into a cylinder. The edges are sharpened with a grinder.
Using the same principle, it is easy to make an attachment that forms furrows. It’s good if there are cultivator stands. They can be attached to a corner or two racks can be made from scrap materials. To do this, plates are cut from a metal sheet 1.5-2 mm thick. The size of the plates should correspond to the depth and width of the furrow. They are fastened with bolts to the racks of the structure. This attachment can be used for instillation. You just have to give the plates the required shape. They must be in the form of a disk or circle, located at a certain angle. Such plates are located closer at the top than at the bottom. Due to this, the disks, rotating, open the cavities outward.
The attachment to the walk-behind tractor for collecting cranberries contains a self-propelled platform on caterpillar tracks. An intake is attached to the rotating frame of the platform. It is made in the form of a box with curved parallel teeth. While moving, the device, using the draft from the fan, captures the berries into the box. The fan is powered by a motor. Helical spirals are installed in the box.
Picked cranberries are heavier than garbage, so they fall to the bottom of the container. Leaves and small specks that fall along with the cranberries are removed through the hole along with the air flow from the fan.
A brush for a walk-behind tractor is used to clean the area not only from leaves, but also from shallow snow. Simplicity, efficiency and versatility of use are the obvious advantages of this hanging element. The brush shaft is vertically attached to the walk-behind tractor. A ring and discs with brushes are alternately put on it. The diameter of the rings is 350 mm. The grip width of such a brush is usually made no more than one meter. This way the walk-behind tractor retains maneuverability and covers a fairly large surface area for cleaning.
The length of the bristles is 40-50 cm, otherwise it will soon begin to wrinkle and break. It is not possible to restore the properties of the bristles, just attach new discs. The speed of movement of a walk-behind tractor with a mounted brush varies in the range of 2-5 km/h, depending on the engine power of the unit.
To learn how to make a plow for a walk-behind tractor with your own hands, see the following video.
Trencher Information
Although it is possible to dig trenches by hand, the use of specialized equipment is still more profitable.
Here are some reasons for this:
- During the work, the trench is narrow, deep and with steep edges. With this method of digging, the risk of crumbling the walls is reduced.
- The quality and efficiency of the unit does not suffer if the soil is denser than usual.
- When this mechanism works, the need to remove excavated soil is significantly reduced.
- When compared with an excavator, it should be noted that the excavated soil can be used at any time to fill the hole. In this case, the excavator can dig up blocks that must be broken before use.
- This mechanism has high performance.
- The ditch digger works effectively in winter conditions when it digs trenches in frozen ground.
Trencher for walk-behind tractor
Areas of application
This device can be used for various purposes:
- With its help it is possible to dig ditches. The most powerful trenchers can reach a depth of 200 cm. More affordable types, depending on the type, are capable of digging a ditch with a depth of 30 to 90 cm.
- Sometimes, to replant a tree, you need to carefully dig up its roots along with a lump of earth. This can be done using a trencher.
- When construction of a house is about to begin, the work site must be prepared in advance. The tool in question can help with this work.
- A trencher can be used effectively to remove road surfaces before road repairs.
- It can actually be used as a motor cultivator: carry out land reclamation work, do drainage and loosening.
- This device can help when performing foundation laying work.
The trencher speeds up work when laying the foundation
Varieties
They can be classified by power and performance:
- There are trenchers that are designed as specialized devices. They have high power and performance. They are usually used by specialized organizations. Such trenchers can dig a trench up to two meters deep and up to 40 cm wide. These mechanisms are quite expensive, and their purchase is usually not affordable for summer residents or farmers.
- Another type of device is walk-behind tractors that have built-in trenchers.
- It is possible to use these mechanisms as attachments for a walk-behind tractor.
- Homemade trencher. This type is the cheapest and most accessible for summer residents or farmers.
You can divide according to the principle of action:
- The most common trencher is one that operates using a chain. This tool is very similar in appearance to a giant chainsaw trencher. This saw tool is perfect for use in rural areas. The equipment can be used together with popular brands of walk-behind tractors in Russia: Neva, MTZ, Agat, Oka and some others.
- There are devices that use a gear wheel when digging. They can be used effectively on a variety of soils: hard and soft, as well as where there are a lot of stones. Such units have an optimal cost and are available to almost everyone. Another advantage of such equipment is ease of operation.
- There is such a variety as microtrenchers. They are used mainly on narrow city streets. This tool is equipped with a cutting disc and is small in size.
- A portable trencher is used. It is intended for professional use and is usually used by landscape designers in the process of work.
Vermeer RTX250 Trencher
Buy or rent
If you are involved in an activity that requires the regular use of the described units of special equipment, then it would be more advisable to purchase it than to lease it. However, it should be borne in mind that a manual small-sized trencher can cost you 150,000 rubles. minimum. The maximum cost reaches 500,000 rubles.
If you are purchasing a trencher to solve a specific task, then it is better to rent it. The machine is selected individually, and the leasing cost usually includes the operator’s labor, as well as the cost of additional materials.
How to make a trencher for a walk-behind tractor yourself?
Mounted and solid units allow all work to be carried out with maximum efficiency, but some owners want to save money and make such equipment themselves.
A homemade bar for a walk-behind tractor must not only be effective, but also meet the following requirements:
- the presence of a cutting system;
- well-thought-out power plant;
- compliance with the walk-behind tractor with which it will be used;
- acceptable weight.
To make equipment you must have the following materials:
- Bulgarian;
- welding;
- dump shovel;
- road disc milling machines;
- protective covers.
When working on a trencher, it is better to use road milling cutters that are best suited for these types of devices.
To make a homemade device for digging a trench with a walk-behind tractor, you need to follow these steps:
- First, the front suspension is created, onto which the digging boom with chain and cutting elements is attached.
- You need to place a shovel on the rear suspension so that it reaches the depth of the ditch and clears it of soil.
- Install a protective cover that should cover the cutting discs and chain drive.
- The equipment is attached to the units using special couplings.
It is important to choose disc cutters that will ensure efficient trench digging. Using trenchers, structurally combined with walk-behind tractors, you can easily carry out the necessary excavation work with virtually no effort required. This saves employee time, money and effort.
This saves employee time, money and effort.
This is interesting: Review of the best representatives of the Tselina walk-behind tractor range - useful to know
Types of trenchers
There are two types of trenchers:
- A trencher that forms a single unit with a walk-behind tractor;
- Mounted trenchers.
The first type is a special technique used primarily by professional designers to implement their landscape design solutions, as well as by utility services to lay communications. In addition to digging trenches, this technique can be useful:
- When planting trees;
- When dismantling the old road surface;
- For cutting blocks from soil.
The most popular models of this type: Barreto 912HM, Laski TR50, Sable /BS/50/, Ground Hog T4.
The second type is factory-made attachments, with which you can easily dig a shallow trench. It is installed on a regular heavy walk-behind tractor. This equipment is represented on our market by the Trenck It trencher manufactured by Quick Attah.
Using special couplings, you can equip the trencher with any model of walk-behind tractor from the Yanmar, Bobcat, Case, and John Deere brands.
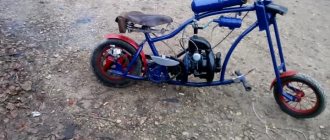
Gasoline scooter
To create such a vehicle you will need:
- saw motor;
- chain;
- bolts, nuts for fastenings;
- switch and accelerator from a mountain bike model;
- old scooter.
The bar part with the chain is removed from the saw, everything else remains and will be installed on the scooter platform. The clutch is unscrewed from the crankshaft. The motor power will be supplied by the bicycle chain through the sprockets. Let us immediately warn you that there will be two problems - it is impossible to stop the engine, and when starting it you will have to raise the rear wheel above the ground. We screw the sprockets onto the rear axle of the scooter.
We place the motor on the platform so that its sprocket is in line with the wheel group. Having drilled holes in the saw body and the scooter platform, we connect them with bolts.
Having adjusted the length of the chain, we pull it onto the stars. The accelerator mounted on the handle is connected by wires to the on and off wiring so that it is possible to keep the supply of motor energy under control.
Such a structure requires a foundation that is firmly fixed so that displacement and vibration are not created.
The manufactured base elements are aligned in parallel, level, which is especially important to avoid creating free play. This is done on a concrete surface, foundation base or compacted earth
The frame is fixed with bolts or studs and welded to the foundation reinforcement.
Now the rail base is installed, fixed to the side fastenings.
The procedure can be seen in the video:
DIY trencher for walk-behind tractor
For construction work on a personal plot, development of territory near the house, when laying sewer, water pipes and cable networks, summer residents and small landowners need a ditch digger. Solid and mounted units, which are offered on domestic markets, are not cheap and are suitable only for certain walk-behind tractors. Therefore, many owners decide to make a trencher for a walk-behind tractor with their own hands.
A homemade unit must meet the following requirements:
- aggregation with a walk-behind tractor with a power of 8-13 hp. with PTO;
- power plant: hydraulic pump NSh-10, cutter motor GMSh-32;
- cutting system: 2 road milling machines ETs-1800;
- the depth of the ditch is up to 0.35 m, and the width is 0.10-0.15 m;
- Approximate weight: 80 kg.
In order to make a ditch digger yourself, you need the following materials and equipment:
- welding machine;
- Bulgarian;
- road milling machines;
- dump shovel;
- protective covers.
The main working unit of the machine is the hinged body, consisting of the following elements:
- soil cutting disc;
- chain transmission;
- hydraulic motor;
- linkage shaft;
- disc bar.
The process of making a ditch digger is not difficult for the master and consists of the following:
- A bar with soil-cutting cutters is installed on the front suspension.
- A moldboard shovel for removing soil from a trench is mounted on the rear suspension.
- The cutting system and chain drive are equipped with a protective cover.
When you turn on the engine from the walk-behind tractor, the hydraulic system of the mounted mechanism starts. The transmission of torque to the chassis must be switched off. The hydraulic system of the cutter is started, the disks begin to rotate, and a trench is cut. The chassis drive encourages the walk-behind tractor to move. At this time, the dump shovel selects the destroyed soil with cutters and throws it onto the upper part of the trench. The operator uses virtually no special effort.
A homemade trencher will save money, facilitate manual labor and become an excellent assistant when carrying out many works on personal plots.
Auto mechanic, specializes in agricultural equipment
Gone are the days when trenches and holes had to be dug by hand with a shovel. Now the owners of private houses have shifted this type of hard work onto the shoulders of special mini-equipment. For this purpose, the industry began to produce trenchers - compact and maneuverable devices for walk-behind tractors.
Trencher Information
Although it is possible to dig trenches by hand, the use of specialized equipment is still more profitable.
Here are some reasons for this:
- During the work, the trench is narrow, deep and with steep edges. With this method of digging, the risk of crumbling the walls is reduced.
- The quality and efficiency of the unit does not suffer if the soil is denser than usual.
- When this mechanism works, the need to remove excavated soil is significantly reduced.
- When compared with an excavator, it should be noted that the excavated soil can be used at any time to fill the hole. In this case, the excavator can dig up blocks that must be broken before use.
- This mechanism has high performance.
- The ditch digger works effectively in winter conditions when it digs trenches in frozen ground.
Trencher for walk-behind tractor
Areas of application
This device can be used for various purposes:
- With its help it is possible to dig ditches. The most powerful trenchers can reach a depth of 200 cm. More affordable types, depending on the type, are capable of digging a ditch with a depth of 30 to 90 cm.
- Sometimes, to replant a tree, you need to carefully dig up its roots along with a lump of earth. This can be done using a trencher.
- When construction of a house is about to begin, the work site must be prepared in advance. The tool in question can help with this work.
- A trencher can be used effectively to remove road surfaces before road repairs.
- It can actually be used as a motor cultivator: carry out land reclamation work, do drainage and loosening.
- This device can help when performing foundation laying work.
The trencher speeds up work when laying the foundation
Varieties
They can be classified by power and performance:
- There are trenchers that are designed as specialized devices. They have high power and performance. They are usually used by specialized organizations. Such trenchers can dig a trench up to two meters deep and up to 40 cm wide. These mechanisms are quite expensive, and their purchase is usually not affordable for summer residents or farmers.
- Another type of device is walk-behind tractors that have built-in trenchers.
- It is possible to use these mechanisms as attachments for a walk-behind tractor.
- Homemade trencher. This type is the cheapest and most accessible for summer residents or farmers.
You can divide according to the principle of action:
- The most common trencher is one that operates using a chain. This tool is very similar in appearance to a giant chainsaw trencher. This saw tool is perfect for use in rural areas. The equipment can be used together with popular brands of walk-behind tractors in Russia: Neva, MTZ, Agat, Oka and some others.
- There are devices that use a gear wheel when digging. They can be used effectively on a variety of soils: hard and soft, as well as where there are a lot of stones. Such units have an optimal cost and are available to almost everyone. Another advantage of such equipment is ease of operation.
- There is such a variety as microtrenchers. They are used mainly on narrow city streets. This tool is equipped with a cutting disc and is small in size.
- A portable trencher is used. It is intended for professional use and is usually used by landscape designers in the process of work.
Vermeer RTX250 Trencher
This is interesting: Drawings and instructions on how to make a cart for a walk-behind tractor with your own hands - let’s look at it carefully
ICE-based technology
Homemade products with installed internal combustion engines have greater power and functionality compared to their electric counterparts. This allows you to significantly expand the scope of their use. Attachments in the form of a plow, flat cutter, cultivator, rake are easily mounted on the frame bracket. The unit can also be easily transformed into a roller skating rink or a home mini-tractor.
Having asked the question “how to make a homemade walk-behind tractor,” first of all you need to understand its structure. To assemble a homemade motor cultivator with your own hands, you first need an engine, transmission and reduction gearbox.
For assembly work, you will need a standard set of tools: a set of wrenches, a drill, an angle grinder, a welding machine, and when assembling more complex and load-lifting machines, also turning and milling of some components.
https://youtube.com/watch?v=1KWv0b94BIc
Chainsaw cultivator
Perhaps the best option when making a homemade motor cultivator is to use a chainsaw engine to create it. The advantages here are the performance and power of the unit, undemanding fuel requirements, light weight and compactness. And there won’t be any particular difficulties with the components when assembling it. Everything you need can be found at the car market or flea markets.
General diagram of the walk-behind tractor:
- the walk-behind tractor frame is made in the form of a diamond from a metal corner measuring 3200x3200x3200 mm;
- the engine is mounted on the cross members from above, the gas tank, as a rule, is mounted slightly below;
- the intermediate shaft supports are attached to the front struts;
- The running shaft supports are installed on the longitudinal ribs
To regulate the speed, the original gearbox is used; motorcycle sprockets (main and intermediate) are also used, the number of teeth of which is selected taking into account the required power output. The working tools of the unit are made in the form of wheels with knives and can perform the function of a trimmer, a rotary cutter or a rotary hoe.
As an alternative, you can use the engine from a lawn mower, which is similar in its characteristics to the drive of a chain saw.
Motoblock from a motorcycle
Often, old motorcycles can rust for years in garages and sheds, but they can easily find a second life. Motorcycle engines are great for creating a DIY power tiller, but the most commonly used engines are two-stroke engines from older models, as well as from scooters. But recently, motors from scooters or mopeds have also begun to be actively used, giving broken equipment a second life through conversion.
There are several types of transmission:
- gear - the most common and easy to install;
- combined (gear-worm gear);
- chain-belt, toothed;
- hydraulic gearbox is a type of transmission that is gaining popularity, but is the most expensive compared to a mechanical one.
Possible schemes
A frame of the required size is welded from a corner, to which an engine with a fuel supply system and a gas tank is attached.
The transmission of torque from the gearbox, which reduces the speed, to the wheels is carried out through a chain. In this case, you can use a bridge from a donor motorcycle mounted on a wheel axle. All controls are transferred to the steering wheel of the unit. When designing heavier equipment, a standard ZID-5 engine or its other modifications are used, which were previously widely used on various units. It is paired with a Zaporozhets gearbox and a lightweight drive axle.
The device turns a chainsaw into a snow blower
In February, spring is already preparing to come into its own, and the insidious winter is fighting for its place, unleashing snowstorms and blizzards on the streets. This means it’s not time to put away your shovels and snowblowers for storage. A member of our forum, Step139, suggests spending the winter properly by making a homemade snow blower based on a Ural-2 chainsaw.
Step139 lives on Lake Baikal, where the snow in the cold season is as endless as the famous lake itself. Previously, a forum member used to clear the area using an ordinary aluminum shovel, but one day, after a large snowfall, he began to think hard about purchasing special equipment. The electric option was no longer needed due to the need to carry a cable. The gasoline and non-self-propelled unit was inconvenient to move along the steep slopes of the site. The self-propelled model turned out to be quite heavy, and, moreover, it could not be carried down the steps.
The last factors that persuaded the man to make his own snow blower were heavy soils - loam with crushed stone and distance from the city: in the event of a breakdown, the store equipment would have to be transported 70 kilometers for repairs. He decided to make the unit as simple as possible, completely made of iron, but at the same time light and repairable.
To make a homemade snow blower, a forum member needed:
• a Ural-2 chainsaw, which had been lying idle in the garage since distant Soviet times;
• metal sheet 1400x400 mm and 2 mm thick (blades and paddles);
• stainless steel sheet 700x800 mm, 1 mm (bucket casing);
• shaft d20mm l =800 mm;
• a pair of bearings d48/20 mm, pressed into the pipe on both sides;
• two unnecessary arcs (square 20x20 mm) and two crossbars (also 20x20) from the greenhouse (frame);
• nuts, washers, pieces of 35 mm angle and metal, a strip 2 mm wide and 40 mm long were needed to attach the casing to the side walls;
• rear sprocket crown from a Minsk motorcycle (large driven sprocket);
• sprocket from a motorcycle “sunrise” (drive, small);
• chain from a motorcycle “Minsk”, “Voskhod”;
• brake cable from a snowmobile;
• gas trigger;
• rubber handles from a snowmobile.
The FORUMHOUSE member found almost half of this list in his garage, the rest had to be purchased in the store - Step139 spent 801 rubles on this.
Step139 (FORUMHOUSE Member):
– Structurally, I imagined the unit as an ordinary auger in a bucket on bearings with a chain drive to a saw. There are two options here - a chain outside the bucket and a chain inside. I preferred the option with a chain inside, because in this case the shaft is clamped on both sides by the side walls of the bucket. I didn’t have any wheels, so I settled on skids. They are simpler to make and can be bent from any pipe (the arcs from the greenhouse came in handy here). Due to the fact that the runners swing, you can adjust the height of the cutting edge of the bucket from the surface (this is about grabbing stones in the first snow).
Watching videos about snow blowers online, Step139 concluded that the shorter the frame and the higher the handles, the more likely the auger to become buried. The forum member decided to avoid this mistake when designing his unit.
Step139:
– For me personally, the most difficult thing was making the auger. But everything turned out to be simpler than I thought. Based on the fact that the auger will consist of 4 blades (2 pieces on each side relative to the center) and 2 blades in the center, and that the final diameter of the auger will be 300 mm, I began to calculate the blade feather. The width of the bucket was approximately 600-640 mm. The width of the blades is 120 mm.
On the forum, the craftsman gave very detailed mathematical calculations and even published a draft of them. He decided to make a spiral blade with a diameter of 300 mm and a width of 220 mm with a working part width of 70 mm. To do this, the forum member used a sheet of metal 2 mm thick - he cut rings out of it with a grinder and a jigsaw, and then, using a vice, stretched them into a spiral. This work turned out to be physically difficult.
Next, Step139 made blades from the same steel, cut plates from a metal corner and began assembling the auger into a single whole. On a flat surface, I welded the blades perpendicular to the shaft. I measured 220 mm from the blades and welded two side plates. After that, I clamped the blades to the blades and plates with clamps and boiled it all. In this case, the central jumper of each blade must be pressed tightly against the shaft, and the jumpers of each pair of blades must be placed strictly opposite each other and at a distance of 110 mm from the side plates and blades, i.e. in the middle. A forum member cut out a disk with a diameter of 110 mm from 4 mm metal and bolted the crown of the rear sprocket from the Minsk motorcycle to it. Then I cut the shaft to size, taking into account the gaps with the side walls.
Step139 searched the entire area in search of metal for the side walls. There was even an idea to cut the public dump into pieces, but in the end, metal was found. And since the most difficult part of the work - making the auger - had already been done, then events developed quickly: the forum member made the bucket casing, installed the auger, the engine with the chain and the remaining parts. The FORUMHOUSE member began assembling his snow blower a week before the New Year, and already in January he carried out the first tests.
Step139:
– If someone is going to make a snow blower, if possible, fasten everything with engraver washers, twist it onto locknuts, in short, tighten it to death. The other day my bolt came loose (it is on the clamp that presses the gearbox to the engine). Well, the saw is secured at the front and back, otherwise it would fall apart in two. The vibration, although small, is still there.
Step139’s detailed story about how he assembled the snow blower, photos of all the diagrams, calculations and the manufacturing process of the unit in this forum thread. And if you have already had experience assembling a snow blower or other garden equipment, share it with other FORUMHOUSE members.
Step-by-step instructions for making a walk-behind tractor from “Friendship”
The manufacturing process depends on the chosen design option and drawing. Step-by-step analysis of one of the modifications:
- Two bases (spars) are made from a steel pipe or profile with a diameter of at least 20 mm. The bend is made so that the ends are bent upward.
- On the long part, a steering wheel is welded, either welded at random or taken from a motorcycle. The bases are connected and reinforced by cross members. Also, platforms for the battery and gas tank are welded or screwed to the bend of the base.
- To mount the engine, a structure in the form of a slide is made from pipes or profiles. The motor is attached to it, and then to the base.
- Next, the RU-32 collar flange from the VAZ car is installed. Thanks to it, the shaft transmitting forces from the motor will be fixed. It is also recommended to use a VAZ gearbox shaft as a shaft. To fix the shaft in the flange, bearings with a diameter of 30 mm are used.
- The transmission link is made from sprockets from any old car or moped. One is mounted on the gearbox shaft, the other on the shaft on which the cutters or wheels are located. A chain from an old motorcycle is connected to each other.
- Next, all parts are installed and connected.
- You can also make wheels and cutters yourself, using old wheels from a car or agricultural machinery as a base. The resulting parts are mounted on a steel pipe or circle of the required diameter.
You also need to consider an effective forced-type cooling system. Several options are offered. The simplest option is to install a fan. More complex designs offer the use of water cooling.
Basic information
In industrial construction, excavators have always been used to lay ditches for pipelines, electrical network cables, and communications.
A walk-behind trencher is a compact and maneuverable mounted mini-excavator. Land owners use it for the following purposes:
- digging holes, ditches;
- removal of the top layer of road surface that has become unusable;
- cutting out soil layers;
- loosening the soil;
- preparing the site for planting;
- arrangement of the foundation;
- land reclamation;
- drainage.
There are 2 types of trenchers:
- Whole. This mechanism is integral with the walk-behind tractor. Most often it is used by landscape designers and professional builders. The most popular models are Barreto 912HM, Laski TR50/CH270/50, Sable /BS/50 and Ground Hog T4.
- Mounted. Produced by the manufacturer specifically for a specific type of walk-behind tractor. In the CIS markets, a mounted trencher is presented by Quick Attach and is called Trench It. The soil cutter has dimensions of 1.025x0.61x2.01 m, weight - 272 kg, lays trenches 0.96 m deep. It is used for aggregation with walk-behind tractors from world manufacturers Yanmar, Bobcat, Case, Daewoo, John Deere using special couplings.
Solid equipment is very expensive, so it is in demand only among professionals.
The main criteria for evaluating trenchers are:
- digging depth;
- trench length;
- speed of work.
Mounted units have the following advantages:
- minimum soil after excavation in the digging area;
- the possibility of using soil for other purposes;
- compactness;
- high reliability of components and connections;
- low fuel consumption;
- no damage to the soil surface;
- accuracy of work;
- smooth edges of the trench (the earth does not fall back into the hole);
- high performance when working with frozen soil;
- simple operation and maintenance;
- affordable price;
- lack of permitting documents.
It is difficult for a user to choose the best model among a wide variety of diggers. All of them are designed to work in different conditions and achieve specific goals. Digging depth and productivity depend on the weight and power of the unit. The price directly depends on these factors.