Briefly about the device
The laser was invented as a result of testing the theoretical assumptions of scientists involved in quantum physics, which was then just beginning to emerge.
The principle underlying the laser pointer was predicted by Einstein at the beginning of the 20th century. It’s not for nothing that this device is called a “pointer.” More powerful lasers are used for burning. The pointer makes it possible to realize creative potential , for example, with their help you can engrave a beautiful high-quality pattern on wood or plexiglass. The most powerful lasers can cut metal, which is why they are used in construction and repair work.
How to check if a homemade level is working properly
Using a simple rope, the device is suspended from a support in the center of the room. The equipment is turned on, directed in the desired direction, and the required distance along the length of the beam projection is noted. After this, a special stick is installed to ensure ease of marking.
After such important events, you can begin to use the device and point it in any direction. If you leave the position of the stick unchanged, the same height of marks will be ensured. After marking the laser dots, they are connected with construction cord. Next, using a measuring meter, preferably a hard one, draw a marking line.
Operating principle of a laser pointer
According to the principle of operation, a laser is a photon generator.
The essence of the phenomenon that underlies it is that the atom is affected by energy in the form of a photon. As a result, this atom emits another photon, which moves in the same direction as the previous one. These photons have the same phase and polarization. Of course, the emitted light is intensified in this case. This phenomenon can only occur in the absence of thermodynamic equilibrium. To create induced radiation, different methods are used: chemical, electrical, gas and others. The word “laser” itself did not appear out of nowhere. It was formed as a result of abbreviation of words describing the essence of the process. In English, the full name of this process is: “light amplification by stimulated emission of radiation,” which is translated into Russian as “light amplification by stimulated emission.” Scientifically speaking, a laser pointer is an optical quantum generator .
Making a simple level from a laser pointer
Of the entire list of elements of such a level, you only need to buy a pointer. It is quite possible to make the remaining auxiliary parts yourself. The goal of the presented process is to build a reliable fastener that will allow the device to rotate around an imaginary axis completely unhindered. The tool consists of the following parts:
- laser pointer;
- wooden beams (length - 0.5 meters, width and thickness - 25x25 mm, respectively);
- cord intended for construction work;
- drill for drilling holes;
- support (an ordinary stick will do).
To assemble the equipment, just follow the simple steps described below.
- The block is drilled on both sides. As a result, neat holes are formed, which must be parallel to each other. One of the holes made will be used to securely fasten the pointer, and the other will fit the construction cord.
- The pointer is securely fixed in the hole and a rope is secured, making it possible to install the device above the floor surface. The hole drilled specifically for the cord must be of the optimal diameter so that the cord can pass through it freely.
- A rope is threaded into the hole that was prepared in advance and secured as securely as possible.
The support should be fixed. Otherwise, it will not be possible to adjust the level correctly. The pointer must be of high power so that the beam can be clearly displayed on any surface. If the presented parameter is insufficient, the equipment will only be comfortable to use in a darkened room.
Preparation for production
As mentioned above, you can make a laser yourself at home. To do this, you should prepare the following tools, as well as simple items that are almost always available at home:
- screwdriver;
- knife;
- soldering iron;
- file;
- a failed DVD drive with a working laser diode;
- low-power laser pointer;
- 2 resistors per 1 ohm;
- 3 AAA batteries;
- capacitors of 100 µF and 0.1 µF.
These materials are enough to complete all the work on making both a simple and a powerful laser with your own hands.
Making a laser at home
Depending on the specifics and requirements put forward, lasers can be completely different, both in size (from pocket pointers to the size of a football field), and in power, the working media used and other parameters. Of course, it is impossible to make a powerful production beam yourself at home, since these are not only technically complex devices, but also very difficult to maintain things. But you can make a simple, but reliable and powerful laser with your own hands from a regular DVD-RW drive.
Principle of operation
The word “laser” comes to us from the English language “laser”, which is an abbreviation of the first letters of a much more complex name: light amplification by stimulated emission of radiation and literally translates as “light amplification through stimulated emission”. It can also be called an optical quantum generator. There are many types of lasers, and their scope of application is extremely wide.
The principle of its operation is to convert one energy (light, chemical, electrical) into the energy of various radiation fluxes, that is, it is based on the phenomenon of forced or induced radiation.
Conventionally, the operating principle is shown in the following drawing:
Materials required for work
When describing the basics of laser operation, everything looks complicated and unclear. In fact, making a laser with your own hands at home is extremely simple. You will need some components and tools:
- The most basic thing you need to create a laser is a DVD-RW drive, that is, a burner drive from a computer or player. The higher the recording speed, the more powerful the product itself will be. It is preferable to take drives with a speed of 22X, since its power is the highest, about 300 mW. At the same time, they differ in color: red, green, purple. As for non-writing ROMs, they are too weak. It is also worth paying attention to the fact that after manipulating the drive, it will no longer work, so you should take either one that is already out of order, but with a working laser, or one that you won’t be sorry to say goodbye to.
- You will also need a current stabilizer, although there is a desire to do without it. But it is worth knowing that all diodes (and laser diodes are no exception) “prefer” not voltage, but current. The cheapest and most preferred options are the NCP1529 pulse converter or the LM317 microcircuit (analogous to KR142EN12).
- The output resistor is selected depending on the supply current of the laser diode. It is calculated using the formula: R=I/1.25, where I is the rated current of the laser.
- Two capacitors: 0.1 µF and 100 µF.
- Collimator or laser pointer.
- AAA standard batteries.
- Wires.
- Tools: soldering iron, screwdrivers, pliers, etc.
Removing the laser diode from the DVD drive
The main part that needs to be removed is the laser from the DVD drive. This is not difficult to do, but it is worth knowing some nuances that will help avoid possible misunderstandings during work.
First of all, the DVD drive needs to be disassembled to get to the carriage on which the laser diodes are located. One of them is a reader - it is too low-power. The second writer is exactly what you need to make a laser from a DVD drive.
On the carriage, the diode is installed on the radiator and securely fastened. If you don’t plan to use another radiator, then the existing one is quite suitable. Therefore, you need to remove them together. Otherwise, carefully cut off the legs at the entrance to the radiator.
Since diodes are extremely sensitive to static, it is a good idea to protect them . To do this, you need to wind the legs of the laser diode together with a thin wire.
All that remains is to put all the details together, and the ROM itself is no longer needed.
Assembling the laser device
It is necessary to connect the diode removed from the LED to the converter, observing the polarity, since otherwise the laser diode will immediately fail and become unsuitable for further use.
A collimator is installed on the back side of the diode so that the light can be concentrated into one beam. Although, instead, you can use the lens included in the rum, or the lens that the laser pointer already contains. But in this case, you will have to make adjustments to get the required focus.
On the other side of the converter, wires are soldered, connecting to the contacts of the case where the batteries will be installed.
This diagram will help you complete a laser from a DVD drive with your own hands:
When all components are connected, you can check the functionality of the resulting device. If everything works, then all that remains is to place the entire structure in the housing and securely fasten it there.
Homemade body design
You can approach the manufacture of the case in different ways. For example, the body of a Chinese lantern is perfect for these purposes. You can also use a ready-made laser pointer body. But the optimal solution may be a homemade one made from an aluminum profile.
DIY laser assembly
You will need to find a disk drive. The main thing is that its laser diode is in good working order. Of course, such an item may not exist at home. In this case, it can be purchased from those who have it. Often people throw away optical drives even if their laser diode still works or sell them.
When choosing a drive for the manufacture of a laser device, you need to pay attention to the company that produced it . The main thing is that this company is not Samsung: drives from this manufacturer are equipped with diodes that are not protected from external influences. Consequently, such diodes quickly become dirty and are subject to thermal stress. They can be damaged even by a light touch.
Drives from LG are best suited for laser manufacturing: each of their models is equipped with a powerful crystal.
It is important that the drive, when used for its intended purpose, can not only read, but also write information to the disk. Recording printers have an infrared emitter needed to assemble a laser device.
The work consists of the following actions:
- Disassembling the DVD drive. This must be done as carefully as possible, since the parts inside are very fragile.
- After disassembling the case, you can easily spot the required component. It is a small piece of glass located in a mobile carriage. It contains a pair of diodes and a lens. The beam can damage vision, so under no circumstances should it be directed into the eyes, even if it is at a distance of 100 m.
- As soon as the crystal is removed, you must immediately tie its ends with wires without insulation. This results in two voltage outputs. To one of them you need to connect a small capacitor with a “-” polarity using a soldering iron. The second of the previously prepared capacitors is also attached to the other output using a soldering iron. Its polarity is “+”.
- The laser installation must be powered by a current voltage of 3 V and a power of about 300 mA. You can use three simple AA batteries or a mobile phone battery. If the write speed of the disassembled drive was low, then the current may also be low, for example, only 200 mA. If the speed was greater, then the current should be increased.
- The collimator can be made from an optical lens. It can be taken from a simple laser pointer made in China.
All about the dacha
I decided to please the son of one of my good friends and make him a wooden toy. To my question: “what should I do?”, my friend answered immediately: “maybe some kind of pestle?” Not a bad idea, I thought, and went into arms production. True, I decided not to waste time on trifles and instead of a “pestle”, make a machine gun right away! Still, no matter how you look at it, every kid knows that a machine gun is cooler than a pistol! :))
I decided to take the legendary Kalashnikov as a basis. I want to say right away for all connoisseurs of modeling and accurate models: the task was, first of all, to make a reliable and strong toy, so I did not try to recreate the machine in all its details, but made a conditional copy!
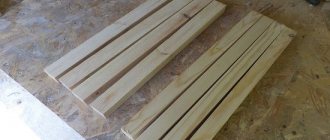
A thick 50-gauge pine board was chosen as the building material. I just took a pencil and sketched out the outlines of the future machine by hand, using a picture from the Internet as a guide.
I don’t like any kind of nails, brackets, or wires, so I decided to make the trigger out of wood too. It’s more reliable and more pleasant to the touch!
I immediately figured out and drew a mounting system for the store. The detail seems small, but very significant, without which the machine gun will not be a machine gun, but just... a fart for kids. After all, if a machine gun has a non-removable magazine, then such a weapon is worthless! :))) The photo below shows prototypes of the future store.
Then I cut out the workpiece using an electric jigsaw. The result is a blank like this.
After that, I cut out the side “walls” of the machine gun from thin plywood, covering the mounting location for the magazine.
Once again I looked around the store. For it I used the same board as for the main workpiece.
I sawed out and sharpened the corners with a file so that nothing would touch and the parts could move freely.
Next, on the milling table, I chamfered the butt and handle, so that I could then use a grinder to finish what I started and finally round the corners.
I glued the side walls with PVA glue.
I secured them with clamps and left them to dry.
I went through the corners with a router and in the end I got something that already resembled that same Kalashnikov!