Types of hillers for walk-behind tractors
Conventionally, the hiller for a walk-behind tractor, according to its design and operating principle, can be divided into several main types:
- disk type;
- lister;
- propeller (active).
Listerny
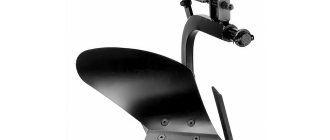
A device of this type has the simplest design solution. Such hillers have a strictly fixed working width and resemble butterfly wings in appearance.
The design of this device consists of two branched, attached and fixed sheets of iron. When working, the hiller must lift the soil from a flat surface to the top, while overcoming the resistance of the soil and creating the necessary ridge. The end of the pointed device should descend below the soil surface to a predetermined depth. It loosens the soil and lifts it, and guide planes serve to direct the soil to the base of the plant, which creates the collapse of the soil on both sides.
Since the wings in such a hiller are fixed motionless, when working with it you have to adjust the row spacing to the size of the device, and not vice versa. Therefore, given that the optimal width between rows when planting potatoes is considered to be 60 cm, the working width of a factory hiller of 25-30 cm is considered not very convenient when growing potatoes. Structural modifications for the hiller concern the size of the wings and the angle of their installation to reduce soil resistance and change the working width and height of the furrow ridge.
Variable width attachment
This device is the most convenient because it has an adjustment mechanism that provides convenient and quick changes in the position of the wings. It is thanks to this design solution that the hiller can be easily adjusted to suit different sizes of beds. One unpleasant drawback of such a mechanism is related to the fact that during the loosening process, the wings push the earth in different directions, but not a very large amount of it falls back into the furrow. But, despite this inconvenience, this model of hiller is more popular among many farmers.
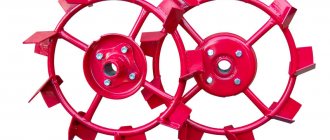
Disk
From the very name of the device you can understand that it uses discs, the thin rims of which go to the required depth with little soil resistance. For high-quality and easy work, this design requires precise adjustment of the take-off angle and the vertical tilt angle of the disks. The distance between the working disks is set on the frame according to the required size of the row being processed.
This type of tool has a number of advantages:
- Pairs perfectly with a walk-behind tractor. When using such a tool in a low gear on a walk-behind tractor, its power increases. Therefore, the efficiency of digging soil increases significantly, and also has a beneficial effect on the working cycle of the tool.
- Very convenient to use. Loosening and digging up the soil does not require much physical effort. A correctly configured device does not require additional support from behind, but moves along the ground as if on its own.
- Versatility of use. This tool is convenient to use for loosening the soil both during the planting of potatoes and during the growing season of the plant.
Propeller
This type of hiller is also called active, because the principle of its operation involves both the rotational movement of the working elements and their translational movement. The use of such equipment is only possible on walk-behind tractors with two forward gears and a power take-off shaft. In appearance, the design resembles a home fan.
The use of such equipment is much more effective than other models, but due to the complexity of manufacturing and the high cost of components, they are used much less frequently.
The entire technological process of operation of the propeller elements is carried out in one turn of the active disk. First of all, the soil is dug up and the weeds are cleared, and then the beds themselves are loosened.
At maximum power, this device can be used not only for hilling soil, but also for transferring soil to another place.
About the device of the hiller
The design features of the hiller directly depend on the type of device, of which there are several.
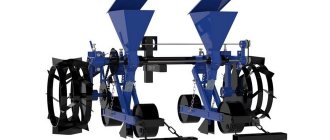
- Disc hiller. Already from the name itself it is clear that the design of this hiller uses disks, or rather two disks, located to each other at a certain angle. In addition, these discs are attached to a special frame, which is directly coupled to the walk-behind tractor via a hitch.
For more information about the disc hiller, watch the video:
- Active hiller . This type of hiller is also called a propeller hiller, because its operation uses translational and rotational motion. Such hillers are installed on walk-behind tractors that have two forward gears.
- This is necessary so that in second gear it is possible not only to loosen the surface, but also to transfer soil from the inter-row spaces.
- Lister hiller. This is the simplest type of hiller, which is gradually losing its popularity due to its lower efficiency compared to the two previous types of devices. Structurally, they are two sheets connected to each other; their shape is similar to something like wings.
Lister hiller
Using these tools, you can form furrows, and then plant the potatoes themselves. In the future, when the bushes have formed to optimal sizes, hilling can be done using the same tools.
Thus, the rows are very even and neat, which not only improves visual perception, but also helps the potato tubers form better and ripen faster in the bush.
A do-it-yourself hiller for the walk-behind tractor Cayman, Patriot, Texas, Foreman, Crosser, Viking, Forza, Sadko, the drawings and production videos of which can be found in the public domain, is the best way out of a situation where there is no extra money to purchase attachments.
In addition, independent production of one or another technical device will allow you to significantly save on the subsequent operation of the walk-behind tractor itself.
DIY hiller
What is required for production
Every gardener can make a manual hiller with his own hands. In the process of work you will need a certain set of tools and materials:
- welding machine;
- pipe bender, blowtorch or gas torch;
- cutting torch;
- gas welding station;
- grinder or angle grinder;
- drill with a set of carbide drills for working with metal;
- hollow water pipe with a diameter of 1 inch;
- sheet steel 2–3 mm thick;
- hollow pipe with a section size of 0.37 inches.
Prepare a set of plumbing and construction tools that may be useful for making a homemade hiller.
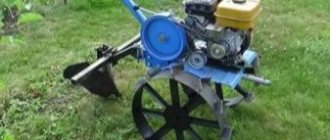
Making a lister plow
Such agricultural implements for motor vehicles are a classic non-adjustable device, used most often. To manufacture it, you need to sketch or use ready-made drawing documentation, according to which it will be easy and simple to carry out all the activities.
- We construct the base from an iron sheet 3 mm thick. It will encounter resistance from the soil, therefore, it must be extremely strong.
- The holder is made of a metal strip, 4 millimeters wide, the spare part must be hardened.
- The field board is made of steel 5 millimeters thick. It is hardened in several steps using a gas burner.
- The stand is made of iron 8 millimeters thick, since it will be the component that bears the entire load.
- The wings for the gun are made of iron 2 millimeters thick; they must be consistent with the parameters of the chosen design, since this is the only way they can be docked to the base.
- Then they bend a little and cook to the base.
Read more: How to build nests for indo-ducks with your own hands: drawings
If you need to set up a tiller, you need to fix the wings to the base using hinged joints. The rods for adjusting the angle are mounted in the tail of the base. You can also create a 2-row device, due to which the work rate will double. In this case, it is necessary to add traction mechanisms to the constructed structure, and make the fasteners movable, which will make it possible to adjust the size of the rows.
Principle of operation
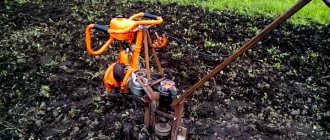
Gardeners know that hilling potatoes should be carried out several times a season. If the soil on the site is well-cultivated and loose, this contributes to a better process of oxygen exchange. The air entering the soil has a positive effect on the development and growth of plants. Timely loosening increases yield by 30–60%. Thanks to the design of the working body of the hiller, furrows with the required depth are obtained. The loosened soil falls off on both sides of the resulting ditch. Tubers are placed in it, and then the grooves are filled with earth. As the potatoes grow, you need to add a thick layer on top. This contributes to the formation of a large number of tubers. This addition is again ensured by loosening with the formation of a groove along the planted seedlings. This is achieved by the fact that the working parts of the hiller, when moving between the rows, cut off the top layer of soil.
In addition to potatoes, other crops that are planted in rows and require hilling, for example, tomatoes, eggplants, and peppers, can be processed with a hiller. Tool designs differ in grip width, manual or mechanized operating principle. The first option is quite primitive, requiring two operators, one of whom takes the front handle, and the other presses on the rear link. As a result of the efforts, the device goes deep into the ground, cuts the soil, and when moving inside the formation, leaves a noticeable trail of earth. The automated version is attached to a tractor or walk-behind tractor and is controlled by one operator.
Manual and automated hillers can be divided into the following types:
disc is a simple tool suitable for one person;
garden plow is a universal plow that requires the presence of two operators.
It is clear that disc options are easier to use; they are also often automated by coupling with motor vehicles. The ridges of the earth after the disc hillers are higher. There is also a negative point in these devices - the price. Compared to a plow hiller, it is four times higher. Externally, the tool looks like a frame with wheels on which disks are suspended. The distance between them can be changed in accordance with the width of the rows. The discs are set at a certain angle, which is not recommended to be adjusted relative to the vertical. Without a constant equal distance between the circles, the tool will pull sideways.
The simplest type of hand plow has a predetermined working width, wings (ploughs) shifted relative to each other, which are motionless. This is convenient if the row spacing has already been determined and the tool fits them. Another advantage of hillers with a fixed working width is the ability to use them with light cultivators weighing up to 30 kg. The advantage lies in its compactness, and the negative side lies in the limited work in wet areas. Here the tool will stick in the soil.
A hiller with variable working width is the most common option. The adjustment mechanism is simple, but it allows you to move or extend the wings, adjusting them to the desired width to the row spacing. The tool can also be automated, but only with heavy walk-behind tractors. The wings of such a hiller push the earth in both directions at once. After the tool passes, the part falls back into the line that it cuts. For a more efficient harrowing process, a more powerful walk-behind tractor is required, otherwise pulling the hiller will seem harder than working with a hoe or hoe.
Tips for use
Before loosening the soil in the beds, it is necessary to remove weeds. It can be left on the site to prevent moisture evaporation under the sun's rays, using it as mulch. After clearing the weeds, they begin to work. To properly hill up potatoes, you need to adjust the device to the desired size of the bed. To do this, the distance between the cutters is set on the disk device, and the penetration angle is set on the plow device. The latter is changed by rotating the lanyard.
For your information! A properly adjusted tool will not damage plant roots. The effort required to move it will be minimal.
When the hiller is set up, they make a test run in a place where there are no plants. After obtaining satisfactory results, you can begin to work. It is better to carry out cultivation in cloudy weather or in the evening: moisture loss from the soil will be minimal, and exposed tubers will not get sunburned. If after the first hilling a ridge of insufficient height has formed, make a second pass. The hard earthen crust that remains after processing is broken up with a hoe or hoe.
You may be interested in: How to hill potatoes with a cultivator, walk-behind tractor, disk hiller: tips Hilling potatoes is a mandatory procedure for proper cultivation of a vegetable crop. This procedure…Read more…
Why is hilling necessary?
Some gardeners manage to grow potatoes without hilling the beds. However, in order to grow a truly good harvest of large root crops, hilling is necessary.
This procedure allows the plant roots to have better access to air, and it also helps retain moisture. In addition, hilling causes the plant to begin to develop stolons (side shoots), resulting in more tubers.
Of course, you can hill up potato beds using hand tools, however, this method is only suitable if the beds are small. For large areas it is necessary to use a hiller, which significantly speeds up and simplifies the work process.
It is also worth paying attention to why a potato digger for the Neva walk-behind tractor is needed, and what is its price
Nuances of single- and double-row devices
You can install one or two hillers on a walk-behind tractor. Single-row ones include lister and propeller, while all types can be used in pairs. Depending on their quantity, the nature of cultivation changes. When processing a bed with one hiller, the passage is made on each side, and the wheels of the walk-behind tractor are placed in the rut between the plants. This method of cultivation does not allow obtaining high productivity.
Double-row hillers for walk-behind tractors increase cultivation efficiency. In one pass, a ridge is formed on both sides of the bed. However, during operation, the user has to control the contact area from both sides. This often leads to damage to plant roots. The convenience of such models is the ability to adjust the width of the hilling, which allows you to adjust it to the desired parameters.
For your information!
For winding beds, the use of a single-row processing method is more suitable.
Disc hiller for walk-behind tractor
You can make a disk device for the Neva walk-behind tractor with your own hands. For this purpose, available materials are suitable, which will reduce the cost of the finished product. Prepare a sheet of steel. A thickness of 2 mm is sufficient. Cut out round discs - 2 pieces. It is necessary to sharpen each edge to prevent resistance to the ground during operation.
All steps are carefully followed:
- The elements are bent with a hammer. One side will be concave, the other convex. This way the blades will be able to rake more soil and cover the plants.
- Fastening bolts and welding connect the stand, lanyard, and T-shaped leash.
- Adapters are used to fasten the wheels.
- There should be a distance between the blades equal to the width of the row spacing in the bed.
On a note! Using a lanyard, the angle of rotation in the vertical plane is ensured.
Using a leash, the entire structure is installed on the walk-behind tractor bracket, secured with bolts and locking elements. Plowing equipment is ready.
Making your own hiller
Of course, making a hiller cannot be called a simple task. This will require the ability to carry out welding and plumbing work. But this will allow you to save quite a decent amount and make a device that is more user-friendly.
To carry out the work you may need the following tools:
- Arc welding machine.
- Electric drill with a set of reliable drill bits of different diameters.
- Grinder and several attachments and discs included.
- Electric emery.
- A gas burner designed to heat metal during hardening.
- Workbench with a vice.
- Various files.
- Consumable fastening material (bolts, nuts, rivets).
Making a lister-type hiller
To make such a device, it is necessary to cut two identical parts from a sheet of steel 2 mm thick. Then you need to bend these plates so that the bending radii coincide. After this, these surfaces are welded and the seams are processed to obtain a perfectly flat plane. The quality of stripping significantly affects the ease of operation of the device and the absence of soil clogging of bad joints.
Particular attention should be paid to the strength of the hiller stand, since it bears the main load during operation of the device.
By making two such devices and connecting them in a unique way, we get a device for double-row tillage.
If you make such a device with an adjustable wing system, based on a hinge joint and installing movable rods at the end of the device that regulate the angle of inclination of the structure, you will get an adjustable two-row hiller.
Disc hiller for walk-behind tractor
The manufacture of a disk device can be done using available material, which will significantly reduce its cost.
The main stages of manufacturing a disk device:
- We cut out two round discs from a 2 mm thick steel sheet and sharpen their edges to reduce resistance when cutting into the soil.
- Using a hammer, we bend the elements: one side should be concave, the other should be convex. This disk shape better rake up the soil and sprinkle it on the plants.
- We use special fastening bolts and welding to connect the racks, tarlap and T-shaped leash.
- We connect the wheels of the disk device with adapters.
- The distance between the disks is made equal to the size of the row spacing.
- The vertical rotation angle of the disks is ensured by a tarlap.
- Then the entire device is attached through a leash to the walk-behind tractor bracket using bolts and locking elements.
When and how to use the hiller?
A self-made hiller can be used not only for processing potato bushes, but also for planting vegetables.
- With equipment attached to a walk-behind tractor, they walk across the field, pushing the dumps apart. To do this, you can increase the grip of the wings. The track width when planting seed tubers is at least 60 centimeters. When the furrows are prepared for planting after passage by the hiller, all that remains is to place the potatoes in them at the same distance from each other. Then backfilling is also carried out with a hiller. During the first procedure, do not forget to equip the walk-behind tractor with lug wheels. Backfilling will require equipment with ordinary rubber wheels.
- The main function of the device is hilling potato bushes. The operation is carried out only when the ground is moistened by rain or dew. Hilling up with dry soil will ruin the vegetable harvest.
- Potatoes are earthed for the first time when the height of the stems reaches 15 centimeters. The working device is attached to the walk-behind tractor, setting the stand vertically. When the device begins to burrow into or out of the ground, the stand is tilted slightly back or forward.
- Before work, it is necessary to set the width between the lower points of the disks. It can vary from 35 to 70 centimeters. The angle of attack does not change, otherwise the hiller will tilt to the side.
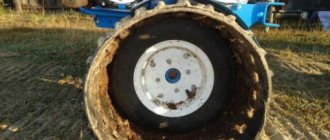
- Do not forget about the size of the walk-behind tractor wheels. Their width should be within 15 centimeters, and their diameter should be 70. Then the wheels will not damage the plants. The parameters on the disc hiller are adjusted using a leash.
- The potatoes are earthed up a second time before flowering. Two field treatment procedures are sufficient per season.
If the device parameters are correctly followed, the potato bushes will not be damaged and their hilling will be beneficial for the future harvest.
More information can be found in the video:
How to do it yourself?
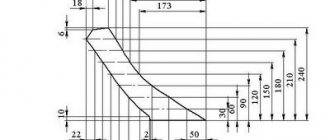
It is easier to manufacture any equipment if there is a corresponding drawing with given dimensions. The tool manufacturing algorithm is required first:
- draw drawings on paper;
- make a template in full size, according to which steel parts will then be cut out;
- bend the disk blanks according to the level until parallel radius lines are reached;
- organize welding work using a machine with the appropriate power for the metal used;
- Sand the welding edges with sandpaper;
- fasten the racks and turnbuckles with bolts;
- weld structural elements;
- Adjust the location of the disks.
The required steel thickness for discs is 2-3 mm. The distance between elements can vary from 35 to 70 cm. Racks and brackets are made from ordinary water pipes with a diameter of up to 20 mm, steel about 2 mm thick.
Required materials and tools
It is allowed to use ordinary lids from kitchen utensils with a diameter of 40 to 60 cm as disks. These parameters are selected experimentally and are related to the power traction of the walk-behind tractor. If the device is too heavy, the unit may simply not be able to pull it. The connector elements will be replaced by a hollow pipe with a diameter of at least an inch, with a meter in size.
The purpose of the traction force will be provided by a hollow pipe with a cross-section of 3⁄4 inches. For the leash, you need to choose T-shaped steel products. Adjustable adapters are useful for coupling the disc elements. The role of fastening elements will be played by bolts. The elements are fastened with welds, bent with a turbo bender or using a gas lamp. If the structure is made for a walk-behind tractor, a bracket should be provided. Hand tools need comfortable handles.
Manufacturing
You can make a hiller for the popular walk-behind tractors “Ugra”, “Belarus 09N-02”, “Motor Sich” using the same principle. The main axles on which the disks are mounted are adjusted to the parameters of the walk-behind tractor. The parts are connected to each other by welding. The main condition for disks is a symmetrical arrangement. Both elements are mounted at an angle, and the best connection option would be an adjustable one using an adapter. The holder elements are bent using a turbo bender and then attached to the axle by welding. The reliability of the fastenings must be checked, and the edges of the weld must be cleaned.
The elements are attached to the axis using the letter T. The assembled structure is installed on the walk-behind tractor using a bracket. The stopper can be inserted inside the profile pipe and pressed tightly. The hiller is completed before planting the potatoes. This will allow you to eliminate defects in a timely manner and not spoil the harvest.
During operation, you will be able to set the optimal speed, which will correspond to the power of your walk-behind tractor. Do-it-yourself mechanisms allow you not only to save on attachments for a walk-behind tractor, but also to facilitate manual labor. Even if there is no unit with a power device on the farm. A homemade manual disk hiller will be a good helper, and will also save money on the purchase of equipment.
Assembly
The basic elements of a manual disc hiller remain the same. Assembly of the product is simpler, since the two discs of the hiller are connected to each other by a regular bushing or by welding through a pipe, which will act as a jumper. Manual models do not require adjustment of the connection angle, so working with them is possible along row spacing with a standard distance. The free rotation of the disks around the axis will be facilitated by the hubs. Due to rotation, the tool will easily enter even heavy, dense soil.
Elements with disks are connected to a beam, for connecting which a welding machine is useful. You can choose anchor bolts as connectors. Such fasteners make it easy to disassemble garden tools.
A handle is useful to operate the device. For which you can choose a steering wheel from an old bicycle or other similar equipment. It is fixed to the beam and aligned with the height of the person who will operate the hiller.
By the way, you can also adapt wheels from an old bicycle to a manual hiller. If they are attached to the frame at the front, this will significantly reduce the load on the operator. Some craftsmen also use a bicycle frame in the assembly, installing hiller discs instead of pedals. The design retains the steering wheel and one wheel.
Creation of propeller devices
It is worth considering how to assemble active hillers (propeller).
For assembly you will need the following tools and materials:
- metal layer 2 mm thick;
- metal welding machine (arc);
- grinder with additional discs;
- consumables (bolts, nuts, etc.);
- drill;
- bearings and seals;
- T-shaped leash and stand.
Active or rotary hillers are in great demand. They can be made either single-row or double-row.
The two-row rotary hiller has its own advantages: with its help, potato cultivation occurs 2 times faster.
The assembly method is similar to the manufacture of disk hillers. They are connected to the motor cultivator using brackets and a stand with a T-shaped leash. The distance between the blade discs is chosen by the owner himself, adjusting it to the size of his cultivator and the width of the rows.
Double-row hillers are the same lister device, only instead of one “triangle” two are attached. For manufacturing you will need:
- 4 metal foxes with a thickness of 2 to 4 mm;
- tools for welding and fastening.
The base of the product itself is made from denser sheets of metal. It should be heavier than the hillers themselves, because it bears the main load and heaviness during work.
The hillers are made of a thin layer of metal, bending the wings outward. In this case, a pipe of the required diameter should be used.
Otherwise, the fasteners are identical in technology to disk hillers.
For better performance, you can mount additional wings to the tool. They are attached to the base using a hinge system on the provided rods.
The angles of the wings can be adjusted, making even the most difficult work easy.
Knowing the principle of making homemade hillers, we can draw a conclusion about which hiller is the best at work and which one is easier to assemble. The technology used is the same, with the exception of small details for each type of hiller. The setup of the device depends on the assembly method and type of equipment. By not buying factory plows, but by making them yourself, you can save money.
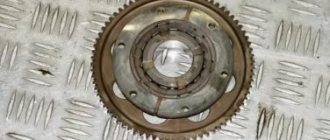
Used seeder cutter discs or circular saws that are mounted on bearings are perfect for the role of disks.
- The disks must be mounted at an angle, maintaining a distance between their lowest points. In addition, the fundamental condition is their symmetry, otherwise the walk-behind tractor will be pulled somewhat to the side.
- All parts must be connected by electric welding or bolts; the disks are mated with customizable adapters.
- Lanyards (screw ties), racks and a leash are also fixed.
- Next, you need to use a jumper with wings to fix the implement on the cultivator.
- An equally important factor is the correct choice of immersion depth and angle of inclination; for this purpose, moving components are pressed onto the holder and secured with bolts.
To work, you will need reliable thick steel, a grinder and a welding unit. The first to be made are the axles that need to be adjusted to the cultivator. Afterwards you need to create a stand and a base, which are welded. You immediately need to select the distance between the nozzles, the configuration of the lugs and the installation angle, which will make it possible to cultivate the soil as efficiently as possible.
Installing a hilling implement on a motorized cultivator requires proper adjustment of the tilt of the field board and the depth of immersion, which must be less than that of a plow. Before you start using the hiller, you need to do the following.
- Mount the coupling device and wheels on the motorcycle, then add a hiller.
- The walk-behind tractor is installed on an equal plane, and the hilling implement is lowered to the ground and fixed to the coupling device.
- When installing equipment, make sure that the stand of the agricultural implement is in a vertical position. This will ensure the required tilt of the field board is adjusted.
- Then the equipment lands or is slightly immersed in the soil so that it is below the supporting plane of the lugs.
It is necessary to do a test hilling and see: if the equipment is buried in the soil, move the stand forward, raising the toe slightly. When leaving the ground, the stand is retracted back by lowering the toe. The main thing is to take into account the width between the rows, adjusting the existing structural elements.
Features of operation and maintenance
Installing a hiller on a walk-behind tractor requires compliance with the rules for adjusting the angle of attack and depth of immersion, and it should be smaller compared to a plow. Wheels and a hitch are installed on the hiller, after which it is connected to the main unit. The walk-behind tractor is placed on a flat surface, while the hiller is lowered and connected by means of a hitch.
When installing attachments, the operator tries to ensure that the hiller stand is positioned vertically. This is the position that is necessary to correctly set the optimal angle of attack. After this, the hitch is lowered to the ground or even slightly deeper into it
It is important that the equipment is positioned below the lug support
Before starting the main work of plowing or hilling the land, it is necessary to carry out a test run in a small area
It is important to work in good weather, having first checked the sharpness of the working elements. In addition, before starting work, it is necessary to assess the condition of the soil
Along with this, it is necessary to determine the optimal speed of work, since a correctly selected indicator will contribute to greater efficiency and quality of work. For example, if the speed is high, the hiller will simply throw the earth in two directions instead of creating a hill and a furrow. When the equipment goes too deep into the soil during operation, the stand must be tilted forward by lifting the toe.
When it is necessary to plant potatoes using a hiller and walk-behind tractor, you must first make marks with a distance of approximately 65 cm. After this, create furrows and lay out planting material in them. After this, the wheels need to be replaced with rubberized ones, setting the wings to the widest position. Having placed the unit between the rows, they walk the entire row with a walk-behind tractor, covering the planted potatoes with soil.
Setting up the disc hiller primarily involves its correct direction relative to the furrow. The device must be positioned parallel to the beds with a given angle and working width.
This is what will determine the depth of tillage (furrow depth). If a moving-type hiller is installed on a walk-behind tractor, it is necessary to adjust the width and height of the ridge.
In the disk model, you can adjust the processing width. To do this, the lower points of the disks are moved to the sides by approximately 40–70 cm (the specific value will depend on the row spacing). When setting up, make sure that the disks are positioned symmetrically with respect to each other.
The soil is treated with such devices three times per season:
- when the seedlings grow to 15 cm;
- when they grow to 23–25 cm;
- at the moment of flowering.
Let's look at the features of each of them.
They have a fixed soil width and are used on very light motor cultivators with a power of up to 4 horsepower. Capable of cultivating beds measuring 25-30 centimeters in width, they are equipped with two side wings and a thin stand. The stand protects the equipment from overloads and mechanical damage.
This tool can only be used on dry soils, since adhered soil will interfere with the operation of moving structural elements. There are lister devices with adjustable tillage width. They are installed on motorcycles with higher power – from 4 horsepower. Such units can be safely used on wet soil.
Propeller
The principle of operation is the activity of the propeller parts. Under their influence, the soil is first dug up and weeds are removed, and only then the beds are loosened. These modifications are mainly practiced for motor cultivators with front-wheel drive and two speeds. This is due to the fact that at second speed the power increases to 180 rpm.
Double (2-row)
It cuts two furrows before planting crops, and is also used for hilling and loosening the soil. Includes a frame on which 2 hillers are fixed. When cultivating land, it significantly saves time, since it has two working elements. Mounted on a walk-behind tractor using a hitch. Due to the fact that such a device requires a lot of resistance to operate, it is used in conjunction with lugs.
Read more: Do-it-yourself brooder for turkey poults
Rotary active
Instead of wheels, this implement is equipped with rotors with screw-type teeth. Demonstrates high performance when creating, loosening and hilling potatoes. Suitable for use with 3-speed units (two forward and one reverse). In the first gear, the implement hills up the plantings, and in the second gear it also removes the soil from the space between the rows of plantings.
Single row
The most common type. Suitable for use with light soil types. Cutting ditches is carried out after completion of the preparatory loosening of the soil using a cultivator.
Disc hiller: step-by-step instructions
Cultivation with a disk hiller is more efficient, but it is more difficult to build. The stages of work take place in the following sequence:
- Based on a cardboard template, halves are cut out of a steel sheet.
- The workpieces are bent so that the outer side of the disk is parallel to the radius.
- Having connected the parts with a union of radii, they are welded.
- It is necessary to process the seams with a grinder to remove seams and irregularities.
- If the fastening seems unreliable, carry out the welding machine again at the joint.
- The seams are sanded with sandpaper.
- Assemble a leash in the shape of the letter T, stands and lanyards for adjusting the rotation of the device.
- When installing disks, maintain symmetry by connecting the wheels with adapters.
- All parts of the hiller are attached to the bracket using bolts with washers and a stopper.
It is important in the manufacture of a disk hiller that the surface of its parts, especially the disks, is clean, smooth, without nicks or potholes. It is better to give the disks a streamlined shape. This way they will turn out the soil less, and the drying out of the soil will slow down. A self-made hiller will last a long time and has more advantages even over purchased models.
How to make a disk hiller for a walk-behind tractor with your own hands
The optimal solution, in the conditions of Russian reality, is the purchase of a walk-behind tractor. Now there is such a huge selection of hillers for walk-behind tractors on the market that you can get lost when choosing the right tool. The disc dipper is one of the most practical and convenient to use.
But there is still a minus - high cost compared to other types. Therefore, it is easier to make a disk hiller for a walk-behind tractor with your own hands.
Disc hiller device
Manual hiller, assembled with only one outlet so that one person can work. The hiller consists of four elements:
- two disks;
- two screw lanyards;
- two racks;
- T-shaped leash.
Turnbuckles are used to adjust the rotation of disks along the vertical axis. However, the forward tilt angle cannot be adjusted. For more convenient work, you need to install the disks so that the wheel track width is equal to the distance between the lower points, which, in turn, should be equal to the row spacing. This will be easy to do if it is possible to change the width between the shares.
- C - racks that are symmetrically rearranged to change the distance between the disks.
- B - bolts that hold the disks.
To prevent the hiller from being pulled to the side, the discs must be set strictly symmetrically. Otherwise, it will be very inconvenient when working. To attach the tool to the walk-behind tractor, we use a hitch bracket without a beam. The leash of the assembled hiller is attached to the bracket with two bolts and a stopper. We insert the stopper inside the square pipe and press it from the outside. Using two bolts, you need to rotate the hitch bracket and align the leash along the longitudinal axis. We fix the position with nuts.
- G - nut;
- B - fastening bolt.
To increase the traction of the walk-behind tractor, we work with the hiller in low (first) gear. If the wheels slip and the walk-behind tractor has one gear, for ease of hilling you need to pair the wheels.
A disc hiller for a walk-behind tractor is a very effective and convenient tool when working with potatoes. This device allows you to process large areas, spending much less effort on the work, compared to conventional manual
tool. As you have already seen, such a unit can be assembled with your own hands without any problems.
Additional Tips and Warnings
After completing the self-assembly of the hiller, the most important thing is to test it in the garden. Successful production does not yet guarantee high-quality work, because it depends on a combination of many factors - weather conditions, soil conditions, correct sharpening of the hiller elements, etc.
Before you start hilling, you need to walk through a regular piece of land. During the work, you will feel the correct operation of the hiller and will be able to adjust the optimal depths and angles of entry into the soil.
The second important point is the speed with which you will carry out the hilling process. A correctly selected pace of work can be no less useful in work than the presence of a hiller itself, because at high speeds the unit will simply scatter the earth in different directions without hilling.
Technical characteristics of equipment
Advantages of this equipment:
- ease of operation - the device is mounted on a walk-behind tractor or a metal handbrake;
- strength - the structure is securely fastened with bolts and washers;
- durability – equipment service life is more than 10 years (with proper care);
- versatility - the equipment can be used for hilling any vegetable crops.
You can’t do without such a device in the garden. You can purchase it ready-made or make it yourself. Hillers, which are sold in specialized stores, are endowed with excellent technical characteristics. They have one drawback - high cost. Homemade products can be made from scrap materials. This will save you a lot of money.