How to make a bucket with your own hands from tin, galvanized iron or stainless steel with straight walls.
We cut out the product from the material
h
– height (set the given value)
d
– diameter (set the given value)
l
– circumference (we find by calculation)
l = πd = 3.14 * 329 = 1033
(mm)
h = 310
(mm)
In the middle of the reamer we mark holes for attaching the ear
1.
On a rectangular sheet of thin-sheet galvanized steel GOST 14918-80, on a homemade manual sheet bender, or manually using a mallet and a beam, fold the edges of the sheet “heightwise” in opposite directions.
Bend the sheet into a cylinder. 2.
Fasten the folded edges.
Press the resulting seam evenly with a mallet or mallet along the entire length of the cylinder. 3.
In order for the seam to remain inside the cylinder, it is necessary to carry out the following operation: turn the finished seam so that it is located near the edge of the beam; By hitting the seam with a mallet, we obtain the outer surface of the cylinder without a protruding seam.
The width of the fold depends on its purpose: obtaining a lock; rolling of wire.
4.
Set the cylinder relative to the block to its original position.
Tap with a hammer and bend the fold. 5.
Tap with the pointed side of the hammer.
We monitor the width of the fold - it should be the same. 6.
Align the fold by tapping with the blunt side of a hammer.
7.
We finally bend the bent fold at a right angle.
We insert a circle around the perimeter of the flange,
made of wire, the diameter of which must coincide with the outer diameter of the cylinder.
We round the circular edge and complete the seaming.
CONNECTION OF CYLINDER TO BOTTOM
8.
Fold the edges of the circle and insert it into the cylinder.
9.
With light blows of the pointed part of the hammer, we bend the fold inside the circle.
10.
Using strong blows from the blunt part of the hammer, we tap the seam on the beam, while turning the cylinder.
11.
Place the fold on the outer plane of the cylinder.
12.
If the work results in a convex bottom, it is necessary to level it.
13.
At the very edge of the bottom, hit with the blunt part of the hammer, along the entire perimeter of the circle. At the same time, the bottom will be leveled, the edges of the connection will receive a clearly defined contour.
ATTACHING THE INTERMEDIATE HOOP
The bottom of the bucket can be attached to the intermediate hoop, and the intermediate hoop can be attached to the cylinder.
14.
We attach the bottom of the bucket with a hoop.
15.
Connect the hoop to the cylinder (bucket body).
16.
Bend the fold at the hoop.
17.
Place the fold on the outer plane of the cylinder and thoroughly tap along the perimeter of the entire circumference.
We will cut out the ears from a similar material. Let's punch or drill through holes: two for rivets; one with a metal handle.
We bend the handle from metal wire with a diameter of 5...6 (mm) GOST 18143-72.
How to make a bucket with your own hands from tin – as you can see, it’s not complicated. Having mastered a simple model. You can move on to a more complex model with sloping walls.
Metal buckets replaced wooden ones in the everyday life of the Russian people at the turn of the 19th and 20th centuries. Before this period, they were not available to ordinary people because they were expensive. With the development of the metallurgical industry, they supplanted their wooden predecessor and reliably took their position in every person’s home. Despite the fact that plastic buckets have now appeared, the metal bucket has not disappeared from circulation. Moreover, many people prefer a simple galvanized bucket to any shaped or folding plastic bucket.
Rumors about the dangers of plastic dishes, sometimes not unfounded, do their job. An iron bucket is more reliable and safer, this is the opinion of a villager. After all, in the village to this day they get drinking water from the well. It is very difficult to do this with a plastic bucket. The scope of application of a steel bucket is immense: it is in construction for bulk materials and for concrete mortar, and in agriculture it is needed everywhere. It is used as a measure when trading grain and other agricultural products. They get water from natural reservoirs and heat water for household needs. So for now it is indispensable.
Tin buckets
Almost all metal buckets are made of tin. Therefore, it would be advisable to familiarize yourself with the process of producing tin, and then with the production line of buckets from this material. A 10 liter metal bucket is the most popular product, so it attracts the close attention of enterprising people.
Tinplate is cold-rolled sheet steel, which after rolling undergoes additional processing depending on what it is intended for:
- Most often, this is the process of tinning - covering the sheet with a layer of tin. The material becomes marketable and is called tinplate. Tin is tinned using hot and cold methods. In the first case, the thickness of the tin coating is in the range from 1.6 to 2.5 microns. After cold, that is, electrolytic tin deposition, the coating thickness varies from 0.34 to 1.56 microns. Tin plating is an expensive process, so other methods of plating tinplate are increasingly being used.
- Tin can also be coated with varnish, which is mainly used to make tin cans. A layer of varnish makes the tin neutral, so that canned foods do not react with the metal. Varnished tin is also used in mechanical engineering.
- Coating the sheet metal with zinc makes it more durable and anti-corrosion. Galvanized sheet metal is used in many areas of human life. These include household items - buckets, basins, baths, tanks; various pipes for chimneys and hoods, as well as tin roofing.
- Chromed sheet metal is produced by electrolytic deposition with chromic anhydride. The scope of application of chrome tin is quite numerous: in mechanical engineering, as canning containers, for creating various household items, including containers for serving chilled wines and champagne.
- Tin plate is coated with nickel, and then it is called stainless steel. Stainless steel buckets are perhaps the most expensive. Therefore, against the backdrop of more democratic options, they are considered a kind of luxury.
Required tools and materials
In order to make a pipe with a diameter of 100 mm, we will need the following tools and materials:
- Wooden or rubber mallet. Generally speaking, the quality of the finished product will primarily depend on the quality of this tool. The mallet should be heavy enough, but such that it is easy to control the force of impact, not very hard, but at the same time dense enough.
- Metal scissors. Any will do, the main thing is that they are convenient for cutting metal on large surfaces.
- A metal corner at least 1 m long, installed on the edge of the workbench. It is on it that the metal will be bent, so it must be stable and quite massive.
- A steel pipe with a diameter of 60-90 mm, fixed horizontally - a “gun”. Products will be assembled there. Accordingly, its length should also not be less than 1 m.
- Ruler.
- Metal scriber. Any sharpened metal rod, up to a large nail, will do.
- Actually, the sheet of galvanized metal itself is 0.5 mm thick.
Enameled bucket with lid
Enameled bucket, with lid, 12 l. 2S28
Enameled buckets are an indispensable item in the household:
- they can hold water;
- collect and transport berries without fear of oxidation;
- they are suitable for milk, sour cream, cottage cheese in those farms where they are engaged in animal husbandry;
- You can use them to ferment cabbage, pickle cucumbers, mushrooms and other pickles.
What are the advantages of enameled containers:
- thanks to the enamel coating, they do not corrode and do not react with aggressive fillers;
- Enameled containers look very attractive. Manufacturers produce them in a wide range of colors. In addition, they are often decorated with printed designs, which cannot but please the eye;
- as a rule, they are equipped with lids and trays, which allows you to boil water, laundry in them, and even cook first courses in large quantities when necessary;
- The handle of the enamel containers is covered with a plastic braid, which is very convenient. When carrying heavy filler in a bucket, the handle does not cut into your hands;
- enameled containers with a lid are most often produced in a standard size - 10-12 l;
- Basically, the shape of enameled buckets is not very diverse: cylindrical and truncated cone.
They are very easy to use, wash well, and do not absorb foreign odors. Usually made from high-quality sheet metal with a thickness of 0.8 to 2.0 mm with double enamel coating, which is carried out, according to technical specifications, in two ways:
- Wet or slip method, in which enamel is applied to the walls of the container using a spray gun or by completely immersing the object in liquid enamel. The item is then dried in an oven and the procedure is repeated.
- Dry method, in which enamel powder is applied to the walls of a red-hot product. After this, the object is fired, a second layer of powder is applied and fired again.
Note! Buckets treated in this way last a long time; the only thing that threatens them is chips of the enamel coating. The thing itself is unpleasant, because it opens access to unprotected metal.
With a mallet in hand
Let's move on to making the products themselves using the patterns made. First, we will form a single rebated seam - a seam used to connect parts in tinsmithing.
Having calculated, drawn and cut out a pattern (for example, a bucket) from paper, we transfer it to sheets of tin from which the bucket will be made.
But first, the sheets of material should be straightened on a mandrel, unless, of course, they are completely straight and have dents.
After this, the pattern, placed on a sheet, is traced along the contour with a scriber. In order for the marking lines on the iron to be clearly visible, it is better to mark them with a center punch, applying indentation points along the contour line at a distance of 3-5 mm from each other. The cut parts should again be straightened on a mandrel, trimming their edges.
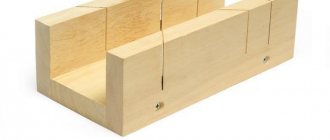
Let's start the work from the side surface of the bucket. First, we will make bends on its side edges - blanks for forming a connecting seam (a). This operation is usually performed with a hammer on a rectangular mandrel.
Having made a blank for the seam on the edges, on a round mandrel we use a mallet (or a steel hammer) to give the side surface the shape of a bucket.
Having connected the seam blanks together (b), use a hammer on a rectangular mandrel to carefully compact the seam along its entire length.
Then, on a round mandrel, bend the entire seam to the side (c) and again carefully align it with a hammer so that it fits snugly along its entire length to the side surface of the bucket. Then, on a round mandrel along the entire length of the seam on both sides, use a hammer to make bends (d) in the surface connected by the seam, called locks (the bends prevent the seam from separating).
The finished seam is again carefully sealed on both sides. We check the locks again - if the locks are poorly made, the strength of the seam will be compromised and it will come apart. Having finished the seam, use a mallet to give the side surface of the bucket its final shape on a round mandrel and begin processing the upper edge to give it rigidity.
To do this, on a rectangular mandrel, use a hammer to bend the edge of the top edge (the width of the folded edge is 1.5-2 cm) to the outer side and carefully align the bent edge on the rectangular mandrel with a hammer.
Then take the wire, bent into a ring, under the bent edge of the top edge of the bucket and carefully roll it along the entire circumference of the edge. After this, carefully align the top edge of the bucket with a hammer on a round mandrel, giving it the shape of a circle.
The bottom of the bucket is connected to the side surface in two ways. According to the first option, the bottom is fixed flush with the lower edge of the wall of the future bucket, which in this case will stand on its “own” bottom.
The second option provides that the bottom is somewhat “recessed” in the bucket. In this case, the wall together with the bottom (its edges) forms a small side on which the bucket stands.
First, we will consider the option when the bottom is fixed flush with the lower edge of the wall of the bucket. On a rectangular mandrel, use a hammer to bend the edge of the lower edge of the side wall of the bucket. We align the bent edge (its width is about 1 cm) on a straight mandrel with a hammer so that it is the same width along its entire length and makes an angle of 90° with the wall of the bucket.
The diameter of the cut bottom in this case should be 4 cm larger than the diameter of the bucket. Place the side of the bucket on the bottom in the center and mark the circle of the bent lower edge on the bottom with a scriber. Then, along the applied contour on a round mandrel, bend the edge of the bottom (like a frying pan), level it well with a hammer on the round mandrel and insert the side of the bucket into the “frying pan”. By bending the edges of the bottom on a rectangular mandrel, a seam is formed on a round mandrel. After this, the seam on the round mandrel is carefully compacted with a hammer, achieving tightness.
Now let's consider the option of fastening the bottom when it is slightly recessed in relation to the lower edge of the wall of the bucket. In this case, on a rectangular mandrel, use a hammer to bend the edge of the lower edge of the bucket wall outward to a width of 1 cm.
Galvanized
These buckets are an indispensable household tool. They serve:
- for storing bulk construction materials and non-food products;
- They can carry water, but leaving it in a galvanized bucket for a long time is not recommended. But due to their high resistance to aggressive environments, they can be used to dilute solutions of household chemicals when cleaning premises;
- they are widely used in construction work for storing and transporting building materials, solutions, mixtures, etc.;
- in agriculture they are needed for household work and for storing fodder for livestock and poultry.
Manufacturers produce galvanized buckets with a volume of 15 l, 12 l, 9 l, 7 l and 5 l. There is another variety - a 12-liter zinc bucket with a spout for use as a milk bowl on farms. It is made from galvanized sheet metal using special modern equipment, thanks to which:
- the buckets have only one seam, treated with a special sealing paste before stitching, which makes it airtight;
- handles are made of special reinforced wire;
- Strong steel rivets are used to attach the handles, which makes the bucket reliable when carrying heavy loads.
Make it yourself or order it
What is better, buy a galvanized sheet of the required thickness and bend the pipe yourself, or go to the store and buy a finished product?
As usual, let's start with the price. A finished pipe with a diameter of 100 mm and a length of 3 meters will cost you and me about 500 rubles.
The cost of the material in this case is 150 rubles, the rest is labor costs and the seller’s markup.
What if you plan to organize an entire drainage system? You can see for yourself that you will have to overpay for finished products by 2.5-3 times. Making your own pipes will greatly ease the financial burden.
In addition, factory products have strictly defined dimensions, and sometimes it is difficult to choose the right one for your system. And the thickness of the finished pipe usually does not exceed 1 mm.
You should definitely remember that any factory-made product, unlike a home-made one, undergoes strict quality control control, has a perfectly round surface and a precision weld.
Whether a home master will be able to ensure compliance with all these conditions is far from certain.
Stainless steel containers
Stainless steel bucket with lid
A stainless steel bucket is not a mandatory attribute of everyday life for the average family. Rather, on the contrary, this is a rather rare occurrence in ordinary households. And the point here is not the high cost of the product; it may be slightly higher than the price of an enamel container of the same volume. It’s just that in everyday life they use enameled or galvanized buckets more. The reasons here are as follows:
- A stainless steel bucket is essentially made of chrome plated sheet metal, usually very thin. It doesn't inspire confidence and seems unreliable. No one would think of fermenting cabbage in it, and rightly so, because most often it is made from non-food grade steel. And chrome coating is not sufficiently reliable protection against chemical reactions in aggressive environments - brines, starter cultures, etc.
- The gray color and steel sheen make this container unattractive for food products. The most you can do is bring water in it. Whether it is possible to leave water in it to settle is a controversial issue, but it is better not to risk it.
- For rural areas, it is not advisable to buy such a bucket, because there the bucket performs a bunch of functions at the same time. It is not suitable for a well, as it is too light.
Here's where stainless steel containers took the lead:
- Containers for garbage in the kitchen and toilet. They look presentable. Easy to clean. Here their metallic shine is not a hindrance, but rather an undeniable advantage. The volumes of such buckets vary between 5, 7, 10 and 12 liters. These buckets are equipped with hinged lids with special pedals.
- Stainless steel thermos buckets are also in great demand. For lovers of country outings, fishermen, and truck drivers, this is an indispensable attribute that allows them to keep food hot for a long time.
- Standard-shaped stainless steel buckets with and without lids are presented by manufacturers in the following volumes: 3, 5, 7, 10, 12 and 15 liters. You can buy them at any store.
- A small chromed steel bucket is great for serving crushed ice or chilled drinks. Looks great.
Note! Do not wash stainless steel containers with steel wool or abrasives.
Outdoor washbasin for a summer residence: main types of purchased models
A garden washbasin or country sink should combine ease of use and affordable cost. When choosing a purchased model, you need to pay attention to the following parameters:
- the street model should fit harmoniously into the overall decor and the entire concept of the summer cottage;
- for frequent outdoor use, it is best to choose a wall-mounted washbasin with a large water tank;
- for rare, periodic use, it is advisable to give preference to small-volume washbasins, which will prevent water stagnation.
An outdoor washbasin can be portable or portable and stationary.
Such a device is usually located in the working area of a personal plot and can be represented not only by a primitive hanging tank, but also by a device with an increased level of comfort:
- a washbasin without a cabinet
or a so-called pour-over street washstand. This is the simplest design, represented by a capacity of three to five liters. Water is poured into the tank from above. The tank is closed by a lid, and a tap is located in the lower part or a special outlet float is installed. For drainage, a bucket or drainage layer on the ground is used. The best option is a durable plastic model. The most modern type is a plastic hanging tank with lids and a magnetic release; - A special feature of the plastic model on a stand
is the ability to attach it to a metal stand. You can firmly install such a device on the ground by pressing your foot on the bottom crossbar. Some models are characterized by the presence of such an additional element as a sink with water discharge directly onto the ground with a built-in drainage layer represented by fine crushed stone or gravel. The device can be installed between ridges or flower beds, as well as anywhere in the garden.
Aluminum
From the middle of the 20th century. and to this day, aluminum utensils, including buckets, have reliably gained their position in the world market, despite the fact that serious wars have been waged against aluminum utensils. Aluminum was accused of increased toxicity. Although it, like chromium, copper and tin, reacts with oxygen and covers the dishes with a protective film. The older the aluminum cookware, the more reliable the protective layer, especially if you do not rub it with abrasive agents.
Note! A person can receive 50 mg of free metal per day without harm to health. When water is heated in an aluminum bucket, no more than 3 mg of aluminum is released.
In general, aluminum cookware is light, durable and looks aesthetically pleasing. Why you should buy aluminum buckets:
- low cost of the product;
- excellent thermal conductivity;
- corrosion resistance;
- easy to clean.
Note! Aluminum buckets should not be used to transport acids and alkalis.
Aluminum buckets are widely used in the dairy industry, and not only them, but also tanks for transporting milk from the farm to the milk processing plants. Aluminum buckets are available in volumes of 5, 7, 10, 12 and 15 liters. The most popular is a 10 liter aluminum bucket.
Why do you need a bucket in Minecraft?
The tasks for which a bucket can be useful are completely different. You can make a small garden and become a farmer, or try your hand at confectionery, and sometimes you have to collect and carry various liquids. It is the bucket that will help solve many of the problems that players face. This short article will describe in detail and clearly how to craft a bucket, and then start using it yourself.
Now is a good time to explain how this item can be used most effectively before we start making it. This paragraph will describe those elements for which the player will definitely need a bucket to collect.
Water
Of course, in real life you immediately imagine the water you pour into it. It’s the same in Minecraft - get water using a bucket, because this is one of the most important components of the game, with which many new possibilities open up.
- The hardest material in the game, obsidian, can only be mined using water.
- Without water, it is impossible to create a wheat field, and without it, fresh bread.
- You can make an endless source of water with water - you need to break three blocks and fill them completely.
- Water will help create decor - try starting with a small pond or fountain.
Lava
Another important element of the game is lava. It can be obtained in dungeons and mines.
- Lava is used as a power source for the furnace. This way it maintains combustion much longer.
- When used skillfully, this is a good weapon.
- Like water, lava also serves for design purposes, but can also provide indoor lighting.
Milk
One cannot fail to mention the animal product – milk. You can not only eat beef, but use cows by setting up your own farm to collect milk. The scope of use of cow's milk in the game is as wide as that of other substances collected by the bucket.
- If a potion has been drunk, its effects can be removed with cow's milk.
- Time to bake something! Milk will become an integral part of cake and other products
- Use a trick - with the help of milk you can lure a cow into the area, which is usually not found except in a valley or forest. Put up a fence and start your own dairy farm!
It is impossible to talk about all the possibilities that open up after making a bucket. Minecraft is a game where creative abilities are revealed, which means that all players can find a unique and truly necessary application.
What material can a bucket be made from?
They are usually made from stainless steel. It depends on the purpose, if for drinking water it is definitely stainless steel, for non-food products or garbage any thin metal that can be processed is suitable.
The quality of such buckets is not very different from store-bought ones. Although everything is done by hand. Of course, the first time you may not get what you hoped for. Therefore, simple advice: first make it from simple roofing sheet. It won’t be so offensive if it turns out not to be a bucket, but something like this, neither this nor that.
Mounted models from canisters
If a do-it-yourself summer washbasin at the dacha made from bottles does not meet the needs of the family even with temporary use, you can install a larger model made from a plastic or metal canister, or even a bucket. To do this, cut or knock out a hole in the container into which the tap is installed.
If necessary, for better tightness, first install a squeegee into the hole knocked out in the canister, providing it with rubber gaskets on both sides. The position of the squeegee is fixed with nuts on the outer and inner sides of the canister. A crane is installed on the drain.
During installation, it is important to ensure the tightness of the joints
. If you choose a canister model, you should take into account that the drainage volume will be larger, which means you should think about drainage.
The following options are possible:
- a container for collecting liquid installed under the washbasin,
- drainage ditch,
- drainage channel to, etc.
If the site has permeable soil into which water drains easily, you can allow the liquid to soak into the soil. In this case, it is recommended to fill the space under the washbasin with gravel, crushed stone or expanded clay for better drainage.
How to get a bucket out of a well if it falls off
A bucket falling into a well shaft is a fairly common occurrence.
Water from an ordinary village well, especially if it is intended for public use, is rarely obtained using pumping equipment. Usually for this purpose they use a bucket, for lifting which the well is equipped with a collar or a so-called “crane”. But what to do if the bucket falls off the rope and drowns? Is it possible to get it with your own hands?
Ropes and cables
There are different wells, some are equipped with a lifting gate, some with a so-called “crane”.
This is a kind of lever mechanism consisting of a long stick with a counterweight. An electric pump can be installed in the well; in this case, a bucket is not required. As for the other structures, in addition to the well bucket, they are equipped with ropes or chains for lifting it. Ropes quickly rot from constant contact with water, so they are rarely used now. Most often you can find a regular chain in a well. It is quite durable and acts as a kind of sinker for the handle when lowering it into the water. The heavy chain quickly sinks, pulling the handle to the bottom, which allows you to scoop up water.
You can also tie a bucket to a collar or “crane” using a cable. Usually it is purchased immediately with fasteners at both ends, and for a well you need to use it in a polyvinyl chloride case. This will protect the tied cable from exposure to water, and therefore from rust.
Whatever is used in the well: a chain, a cable or a rope - the main thing is that the fastening with the handle is reliable, and the handle itself is attached with high quality. The well itself must be equipped with a wide enough side on which to place a bucket.
Types and design features
A winch is a rotating device that allows you to lift a bucket of water from aquifers by wrapping a chain or rope around its axis. As a rule, the gate is made in the form of a cylinder, equal in length to the width of the well or slightly exceeding it.
You can make a gate for a well yourself or buy a ready-made version
The main parameters influencing the effectiveness of the device are:
In addition, the winch for a well can be represented by a special lifting mechanism - a crane. It is made in the form of a thick long pole on a crack with a chain and a bucket at one end and a load at the other, and the greater the depth of the well, the more the load should weigh.
The crane allows you to lift a bucket of water with less effort than a classic swing.
However, such a lifting mechanism is quite cumbersome. It will not be possible to close the well with it. On average, the height of a crane is 2.5 m. At the same time, the length of the boom can reach up to 3 m. Therefore, such a lift is rarely used as a permanent structure. In addition, “cranes”, as a rule, are made entirely of wood, which is why the mechanism quickly becomes unusable. Such devices are not used in wells with an aquifer located below 10 m.
Which tin to choose
Before making a pipe from tin, a suitable one is selected. For chimneys, thin sheet metal coated with a special compound is recommended.
The tin pipe removes smoke and increases draft.
Tin comes in black and white. The black type of material is thin sheet and cold rolled steel. Products are made from steel of various grades. The material is offered by manufacturers in sheets or rolls.
Tinplate is a material coated with tin on both sides, which is processed using electrolytic and hot tinning methods. This material is a low-carbon and thin sheet.
The processing method gives the steel rust resistance and ductility.
Production is accompanied by control of the composition of substances. The processing method and content influence the production of different grades of material.
The white type of sheet metal is treated to improve the surface's adhesion to varnish coatings.
Lacquered sheet metal is used. The varnishing process is used to protect surfaces from external factors.
Black and white type of material comes in the following types:
- single-rolled sheet is a product of low-carbon steel that is processed by cold rolling to the desired thickness;
- metal double-rolled after the first rolling procedure is subject to the second rolling and special lubricant, which reduces the thickness of the product.
The material is classified according to its degree of hardness and the amount of tin used.
Tin pipes have technically universal qualities.
Making a gate for a well with your own hands
The use of wells as sources of clean water in suburban areas has not lost its relevance. Many sources are equipped with electric pumps for convenient water supply. This technologically advanced method becomes useless in the event of a power outage or pumping equipment failure. A simple and practical gate for a well is a classic lifting mechanism. It does not require power, and if made correctly, it does not require special physical effort to lift a bucket of water.
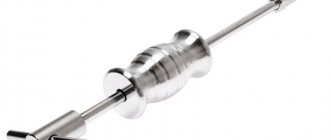
Methods and devices for fishing a bucket
In former times, every village house had a special device for extracting a broken bucket from the depths of a well. It is called a “cat” and is a forged product of three or four hooks on a common base.
Why in every home:
Today such a “cat” is a real rarity, but if necessary, it can be made from thick wire. Or simply drive 3-4 large nails into a wooden stake and bend them with a hook. The instructions for its use are simple: the hooks are tied to a rope or attached to a strong long pole and thrown into the well until they hook the sunken bucket. Sometimes in the process it is possible to fish out a lot more interesting things from the well. There is also a more modern and effective method using a powerful neodymium magnet. A small cylinder like the one in the photo, 2.5 cm thick and 4.5 cm in diameter, is capable of attracting and holding a metal object weighing 80 kg.
Advice. The easiest way to “get” such a magnet is from an old computer hard drive. If you can’t pull out a full bucket with its help, you can at least find it and pull it to the surface of the water, and then hook it with a hook.
You can combine these two devices into one so that you don’t have to worry about searching for a bucket blindly for a long time. To do this, a magnet is tied to a “cat” and this cunning structure is lowered to the bottom of the well. The bucket is attracted to the magnet, after which all that remains is to carefully hook it and pull it out.
Attention! If the well is very deep and there is no magnet, some people risk descending into it using brackets embedded in the walls or on a rope in order to be closer to the surface of the water. This is a very dangerous matter, since gases can accumulate in the mine. Therefore, it is imperative to act with insurance, and there must be at least two assistants at the top who can lift a person to the surface. The price of the issue is his life.
Material characteristics
Thin sheet steel coated with zinc in the factory must comply with GOST 14918-80. Main characteristics that you should pay attention to when choosing:
- Sheet thickness
The most common galvanizing thicknesses are from 0.35 to 3mm. The thinner the sheet, the easier it is to process, which is important for making products at home. But don’t forget – less thickness means less strength.
- Zinc coating thickness
There are 3 classes of material, in accordance with the thickness of the zinc coating layer. Let's summarize the data in a table for convenience.
GOST allows some deviations in thickness and the presence of some defects
Marking:
- NR – normal thickness variation;
- UR – reduced thickness variation.
Sheet appearance options:
- KR – With crystallization patterns (some cracks and darkening);
- MT - without patterns.
An important characteristic for the manufacture of pipes is the ability of the metal sheet to be drawn:
- N – normal hood;
- G – deep drawing;
- VG – very deep drawing.
Steels marked VG have the highest ductility, N - correspondingly the lowest.
What tools are needed?
Before carrying out tin work, it is worth choosing a set of materials and tools. You will need equipment for tin work.
You will need a sheet of thin tin. To make the pipe even, a material with a smooth structure and clear corners is taken. Do not use sheets with torn edges.
Cutting the material does not require effort, but before starting work, it is worth preparing the following tinsmith tools:
- Metal shears are used to cut the piece into blanks.
- Use a mallet or rubber hammer that does not leave dents. The weight of the tool is selected to be heavy, but the impact force is controlled.
- To make bends, use pliers or pliers.
- Machines for sheet metal work are recommended. A workbench is suitable that allows you to evenly position the sheet and mark it.
- For calibration, a tube with thick walls and an angle are used, which is mounted to the edge of the workbench. The corner is chosen to be massive, since the metal is bent on it. The pipe helps in making the longitudinal seam of the main line.
- A thin steel rod is used as a marker. It is made independently. To do this, sharpen the nail.
- A measuring tool is recommended. Tape measures and squares are suitable for this.
You will need a round piece to assemble the product. For this, we recommend a pipe with a cross-section of 90 mm and not too long.
DIY metal brace
In order to make a metal gate, you will need to prepare its drawing. As a rule, it contains the dimensional characteristics of the necessary elements. In addition, it may indicate the number of parts needed (for example, 5 bearings).
The easiest way would be to make a metal device from a car wheel and a pipe of a suitable diameter.
In this case, the diameter will need to be selected so that the disk fits easily onto the pipe, but fits tightly. In addition, to make the gate you will need 2 bearings and well mounting rings.
The gate for a wooden well should be impregnated with a protective compound
To make a metal brace, you will need:
The gate is ready! If a pipe of the required length was not found and the handle could not be made, then it can be welded later. To make it convenient to turn the rotator, a large-diameter round tap can be welded to it. This is usually installed on large doors. It has curved internal ribs for comfortable turning.
A well lift is simply a device used to lift a bucket of water from the depths of an aquifer. Today, well gates can be made from either wood or metal. Unnecessary, improvised elements are also suitable for production. The main thing is to properly secure the mechanism to the supports.
Source