What and how to cut
Floor and wall materials vary in thickness and strength, so different tools can be used to cut floor and wall tiles.
Various tools can be used to cut tiles
For cutting use:
- Roller or regular glass cutters.
- Tile cutters.
- Angle grinder (grinder).
- Manual (mechanical) tile cutters.
- Electric hand-held devices;
- Professional electric machines;
- Jigsaw (with tungsten thread or abrasive file).
- Electric drills with special attachments.
About tiles
The classic model of a manual tile cutter is designed for cutting ceramic tiles and porcelain stoneware. The listed materials are used for cladding walls and floors in residential and civil premises.
- Ceramic tile. Or tile, in the common name. It is a rectangular plate made of annealed clay. The native color is brown with shades from light to dark tones. The upper part is covered with decorative colored glaze. The average thickness of products is 6~14 mm. Smaller values (6~10mm) correspond to wall-mounted versions, larger values correspond to floor-mounted versions.
- Porcelain tiles. An artificially produced finishing material based on clay, kaolin, sand and spar. It is characterized by high strength and hardness. Technical porcelain tiles resemble natural rock in various color shades. Decorative (artistic) is covered with colored glaze.
Ordinary wall and floor tiles are 1.5~1.7 times inferior in hardness and strength to porcelain tiles. Therefore, when choosing a tile cutter, you need to remember the technical properties of the material being processed.
Roller or diamond glass cutter
This device can only cut thin wall tiles; it is not suitable for floor tiles, they are too thick for it. If you need to quickly cut one or several tiles, it is convenient to use. The material is cut by cutting a strip on the front side and then breaking off the desired part. They can cut at least 1/3 of the width of the tiles.
Roller or diamond glass cutter
Cutting tiles with a glass cutter
- The tiles are placed face up on a flat hard surface or the smooth edge of a table so that the planned cut coincides exactly with this edge.
- Mark the cut line with a marker.
- Along this line, draw the glass cutter towards yourself, pressing evenly, a clear stripe should appear on the surface.
- Place a match, pencil, drill or nail under the cut and carefully press the tile on both sides, or rest it along the cut on the edge of the table and break it off.
Advice:
A variation of this device is an oil glass cutter. There is a container installed in its handle, which is filled with a mixture of kerosene and machine oil. The mixture flows through the channel onto the roller, which simplifies the cutting procedure.
Curvilinear cutting
If a curved cut is required, use a roller glass cutter and pliers. To make a cut like this:
- Use a felt-tip pen or marker to mark it on the front side of the product;
- cut along the markings several times with a roller glass cutter;
- Pieces are plucked off little by little with pliers. The closer to the cut line, the smaller the pieces you need to pinch off;
- The cut area is trimmed with sandpaper or a file. This work is labor-intensive and time-consuming.
If you need a curved cut, then use tongs and a glass cutter
The advantages of this tool include simplicity, low price, and speed. But it is difficult to process a large amount of material at one time.
Advice:
If you don’t have a glass cutter or other tool, you can use a metal or concrete drill, a large nail or a construction knife for urgent cutting. They are drawn along the cutting line using a metal corner, in the same way as with a glass cutter (a nail and a construction knife must be drawn several times to obtain a clear groove). After this, place a pencil or drill under the cut line and break the tile.
Sequence of work steps
First of all, it is necessary to mark the cutting line, and then secure the workpiece on the working platform. In the future, the instructions prescribe the following operations:
- In accordance with the intended mark, the cutting roller is installed on the edge from which the cutting will be made.
- The wheel and guide frame are pre-lubricated with technical oil or, in extreme cases, moistened with water.
- Holding the handle, you need to cut. And here it is worth paying attention to the following question: how to use a manual tile cutter - by yourself or by yourself? That is, in which direction is it easier to direct the cutting line? As practice shows, it is more convenient to work “towards yourself”, since in this case a higher pressure force is provided and physical risk control is improved.
- At the final stage, a fault is made along the cutting contour.
Nippers (tile cutters)
They are specially designed for cutting tiles. On one side they have a roller 1.5 cm in diameter, and on the other there is a transverse plate. The metal roller also allows you to cut floor materials. If it is plastic, use pliers to cut thin wall tiles.
Tile cutters are needed for cutting tiles
How to cut with tongs
- Mark the location of the cut;
- from the opposite edge of the tile, cut a line towards you with a roller with slight pressure;
- the product is inserted into the socket of the pliers so that the plate is located on the front side and the base is on the back. The cut must be exactly in the middle of the top plate;
- The tongs squeeze and the tile should break exactly along the cut line. When broken, both parts are held by the jaws of the forceps;
- The edges are treated with sandpaper.
Workplace organization
It is advisable to process the tiles in a room where there is good lighting and there is also enough space for laying workpieces with accessories. You should also ensure that the workbench is securely fixed. It must have a metal base that is cut-resistant. By the time of immediate processing, all unnecessary consumables and workpieces are removed from the table. Even a small part that gets caught under the roller can cause injury or damage to the material. Another important question is how to use a manual tile cutter so that less dirt remains? This nuance is also thought through before the start of work events. During the cutting process, after each operation, you should remove the fragments into a special pocket on the workbench. In some models it is already present in the basic design. But this should be done carefully so as not to get hurt. It is not advisable to remove dust during work, but it is advisable to get rid of large waste immediately so that it does not become a nuisance.
Mechanical tile cutter
This is the most common tool for both amateurs and some professionals. It is optimal in terms of price, speed of work, and quality of work.
Mechanical tile cutter is the most common tool
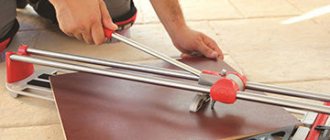
A small manual tile cutter has a cutting wheel that cuts a deep groove into the glazed surface of the tile, and it breaks easily along the cut line. The long handle acts as a lever when pressed, making cutting easier.
How to cut tiles with a manual tile cutter
- The tile cutter is installed on a flat, hard surface (floor or table);
- mark a cutting line on the surface;
- the product is inserted horizontally into the device and fixed, resting it against the ruler. The cutting line should be exactly along the arrow on the ruler;
- raise the handle, bring the cutting wheel to the edge of the product and cut away from you, holding it with your hand;
- Having cut through, lightly press on the handle.
A mechanical tile cutter can be used to cut wall and floor coverings made of tiles and ceramics. A small tile cutter with a plastic body is suitable for wall tiles, and a powerful tool with a metal body and a long lever is convenient for cutting floor tiles.
The cost of such tools can be from 1.5 to 20 thousand rubles. A manual tile cutter can cut materials in a straight line and at any angle, and cut narrow strips. Some devices are equipped with a ballerina for cutting round holes of a certain diameter.
Advantages:
- convenient and comfortable to work;
- a very compact tool, can be stored in the utility room, work can be carried out in any room;
- the long handle reduces the required physical effort;
- The tiles are cut with high precision and an even cut.
Among the disadvantages, it can be noted that it cannot cut a strip less than 5 mm wide; in some cases, the edges turn out to be uneven, but they can be sanded with an abrasive material.
Design and principle of operation of a manual tile cutter
Manufacturers produce manual devices for cutting tiles in different designs. However, their basic structure is similar. The tile cutter consists of the following components:
- The bed is the main support. It is usually made of steel plate. A rubberized coating is applied on top, which prevents the tiles from sliding during cutting. The frame is firmly secured with supports with guides along which the carriage moves. Good tile cutters have a strong frame made of thick steel. Rigidity ensures tool stability. Cheap tile cutters with thin frames vibrate during cutting, which results in defects.
- The handle is made from a piece of tube. Its elongated shape simplifies the work of a manual tile cutter, as it forms a lever, thanks to which the worker applies less effort.
- The main cutting element is the wheel. It is made of hard alloy materials. The surface of a high-quality roller is perfectly round, without chipped areas or burrs.
All manual tile cutters are similar in their design. Important! A dull cutting wheel cannot be sharpened. It is simply thrown away and replaced with a new element. - The foot holds the tile and prevents it from moving during cutting.
All working units are made of steel and silumin. They have increased strength and provide structural rigidity. Auxiliary elements can be made of plastic or non-ferrous metal alloys. These include the scale by which the tile size is selected. It can even be double - mirrored. This scale is convenient for left-handed people to use. Manual professional tile cutters have a rotating ruler. It helps to make figured cuts at any angle.
All manual tile cutters work on the same principle. A roller rolled under strong pressure cuts a groove on the surface of the tile. At this point, the workpiece weakens and it is easier to break it into two parts with the applied force.
Electric tile cutters
They can cut tiles, ceramics, porcelain stoneware, and stone quickly and with very high quality. Electric tile cutters are professional tools for tilers and mosaics. Some models come with additional features such as 45° edging, which is great for cutting corners. There are nozzles for cutting holes and other additional accessories.
Electric tile cutter - a professional tool
This is a universal tool that can be used to make straight, even cuts that do not require additional processing. They can cut strips less than 5 mm wide, and also cut edges at an angle of 45°. They can also cut holes and recesses.
The design of a manual electric tile cutter resembles a grinder; it is convenient when working in cramped conditions or at heights, when tiling small rooms.
A stationary tool consists of an electric motor, a frame on which a cutting tool (diamond wheel) and a container with water are located. For some models, the disc is completely immersed in water, while for others, water wets only the cutting area, this eliminates dust and cools the wheel, protecting it from overheating.
Depending on the placement of the motor, there are two main models of electric tile cutters: with a lower and an upper motor. A tool with a bottom-mounted electric motor is more compact, making it convenient to work in small spaces. A tool with an overhead motor allows for shaped cutting of tiles.
Features of working with a tile cutter:
When cutting, protect your eyes from splinters and sparks, and your ears from loud noise. The device should be installed on a flat, hard surface, and the container should be filled with water to the mark.
How to cut
You should wear gloves to protect your hands.
- Use a marker to mark the location of the cut;
- The cutting line is aligned with the pointer on the tile cutter and the tile is carefully moved away from you towards the rotating disk. This must be done slowly and smoothly, otherwise the material may crack.
When cutting tiles, safety precautions must be observed.
Shaped cutting is performed as follows:
- Mark the cut line with a marker. The tool makes cuts towards the faults;
- use a diamond glass cutter to carefully cut the markings and very carefully break the tiles;
- remove irregularities with sandpaper.
The disadvantages of electric tile cutters include their high cost. A good electric tile cutter is a very expensive tool. You should only purchase it if you are going to use it regularly. For one-time work, you can rent a tool for one or two days.
Description of the tool
The manual tile cutter has a simple design and ease of use. It is enough to cut the enamel-coated material with a diamond cutter, and then use a corner to break off the product. The tool is ideal for performing small amounts of work. It is designed for cutting ceramic and other types of tiles. Thanks to the use of a tile cutter, you can avoid dust and noise , which cannot be avoided when cutting tiles with a grinder.
A manual tile cutter consists of several elements:
- floating base;
- goniometer;
- titanium knife;
- guides preventing backlash.
A manual tile cutter is used when the thickness of the tiles does not exceed 15 mm. It is worth noting that some models come with a circular cutter , which allows you to make holes of various diameters. There are also tools that resemble pliers in appearance. These tile cutters are called tongs.
Professional tile cutters
Professionals for cutting tiles and porcelain stoneware use stationary and manual electric tile cutters, which can easily cut off the required sections, make curly cuts or process edges, and chamfer. Stationary electric tile cutters for professional work have a lower or upper motor.
Professional tile cutter - a powerful tool
Devices with a bottom engine operate on the principle of a circular saw. The material is moved onto a rotating disk slowly and evenly and cut according to the markings.
In devices with an overhead engine placement, a tile is fixed to the frame, onto which the upper part with a rotating disk is carefully lowered and a cut is made.
Important!
Professional tile cutters with a water cooling system are optimal for work and are very productive.
Their continuous operation time is much longer; they can cut durable materials (ceramic granite, stone, clinker tiles). Such equipment is offered by De Walt (USA), Makita (Japan), Matrix (Germany) and other well-known manufacturers. This is what professionals use.
The cost of such equipment is quite high; if necessary, amateurs can rent it for one-time work.
Features of using nippers for cutting tiles
This is a pliers version of the tile cutter, which is characterized by its small size and the ability to make shaped non-standard recesses. A typical example of this type of tool is the STAYER 3352 with a 200mm plastic jaw. The design of the model allows you to create neat cuts in workpieces made of tiles, ceramics and glass. How to use the manual tile cutter STAYER 200 mm? The principle of operation is similar to that of conventional wire cutters. The workpiece is secured in a vice or pressed against a stationary structure with your free hand, after which you need to grab the target section of the tile with your other hand and break it.
Angle grinder (Bulgarian)
If you don’t have an electric tile cutter, but you need to cut thick floor tiles or porcelain stoneware, you can use a grinder with a fine diamond-coated wheel or a wet cutting wheel. The disadvantage of this method is a large amount of dust, sparks, and fragments, so it is better to do the work outdoors using protective equipment.
If you don’t have a professional tool, you can cut the tiles with a grinder
Important!
It is imperative to attach a protective cap to the grinder and work in gloves, safety glasses and a respirator. Before work, check the tightness of all components.
It is not necessary to cut the entire thickness of the material with a grinder; it is enough to make a cut to a shallow depth and break it off, resting it on the edge of the table or placing a pencil under the cut line.
How to work with an angle grinder
- For cutting tiles and porcelain stoneware, grinders with adjustable wheel rotation speed are best suited.
- When working with tiles, the rotation speed should be no higher than 3.5 thousand rpm. At higher speeds, chips may form on the tiles.
- When cutting, the grinder must be held firmly in your hands; there should be enough space for free movement with the tool.
- The material to be cut is fixed on a hard surface.
- Moving the circle away from you, make a groove along the entire length of the cut, then gradually deepen it. There is no need to press hard on the tool; move the circle with light pressure.
Large round holes are cut in a circle of small diameter according to the markings, gradually deepening it into the thickness of the material.
The advantage of a grinder is that it can cut any materials by choosing the right cutting disc. This is a mobile tool that can be used in cramped conditions. The disadvantage is noise, an abundance of fine dust, the need to take precautions.
Safety precautions
You need to know how to safely cut tiles with your own hands and how to avoid possible injuries. There are a number of requirements that must be met:
- Inspect the tile cutter for functionality and damage.
- Check the carriage stroke. It should move smoothly, without jerking.
- The guides must be even and smooth, without damage.
- The cutting disc must have a smooth surface, without burrs or gouges. It should rotate on the axis freely, without creaking or getting stuck.
For safety reasons, you should use protective plastic glasses and fabric gloves.
Manual or electric jigsaw
This tool will be useful for those who are not involved in professional tiling. For a jigsaw, you should purchase tungsten threads “ropes” or abrasive files for tiles. With a jigsaw you can cut material in a straight line, cut holes, make shaped cuts, etc.
Advice:
Before cutting with a jigsaw, the tiles should be soaked for 3-4 hours, and also moistened during work, this will prevent the formation of dust and chips, and the cutting file will wear out more slowly.
It is recommended to use a jigsaw only to cut thin wall tiles. It is not suitable for floor use; the files will quickly become dull. It is better to process thick products with a grinder.
If there is no other tool, you can cut the tiles with a jigsaw
How to cut
- The selected file is fixed into the groove of the jigsaw;
- a cutting line is marked on it;
- the material is placed on a stable surface so that the file does not damage this surface;
- turn on the jigsaw at medium speed;
- a through cut is made along the marking line;
- After cutting several tiles, the file should be cleaned and checked to see if it has become unusable, and if necessary, replace it.
Cutting with a regular hand jigsaw is done in the same way. A rope file is inserted into it and sawed manually along the marked line. It takes a long time to saw, and this is the main inconvenience and disadvantage of this tool.
Electric drill
If you need to cut shaped holes in the tiles (for sockets, pipes), use a drill.
If you need to make holes in the tiles, you can do this with a drill.
There are three ways to cut holes with a drill: a diamond-coated crown, a ballerina bit, and a thin tile drill.
- Holes cut with diamond crowns are very smooth and of high quality. The better the coating on the crown, the smoother the cut. The only drawback of such crowns is their high price. Crowns should be purchased if you have a lot of holes to drill.
- The ballerina attachment is used at low drill speeds, otherwise chipping may occur. First, mark the center of the circle, adjust the “ballerina” to the desired diameter, carefully cut the tile from the front side, then do the same from the back, and so on until it is completely cut out. The attachment does not last long, about 35–40 cuts, but at home this is enough. The price is much cheaper compared to diamond crowns.
- If you need to cut a large hole, make it with a thin tile drill. First, mark a circle on the front side of the product and drill many holes in a row close to each other. Then the circle is broken out and the cut is smoothed with an abrasive material.
General cutting recommendations
- It is recommended to immerse the tiles in water for 1-4 hours before cutting.
- When marking, it is best to use a thin marker and a metal corner.
- It is recommended to carry out the cut in one step, pressing with equal force along its entire length.
- To ensure that the roller of a glass cutter or mechanical tile cutter moves smoothly, it is lubricated with machine oil.
- An uneven cut is sanded with any abrasive material (sandpaper or mesh, file).
There are many ways to cut floor and wall tiles, it is important to choose the one that best suits your conditions. Power tools and diamond bits are expensive and should only be purchased if there is a large amount of work to be done or if you intend to become a professional tile maker. In all other cases, you can use available tools: glass cutters, tongs, a mechanical tile cutter or an electric drill. The choice is yours!
Tips for using the tool
- If you are choosing a tool for one-time use, an inexpensive model, for example, from a Chinese manufacturer, will do. For reusable use, it is advisable to buy a manual professional tile cutter - it will last for many years.
- Regardless of whether you are cutting porcelain stoneware with a tile cutter or ceramics, take into account the diagonal length of the die. It is desirable that the length of the working section be greater and in no way less than the diagonal of the finishing element.
- Before you start cutting, you need to drip machine oil onto the surface of the roller. This solution will significantly reduce the friction between the roller and the die - this will help improve the quality of the cut.
- To ensure that the break turns out the way it should, do not rush, do not make sudden movements. The movement of the crown should be smooth and unhurried. Make sure that the box does not get stuck while driving.
- Pay attention to the roller, it should not have a loof.
