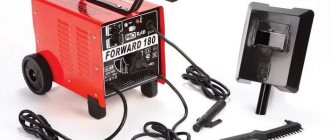
Reverse hammer for body repair
The reverse hammer is widely used in car repair shops and is used to perform body work. What is a reverse hammer? This is a hand tool used to repair a car body by creating a retracting force. Unlike a conventional hammer, it does not affect the surface by deforming it when hammering, but, on the contrary, drags the metal towards itself.
Design and principle of operation
This tool has a specific device; it consists of a metal pin, the size of the reverse hammer is about half a meter. On one side of the pin there is a massive handle, and on the other there is a fastening device with which it is fixed to the surface being processed. In front of the fastening device there is a special moving weight.
How does it work? To work, you need to attach the tool to the required surface, hold the handle with one hand, and the weight with the other. Then, with a sharp movement, bring the weight to the handle, due to which a pulling force is generated. With this movement, you can feel a blow that moves the metal surface towards the handle. The effect itself is similar to the blow of a regular hammer, but from the opposite side.
There are several ways to attach it to a surface. This is most often done using a vacuum, but can also be attached using glue or by welding. In some cases, when there is a fastening point on the surface being processed, a hook or clamps can be used.
The principle of operation of a suction cup for a reverse vacuum hammer is similar to the principle of operation of a plumbing vacuum.
Different models can be equipped with different accessories, including weights of different weights, to create a wide range of forces, but the operating principle is the same. The manufacturer may also provide a mounting kit. This allows you to effectively use the tool for repairs of varying complexity and in a variety of situations.
It is very important to correctly arrange the tool based on the characteristics of the metal being processed. If it is too thin, a hammer with a large weight may not level the surface, but create a hump.
They need to work very carefully, since the slightest deviation from the required effort will not bring the desired result. It is recommended to use this tool only in cases where there is no access from the back of the body. In all other cases, it is better to use a rubber mallet.
If fixation to the body is carried out by welding, it is important that the fastening cools down. Otherwise, it will not be the dent that will stretch, but the heated metal.
Varieties
There are four types of reverse hammer for body repair:
- The vacuum reverse hammer is the most versatile, at the same time the most expensive. It is attached to the metal using a suction cup, the vacuum in which is created by a compressor. To work with dents of various sizes, manufacturers equip the tool with suction cups of several sizes. The quality of vacuum fixation is not inferior to that of other types of fasteners. This model can be attached to various surfaces, regardless of curvature, the presence of paint or any contamination.
- On a glued suction cup – they are made with a rubber suction cup, which is attached to the surface with glue. After the glue has dried, the pin is glued to the nozzle with a threaded fastener. The dent is then pulled out in the usual manner. Then the pin is unscrewed, and the attachments are removed by heating the glue with a hair dryer. Residues of glue are removed with solvent. The disadvantage of this type is that it is almost impossible to work with it in winter, since the glue does not set. Please note that the solvent is designed specifically for this type of glue and will not affect the car’s painting.
- With welding fixation - this type used to be the most common, but due to a large number of disadvantages and limitations, such hammers are used much less frequently. To use it, you need to weld a nut to the body into which the tool pin is screwed. The work surface must first be cleared of primer paint so that exposed metal is accessible. The nut is welded using spot welding. After straightening, the nut is cut off, the welding area is cleaned and painted. Due to its great complexity, this type of instrument is used only in very complex cases.
- Mechanical hammer - has a classic design, differs only in the type of fastener. Usually hooks and clips are used. It is used only in cases where there is a mounting point on the body. In some cases, a hole may be made in the housing, which is welded after the work is completed. Very often, mechanical hammers are used to dismantle bearings when there is no access to their reverse side. In this case, the bearing remains intact.
Using a Reverse Hammer
When studying information on how to use a reverse hammer, it is worth considering the type of tool and the degree of deformation of the body. In almost all cases, the recommendations for use are the same. Only small details differ. In some cases, the necessary work can be done without treating the surface, sometimes it needs to be degreased, and sometimes completely cleaned of the paint coating.
Working with a reverse hammer requires some skill. If you don’t have enough experience in using it, it’s better to practice on some sheet of metal of similar thickness and strength to a car body. If the damage to the housing is too complex, it is better to entrust its removal to an experienced specialist.
How to use
The operating principle of the reverse hammer is as follows:
Good to know: A body work hammer is one of the most important tools designed to remove uneven surfaces in hard-to-reach areas of the car.
However, it is worth paying attention to the fact that such a device has its drawbacks, due to which, along with the dent on the car body, a layer of paint that was not even damaged is completely removed. In addition, areas of extensive dents in the hood, roof and surface of the trunk of a car cannot be straightened with its help. Welding staples can greatly deform the metal, which will ultimately lead to a complete replacement of the part.
Advantages and disadvantages
The reverse action hammer has many advantages over tools of a similar nature. It allows you to quickly perform straightening without significant structural changes to the car. Work with this tool can be done in places that are inaccessible to work with a conventional tool. Also, the cost of such a tool is relatively small; almost any car enthusiast can purchase such a tool for his garage. Also, in most cases, you can do without destroying the factory paint.
The only disadvantage of this tool is that complex damage cannot always be corrected. Also, in some cases, a person without experience can only cause more damage to the car body.
Do-it-yourself car hood straightening
Most often, motorists have to straighten the hood. First you need to remove it and remove any remaining paint or varnish from the outside. You will also need to remove a special anti-corrosion and noise-absorbing coating from the inner surface.
The process of repairing this element must begin with straightening those places that are characterized by high levels of rigidity:
When carrying out this process, frequent and low-force blows should be made. If the dent is large enough, the straightening process must begin from the top of this defect.
The straightening process is considered quite complex to be used at home. This is based on the need for extensive work experience. There is no educational literature on how to carry out this process, so there are not many craftsmen who can perform manual straightening.
Forget about fines from cameras! An absolutely legal new product - Traffic Police Camera Jammer, hides your license plates from the cameras that are installed in all cities. More details at the link.
- Absolutely legal (Article 12.2);
- Hides from photo and video recording;
- Suitable for all cars;
- Works through the cigarette lighter connector;
- Does not cause interference to radios and cell phones.
Reverse hammer. Types and work. Device and features
A back hammer is a hand tool designed to create a retracting force. If a regular hammer is used to hammer or deform a surface away from itself, then a device with a reverse action pulls the metal towards itself. Such equipment is used in body repair, in particular when straightening, and it is also used when it is necessary to tighten a bearing when it is not possible to hit it from the back side. Reverse hammers are rare because they are designed to perform highly specialized tasks that the average car enthusiast or mechanic does not need. The tool can be found in automobile service centers, as well as among those drivers who are faced with straightening the body themselves.
How does a reverse hammer work?
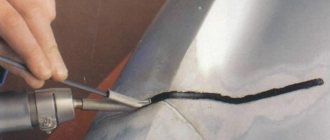
The reverse action hammer is a metal pin about 50 cm long. Its diameter is 20 mm. There is a handle on the back of the tool. A freely movable weight is mounted directly on the pin itself, made in the form of a thick-walled tube, the length of which is adjusted to the size of the palm. The front end of the hammer is fixed in various ways to the surface that needs to be pulled back. To work, you need to grab the weight with your right hand and the hammer handle with your left. To create a pulling force, you need to move your right hand with a weight into the handle with a sharp movement. This creates a blow, from which the hammer pin moves in the opposite direction, dragging the deformed surface along with it. Thus, almost the same effect is created if it were possible to hit with a regular hammer on the back side of the dent.
The working end of the hammer is fixed to the deformed metal using a vacuum suction cup, glued or welded attachment. If you need to work with the edges of the car body, then hooks and clamps are used. Each type of fastening has its own advantages and disadvantages, and therefore can only be used in certain cases.
The classic device of a simple hammer with reverse action is described. There are more advanced models that are equipped with additional devices that make work easier. Most often, they have removable attachments for fixing to the surface being treated, as well as a set of weights of different weights. Thanks to this, you can select components to ensure more efficient performance of the job. For example, if the installed weight is too heavy and the metal of the body is thin, then instead of a straightened dent you will get a hump that will have to be pressed back.
How to use a hammer
It is worth noting that a reverse hammer is a tool that needs to be worked with very carefully. If you overdo it and apply too much force, other defects may form when aligning the dents. Auto body repair specialists do not recommend using a blowback hammer on very large dents that are present on the roof of a car or trunk. These parts are relatively easily accessible, so it is quite possible to remove the inner lining and apply pressure from the reverse side to squeeze the metal into its original place. In the same case, if a dent has formed on the side of the car, and especially on the sills, then using a hammer will be more than justified.
To accurately straighten a dent, you need to secure the tool pin at its beginning. It is unacceptable to immediately grasp the center of the defect, since when pulled back the metal will become wrinkled and sharp corners will be obtained. Often, when using a hammer on dents without sharp kinks, you can level the surface so much that the previous defect will be completely invisible. There is no need for putty or paint.
On significant defects you need to work slowly and smoothly. First, the rim of the dent is pulled back, as a result of which its diameter and depth will gradually decrease. At the final stage, the central part is pulled back. If the tool is attached to the body by welding, after each pulling it is necessary to cut off the fixation and grind the seam. It is unacceptable for weld residues to remain on the metal, since it acts as an additional stiffening rib, which interferes with work at other fixation points. Using a reverse hammer is a lengthy process that cannot be rushed.
When using a reverse hammer with fixation by electric welding, after each welding you need to allow the metal to cool, since the hot area stretches much more easily and does not drag the cold part of the dent along with it. It is also worth considering that it is unacceptable to start work if there is dirt, chipped paint and other deposits on the surface being treated.
Types of hammers
Reverse hammers differ in the method of fixation to the surface being processed. According to this criterion they are divided into types:
- Vacuum.
- With glued suction cups.
- Welded.
- Mechanical.
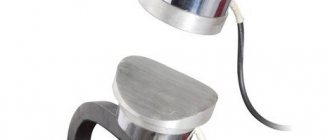
Vacuum return hammer
The vacuum reverse hammer is the most expensive and yet very effective. The tip of this tool resembles a regular household plunger used to unclog clogged sewer pipes. At the end of the hammer there is a rubber plate that is applied to the dent. The tool is connected to a compressor that pumps out air between the rubber plate and the car body. As a result, the suction cup is securely fixed to the metal. After this, the hand holding the weight is sharply pulled back and a reverse thrust is created, pulling out the dent.
Typically, a set of vacuum hammers comes with 3 rubber pads of different diameters. The larger one is used for processing wide dents, and the smallest one for small defects. Such a hammer, when connected to a compressor, creates quite a lot of clamping power. The plate is applied not only to absolutely flat surfaces, but also to flat ones, which is especially important for cars with a streamlined body. The vacuum type tool is quite lightweight and often weighs no more than 1.5 kg. The only inconvenience is the hose from the compressor.
Vacuum device
I would like to add a special type of device being described - a vacuum return hammer.
It is interesting to know that vacuum straightening of the body has a characteristic feature that makes it possible to repair a considerable area of the damaged surface of the car.
The advantage of such a reverse hammer is the vacuum suction cup, with the help of which you will not need to remove the thickness of the paintwork from the car before starting body repairs. When working with a reverse vacuum hammer, there is no need to drill or weld brackets onto the area of the body to be leveled.
In this case, caps of any shape and configuration are used. Using a vacuum suction cup, the material is held firmly while leveling out the dent. Working with such a tool reduces labor costs and production time.
You might be interested in an article on how to make a pipe bender yourself.
And you can read about what a grinder is here.
Restoring the body using vacuum straightening occurs in several stages:
Take note: to level out unevenness in difficult places, hooks of the same shape and different lengths are used, allowing you to eliminate defects in various parts of the surface of the car body.
However, vacuum extraction of dents is also not without its drawbacks, namely that it does not completely eliminate the defect. In addition, if the damaged areas of the car have cracks, then such straightening can damage it more. Therefore, it is worth paying great attention to the method of carrying out body repairs and the selection of appropriate tools.
However, when performing auto body repair work to remove dents in difficult places where there is no access from inside the car, only a reverse hammer will help you. Every car mechanic who repairs cars should have such a reliable tool for leveling dents.
How to make a reverse hammer from scrap materials, see the following video:
See inaccuracies, incomplete or incorrect information? Do you know how to make an article better?
Would you like to suggest photos on the topic for publication?
Please help us make the site better! Leave a message and your contacts in the comments - we will contact you and together we will make the publication better!
What is a reverse hammer?
The purpose of this device is to create a pulling force on the surface in order to level a deformed plane or remove a pressed part. If a standard sledgehammer consists only of a handle and a head, then the structure of this tool is relatively more complex. In order to understand what a reverse hammer is, let’s consider the design of the simplest and most common mechanical model:
- lever;
- movable weight;
- pin;
- holder;
- nozzle;
How does a reverse hammer work?
The weight here moves freely along the smooth pin from the adapter to the hard stop on the handle. Having briefly studied what a reverse hammer looks like and what this useful device is, let’s consider the principle of its use. The pulling force is created by a sharp movement of the weight at the moment of impact with the body of the metal stop. Essentially, this method simulates tapping on metal from the opposite side of the body. In collapsible devices, the impact force is easier to regulate by using weights with different weights.
Variety of hammer handles
In addition to the variety of shapes and sizes of the head, hammers also differ in handles. This part of the tool plays an equally important role in its functionality, determining not only the impact force and speed of movement, but also the level of fatigue of the person working with the hammer, the safety of using the tool and its durability.
The handles are made from hard wood, which is given a comfortable and ergonomic oval cross-section shape, easy to grip. But, in addition to hardness, wood is also required to have a certain flexibility to reduce the recoil force, resistance to fracture (viscosity), and uniform density. The following breeds are most suitable for making handles:
Exotic types of hammers and mallets can be made from mahogany and other valuable species.
Many modern tools are equipped with handles made of various types of polymers, fiberglass, even all-metal. They are certainly equipped with vibration-damping pads made of soft rubber or rubber, which reduce the recoil force and increase the friction between the worker’s hands and the handle.
The peculiarity of the hammer action is that the maximum part of its mass should be concentrated in the area of the head part - in this case, the speed of its movement will be maximum with a minimum of applied effort. The optimal ratio of handle strength and weight is the main requirement in the production of any type of hammer.
What is a reverse hammer used for?
The product has a relatively narrow specialization and requires some skill when using it, otherwise a small dent can easily be turned into a solid hump. Depending on the type of nozzle, it can be used for the following work:
- In auto mechanic shops, this tool is used to straighten a deformed body.
- If you have special clamps, it is convenient to use a reverse hammer to remove bearings if access to the back side of the race is difficult.
- You can use a reverse hammer to remove the hub.
- For dismantling hinges and other pressed parts.
Step-by-step instructions - how to straighten a car correctly
Beginner car enthusiasts and those who do not have much experience can be advised to use the services of professionals, both their physical assistance and consulting.
The do-it-yourself straightening process is carried out through the following steps:
- First of all, the defective body elements are dismantled; it is also necessary to remove the trim and other interfering elements.
- The removed element is placed on a flat surface, this is necessary in order to outline the existing boundaries of the damage.
- Any fairly large dents should be leveled from the edge, where all the main mechanical damage is located. Using a special straightening hammer, you need to move from the edge to the center, and the dent will gradually decrease. When carrying out this process, it is mandatory to use support.
How high-quality the body straightening is done can be determined simply by applying the palm of your hand to the treated area. If these are depressions, then it is impossible to eliminate them by simple extrusion.
The process of straightening a car is usually carried out element by element, and below it will be described how to carry out this process depending on which of the elements is being straightened.
Types of reverse hammer
The design of this device is relatively simple. For convenience, several models are used in plumbing. A pneumatic reverse hammer can have a different weight of the weight and the design of the nozzle, with the help of which the rod is attached to the car part or the surface being processed. The following methods are used to fix the holder to metal:
Vacuum return hammer
This type of device allows for gentle body repairs without drilling or welding metal. The rubber nozzle is applied to the damaged body. On the reverse side of the hollow pin there is a fitting for connection to a compressor device to create a vacuum. This is an effective reverse hammer, the soft pear-shaped puller of which practically does not damage the paintwork during straightening. The nozzle immediately disappears when the unit is turned off. Despite tangible advantages, such a tool has several disadvantages:
Reverse hammer attachments
The design of the holder depends on the purpose and method of attachment to the body, bearing, hub or other pressed part of the mechanism. One attachment, even though it may be the most convenient in appearance, is not able to help out a mechanic who is constantly engaged in straightening and repairs. In a small workshop, it is advisable to have a universal tool with a set of several convenient clamps of different types.
Examples of attachments for a reverse hammer:
- Hook attachments for mechanical hammers.
- A set of nozzles for working with cold glue.
- Comb gripper.
- Tool with a set of pneumatic suction cups.
- Reverse hammer for bearings with a set of convenient attachments.
How to use a reverse hammer?
The actuation of the impact mechanism in all models of the instrument is almost always the same. All the main differences lie in the method of attaching the holder to the surface. In one case, spot welding is used, in the other, cold glue or hooks are used. Much depends on the configuration of the pressed part or the shape of the dent. Let's look at a brief instruction on how to remove defects using a reverse hammer:
- Clean and degrease the metal surface.
- Fix the adapter on the metal using a suitable method depending on the model of the tool (glue, weld, use a vacuum suction cup).
- Screw the hammer pin onto the adapter.
- Hold the device by the handle with your left hand, and firmly grasp the weight with your right hand.
- Quickly move the weight from the adapter to the upper stop.
- At the moment the weight hits the stop, a pulling effect occurs on the holder.
- In the most difficult cases, you have to use several attachments or alternate a mechanical reverse straightening hammer with an electric spotter.
How to make a reverse hammer with your own hands?
Thanks to its simple design, this device can be assembled even in a garage. In the most primitive case, it is easy to get by with a commercial pin as a pin, and instead of a solid weight, use a set of washers of a suitable size and weight. We suggest studying a successful example of how to make a reverse hammer with your own hands:
- You need to prepare a couple of metal rods with a diameter of 12 and 16 mm.
- Cut a piece 50 cm long from a 12 mm rod.
- From a 16 mm rod, cut 5 pieces 15 cm long.
- You need to grind or buy several long nuts with 12 mm threads.
- The nuts will serve as adapters; their length should be sufficient to connect the hooks to the axis of the reverse hammer.
- To make the stops, washers with a 12 mm hole are required.
- Before welding, to insulate and obtain a gap, first wrap the future hammer axis with tape.
- Weld the load from several pieces of 16 mm rod, having previously secured them around a thin 12 mm rod with electrical tape or tape.
- On the side of the holder, a tightened nut serves as a limiter for the movement of the load.
- At the end of the pin you need to cut a thread that is long enough to install the nut and adapter.
- Having left a little space for the future handle, weld a second stop on the back side of the rod.
- Make tips in the form of hooks from the remains of the rod.
- You need to cut a thread on the long side of the hook and screw on long nuts.
- Make a handle from a piece of rubber hose.
- To fix the handle at the end of the rod, you need to weld or screw on a nut with a washer.
Source
Self-production
Reverse hammers can be purchased separately or in special tool kits for body repair. In addition, this tool can be made by hand. To do this you will need the following materials:
- steel pin with a diameter of 2 cm, a length of 50 cm (you can use a smaller diameter option, but in this case the service life of the tool will be shorter);
- handle made of ebonite or rubber (an ordinary nozzle will do);
- welding machine;
- stainless steel hook 4-5 mm thick;
- weight 16-17 cm long, 6 cm thick;
- two steel washers with a diameter of 2.5-3 mm.
The following is a sequence of work on making a reverse hammer with your own hands.
The metal pin must be cleaned, if necessary, given a smooth surface by grinding, and degreased. A hook must be attached to one end of the pin. This can be done in two ways: by welding or by creating a thread and screwing it onto it. Welding a hook is much faster, however, having created a thread, you can later use various nozzles. Then you need to put the washer on top, screwing or welding it near the base of the hook. This will prevent the weight from moving towards the surface being processed during the straightening process.
A hole is made in the weight with a diameter 0.1 cm larger than the diameter of the pin to ensure the possibility of its free movement during operation, and it is put on from the free end of the pin. If the stroke is tight, the diameter of the hole in the weight is increased by another 0.5 cm. The weight itself should not have corners or protrusions, since in this case its movement during operation will be difficult. To ensure maximum grip comfort, round steel sheets should first be welded to both ends of the weight so that the hand does not slip off it. Another washer is put on top of the weight and fixed, which is necessary to prevent the weight from moving close to the handle during operation. Finally, the handle is put on and secured.
As you can see, the work of making a reverse hammer is quite simple to do with your own hands. The whole process takes 30-40 minutes.