General recommendations
Purchased pulleys made in factories are most often cast or machined from metal alloys. Plastic products are produced for low-power engines.
At home, without foundry equipment or precision lathes, it is difficult to make a drive wheel from these materials.
Many experts believe that a pulley made of wood, plywood or plastic, which was made in a home workshop, is unreliable, short-lived, will immediately overheat and fall apart.
It's not like that at all. If you do not try to replace the wheel of a forge hammer with a force of 6000 tons, but use it on a tabletop machine with limited power and speed, then a carefully made part will be able to replace the standard one for quite a long time.
You can make a pulley from sheets of plywood. This is the simplest design; it does not require complex equipment or intricate technological processes.
If you make a part from aluminum, it will be much stronger, will be able to transmit more torque, and rotate at a higher speed. You will have to master the foundry process, even in its simplest form. Manufacturing a pulley by casting will require fire safety and the use of personal protective equipment.
The wheel can be turned on a lathe if you have one in your home workshop.
General recommendations
There are several views on making pulleys for machine tools at home. Most of the debate is about the material from which this part should be made. Experts say that making a pulley out of wood is a bad idea. The fact is that during operation of the machine, the pulley is subjected to quite serious thermal and physical stress. A wooden part in such conditions will not work for too long.
Pulleys made of metal perform best in the harsh conditions of everyday work, but their manufacture requires special equipment and high lathe skills. Average in quality and complexity of creation (compared to metal and wood) is a homemade product made from plywood. This part can be used both when repairing a factory machine and in the process of creating your own machine.
Rules for the care and operation of the pulley on the engine
For long and stable operation of the drive pulley, you should remember some rules for its care and use:
- Do not forget to regularly clean the pulley guards from foreign particles, dust and dirt. This will protect the part from getting dirt inside;
- check the fastening of the pulley on the engine axis. At the slightest loosening of the fasteners during vibration, the part will wobble, which will lead to serious damage and wear of the shaft;
- If serious chips, cracks and scratches appear on the surface of the part, do not delay replacing it. After all, a pulley failure during operation can have quite serious consequences;
- Protect the walk-behind tractor from excess moisture and do not store it in damp conditions. This can lead to severe corrosion and, consequently, to pulley failure.
Making pulleys without a lathe or making pulleys on a knee
The standards establish 3 types of structures:
- monolithic (up to 100 mm);
- disk (from 80 to 400 mm);
- with spokes (from 180 to 1000 mm).
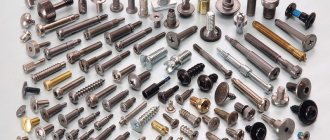
The mounting holes come in conical and cylindrical shapes. The standard number of grooves does not exceed 8. In order to reduce wear of rubber belts, the working surface of the grooves is ground.
The main material used for manufacturing is aluminum or duralumin. They are considered the most optimal, as they have a good level of strength and are the least subject to wear on the belt. You can find pulleys made of textolite, plastic, and plywood on sale.
Pulley manufacturing cost
| Service | Price |
| Manufacturing pulleys for V-belts (steel or aluminum) | from 700 rub. / PC. |
| Manufacturing of toothed pulleys | from 2000 rub. |
*Orders are accepted from 1 piece *The exact price of products can be found by sending an application with drawings, sketches or photographs *Minimum order amount is 3500 rubles
The shape of the groove determines the type of belt and divides pulleys into several types:
- multi-stranded,
- flat belt,
- gear,
- wedge
The production of such irreplaceable and important parts as pulleys is economically feasible for many enterprises, since they are actively used in the manufacture of the following types of equipment:
- woodworking,
- ventilation,
- compressor,
- agricultural,
- mining,
- oil and gas
LLC "Plant Spetsstanmash" offers a full range of custom-made turning and milling work for the manufacture of pulleys of high quality and accuracy according to domestic and foreign standards. Many years of experience and production culture ensure the high competitiveness of our pulleys on the market.
We strictly monitor the fulfillment of the main requirements applied to products - careful surface treatment and perfect balancing, which extend the service life of the drive belt and other associated mechanisms. For production we use the following materials:
- caprolon,
- cast iron,
- aluminum,
- steel.
Our company not only manufactures pulleys, but also provides services for their prompt and high-quality repair. Highly qualified specialists carry out comprehensive diagnostics to identify possible damage and determine the cause of the malfunction in a short time. After which a set of necessary repairs is carried out to ensure complete serviceability of the pulley.
If you want to order the creation or repair of pulleys, eliminating the causes of runout, turning the shape, lining for chips, turning the hub and installing compensating rings, then contact us. We will provide impeccable service delivery and an affordable pricing policy.
The minimum production time is 2-3 working days and depends on the characteristics of a particular product, the availability of a suitable workpiece and other factors.
Manufacturing of metal pulleys
Link to material of similar content
When manufacturing spar and rigging parts, it is often necessary to make pulleys along which the ends of the running rigging slide. Such pulleys look great in blocks, they add additional weight, which has a positive effect on the appearance of the rigging, and the rigging turns out to be essentially working. On such parts of the spar as topmasts, yards, bowsprit, jib and many others, pulleys are also installed, embedded directly into the tree. On topmasts and masts they are used for lifting both the standing spar (topmast) and yards, as well as for guiding all kinds of gear.
Material
You won’t find anything better than ordinary nails for making pulleys, as well as other metal parts on the model. Firstly, the nail is relatively soft and makes it quite easy to carry out miniature and fine processing, secondly, it blueds perfectly, and thirdly, these are almost ready-made pulleys, they only need to be cut off from the workpiece.
To make pulleys of various sizes, stock up on nails, both the smallest size and the giant ones. The minimum pulley size we had to make was less than 1.5 mm, and the largest nail would produce a pulley with a diameter of perhaps 5-6 mm. It is necessary to saw off the head of the nail and process it, starting from the resulting end.
This is necessary because the head will almost certainly prevent you from clamping the nail into the cartridge, whereas the pointed part will, in most cases, clamp the nail without problems.
Tools
- The UNIMAT-1 machine (or rather its analogue) in the version, but without a support. A drill fixed in a holder and an engraving like Proxon, Kinzo, Fermat, etc. will probably work. But it’s not so convenient to work, and all this will impose restrictions on the size of the workpiece.
- A hand drill or just a collet clamp to hold the drill. (see below)
- Jigsaw files: for metal from Vallorbe, Antelope or Golden EYE, and preferably in different sizes. Sold, for example, in Ruta. You can refer to the following table when choosing the size of the files.
| Number | Width, mm, A | Cut size, mm, V | Notch, tooth/cm |
| 7/0 | 0,34 | 0,17 | 35 |
| 6/0 | 0,36 | 0,18 | 32 |
| 5/0 | 0,4 | 0,2 | 28 |
| 4/0 | 0,48 | 0,22 | 26,5 |
| 3/0 | 0,52 | 0,24 | 23,5 |
| 2/0 | 0,56 | 0,26 | 22 |
| 0,6 | 0,28 | 20,5 | |
| 1 | 0,65 | 0,3 | 19 |
| 2 | 0,7 | 0,34 | 17,5 |
| 3 | 0,75 | 0,36 | 16 |
| 4 | 0,8 | 0,38 | 15 |
| 5 | 0,85 | 0,4 | 14 |
| 6 | 0,95 | 0,44 | 13,5 |
| 8 | 1,2 | 0,52 | 11 |
Technology
1) Select the nail size, with a small margin. Since we will not sharpen it, but will only sand it a little (to remove rust), then there is practically no allowance for reducing the diameter. Using a file and sandpaper, sharpen the end of the nail evenly.
2) Be prepared for the nail to hit the machine chuck. This is not of fundamental importance for our operation, but it is better to pre-adjust the nail, and also try to clamp it into the chuck in different positions, sometimes this helps.
3) The most difficult operation is marking the center. With a certain skill, it is very easy to find by simply installing a drill bit into the end of a rotating workpiece and achieving the least amount of drill runout. Even if the center is not found exactly accurately, then neither you nor anyone else will see it later; on a 2 mm pulley, an error in the center of 0.2-0.5 mm is very noticeable, but when installing it in place it is almost impossible to determine. The main thing is to achieve a position where the drill does not hit and there is no risk of breaking it.
Another option for drilling is to use the tailstock of a Unimat machine and a collet for clamping the drill (I installed a collet instead of a 3-jaw chuck. I don’t like it when hard and angular pieces of iron spin near the very fingers: But this is not necessary. - D.K. ) In this case, you need to feed the drill VERY slowly. There are two reasons: it can break and, if you press hard, the drill bends like a bow, breaks the already drilled part of the hole and will definitely go to the side.
4) Do not drill the workpiece more than 3-4 times the thickness of the pulley. Even the most correctly found cent can easily escape, and then, when making a deep hole, you risk breaking the drill. As the work progresses, simply deepen the hole so as not to lose the center.
If, however, your center runs off to the side, and sooner or later this will happen anyway, cut the workpiece so that you can start again by centering the hole. If you start well, you will end up with 5 to 15 pulleys without re-marking the center.
The hole diameter on the smallest blocks is 0.3-0.4 mm; tolerance on the size of the axis is required so that the block rotates easily.
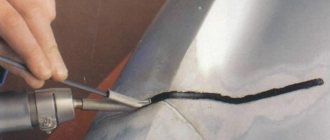
5) Now you need to cut a groove on the pulley. A jigsaw with one of the files is perfect for this. The only note is that you don’t need to press the file hard, place it sharply on the workpiece, and you need to make sure that it is perpendicular to the axis of the workpiece. Then the chance that in the very first second it will move to the side is minimal. When sawing through the entire groove, you will have to rely on your eye, although the open end can always be sharpened a little with a needle file.
How to make a plywood pulley at home
This design is the easiest to manufacture. It consists of the following parts:
- pulley body;
- pulley cheeks;
- screw fasteners for wood.
The number of parts depends on the width of the drive belt. If it is greater than the thickness of the plywood sheet, the drive wheel body will have to be made from several plywood circles.
The diameter of the cheek piece must be greater than the diameter of the body by the height of the belt.
The sequence of manufacturing plywood pulleys is as follows:
- mark the workpieces;
- cut them out of plywood with a jigsaw, drill a central hole;
- if the body consists of two or more circles, fasten them with wood glue or PVA, making sure the axial holes coincide;
- tighten the circles with self-tapping screws;
- process the side surface of the disk with sandpaper, a file or a grinder until a smooth, even surface is obtained;
- remove chamfers from the inner surface of the cheeks, their slope should be equal to the slope of the cross-section of the belt;
- secure the cheeks to the body with glue and self-tapping screws, being careful not to get into those already screwed;
- Carefully drill out the central hole.
When performing the last operation, you need to make the diameter of the hole half a millimeter smaller than the diameter of the shaft. This will allow you to fit the detailed axle into tension. The wooden pulley is ready.
Places for self-tapping screws should be marked in advance. They must be on the same circle, as well as at equal angular distances from each other. If there are four self-tapping screws, the angle should be 90°, if there are 5 - 72°, if there are six - 60°. Then radial vibration can be minimized.
Is it possible to make a pulley from plywood?
We continue experiments with wood.
Namely with plywood.
For some reason it seems to me that the properties of this material have not been fully appreciated.
But plywood is a durable construction material (aviation material).
But due to the impossibility of conveyor production of parts from plywood, many manufacturers switched to metals and polymers.
However, a number of problems can be solved by using plywood.
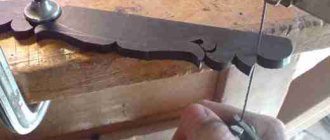
For example, grind a pulley for a V-belt drive.
It’s a pity that in this case I didn’t get the highest quality piece of 10 mm plywood.
Several nicks appeared.
The pulley is already a year old. Great flight))
Fingers and eyes are in place.
It can be done, but it won't work for long. Plywood has the unfortunate property of delaminating between layers.
Will not help. The pulleys heat up, the glue floats
It’s better to use epoxy with fillers, it’s more reliable.
They don't get hot. The belt doesn't slip.
The experiment has been going on for a year now. The pulley is still intact.
For homemade products that work 10 hours a year, the result is acceptable, or if the diameter of the pulley is 300 mm or more. When I was making the ribbon, I put a plywood pulley on the motor, and it died within a month. And the pulley on the wheel is still alive today.
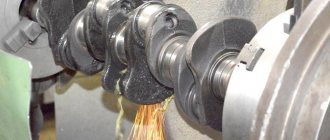
The pulleys are steel, welded.
Welded steel (Fig. 4, a) and prefabricated pulleys (Fig. 4, b) are accepted at peripheral speeds of up to 60 m/s. The rims, discs and spokes of these pulleys are made of low-carbon steel type St3. Since pulley hubs are subject to significant crushing stresses from keys, they are made from medium-carbon steels, and in prefabricated pulleys, sometimes from cast iron. The rims of steel rolled and assembled pulleys of flat belt drives are rolled from sheet steel and butt welded; The disks of these pulleys are made from sheet steel, and the spokes are made from bent strips, pipes, stamped blanks, and sometimes from sheet steel (Fig. 4, a). When the rim width is B≤350 mm, the pulley is equipped with one disk or one row of spokes; for B>350 mm, two disks or two rows of spokes are provided. There are steel flat belt drive pulleys with spokes made of round rods, which are screwed into a steel or cast iron hub or cast into a cast iron hub. Quite widely used are steel prefabricated pulleys for V-belt drives made from thin-walled steel plates stamped and then welded (Fig. 4, b). These plates are fastened to a steel or cast iron hub with bolts or rivets. Cast steel pulleys are rarely used. Rice. 3
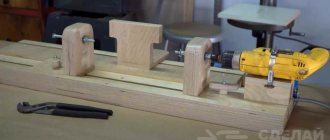
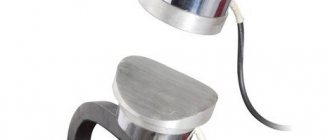
Double pulley manufacturing process
A blank of the required length is cut from the blank.
It needs to be drilled in the center and installed on the motor shaft.
The essence of the process is that the workpiece rotates on a motor, while cutting the mounting holes for the belt is done with a grinder. It is necessary to start the engine and approach it from such a direction that the direction of rotation of the workpiece and the grinder is towards each other, otherwise the abrasive discs will be erased with virtually no result.
First, an even groove is cut on the workpiece, then it needs to be bored to fit the shape of the V-shaped drive belt. During operation, the latter must be constantly tried on until it fits perfectly.
Using this method, you can machine a single, double, triple, or any other pulley. The process is not fast, but it is cheap. The price is a blank and a pair of abrasive discs.
Upgrading the chuck of a wood lathe. Ring jaws.
Hello everybody! In one of his posts he mentioned upgrading the chuck of his homemade lathe. If requested, I will show you what came of it. Although, of course, it was more interesting to film the whole process, but it’s too late, the job is done. All the time I envied the owners of specialized chucks for woodworking with replaceable ring jaws, but the built-in amphibian does not allow you to pay as much for such a chuck as they ask for). Tired of licking my lips, I decided to make myself a kind of collective farm version.
Loosen the cams, drill them, and cut threads for attaching the ring jaws, and after all the manipulations, it will not be possible to harden them again in garage conditions. Therefore, I didn’t fool around, but made them non-removable. 6 mm is taken as a basis. sheet iron. A faceplate was cut out of it and turned on a machine. The ring itself is bent from a square with a cross-section of 10mm. He heated it with a torch and wrapped it around a suitable round blank. The joint is welded using electric welding. The ring is welded to the faceplate, then turned on a lathe to the required dimensions. Also, grooves are cut with a threaded cutter to improve grip. There is a hole machined in the center of the faceplate for mounting on the cartridge. The whole thing is clamped on a chuck, welded to the jaws, and cut into three (according to the number of jaws) parts with a grinder. The outer diameter of the ring jaws is 58 mm. That's all. I enjoy the opportunity to securely fasten workpieces without wasting a lot of material on fastening them to the faceplate with self-tapping screws. By the way, the modernization did not at all prevent me from using my old faceplate when necessary. It is easily clamped with the standard jaws of the cartridge. And here is what happened in the end.
How to make an aluminum part
Manufacturing a cast aluminum pulley will be much more difficult, but the strength and durability of such a part will be much higher. You should approach each step very carefully, observe the dimensions exactly, and follow the recommendations.
A piece of aluminum will be used as a raw material. You will also need:
- melting crucible, steel or ceramic;
- muffle or induction furnace;
- fine sand, clay for molding sand;
- foam for the model.
The sequence of operations is as follows:
- prepare a molding mixture from clay, water and sand;
- cut out an exact model of the future pulley with a knife from dense foam;
- fill a mold made of sheet metal or boards with the mixture up to half, compact it;
- put the model down, cover it with the mixture, compact it again; leaving a hole for the release of casting gases;
- melt aluminum in a crucible and carefully pour it into the hole;
- After the casting has cooled, clean it of any remaining mixture, grind off the sprue, and sand it.
Such a part can be mounted on the shaft with a key or spline connection. It will sit much more firmly and will be able to transmit significantly greater torque and rotation speed.
Making your own pulley
The pulley is one of the most important spare parts for both drilling and lathe machines. It is a part whose purpose is to regulate the speed and power of the engine. Of course, factory pulleys have a high degree of reliability and are designed for your machine, to which they fit perfectly.
But over time, the pulley, like many other parts, fails and requires replacement. In this article we will tell you how to make a pulley with your own hands. A high-quality hand-made part may not be inferior in reliability to factory-made analogues.
Keeping parts in proper condition
For long-term service of pulleys on a walk-behind tractor, you must follow some simple rules:
- promptly check the strength of the seat fastening on the engine axis to prevent the part from becoming loose and failing;
- do not forget to check the protective covers that protect the part from dirt and large objects;
- check the belt tension to avoid slipping;
- visually inspect this unit to identify chips, cracks, etc.;
- observe the necessary safety precautions.
Read also: What model of lamp was invented by apples
A homemade product will serve you for a very long time without needing repair. As the service life expires, the part can be remanufactured.
The idea arose to make it out of plywood. I thought it was temporary, I’ll find a real one and replace it. But then it became clear that there was no need for this. It has been working flawlessly for me for 7 years now, no worse than any metal one.
The machine turned out great.
DIY pulley
.
In order to select a pulley for a walk-behind tractor in a store or online, you need to know several parameters of this product.
The driven pulley is designed to transmit the rotational motion of the engine to the attachments of the walk-behind tractor via a belt.
Using this part, you can increase or decrease the number of revolutions of the walk-behind tractor mechanisms.
Pulley characteristics
They come in different sizes, are mounted on the main shaft of electric motors, and are made of different materials. When purchasing a pulley, you need to pay attention to the size of the seat. It would also be a good idea to buy a new belt and select a part in accordance with its parameters.
The diameters of the pulleys used for electric motors are standardized.
Making pulleys without a lathe or making pulleys on a knee
The standards establish 3 types of structures:
- monolithic (up to 100 mm);
- disk (from 80 to 400 mm);
- with spokes (from 180 to 1000 mm).
CVT: device design, do-it-yourself repair, application
The scope of application of the variator in technology is large; it is also used to optimize the vehicle’s driving mode. This is a device that changes the gear ratio from the engine to the transmission.
In the automotive industry, it can be used to effectively select the gear ratio (engine-transmission). How to repair a variator with your own hands, its advantages and disadvantages are revealed in this article.
CVT, its application, positive factors
Cars produced with a CVT are economical , since the engine operates almost constantly in optimal mode, less toxic gases are emitted into the air, and better acceleration of the car.
It is ensured by a smooth gear ratio and smooth acceleration of the car, no jerks. Transmission components last longer than in a manual transmission. When comparing a CVT with an automatic transmission, their design is simpler, which allows you to do repairs yourself.
Despite all the positive qualities, this device is not an ideal gearbox; the reason for this is its frictional operation . This is when the torque is transmitted by friction, and has limitations; if they are exceeded, the belt will begin to slip, with a high rate of wear.
It is not advisable to use a CVT on a car frequently at maximum loads; you should not use a “sports” driving mode on these cars, with frequent jerking and braking. Its ideal and long-term performance is when the car is driven quietly, smoothly.
How does a variator work?
used on modern cars :
- V-belt transmission.
- Torus transmission.
A V-belt drive consists of 2 pulleys, between which a specially made belt is stretched. The first pulley is connected to the car engine (driver), the second pulley (driven) is connected to the drive wheels of the car. Sliding pulleys are used, they consist of 2 halves, when they come together, the belt is pushed out, and when they move apart, it falls through. There is a synchronous change in the radii of rotation, with an increase on one pulley and a decrease on the other pulley. This achieves a smooth transmission ratio .
When the radius of the driving pulley is smaller and that of the driven pulley is larger, this is a low gear. If the belt rotates along a large radius on the drive pulley and a small radius on the driven pulley, this is an overdrive.
Despite its simplicity, the use of variators in cars began recently, this was facilitated by the invention of a special belt. A simple belt is not suitable for these purposes.
V-belt drive
The belt for a variator with a V-belt drive is made of 2 metal strips on which specially shaped metal plates are strung. When the belt links are pressed against each other, force is transmitted by pushing them by the drive pulley.
Important! The drive pulley, connected to the engine, pushes the metal belt links sandwiched between its disks, and they push the adjacent links to the driven pulley. This belt is a pusher, which makes it possible to transmit large forces and to be used on cars.
Mechanism assembly sequence
We assemble the machine frame using channels and beams. The larger the parts you plan to work with, the stronger the materials the frame should be made of.
To produce the headstock, we will need a hydraulic cylinder with a wall thickness of 6 mm or more. We press 2 bearings into the cylinder. Using large diameter bearings we lay the shaft.
We install a tool rest to give the cutter stability. At the bottom we attach a small strip of metal, which makes the working part wear-resistant.
Which electric motor to choose?
The motor is the most important part of any machine, because without it it will not function. The total power of the machine depends on its power. A motor with a power of up to a kilovolt (old sewing machines can serve as a donor) is suitable for the manufacture of small parts.
Motors with a power of 1.5-2 kW. used when processing large parts. Never forget to insulate all electrical parts.
To install the motor correctly, it is better to call an electrician than to get injured.