Home / Electrodes
Back
Reading time: 2 min
0
1554
Nowadays, welding work with polymer compounds is no longer a rarity. Companies produce soldering irons for working with plastic materials in different cost categories.
There are soldering tools suitable for experienced welders and for those just starting to work with polymers. For small household work, anyone can purchase an easy-to-use device and electrodes for it.
The key element in welding plastic and other types of polymers is the plastic electrode (rod). Without this welding part, it is difficult to create a reliable weld joint.
What are plastic electrodes for welding polymers and how to work with them will be discussed below.
- general information
- Tips for selecting rods
- Principles of application
- Conclusion
Features of these electrodes
Flat electrodes are strips of different sizes, made from modified plastic through chemical and secondary processing. This material has high resistance to rupture or external damage, has good ductility, and high adhesion to many plastic copolymers.
Table of characteristics of plastics.
Strength may be low due to the characteristics of the material used in the production of plastic parts, as well as the active oxidation process if the temperature increases. The structure ages, which provokes early damage.
Many machine parts made of plastic, thermoplastic or polymer can retain their function when frequently melted. Thanks to this, most spare parts in a car can undergo a thermal process during repair work.
Some of the most popular types of plastic used in mechanical engineering are:
- polypropylene plastic electrode - used in repairing machines with plastic parts;
- polyethylene material;
- polyamide;
- styrene, acrylonitrile, copolymer-butadiene;
- polybutyl terephthalate.
Any experienced craftsman who has at least once soldered plastic using an electrode knows that these materials are repairable.
general information
How often have you had to take your car to a workshop to have the bumper repaired? If you are an avid car enthusiast, then probably more than once. Perhaps you have not gone into the details of repairs before. Therefore, we want to draw your attention to this. After all, bumpers are made of plastic. And plastic welding electrodes are the main characters of our article. After reading this, you will be able to do your own bumper repairs in the garage.
So, a plastic electrode (also known as a plastic rod, plastic wire, electrodes for repairing bumpers, and a dozen other names) is a thin oblong rod made of artificial polymer. Available both individually and in reels. Single rods are more convenient for home soldering than coils.
Soldering a plastic bumper with your own hands
Let's talk a little about repairing plastic car parts. Their repair is slightly different from metal surfaces and has its own nuances that you should know in order to make your work easier in the future.
Probably the most repairable part on a car is the front bumper, since it is located at the front of the car and some accidents constantly happen to it. As a result, repair and soldering of plastic bumpers
is in great demand and mastering this craft will be very useful.
I’ll say right away that we will talk about professional plastic welding. Since this method is considered the best, most reliable and high-quality repair. If you are offered repairs using mesh, rivets, fiberglass, etc. This is all “Nonsense”, this is done by outbids and “undermasters”. The plastic is elastic, it “plays” and it all starts to burst and fall off! Tested by our own many years of experience
Welding plastic
Important!
When machining plastic, keep in mind that plastic particles are just as dangerous to the eyes as metal particles.
Before starting work, the first thing you need to do is determine the type of plastic that you intend to cook. On some parts of the reverse side there is a decoding with a code. This code complies with recycling legislation and also allows you to identify the type of plastic.
The following are the main types of plastic:
- ABS
- Acrylonitrile butadiene styrene. - ASB/PC
- Polymer alloy of the above. - PA
- Polyamide (Nylon). - PBT
- Polybutylene terephtholate. - PC
- Polycarbonate. - PE
- Polyethylene. - PP
- Polypropylene. - PVC
- Polyvinyl chloride. - GRP/SMC
- Fiberglass (do not cook) - PUR - Polyurethane (not all polyurethanes can be welded).
- PP/EPDM - Polypropylene/Ethylene Diene rubber.
The most common of them that are used on cars now are ABS
,
PP
,
PA
,
PE
.
The easiest to solder is PP
- Polypropylene.
PA
is difficult to solder and requires high temperatures during operation.
PE
is practically not soldered - Polyethylene, I’ll tell you how to work with it some other time.
The process of soldering plastics is simple, especially for those who have experience in gas welding. But it has features that you need to know about.
It is important to note that plastics are divided into two groups: thermosets and thermoplastics. The first group includes fiberglass (and some others) - they cannot be welded because thermosetting plastics do not soften when heated
Fortunately, most plastics used in cars are thermoplastics. If you need to repair a fiberglass part, this is a different type of work, we’ll talk about that later.
A necessary tool for soldering (welding) plastic.
To work we will need:
- A special hair dryer for soldering and attachments for it.
- Solder for plastic.
- A regular soldering iron with a sharp tip, preferably a more powerful one.
- Grinding machine with abrasive wheels.
If you cannot find rods for soldering, you can cut them yourself from old unnecessary plastic, bumpers, etc., which are similar in composition.
If you purchase ready-made solder, then each package of welding rods is marked in accordance with the plastic code indicated above. Thus, if you know the plastic from which the part to be repaired is made, feel free to take a rod with the required marking.
If you don't know the type of plastic you have, choose a rod that is similar in appearance and try welding it on the back of the part. The experiment can end successfully or unsuccessfully!
If welding of a part fails (this also happens), then the only possible option in this situation is a chemical restoration method. I'll talk about this in another article.
How to solder a crack on a bumper (example).
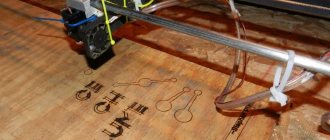
And so, let's start repairing the plastic bumper
. The first thing to do is to sand down the repair area down to bare plastic. I use an eccentric sander. Next, remove dirt and degrease with solvent. Then use a soldering iron to cut the crack along its entire length in the form of a V-shaped groove. This is necessary so that solder can be placed there for high-quality soldering.
Next, turn on the hair dryer and set the desired temperature. The temperature for welding a bumper is somewhere from 300 to 600 degrees, depending on the type of plastic. Start from the beginning of the crack. Hold the hair dryer at an angle and at a distance of 0.5 - 1 cm from the part and the solder and move it evenly to the edge of the crack, observing how the solder goes down. Do not lean the hairdryer nozzle too close, as you can easily drill a hole right through the part.
Important! Be sure to solder the seam on both sides. And first from the inside and then from the front side
https://youtube.com/watch?v=qgrftAAaqdg
Principles of application
Welding with plastic filler wire does not require much experience. Even a beginner can cope with it. The beginning of the work will be the preparatory stage. The surface of the part is cleaned of dirt, traces of foreign substances and irregularities.
Depending on the material, you can use sandpaper, a sander, or a file. This simplifies the process of further work and improves the quality of the connection. Seams created on a flat, clean surface are more durable.
Plastic electrodes with a circle-shaped cross-section are also being prepared for work. They sharpen the edge of the rod, which significantly helps in welding.
If you have a welding extruder, it is equipped with a hole for filler wire. The electrode is inserted into this hole, then the device is turned on.
The rod is heated, after which the nozzle is applied to the joint of the parts and the feed is turned on. The molten electrode is fed to the pressed end of the nozzle; all that remains is to move it along the welding joint.
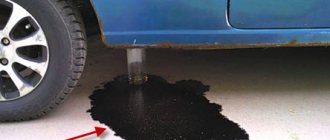
Priority actions when a leak is detected
If a leak appears on a heating or high-pressure pipe, you must immediately shut off the system using shut-off valves. To solve the problem of how to seal a hole in a plastic pipe, you can use a clamp. Such structures are characterized by very simple use, which consists of putting them on the damaged area and tightening the bolts.
An older method is to use rubber: heating and water pipes are often repaired this way. This involves wrapping a piece of rubber around the damaged area, which can be done using an old car tire.
Payment methods for bumper repair kits:
- Cash payment upon receipt of goods - this method of payment is possible only in the Krasnodar Territory, Stavropol Territory, Rostov Region and the Republic of Crimea when delivered by our vehicle, or in case of pickup from a retail store when paying at the checkout. You can also pay for goods with a bank card at the store's checkout.
- By Visa or MasterCard
bank card online when placing an order without any additional fees. - Cashless payment on an account (the invoice can be printed in your personal account or from a letter that will be sent to your email after placing an order) at the cash desk of any bank. The bill can be paid through any online bank.
Best models
A soldering iron for repairing plastic parts is an expensive device, which is explained by its technical characteristics and operating features. There are several of the most reliable and effective devices on the domestic market:
- Steinel. This brand produces a whole repair kit, which includes a heat gun. The device has a power of 2.3 kW. With its help, plastic can be heated to a temperature of 650°C. Sold in a durable polymer case with additional accessories (electrodes, extension cord, etc.) and attachments.
- RT-2003 from Intertool. This device is great for processing thin plastic materials.
- Teroson. A convenient kit for repairing plastic parts, which contains a heat gun. Additionally, the device comes with attachments and accessories, including mixers, replaceable cartridges and reinforcement materials.
- Neico. This tool is professional and made in China. Its power is 1600 W. Additionally, a special roller and attachments are supplied with it. Precisely selected components can ensure fast and simple operation. The advantage of Neico is that you do not need to purchase auxiliary materials for it.
- Stapler. Budget class model with a power of 100 W. The seams are created using special staples, which is why the tool got its name.
- Lukey. This is a cheap Chinese model. It is perfect for beginners and home use.
It is necessary to choose a tool taking into account your goals and financial budget.
Areas of application
Currently, a hot air gun with attachments is used both at home and in large enterprises to solve various problems. One tool cannot perform most functions, but with a set of attachments the device becomes multifunctional and is used:
- for joining and processing seams;
- sealing cracks, deformations, irregularities;
- soldering objects made of polymer-based film, plastic with other materials;
- roofing works;
- installation, dismantling, restoration work in the automotive sector.
In addition to the above activities, a hot air gun with attachments can perform a lot of other work where soft polymer materials are used and thermal exposure is required.
Requirements for soldering irons for plastic
One of the main parameters for any such tool is power. When choosing a suitable soldering iron, you need to ensure that it is at least 100 W
This is a very important requirement that must be fulfilled, since otherwise the plastic may simply not melt. When choosing thermal hair dryers, you should focus on models from 1600 W
The main requirements include rapid heating of the tip. Standard models that take several minutes to warm up are not suitable here. When working with plastic, it is better to choose those options in which the tip reaches the desired temperature within a period of up to 10 seconds. For some situations, it is permissible to take a model with a longer warm-up time, but in professional work this will be a big disadvantage.
TOP 5 best models of bumper soldering irons
A soldering iron for a bumper is a rather expensive product, since it is often supplied in a ready-made kit, and also has its own features and technical characteristics. Some of the best models that are presented on the domestic market include:
Steinel. This is a whole set that includes a heat gun. This is a fairly powerful 2.3 kW device that can heat material up to 650 degrees Celsius. Supplied in a plastic case with all necessary attachments and accessories.
Soldering iron for plastic Steinel
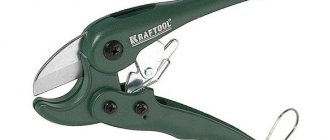
Intertool RT-2003. The tool allows you to work with materials with a small thickness.
Soldering iron for plastic Intertool RT-2003
Teroson. Another set that uses a heating gun. The kit includes all the necessary accessories and tools. There are cartridges, mixers and reinforcing materials here. The soldering iron can also be used to work with other plastic parts.
Soldering the bumper with Teroson material
Neico. A professional Chinese instrument with a power of 1600 W. The kit includes additional attachments and a roller. Professional components make the work easier and do not require you to buy anything extra at first.
Soldering iron Neico
Stapler. Inexpensive and high-quality model with a power of 100 W. This is a standard electrical tool that allows you to work with staples. Soldering iron for bumpers of this type. Using braces of the right size allows you to create the highest quality and affordable seam.
Progress
The working surface must first be degreased and then sanded. This will help improve the quality of the connection. When working with a standard soldering iron, the edges of the part are simply melted and then connected to each other. It is advisable to immediately press them tightly against each other, and then carry out heat treatment. When the two ends melt and are tightly connected to each other, a high-quality seam is formed.
Approximately the same principle is present when processing with a hairdryer. A narrowly directed air flow of heated air, or its wider distribution, helps to achieve the transition of plastic to the desired state. If we are talking about leveling, then you need to wait until the bumper becomes plastic and then carry out the necessary procedures. When the ends melt, they should be immediately connected tightly and held until everything dries.
When working with staples, a consumable is inserted into the soldering iron, which is heated by the tool and immersed under pressure inside the plastic. Due to oscillatory movements, a bond is created. The bracket has a special shape that allows you to grab both parts of the bumper and connect them together. as it cools, the metal part is detached from the tool and remains inside the plastic, reinforcing the connected area.
Conclusion
When repairing bumpers, many problems arise that relate to cosmetic effects. Having the right soldering iron for the job will help you overcome many of the shortcomings and achieve the look you want. Many specialized models now have the required parameters, so there are no big problems when choosing. The main thing is to focus on the requirements for the tool.
Let's understand the types
Metal-plastic
Polyethylene Such communications are divided into subtypes:
- Polyethylene - used for laying wiring inside buildings and external routes. They can be used on high-pressure pipe connections and at low ambient temperatures.
- PVC is used to reduce the cost of repairs.
- Metal-plastic ones are the most practical products, with a useful life of more than 50 years. Ideal option for replacing hot water supply.
The widespread use of this material is due to a number of reasons. Positive properties of such structures, in contrast to metal ones:
- Long service life.
- Low corrosivity.
- Easy to install.
- Does not require special skills.
- Environmentally friendly material.
- Economical and easy to use.
- Lightweight and easy to transport.
- Resistant to the harmful effects of microorganisms.
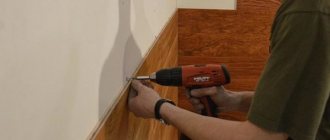
Pipe after repair: operating features
After the polypropylene pipe has been repaired, you should pay attention to some features of its operation. Under no circumstances should any mechanical impact be allowed on the soldering area.
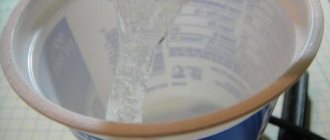
The repaired breakdown itself must be constantly monitored to see if it begins to get wet. This cannot always be seen with the naked eye, but ordinary toilet paper leaning against the pipe will help determine the location of even the smallest leak. Moisture stains will instantly become visible on it.
I would like to remind you that such a measure is only temporary. At the first opportunity, it is necessary to replace the damaged section of the pipe. You can do this kind of work yourself if you have the opportunity to “rent” an iron from your friends, which is used for soldering. By the way, I saw the algorithm for producing work on the pages of this magazine. At the same time, everything was described quite competently, as far as I thought. At least, I carried out soldering in my apartment, guided by these instructions.
This is what the repaired pipe will look like after soldering
How to choose?
Manufacturers make plastic electrodes from a wide variety of polymers. The most commonly used are so-called ABS rods or PP rods (the main component is polypropylene). But the types of plastic rods do not end with these two varieties. There are as many types of plastic electrodes on the market as there are varieties of plastic itself.
There is a simple explanation for such great diversity. To solder a part made of any polymer, you must use a rod of the same material. Simply put, if a part is made of polypropylene or HDPE, then the electrode must be made of polymer or HDPE, respectively.
Also, when choosing a plastic electrode, pay attention to the thickness and cross-section of the rod. The thickness of the rod should match the diameter of the outlet hole on your soldering iron and match the size of the joint. If you choose a rod that is too thick, it may get stuck in the soldering iron when melting. And if you choose too thin, then it may fall out of the joint if it is wide enough.
Also, electrodes for welding plastic can have different cross-sections. Take a closer look: some rods are round, others are triangular, and others are completely flat. Each section is intended for specific work. The round section is universal and can be used for most types of plastic soldering. Only the resulting seam must be smoothed using a rubber roller. The triangular rod has proven itself well when soldering parts joined at an angle. A flat rod is suitable if the parts are joined in the same plane. Then you won’t have to smooth the seam with a roller, as is the case with round bars.
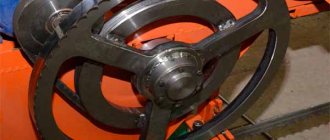
Welding process
After all the parts are prepared, they need to be precisely aligned and fastened together. This can be done using clamps. Next, turn on the heat gun for welding and set the temperature. It must correspond to the melting temperature of the material from which the parts are made.
After the gun heats up, make so-called tacks in several places of the future seam. Tack welds are small weld points located around the perimeter of the joint. Using tacks you will ensure reliable fastening of parts at the initial stage. You can remove the clamps and proceed to forming the seam.
Use plastic rods to fill the joint. The rods must be made of the same material as the parts. Apply the rod to the joint and heat it with a gun. The rod will melt along with the part. As soon as the rod and the part become plastic, begin to move along the entire joint. The seam must be made from both sides of the parts, it is better to start from the back.
Avoid excessive melting of the plastic. It should be plastic, not fluid. To make the seam more aesthetically pleasing, use special rollers that smooth the joint. The seam must be smoothed before it completely cools down. If the seam has cooled down, you can additionally warm it up with a gun and smooth it out.
If special staples are used for soldering instead of rods, then select the optimal size in advance.
What to do if there is a crack on the bumper - methods for repairing it
If a crack has formed on the car bumper as a result of damage, then simply cleaning and polishing this place will no longer work; in any case, it will be visible.
To repair a crack, you need to resort to more effective methods. There are several ways to repair cracks in plastic bumpers:
- repairing damage with liquid polymer;
- welding using a rod;
- welding the crack with a hot air gun;
- repairs using fiberglass;
- gluing plastic with a two-component composition.
Let's look at each of them in detail.
To make it easier to work with damaged areas, the car bumper must be removed and secured on a stand. Before starting the repair, you need to thoroughly clean the damaged area from dirt and dust, and if the bumper has already been repaired, then remove the remnants of the repair kit from the last time.
Experts advise treating damaged surfaces with any degreasing chemical before starting repairs. means.
Seal the crack using liquid polymer
For this method you will need: a soldering iron, fine-grained sandpaper, a knife, wire cutters, steel wire, a hot air gun, a piece of protection for the car fender liner.
Sealing process:
- We clean the edges of the crack with sandpaper.
- If the crack is long, then it must be sewn together in several places along the edges with scraps of steel wire. The edges of the wire are bent and cut off with wire cutters.
- Next, the edges of the crack are brought together and carefully soldered with a soldering iron.
- The fender liner protection is made of polymer plastic, which melts easily and is suitable for creating patches. Small strips are cut from the protection fabric (about 2-3 cm wide, 15-20 cm long and 2 mm thick), which will be patches for soldering.
- The place where the patch will be applied and the patch itself is cleaned with a sharp knife.
- We heat the damaged area with a hairdryer in the place where the patch is applied. Next, we heat the patch strip to a semi-liquid state, gradually applying it to the damaged area. This is repeated several times (with new strips) until the crack on the bumper is completely sealed.
- The resulting seam is cleaned with an emery wheel and prepared for painting.
Video instructions for repair using this method are given below.
- Pros: low cost, simplicity, minimal set of materials and tools.
- Cons: likelihood of plastic deformation when heated.
Work order
The sequence of work to restore and solder the bumper can be represented as follows:
- first of all, the plastic bumper, which needs repair, is carefully removed from the car;
- Next, you need to wash it, degrease it and get rid of dirt and debris, remove the paint and varnish mixture from the damaged area;
- if the bumper splits into several pieces, then they are combined into the original integral structure, joining the edges;
- Now you can begin the soldering process, which boils down to progressive movement of the soldering iron tip from one edge of the crack to the other with a slight recess of the tip into the body of the bumper;
- then the plastic that was squeezed out during soldering is leveled over the surface with a soldering iron;
- After this, you don’t need to do anything on the inside of the part; the soldering area will still not be visible. And on the outside, you will need to treat the surface at the crack site - sanding, puttying, painting.
Sometimes bumper soldering is carried out using reinforcing mesh. This mesh should be used correctly for large and serious cracks. The peculiarity of this method is that after removal and cleaning, the master must “sink” the mesh into the plastic. That is, the mesh for soldering bumpers is carefully applied to the inside of the part and heated with a soldering iron. And when the temperature of the mesh becomes sufficient, you just need to press it into the plastic with a screwdriver.
In some cases, craftsmen first, in addition to the mesh, install brackets or fasteners on the bumper to tighten the crack. The features of this procedure will be discussed in the corresponding section.
Sequence of work
Repairing bumpers includes several stages. The following is the sequence of their execution:
- First of all, you need to remove the damaged bumper from the car.
- Next, the preparatory work begins. They consist of cleaning the part by washing, degreasing, and removing paint and varnish material from the damaged area using a grinding machine with a P240 wheel.
- If the bumper has split into several fragments, they are combined into the original integral shape by joining the edges.
- After that I start soldering. The seams are tightened with staples, placing them at intervals of 1 - 2 cm at a depth of no more than half the thickness of the bumper.
- Then the plastic layer is fused with a soldering iron tip to prevent the formation of corrosion.
- After cooling, the seams are cleaned with a grinding machine with a P240 wheel and blown with compressed air. To remove lint and hair, use a tool such as a hair dryer.
- Then putty is applied to the surface of the bumper with a rubber spatula. In hard-to-reach places, apply with your finger or any suitable object. After the material has hardened, the surface is ground with a machine using a P120 wheel.
- Next, the entire part is covered with primer in two layers with an interval of 15 minutes between them.
- A light-colored developing layer is applied on top using a dark base underneath. After drying, the surface is ground with a P800 wheel. The remaining stains are removed with nitro putty. Then wet grout the bumper surface with a P1000 wheel using grinding equipment.
- After drying, the surface is wiped with napkins and degreased. Paint is applied over the primer in 2-3 layers.
- Finally, the surface of the bumper is also varnished in 2 - 3 layers.
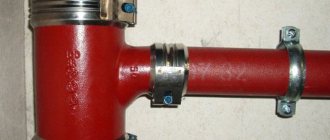
Secrets of PVC soldering and safety measures
Soldering work should be performed in a room with positive temperatures. It is necessary to take into account that the colder it is, the longer it will take the elements to warm up. However, there are a number of other rules that must be followed.
Features of soldering PVC pipes:
- The iron power should be 1200 W.
- The hand-held device is used for pipes with a diameter of up to 32 mm. For larger sizes, professional equipment is used.
- Before starting work, the device must be warmed up for 5-10 minutes. This is necessary for the device with nozzles to achieve the desired parameters.
- After soldering, it is prohibited to twist the connection. Otherwise, it may compromise the integrity of the seam. You can only straighten the distortions so that the connection does not leak.
- You don't need to use a lot of force to compress the parts. Otherwise, the gap will fill with hot plastic and impair patency.
- Gaps between the pipe joint and the inside of the fitting are prohibited. Otherwise, leaks will occur under pressure.
- The soldered area must be completely cool before use.
- After completion of work, the iron is cleaned of plastic. This way, carbon deposits will not appear on the device, and the elements for soldering will not be damaged.
A flat wooden stick should be used for cleaning. This way the Teflon will not be damaged. Metal objects can scratch the surface and render the nozzle unusable, because the plastic will begin to stick to the coating.
The soldering apparatus should be placed in such a way that it stands stable
When working with power tools, it is important to follow safety precautions. Otherwise, you may get burned or injured. You need to wear protective gloves when working
The room must be clean, dust-free. Otherwise, particles will settle on the plastic and interfere with the quality of the seal.
You need to wear protective gloves when working. The room must be clean, dust-free. Otherwise, particles will settle on the plastic and interfere with the quality of the seal.
The soldering iron is placed horizontally on the surface. During operation, it is prohibited to turn off the equipment. Work begins when the iron is completely warmed up. In modern models this is indicated by an indicator. For old-style options, wait 20 minutes.
Soldering polyethylene pipes does not have a complex technology. Welding may have special features if you solder reinforced products
It is important to take precautions when doing this. Basic secrets and rules will help you solder pipes correctly. You should also follow the instructions exactly
You should also follow the instructions exactly
You should also follow the instructions exactly.
Sequence of actions when soldering a damaged bumper
- The first step is to clear your workspace, be it a workbench, shelving or table. After removing the bumper from the car, place it on a flat surface and securely fix it.
- Thoroughly wash the bumper outside and inside (regular dishwashing detergent will do the job).
- Degrease the soldering area on each side; the surface should be clean and dry.
- Before you start soldering cracks, you need to make sure that the bumper is not deformed, as this can make it much more difficult to repair the cracks. To return the bumper to its original shape, you need to heat the plastic with a hairdryer. To do this, heat the bumper throughout the entire thickness of the plastic at the place of deformation and squeeze out the dent. It is better to straighten the dent with a blunt object (it can be a wooden block or the handle of a screwdriver), and then cool the area with a damp cloth. When working with a hairdryer, use a rag and straighten the hot plastic with gloves on, this will help protect your hands from burns.
- Remove all varnish and paint in areas where soldering will be carried out. Use a wire brush or coarse sandpaper.
- It is necessary to thoroughly clean and degrease not only the damaged area, but also the surrounding area.
- To eliminate further growth of cracks, their ends must be drilled.
- After this, start soldering. In places where the edges of the crack are in close contact, grab the plastic with small solders; this must be done as accurately as possible.
- Having soldered the main places of the crack, you need to wait until the plastic hardens. It is easy to determine whether plastic has hardened or not: semi-liquid plastic is shiny, while fully hardened plastic has a matte texture.
- Next you need to adjust the broken pieces of the bumper. Applying a splinter to the crack, trim off the interfering edges. In the same way, grab them to the bumper.
- Thoroughly sand the joint, apply primer, paint and varnish.
Your water supply
Coupling assembly
Soldering Polyethylene models are mounted using the soldering method or using couplings/fittings (coupling assembly). How to solder plastic pipes for water supply?
For new water supply networks, products made of PVC and polyethylene without reinforcement or reinforcement are suitable. Preparation requires creating a diagram of the future water supply indicating the lengths of the branches, its position and all the fittings necessary for installing the structure. Correct calculation of the lengths and number of bends will simplify the technology, increase the speed of task completion and prevent rework.
Soldering iron
Pipe cutter
To solder polyethylene connections you will need:
- Soldering iron.
- Pipe cutter
- A trimmer for cutting pipes and trimming the edges of cut ends.
- Fine sandpaper for cleaning edges
- Connecting coupling (if coupling assembly)
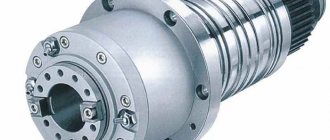
The heating device is a special device with a sole with special nozzles of various diameters attached to it. There are devices that include two or more attachments at the same time.
The stages of technology for laying hydraulic communications will tell you how to learn to solder:
- We measure the required length with a tape measure.
- Use a pipe cutter to cut the measured length.
- Trim the cut ends. This is an important step in soldering. The cuts must be smoothly sanded and cleaned. To be more sure, you can additionally degrease it with an alcohol solution.
- We solder the ends. If a coupling connection is used when installing life support networks, then we install a coupling/fitting at one end of the structure and heat it together with the future return in a soldering iron nozzle of the required diameter. After warming up, immediately connect the ends and wait for the assembly to cool completely. The quality of welding is indicated by the presence of a shoulder.
Attention! When installing heat and water supply using a soldered seam, it is strictly forbidden for water or moisture to fall into the cavity or onto the surface. When heated, water turns into steam and deforms the plastic structure, causing it to lose its strength.
Step-by-step procedure for gluing elements
Before you start gluing polypropylene, study the instructions. As a rule, recommendations and procedures, as well as compliance with proportions for two-component formulations, are indicated by the manufacturer directly on the packaging. However, there is a general principle of action:
- The surface must be cleaned and degreased, for example, with a solvent for polypropylene;
- The glue is applied in a thin layer to all surfaces that require subsequent gluing. This action is relevant unless otherwise specified by the manufacturer;
- Fixing the parts should take at least three minutes.
After treatment, you should not move or disturb the parts in any way for a couple of hours until they are completely dry.