Simple do-it-yourself wood lathes Wood is the most popular material for the Kulibin craftsmen and other home-made craftsmen. Its popularity is largely due not only to its versatility in use, but also to its accessibility and ease of processing.
In most cases, to work with wood, you can use your personal hand tools, which everyone has in stock: wood hacksaws, planes, chisels, sanding blocks.
Various types of power tools are also used: drill, grinder screwdriver, hand router. Almost anyone can buy them, especially if a person is involved in woodworking.
But in cases where it is necessary to give a wooden blank a cylindrical shape, turn tool handles, make pulleys, as well as candlesticks and other decorative elements, you cannot do without a lathe.
Buying such equipment is not always affordable. But there is always an alternative option. For example, if you wish, you can make a simple machine yourself. It's not as difficult as it might seem at first.
Our website presents different options for homemade wood lathes: from primitive, easy-to-manufacture and budget-friendly to universal designs. With such a variety of options, you can choose what's right for you.
The device of a wood lathe
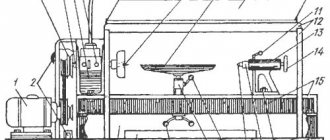
Before proceeding with manufacturing and assembly, it is important to first become familiar with the design features of the equipment. There are five key nodes here.
The base of the homemade product is the base (or it would be correct to say - the bed). All other structural elements are located on a fixed platform, without which the operation of the machine is impossible.
The foundation must be solid (pardon the tautology), strong and reliable. For the bed, home-made craftsmen use both metal and wooden platforms.
Another important structural elements are the so-called headstocks. Without them, work is basically impossible. It is between them that the workpiece being processed is fixed.
Please note: the quality of processing of the workpiece will directly depend on how responsibly you approach the assembly and installation of the heads of a wood lathe. Therefore, we recommend that you first familiarize yourself with the main nuances. An important and mandatory condition is that their centers must be coaxial.
For their manufacture, it is advisable to use metal (the thicker the better), however, there are many alternative designs in which they are made of plywood or wood.
When making a wood lathe for yourself with your own hands, do not forget about making a tool rest.
This is the fifth structural element, which, although it does not directly affect the operation of the machine, like the previous ones, it must be there.
An adjustable tool rest serves as a support for turning tools, namely carpentry cutters, with the help of which wood workpieces are processed.
There are also “home” designs that are more difficult to manufacture - for example, those that work in conjunction with a copier. You can also make them yourself, but in this case you will need some experience, and the ability to work with drawings.
A few words about the material and tools
We will not deceive you, making such structures with your own hands is only possible for a person who is well acquainted with the basics of carpentry and confidently owns all household power tools.
Tabletop version of the machine.
What kind of plywood is needed
Although laminated wood sheet is deservedly considered a fairly durable material, not every profile is suitable for the manufacture of such structures.
- Let us immediately note that sheets with a thickness of less than 6 mm cannot be used for the manufacture of supporting and load-bearing structures. In this case, we can only talk about the design of casings or lightweight protective panels;
- As for sheets with a thickness of 10 - 12 mm, expert opinions differ. Some believe that this thickness is not enough for reliable operation of the units. The latter, on the contrary, argue that everything depends on the purpose of the machine; a ten-millimeter sheet, for example, is quite suitable for a cutting table in CNC machines made of plywood;
Characteristics of the material.
- Some claim that medium-thick sheets are well suited for gluing three-dimensional parts that are subject to periodic vibration; supposedly, the multilayer structure of the monolith dampens vibrations better. And in principle we agree with them;
- Sheets with a thickness of 19 mm and above are the strongest. They are most often used to make dimensional load-bearing and supporting structures. And although the price of this material is far from affordable, this is the profile that most craftsmen prefer to use.
Assortment of sheets.
But besides thickness, there are a number of important characteristics of a laminated wooden sheet, and since all such structures experience significant mechanical loads, it is undesirable to neglect these recommendations.
- Basically, all plywood is divided into coniferous and hardwood. Coniferous wood itself is lighter and softer, and accordingly the leaf inherited its qualities. Material glued together from hardwood veneer, although more expensive, is better suited in this case;
- Gradations in the chemical composition of the adhesive and the level of moisture resistance are not so important for such products. As a rule, machines are installed in a home workshop and are operated at room temperature and normal humidity. Therefore, you can safely take a thick sheet marked “FC”; in terms of cost, this is the best option;
Veneer grade.
- For such structures, the quality of the veneer matters. The more knots, the higher the likelihood of cracking and delamination of the sheet. There is no need to save money here; the sheet should be taken no lower than second grade;
- Sheets with unsanded jackets (NS), sanded only on the front side (Sh1), as well as completely sanded plywood sheets (Sh2) are produced. Theoretically, you can take unpolished material and polish it yourself, but in artisanal conditions this is difficult to do. Therefore, experts recommend using completely polished material. It is easier to process, and most importantly it adheres better.
Tool selection
The construction of such units requires a good power tool; a hand hacksaw or drill attachments will not work here. There is an opinion among professionals that sheets up to 10 mm thick can be cut with an electric jigsaw. Anything outside of these parameters requires the use of a circular hand saw or a stationary circular saw.
Standard jigsaw.
Important: modern high-frequency jigsaws from reputable and well-known manufacturers, as the attached instructions say, can easily cope with furniture boards up to 20 mm thick. And we have no reason not to believe in this.
To select various types of grooves and holes of non-standard configuration, you will definitely need a hand cutter. It is better to have this tool for personal use, since you can make a plywood bed for it and then you will have a personal milling machine. It is these units that are common among home craftsmen.
Manual frezer.
Naturally, in any such work you cannot do without an electric drill and a set of high-quality carpentry tools. Various kinds of clamps, screwdrivers, hammers, files, sandpaper and other little things are a must have for any self-respecting craftsman by default.
Set of carpentry tools.
Possibilities of a homemade machine
It is clear that garage mini “versions” of factory models differ from the latter in many respects. Nevertheless, you can work for them, and they do their job well.
To carve a decorative wooden candlestick or a handle for a chisel and file - even the simplest machine driven by an electric drill, made of wood, can handle this operation.
You can read in detail about how to assemble such a lathe from waste materials and in a hurry on our website in this article.
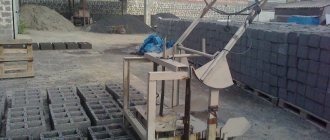
If you need a unit for more serious work, then it is better to make a solid frame - from thick metal.
Using homemade structures, you can easily turn wooden pulleys for any kind of garage homemade products, various cylindrical parts, beautiful wooden ashtrays, etc.
Once again we would like to draw your attention to the fact that assembling a wood lathe with your own hands will be beneficial if you need to process (turn) small-sized workpieces and in small volumes. For more serious and important things, it is better to purchase factory designs.
Drive implementation
Many craftsmen and DIYers are often interested not even in how to make a wood lathe, but in which drive to choose.
Here, of course, everything depends on your capabilities, as well as on what exactly you are going to do, what parts to grind.
If we are talking about a budget option, which does not require drawings and serious calculations, then an electric drill will cope with the role of the drive. This is one of the most commonly used options.
Some craftsmen use an angle grinder (grinder) instead of a conventional electric drill drive, but this design solution is not widespread.
Moreover, using an angle grinder without adjusting the speed is generally impractical. Read more about making a lathe from an angle grinder in our article.
If you need a structure to make various crafts and parts from wood, then it makes sense to use an electric motor, which will be connected to drive pulleys via a belt (and they should be of different diameters).
In this case, the lathe itself, or rather its main elements, should preferably be made of metal. In this case, the design will be not only reliable and solid, but also safe, which is also important.
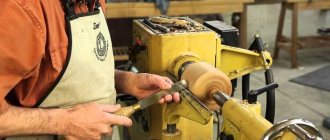
Using a drill
As it was written earlier, one of the most popular designs for the garage and home workshop is a simple lathe based on an electric drill.
It's easy to make and easy to work with. To make the main structural elements, you can use what you have at hand.
For example, the bed can be made from a piece of metal I-beam. You can also take a channel or a construction angle as a basis - there are a lot of options.
The headstocks themselves can be made from the same I-beam. You will also need to make a simple clamp to firmly secure the electric drill in its place.
This mini wood lathe can be installed directly on your workbench, and after finishing work, you can put it in a corner of the workshop by removing the drill from it.
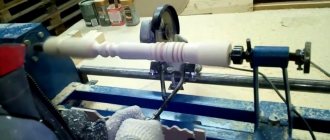
With a motor from a washing machine
While designs based on a corded electric drill are popular due to their ease of assembly, machines driven by an electric motor attract attention for their versatility.
To manufacture such a lathe, you can separately develop drawings with the main components and detailed dimensions. This will help a lot during assembly.
Please note that when using a washing machine motor, several basic design solutions can be used.
It is possible to implement both direct drive, when a special (often homemade) attachment is put on the shaft to fix the workpiece, and indirect drive, when rotation is transmitted to the spindle through a system of pulleys and belt drive.
The tailstock is attached to a movable platform, which makes it easy to move it along the bed, adjusting to the size of the workpiece or workpiece.
We make sure to make a housing made of metal or wood, inside which the electric motor will be located.
And the power button can be placed on the front side of the case. Additionally, if possible, you can install a speed control board.
What kind of wood can be processed
Any type of wood is suitable: oak, birch, ash, hornbeam, and even more so - pine or other conifers. Glued birch plywood blanks can also be turned on a homemade lathe.
And using an auxiliary copying tool, you can make some very cool things.
Therefore, you don’t have to worry too much about choosing wood - a homemade design can handle processing any small wood blanks.
Tabletops and machines made of plywood sheets
Plywood is an excellent material for making a workbench. Water-resistant sheets are suitable for this. A good choice would be FSF or laminated FOF plywood. It can also be used to make functional tabletops for machines or the machines themselves. For example:
- Manual milling machine. It requires 20mm thick plywood, wing nuts, steel bushings and a drill. The device is suitable for turning ends or making grooves.
- Belt sanding machine. The belt is driven using a drill. The base and stand for the drill, the table top for the workpieces being processed, and the drive and driven rollers are made from a plywood sheet. Additionally, you will need sealed bearings, nuts, bolts and screws, and a set of sanding belts.
- Jigsaw machine. The stand, boom and table top are made from plywood sheets. An electric jigsaw can be used as a drive. This machine allows you to achieve maximum accuracy when cutting out shaped elements.
Advice! To make durable machines, use only high-quality grade 1 plywood. And to increase its water resistance, cover it with varnish or paint.
Rules of use and safety precautions
When working on any equipment, it is important to follow basic safety rules. First of all, it is necessary to use personal protective equipment - a mask or goggles.
When assembling a wood lathe for yourself with your own hands, it is important to provide in advance for it a suitable place where it will be securely installed.
The place must be level and durable. And the desktop is basically suitable for this. You can also make a separate seat.
It is also extremely important that there is good lighting above the place where the machine will be located.
Before starting work, you need to make sure that the wooden workpieces being processed are securely fastened, as well as that all structural components are in working order.
Making a woodworking lathe with your own hands is not at all difficult - we have shared with you simple solutions that every craftsman can implement.
Principles of equipping a home workshop, preparatory activities
Before proceeding directly to the technical equipment, several general comments should be made on the corresponding specialized premises:
- It is convenient when the workshop is located in a separate building. This implies sufficient space, the absence of unnecessary worries, and the possibility of being fully equipped with ventilation and other engineering systems.
- If the room is located in an extension or basement, it must be well isolated from the living area.
- The area of a standard workshop should not be less than 6-7 square meters. Height – sufficient for free passage and the maximum level of the raised tool (from 2.5 m or more).
- High-quality ventilation, heating, and lighting systems will come in handy here. Each engineering system should be considered separately to avoid excessive costs during operation.
- It is necessary to make sure that there is enough electrical power to provide uninterrupted power to all woodworking machines for your home workshop.
For your information! If the equipment has electronic components, special circuit breakers in the circuit that prevent damage from voltage surges and protective grounding will be useful. It is necessary to ensure that the network parameters correspond to the characteristics of the power units (220 V, one phase; 380 V, three phases).
The next group of practical recommendations is supplemented with explanatory photographs.
To ensure effective sound absorption, special materials are used for upholstery of walls and ceilings.
The emission spectrum of the lamp on the workbench should be close to natural sunlight
The use of such a source will reduce fatigue and help maintain good vision. It is preferable to install an LED device. It does not heat up the surrounding area like a regular incandescent lamp. Unlike its gas-discharge counterpart, it is difficult to damage by mechanical action.
It is necessary to create passages wide enough for free movement and convenient location in the workplace
The layout of the workshop and the composition of the equipment are determined taking into account the characteristics of the products that will be created here