Types of heating cables for heating pipes
There are two types of cables - resistive and self-regulating. Resistive cables work on the principle of heating, depending on the amount of resistance and current. Their peculiarity is that such cables always emit the same amount of heat, regardless of what the outside temperature is. In this case, they always consume the same amount of electrical energy. In order to save any money, you have to install temperature sensors and thermostats.
Structure of a resistive cable
The technology for laying resistive cables has some features. Firstly, the conductors should not be located close to one another, much less intersect. If this condition is violated, the system may overheat and fail. Secondly, there are single-core and double-core cables, which is something you need to know about. And most importantly, they cannot be cut, because after such an operation they will not work, so you will have to install the entire cable, regardless of the length of the section that needs protection.
Single-core cables are connected to a 220 V network at both ends, which is sometimes not practical, while double-core cables have a plug on one side and a 220 V electrical plug on the other side.
This is approximately how heating cables for plumbing are sold.
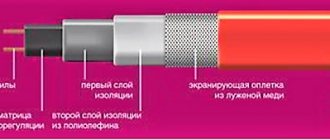
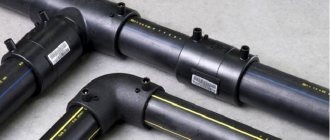
Self-regulating cables have a completely different design, since they are based on a metal-polymer matrix. The wires in such systems only conduct electric current, and the matrix itself is heated, and this polymer has a rather interesting property: the more the matrix heats up, the less heat it emits. When cooling, on the contrary, the matrix begins to increase the amount of heat generated. Because of these properties, the cable is called self-regulating.
Structure of a self-regulating cable
Such products are characterized by a number of positive data:
- Installation methods may vary.
- They can be cut off.
In other words, a self-regulating cable is more practical, despite its high cost. It should be noted that the service life of such cables for heating water pipes is quite impressive (10 years), if used correctly.
On a note! Regardless of the type of heating cable used, the pipeline will have to be carefully insulated. If this is not done, then significant power will be consumed to heat the water supply, so there can be no talk of efficiency.
Self-regulating heating cable https://elektrokhv.ru/
Cable preparation and cutting
First of all, use a knife to cut off the outer insulation from the self-regulating cable. The length of the cut depends on the brand and section.
Usually it is about 7cm.
The cut must be made carefully so as not to damage the grounding braid. Next, this braid needs to be unwoven.
The most convenient way to do this is with a thin screwdriver or an awl.
After unbraiding, the fibers are twisted into one braid.
We get to the inner thermoplastic shell. Make a cut at a distance of 4cm from the edge and remove the middle layer of insulation.
Hidden under it is the so-called matrix with copper conductors on the sides.
You cut through the matrix, heat this area with a hairdryer and pull the sheath off the cores.
When making a cut, do not damage the veins themselves. They are quite thin.
You can extract the veins in another way. Use side cutters to bite the corners of the matrix, and use pliers to forcefully pull out each vein.
Then remove the matrix and remaining insulation from the copper.
Next, put connecting sleeves on the ends of the cores and crimp them with a crimper on one side.
Mistake #3
Do not crimp sleeves with regular pliers.
They will never create normal contact at such a critical junction.
Mistake #4
Also note that it is recommended to install the sleeves in a “ladder” pattern, and not at the same level.
First of all, this applies to moments when you do not use insulated sleeves, but ordinary bare GML.
Otherwise, with sufficiently dense shrinkage, this place will be the most likely source of insulation breakdown. Sometimes one sleeve can even push through another.
After crimping, insert small heat shrink tubes onto each core.
The tube should creep and overlap the sleeve by a few millimeters. Heat it with a hairdryer and reliably isolate this area.
Be sure to allow time for the connection to cool down. After that, insert a wide heat tube onto the inner thermoplastic shell and heat it until the glue comes out.
It should equally cover both the section of the inner shell and the individual veins.
While this insulation has not cooled down, move the cores apart and use thin-nose pliers to flatten the middle for a few seconds.
You will get 100% reliable tightness and no moisture will get inside.
Let's move on to the power cable and plug. Remove the outer insulation from it.
Mistake #5
In this case, you cannot leave all three wires the same length.
The grounding conductor must be longer than all the others.
Pull the largest outer sleeve through the cable, and stretch small heat shrinks onto the working cores.
Then you insert the stripped wires into the sleeve on the heating cable and crimp them with a crimper.
Mistake #6
In this case, stranded wires do not need to be twisted before inserting them into the sleeve.
Otherwise, during crimping, some of the veins will crush themselves. This is the most common mistake when working with similar tips and sleeves.
People often ask, is it possible to simply solder the wires together without using any press pliers? Yes, you can. But this is provided that you have enough experience and skill in this matter.
Crimping of tips and sleeves is less prone to errors due to the influence of the human factor and almost always creates 100% reliable contact (provided the sleeve size is correctly selected).
Slide the heat shrink onto the sleeve and warm everything up with a hairdryer. There should be glue coming out from both ends of the tubes.
As a result, you will get a connection in which each working core:
- sealed from each other
- sealed from braid
Give the connection time to cool and proceed to grounding.
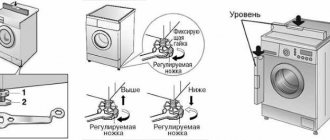
Installation methods
There are two options for installing the heating cable: it is laid either outside or inside the pipe. In this regard, several types of cables are produced, depending on the installation method. You can learn about the installation method from the technical documentation for the product.
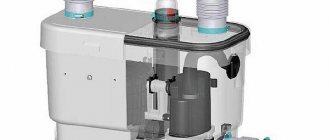
Installation inside the pipe
If installed inside a pipe, the device must meet certain criteria:
- The product must not emit harmful components.
- Have a high degree of electrical protection.
- Sealed end coupling design.
When laying out the pipeline, you should provide an area for installing a heating element. As a rule, a tee is installed at the end of the section and a cable is mounted into one of its branches using a special sealed device - a gland, which must be included in the kit.
An example of installing a heating cable inside a pipe through a gland
Please note that the coupling is not intended for use in wet environments and must therefore be located outside the pipe.
Types of tees for installing a heating cable inside a water supply system
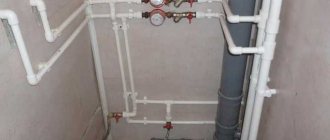
Installation outside the pipe
This installation method also includes some features. Firstly, before installation, the pipes are cleaned of dust, dirt, rust, welding marks, etc. Secondly, the fastening must be carried out so that the heating cable fits tightly to the surface of the pipe. Care should be taken to ensure that there are no elements on the surface that could damage the heating cable. After installation, the cable is fixed every 30 cm using special clamps or special adhesive tape.
Methods for attaching a heating cable to a pipe
When using one or two cables, they are attached at the very bottom, where the coldest zone is. When laying parallel, a certain distance must be maintained, which is especially important for resistive heaters.
There is another installation method - forming a spiral. It should also be recalled that such cables are not intended to form sharp bends, so they should be handled quite carefully. To avoid sharp bends, it is better to use the following recommendations: the cable is wound onto the pipe gradually, as the coil unwinds, or it is attached to the bottom of the pipe with a slack, as indicated in the bottom picture, after which it is additionally tensioned and secured using metallized adhesive tape.
Spiral winding
When heating a plastic water pipe, metallized tape is first glued to the pipe, which increases the efficiency of the system due to good thermal conductivity. As a rule, tees, valves and other fittings require more heat to heat, so in such places it is better to make a few extra loops. In any case, it is necessary to control the bending radii of the cable.
Insulation methods
The process of heating pipelines is accompanied by the formation of condensation, so any insulation, such as mineral wool, is not suitable. When wet, these types of insulation significantly lose their characteristics. If, after getting wet, such insulation also freezes, then after freezing you can forget about this method of insulation altogether.
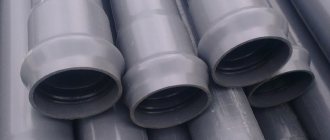
We should not forget that usually water pipes are simply buried in the ground without being laid in special sewer channels. Many types of insulation shrink, as a result of which they lose their basic characteristics. These types of insulation are also not recommended, despite the fact that they are not afraid of moisture. If a specially laid channel is used, then you can get by with ordinary foam rubber. Otherwise, insulation with a protective casing will be required. Alternatively, you can put a rigid pipe in the form of a plastic sewer pipe on top of the insulation.
An example of insulating a water pipe with a heating cable
There is another type of thermal insulation material - polystyrene foam, which is molded in the form of pipe fragments. It is also called shell. It has excellent thermal insulation properties and resistance to moisture. In addition, it is able to withstand certain types of loads.
Selecting the power of the heating cable
The choice of power depends on a number of factors, such as natural conditions, pipe laying method, pipe diameter, presence of insulation, heating method, etc. In any case, each manufacturer develops tables from which you can easily determine the cable length per 1 linear meter of pipe. At the same time, there are tables for each cable power.
As practice shows, in central Russia, heating 1 meter of pipe from the inside consumes up to 10 W of power, and almost 2 times more from the outside. As a rule, calculations are tied to a specific insulation layer, and the colder the region, the thicker the insulation layer.
Heating cable on a pipe. Installation rules
Connecting to the network is an alternative method
We took this cable:
The heating conductor (3) and the conductors (1 and 2), through which current flows, cannot be short-circuited
- This is what the end looks like.
- Cleaned it up.
- Using this terminal block I connected it to the wire.
The opposite side must be insulated. It is prohibited to bridge the conductors. And we must ensure that they do not bridge in any environment. You can buy a special plug for this. They cost around 300 rubles apiece. But you can do everything yourself using improvised means, such as heat-shrink tubing and a heat gun.
- Thermal gun.
- Heat-shrink tubing.
- End of insulated cable.
The plug is made as follows. We put on the heat shrink tube. We warm it up with a hairdryer. Afterwards we fill the entire structure with a heat gun.
The same procedure can be done with the terminal block to which the cable power is connected. You can also wrap everything with electrical tape just in case. If operating conditions are harsh.
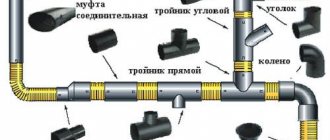
Is it worth installing a thermostat?
Nowadays, issues of saving money in the family budget come to the fore, so no one will overpay, which means that without a thermostat, the operation of the heating system for water pipes will be ineffective and costly. The thermostat turns on the system at a temperature of +3 degrees and turns it off at a temperature of +13 degrees.
When water is supplied from a well, its temperature will not reach +13 degrees, so the system will operate all year round. In the summer, you can turn off the heating, but in spring and autumn, when there is a high probability of frost, this cannot be done.
Whatever one may say, in any case, a thermostat is simply necessary. If you set the shutdown temperature on it to about +5 degrees, then you will have to pay a pittance for electrical energy. In addition, the durability of the heating system increases noticeably, since the cables have a certain working life. The less they work, the more at maximum, the longer they will last.
Heating cable for water supply - connection diagram to the thermostat
Naturally, in this case you will have to correctly position the temperature sensor. It should fit snugly against the pipe, but at the same time it should be reliably isolated from the heating element itself.
As a rule, the thermostat is installed indoors. The device is connected to the house electrical panel via a circuit breaker, 6 amperes and an RCD, with a leakage current of no more than 30 mA.
The heating cable is connected to certain terminals located on the thermostat housing. If several cables are connected, they are connected in parallel. The temperature sensor is connected to other contacts. As a rule, there is a corresponding marking on the body of the device, and the connection diagram is in the passport, so it’s not at all difficult to figure it out. If there is no marking on the device, then it is better not to buy such a product, since it does not meet all the requirements. Most likely it was produced illegally.
How to install a self-regulating heating cable inside a water pipe
Connecting the heating cable
In which zone is it installed?
Any icing area must be equipped with a heating cable. Gutter gutters require a power of at least 300 W per square meter.
To heat drainpipes, install 2 pieces at the same time with a power of 20 W per square meter. meter.
Heating the valley roof will provide power in the range of 250-300 W per square meter. Installation is carried out at the top and bottom.
The roof eaves, made in the form of a “snake,” are heated by a cable laid along the very edge.
Table 1 (for metal pipelines).
Table 2 (for plastic pipelines).
Important:
- A cross marks areas where it is not recommended to wind the cable, as it can be damaged.
- The pipeline must be thermally insulated.
- The tables indicate the length that must be laid per 1 m of pipe. In cases where winding is required, the laying step in meters is given in parentheses.
- For those pipe diameters where flow rates are not indicated, it is necessary to use thermal insulation of greater thickness.
- The calculation of the lengths of the heating (heating) cable is valid for thermal insulation with a thermal conductivity of no more than 0.05 W/(m*K).
Adviсe
When connecting the wire to the network, you must follow the advice of experts.
- selection of a quality product;
- tube preparation;
- use of pliers;
- use of high-quality protective shell.
To insulate the wires, the twisting method is used. For conductive wires, small connecting sleeves can be used. Their maximum diameter is 2.5 mm. The power cable must withstand a large load; it is better to take elements with a reserve.
During installation, it is important to take care to strip the ends and use heat-shrinkable tubes. Before connecting the conductor to the network for the first time, you need to check the quality of the connection. Resistance, insulation and grounding are assessed separately.
The features of the heating cable are discussed above. You can make it yourself, the main thing is to follow the instructions. There are rules for installation and connection to the network.