Wood painting
Once you've decided what you'll be doing, separate your carefully selected and planed lumber into groups.
Mark each piece according to its future location in the product, marking the top, bottom, front surfaces and best edges. Using a pencil and tape measure, mark the sections of the required length, and use a square to mark the cut lines. Use a compass to draw arcs and circles. Using a dividing compass, transfer the dimensions from the drawing to the wood. If you need to make the board narrower or mark a joint, set the thicknesser to the desired division and scratch the mark by moving the thicknesser along the edge of the workpiece. Use a small pencil to mark lines running at oblique angles. If you need paired parts, mark them at the same time and remember that one part should be a mirror image of the second. Use a knife to mark connections.
If you want to make round parts (chair legs, bowls, plates), you cannot do without a lathe. Buy the most powerful and heaviest machine your budget can afford, with an adjustable chuck and faceplate set. Spindle-shaped and cylindrical parts are turned by securing the workpiece between the front and rear centers of the machine, bowls or plates - on the outside of the spindle.
The best lathes are equipped with a device that allows you to turn large workpieces on the outside of the spindle. You will need a variety of turning tools - a chisel, a parting cutter, an oblique chisel and a radius scraper.
To obtain smooth surfaces, numerous types of sandpaper (sandpaper) are used. The skin can be used either on its own or wrapped around a block of wood. It is best to sand the wood several times - after sawing, after the glue has dried and after final finishing.
Sanding wood with sandpaper
For the first sanding, use regular sandpaper, for finishing - fine sandpaper based on aluminum oxide (it is more expensive, but lasts much longer). For sanding large flat surfaces, use a cylindrical grinder. Work in a well-ventilated area and be sure to wear a dust mask.
Sanding wood with a cylindrical grinder
Originally the term "natural finish" meant that the wood was sanded and left in its natural state, but now also includes oiling or waxing. Danish or teak oil is applied in a thin layer with a lint-free cotton cloth or brush.
Wood finishing with teak oil
Allow to dry and sand with the finest sandpaper to remove the “ridges” (the rough texture of raised wood fibers that occurs when the first coat of finish is absorbed), then apply a second thin coat. If you want to make the surface less hard, rub it with wax mastic.
When finishing items that will come into contact with food, use a vegetable oil, such as olive oil, instead of teak or Danish oil. Rub it in with a cloth.
You have a choice between mineral spirits oil paint and waterborne acrylic paint. Both types of paint are applied with a brush. The visual difference between surfaces painted with one paint or another is very small, however, after working with oil paint, brushes should be washed with white spirit, and after using acrylic paint, with running water.
Wood painting
Oil paint fumes can cause dizziness and nausea, while acrylic paint fumes can cause a dry throat. Regardless of the type of paint you use, wear a respirator and work outdoors if possible.
When working with American oak, you can get an interesting texture by wire brushing the wood. The texture is pleasant to the touch, and the resulting rough surface means you don't have to worry about damage from pets' claws.
Wire brushing wood
The brush is moved along the fibers until there are no untreated areas left on the surface, after which it is rubbed with oil.
Finishing wood with a candle flame
A candle flame finish helps hide the imperfections of low-quality wood. Oil varnish is applied to the painted surface with a brush. After a while it dries out and becomes sticky, and then a burning candle is passed under the surface. Be sure to wait until the surface becomes sticky (it should show fingerprints) and keep the can of polish and brush away from the candle. It is better to do this work together somewhere away from the workshop. Practice on scraps before you get started with any serious work.
All photos from the article
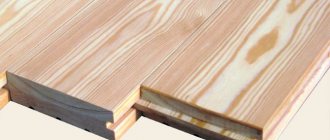
The type of connection based on the insertion of a tenon into a groove appeared in Europe almost simultaneously with floorboards and lining. The finishing material is simple and easy to install and has a lot of advantages. True, the cost is more expensive than ordinary boards and strips, but the joints are much neater, and the service life is much longer.
The groove connection increases the strength of the coating.
Symmetrical groove.
Many users have no idea how to choose a groove in a board, believing that the store will offer them only one option for connection and material.
This is far from true; there you will be greeted by a large assortment:
- Symmetrical groove. This is the simplest type. In it, the lengths of the upper and lower shelves are the same, and they protrude at the same distance.
Asymmetric connection.
- Asymmetrical groove. Here the upper shelves are longer than the lower ones.
- Block house, used mainly for finishing walls and ceilings. The planks often imitate the relief of timber and have a semicircular or shaped profile on the front side.
- Euro lining, like block house, is often supplied with a relief pattern.
- The decking board, made of wood and polymer, also has tongues and grooves for easy installation.
Please note! If you plan to mount walls that are not level, have protrusions and dents without a groove board, do not expect good quality from the result.
The cladding will not lie flat, height differences and cracks are inevitable.
Often you have to make furniture or make repairs at home, using the simplest methods and what is at hand.
If you need to make a groove in the board with your own hands, be patient and have the necessary tools:
- A circular saw. The most practical tool, but, unfortunately, not everyone has it.
- A regular hacksaw for wood. It will take longer to work with it, but this accessory can be found in every home.
- Electric drill. It is also quite accessible, but before making a groove in a board with a drill, it is advisable to practice on an unnecessary block, practicing the skill.
Making a groove with a circular saw.
The optimal materials are wooden boards, bars and the like. The price of raw materials is minimal; in extreme cases, what is available on the farm is used. The most successful solution is a through, single open straight end connection.
The joint will be strong and reliable:
- It is recommended to make tenons with a thickness of ¼ of the thickness of the plank and a groove of the same size.
- The height and length of the groove must correspond to the dimensions of the plank.
- Prepare a pencil and ruler for marking.
- Decide on the coordinates of the cut and mark it.
- The cut should be made along a line inside the side that will then be separated.
- For a circular saw, the instructions recommend a blade width of 2-4 mm.
- Sawing in the middle of the marked line removes 1-2 mm of excess, since two grooves are made on each plank.
Please note! To prevent the workpiece from being damaged, make cuts along the inner sides of the drawn lines.
In this case, a visual correction is made for the thickness of the canvas.
- If you need to join two parts at a 90º angle, cut the pieces at 45º at the ends.
- For an end-to-end open miter connection (single straight), mark the cut locations on the oblique cuts of the planks.
- Before removing the groove from the board, double-check that the cut is correct on all sides.
- For an angular single connection that is not through the eye, an eye is made instead of a groove. In this case, the width of the tenon is left unchanged, and the length will be 0.3-0.8 of the width of the board being attached.
- Since the circular saw rounds the edges of the eye, leaving the shape of the tenon unchanged, it is advisable to refine the corners by turning them with a rasp.
We suggest you familiarize yourself with the gaps between the boards on the floor
The photo shows a groove being cut out with a drill.
Types of groove boards
This is far from true; there you will be greeted by a large assortment:
1. Symmetrical groove. This is the simplest type. In it, the lengths of the upper and lower shelves are the same, and they protrude the same distance.
Asymmetrical connection
2. Asymmetrical groove. Here the upper shelves are longer than the lower ones.
3. Block house, used primarily for finishing walls and ceilings. Boards often imitate the relief of a block and have a semicircular or shaped profile on the front side.
4. Euro cladding, like the house block, is often supplied with a relief pattern.
5. Corrugated sheet made of wood and resin, also with balls and grooves for easy installation.
Using a hacksaw on wood
Well-made markings will help here.
Choose a flat and durable hacksaw blade:
- To avoid mistakes, run two mowing lines along the length of the board, on opposite sides. The distance from the top plane to them will be the depth.
- Secure the block securely and start sawing.
- It is important to monitor, when checking the fishing line, how much blade is included in the tree.
- If the tool is skewed, you can ruin everything, so periodically look at the hacksaw hitting the material from the side.
- With a wide groove and a thin blade, it is more effective to make two cuts, again along the inner sides of the drawing.
- All excess is carefully removed with a chisel and cleaned.
BASIC CONNECTION IN GROOVE
The parameters according to which drill cutters intended for wood processing are divided into different categories are:
- main purpose;
- dimensions;
- the shape of the cutting part;
- design features;
- manufacturing material.
Basic geometric parameters of wood cutters
Types by purpose
Today, many tools are used to perform milling work on wood using an electric drill, since technological operations with this material can be different. Depending on the main purpose, the following types of wood cutters are distinguished.
Using such a tool, the corners of wood products are rounded.
These cutters are used to cut V-shaped grooves on flat wood surfaces. Using such a tool, you can make various patterns and inscriptions on the product, as well as process edges.
These are wood cutters, with the help of which grooves and grooves of various widths and depths are cut out on the surface of the workpiece.
Such cutters are similar in purpose to disk cutters, but they allow you to create wider grooves on the surface of the product. Cutters of this particular type are used in window production, where they are used to cut grooves in wooden frames to accommodate glass.
Using cutters of this type, semicircular grooves can be created at the end of the workpiece. Wood fillet cutters equipped with a support bearing are used for the manufacture of decorative furniture slats.
These are tools with a cutting part made in the shape of a reverse cone. With their help, you can create dovetail grooves in wood products. It is these grooves that are used to create open and hidden tenon joints between two or more parts made of wood.
These wood cutters are designed for processing the edges of wooden products. The design of the edge cutter may contain a bearing, which, resting against the edge of the workpiece, ensures its correct position and limits the depth of its cut.
Wood cutters of this type can be made with straight or helical cutting edges. Using such tools, flat surfaces are processed.
These cutters are also designed for flat surface processing. Unlike cylindrical ones, they have cutting teeth on the end part.
Using these cutters, chamfers are removed from the edges of the workpiece. Such a wood cutter, used for installation on a drill, can also have a thrust bearing in its design, which limits the depth of the tool’s cut into the wood.
These wood cutters are used to create complex grooves and recesses on the surface of the workpiece.
These are cutters used to form elements with a complex configuration on the surface of a wood product.
Milling tools used in conjunction with drills can have different designs. Thus, there are solid and prefabricated wood cutters, which should also be selected depending on the characteristics of the material to be processed.
Solid-type cutters are made from one steel billet, respectively, their body and cutting part are made of the same grade of metal. Such tools are inexpensive, but they can be used for processing materials that are not too hard. Naturally, the working life of this type of cutter is small.
Solid cutters made of tool steel
More wear-resistant and durable are prefabricated wood cutters, the body of which is made of ordinary steel. Their cutting teeth are carbide plates that are fixed to the body of the tool by soldering and are not sharpened during operation. With the help of such cutters it is possible to process harder materials with high productivity.
Wood cutters with carbide cutters
Regardless of the type of wood cutters for a drill, their cutting teeth can be pointed or backed. In the first, the front and back surfaces are flat, and their sharpening is carried out along the back surface. The big disadvantage of milling cutters with cutting teeth of this type is that when they are sharpened, the geometric parameters of the tool, in particular its diameter, can change.
Milling cutters with backed teeth, in which only the front surface is flat, do not have such a disadvantage. Since sharpening of such a tool is carried out precisely along the front surface, this procedure can be carried out repeatedly without worrying that the geometric parameters of the cutter will change.
Cutting grooves on a tabletop circular saw with a set of groove discs is much faster than manually. But long or wide pieces are difficult to maneuver around the table. A pendulum saw solves this problem, but it has a drawback - usually its console is not enough to cut across wide parts.
A router helps solve this problem. But this also has its drawbacks.
First, if you are selecting more than one pair of grooves, setting the ruler for each side can be time consuming. Therefore, use an insert with a width equal to the distance from the rib of the router base to the cutter. To install the ruler, slide the insert along the marked shoulder line on the work piece (Figure 4).
Rice. 4. Insert for router.
Second, the thickness of the workpiece is almost never matched to the cutter to ensure a tight-fitting joint. Solid wood parts can be planed or sanded, but plywood parts are difficult to trim. Cutting a groove to fit is more clear. But this requires two passes with a router - one for each shoulder.
Faced closely with the selection of grooves, you can make a simple device (photo A).
Materials and tools
A vertical router, unlike a drill, has a flat base - a sole on which it stands and moves along the workpiece or table. The housing is fixed and moves vertically along the guides. To create a homemade router from a drill, you need to create a stand and attach the drill to it. When making a simple design, the following materials will be useful:
- plywood 12 or 15 mm thick;
- metal clamp;
- bolts with nuts M6;
- self-tapping screws
Plywood can be replaced with chipboard and laminate of the same thickness. A milling cutter made from a drill will be more convenient to use if the sole - base is made of plexiglass 10-12 mm thick. Then the work area and the markings on the board will be clearly visible.
A standard clamp with fittings is suitable for water pipes. The size is selected according to the diameter of the drill body above the chuck.
The wood milling machine is fastened with screws with a diameter of 4.8 or 5 mm and a length of 19, 20 mm. Self-tapping screws of these sizes are often used in the manufacture of wood crafts. They secure brackets, hooks and shelves. Screws are often left behind after repairs. They can be replaced with self-tapping screws with a diameter of 5.5 mm and a length of 18 and 22 mm.
In order to make a wood milling machine from an electric drill, you need the following tools:
- drill;
- core or feather drill;
- jigsaw;
- screwdriver;
- drills 4 mm and 8 mm;
- wrench.
Usually in any garage or home workshop it is easy to find the necessary tools. A screwdriver can be replaced with a Phillips screwdriver, a jigsaw with a hacksaw.
Curved cuts
A curved cut can be made with an electric hacksaw, jigsaw or band saw. The hacksaw is good for large radius cuts and thick wood, when the cutting line goes away from the edges.
Curved cut
Hacksaws are equipped with rotating bases that change the cutting angle, and depending on the type and thickness of the material, different saw blades should be used. For curved cuts of small radius and with wood thickness less than 50 mm, use a jigsaw or jigsaw.
Jigsaw machine
Install the new file and tighten it until it rings when you click it with your finger. If you need to cut an opening, you can do two things: either start cutting from the edge, or, if you do not need to touch the edge, first drill a hole in the part to be removed, then release one end of the file, pass it through the hole made and clamp and tighten again.
This saw makes it easy to make cuts at any angle. Place the cutting blade on the frame at the required angle (90, 45, 36, 22.5 or 15°) and fix it. Set the depth gauge to the desired mark. Place the workpiece on the saw table, press it against the fence, and then make the cut using smooth back and forth movements.
What does drying out lead to?
A typical case: you made a shed at your dacha to store household equipment and for other needs. They did it for themselves, so they pulled together the boards from which the walls were made, carefully, without the slightest crack. Two or three months pass; the boards dry out and the entire wall glows with cracks. In winter, snow blows through them; in summer, the wind blows dust inside the barn.
Shrinkage reaches 10-13% of the linear size. That is, a board with a width of 100 mm after drying is reduced to 88 mm.
To prevent this from happening, you need to use quarter boards for wall cladding. A wall covered with such boards will never have through gaps. With their quarters, neighboring boards overlap each other and when they dry out, through cracks no longer appear.
How to choose a groove in a board with a drill
Considering the fact that a serial milling machine is an expensive piece of equipment, the question of how to make a small milling machine from a drill is very relevant. Such a machine, used in conjunction with wood cutters mounted on a drill, is indispensable in the construction and repair of a country house, as well as in performing many other works.
Homemade machine from a drill
When starting to make a homemade router, you must first make a table for it, which should be stable and reliable. For this, plywood is often used, the thickness of which should not be less than 12 mm. The supporting elements can be made from four wooden blocks. An important part of such a homemade device is the limiter pad, the task of which is to ensure the correct position of the cutter in relation to the surface being processed.
Arrangement of mechanisms for vertical movement and fastening of the drill
The drill itself is fixed with clamps on a stand made of chipboard. The length of such a stand should approximately correspond to the length of the drill itself, and its width should be sufficient to place power tools and fasteners on it. The stand and the limiting platform are connected to each other at a strictly 90° angle.
When fixing the drill on the stand using clamps, you should place it so that the cutter inserted into its chuck extends beyond the surface of the base pad by the required amount. To increase the strength of the resulting structure, you can further strengthen it with a piece of chipboard connected with self-tapping screws to a stand and a limiting platform.
We suggest you familiarize yourself with Fastening a floorboard with your own hands: what and how to fasten it correctly, video instructions, photos
Homemade coordinate table for a machine
Using a conventional drill, you can make an even more functional and easy-to-use milling machine if you install the power tool on a homemade stand equipped with a stand with a simple microlift. Such a machine can also be made from wood, except for the lead screw, along which the microlift with the tool attached to it will move.
All photos from the article
MiscellaneousHow to make a groove in a board
All photos from the article
How to make a tongue and groove connection?
Tenon and groove - what is it?
First of all, you need to define what a tenon and groove is. This is nothing more than a way of connecting parts.
It is used most often in carpentry, as well as in other types of production. There are many types of grooves and tenons, but we'll talk about that another time.
Properly executed tenons and grooves are sufficiently firmly connected to each other. This connection is considered one of the strongest.
First you need to determine for what purpose this connection method is needed. If this is a table, then the jumpers in it are usually connected to the vertical legs.
Consequently, the wood fibers run vertically and horizontally. If this is a wall table or a bedside table with drawers, then the jumpers here will be located a little differently. They will be horizontal relative to the legs.
In any case, such a connection will be the most reliable. When making a large number of tongue-and-groove joints, special machines are used. If you need one or more tongue and groove joints, and there is no carpentry equipment at hand, then it would be advisable to do this manually. To do this you will need a set of carpentry tools, including:
- hacksaw;
- clamp - 2 pcs;
- measuring instrument;
- pencil for marking.
To significantly expand the functionality of a conventional drill-only electric drill, you can use a tool such as a wood drill bit. Using a power tool with this working attachment, you can effectively carry out various types of processing of products made from wood materials. By choosing the right cutter for certain tasks, you can use it to perform both roughing and finishing machining.
A drill can perform a number of milling operations
The design of a wood cutter for a drill consists of a shank and a working part, which is initially sharpened for certain technological operations. To perform such sharpening, high-precision equipment is used, the structural elements of which should not have any play. Both the sharpening parameters and the hardness of the material used to make the cutter, which uses special grades of steel, are selected depending on the characteristics of the wood being processed.
All wood cutters are divided into two categories:
- attachments, the diameter of the seating part of which is 32 mm (they are intended for installation in the spindle of a stationary milling machine);
- end ones, which are also called finger-type (their seating part (shank) can have a diameter of 8 or 12 mm; they are installed both on a stationary milling machine and on a hand drill).
Main types of wood cutters
It should be borne in mind that a wood cutter mounted on a drill (as, indeed, metal cutters on a drill) can only be of the end type.
Various types of cutters are used to process various wood materials (natural solid wood, plywood, MDF, chipboard, etc.). At the same time, cutters designed for processing plywood are more wear-resistant and, accordingly, durable. They are not sharpened during operation, since they are equipped with cutting inserts made of hard alloy, which increases the resource of their effective use.
All photos from the article
Selecting a quarter with a circular saw: how to make a selection, methods
Selecting a quarter piece of wood. One of the most common operations in carpentry and carpentry. Why this is done and how it is done is discussed below.
Wood, like any material, has specific properties that must be taken into account. This obvious fact, however, is often ignored by beginners. As a result. Spoiled mood, time spent on processing, and often spoiled material.
One of the characteristic properties of wood is that when humidity changes, the linear dimensions of the wooden part change. As wood dries, it contracts and expands as moisture increases. In addition, the resin evaporates from the wood over time. Therefore, the wooden part gradually decreases in linear dimensions, regardless of changes in humidity. They talk about this phenomenon: the tree dries out. These effects are especially noticeable in conifers, which are the most common lumber used.
In construction and at dachas, spruce and pine boards are most often used. These forests change size more when they are dry.
Alternative methods
As noted, a stationary circular saw is very convenient for selecting quarters. (On our website there is a separate article about the types of circular saws and the features of their choice.) But this is not always in the owner’s arsenal, and sometimes it is impossible to use it purely physically.
If you need to cut out quarters in thick, long boards, you can use a hand-held circular saw. The manufacturing principle and sequence of operations are the same. The difference is that in this case the board to be processed and the tool are swapped. Board
is fixed motionless, and the master moves the circular saw with a parallel stop manually.
If you don't have a circular saw or a handheld circular saw, you can use a sander with a wood disc or a handheld router with a matching cylindrical cutter. Both methods are very slow and not suitable for large volumes of work. In addition, picking out a quarter with a grinder is inconvenient, dangerous and uneven.
Another way to use an electric plane. However, most modern plane models, due to their design features, are not suitable for this. See which one shows exactly this method of choosing a quarter.
Quarter selection sequence
- Let's adjust the saw's canopy so that the cutting depth is equal to half the thickness of the board being processed. The easiest way to do it is there. To do this, we attach the board to the saw from the side, as shown in the photo, and adjust the blade canopy.
- We install a parallel stop on the machine so that the width of the cut is also equal to half the thickness of the board. We take into account the thickness of the disk itself. This completes the machine settings.
- We make longitudinal cuts on opposite sides of the board.
- We make cuts from the ends of the board. A quarter is ready. We get glazed beads as a by-product)).
READ How to correctly cut the outer corner of a skirting board
How to choose a quarter using a circular saw
Using a circular saw to make the quarter board will make the process easier. A quality tool with sharp edges and good power will help you a lot. After all, now you can set the necessary values and not be afraid to cut off the excess.
How to choose a quarter in a circular board? The process is not much different from the usual one, the only thing is that now you have a circular saw in your hands. A cut is made from the end of the board with a depth of half the height of the board. Next, a second cut is made in the center of the end. Next, we take the necessary measurements and cut them so that the quarter takes on the desired shape.
Drilling holes
Use a drill press and Forstner bits to drill large holes accurately and accurately. Mark the center of the hole, attach the corresponding drill bit and set the depth stop. Then press the workpiece with clamps to the workbench (this will take some time, but it will be completely worth it).
Drilling holes
To drill holes for screws and installation holes for nails, you should use a drill, and it is more convenient to use a cordless drill. If you need to screw in a lot of screws, install the screwdriver included with this tool into the drill chuck.
Driving screws with a drill
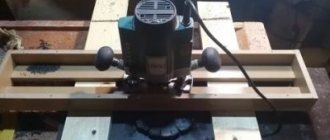
Making a groove on a narrow workpiece or its end
The principle of operation is similar to the one indicated above, only you need to add a flat beam, board, level to the workpiece to be processed to provide a wider area for the router sole and to capture a flat plane with the side stop.
The board or level added to the side should be the same height as the workpiece or lower, but not higher. Otherwise, the router will not stand level and the groove will end up at an angle.
Result of working with a narrow workpiece
The offset was exactly 10 mm from the edge of the workpiece.
Working without a side stop will not be possible due to the fact that the router always goes to the left in the direction of rotation of the cutter, and the groove will not be smooth and of high quality.
The width of the groove and, accordingly, the tenon is selected at the rate of 1/3 of the width of the part. If we connect two parts of different widths, then select the width of the groove and tenon according to the narrow workpiece. Let's look at an example.
One part is 100 mm, the second is 30 mm. We take a part with a width of 30 mm, 1/3 of it will be 10 mm. We make a 10 mm tenon on it, and, accordingly, a groove on the second part of the same width. Voila, the connection is ready.
In this way we fasten the part, measure the required distance, and make a groove. Groove cutters may be suitable for this job. Information about cutters can be found in the article “What types of groove cutters are there and for what type of work. » The groove is made in several passes in order not to overload the router, especially if it has low power.
Wood cutters can be purchased HERE. Offers a large selection at low prices.
I wrote about this method in an article because I like it for its speed and quality of work, and I use it often. Of course, you can make adaptations, but this is time-consuming and unnecessary expense, so I settled on this option.
I hope my article is useful to you. If yes, then like it.
Source
GROOTS CAN BE MADE EVERYWHERE
With a groove connection, the end of one part fits into a shallow groove cut across the grain of the other. This connection is an improvement on the simple butt connection. The groove shoulders provide decent strength. In fact, such a connection cannot be broken, for example, by pressing on a shelf. If it fits tightly, it can withstand oblique loads well, when the force is directed diagonally across the body.
Using just two types of groove connections, you can make almost any body part. The main joint, where the groove engages the full thickness of the adjacent piece, allows for the assembly of bookcases, toy chests, wall shelves, or any other cabinets in which the side walls extend beyond the adjacent pieces (Figure 1).
Rice. 1. Main groove connection.Fig. 2. Modified groove/tenon connection.
If these "through" angles are unsuitable or unsightly, use a modified joint (Figure 2) called mortise/tenon.
Drawers are also boxes. They are easily made using a basic mortise joint and a mortise/tenon joint (Figure 3). Example ZA is the strongest of them; in examples ZV and ZS, you can weaken the front wall. If you want to hide the ends of the drawer sides shown in 30, cover them with a false front or use a quarter joint as shown in 30, reinforced with nails or dowels.
Rice. 3. Grooves in drawers.
What types of beam corner ties are there?
To efficiently connect a wooden frame at the corners, you can use a tie with or without residual ends. In the first case, the connected beams will have leading ends; this option is good because it provides better piping and protection of the corners from precipitation. But with this connection method there is an increased consumption of material.
Sawing method
If we consider this connection option as with the remainder, we can distinguish the following types of grooves:
- Connection using the “slam” method;
- A similar method is “to the point”;
- The simplest type is a bowl or “oblo”, also known as “in the paw”.
Although the “oblo” is simple, there are three types of its grooves:
- cut on one side;
- double-sided cut;
- cut on four sides.
Examples of such connections are shown in the photo. Let's look at each of them separately.
Planing by hand
Planing is a lot of fun when the blade is sharp and you have enough time. The jointer is ideal for planing along the grain. Don't forget to secure the workpiece on the workbench. Make a test pass, make sure the blade is set to the correct depth, and then get to work.
Planing with a jointer
A face plane is good for finishing sharp edges and for cleaning up ends. Position the blade so that it cuts the finest chips. When processing the end sections, try not to stray to the side and avoid chipping.
Planing with an end plane
More videos on the topic
I wish you good luck in all your endeavors. Subscribe to updates and stay up to date with all the interesting materials on my blog. Don't forget to recommend them on social networks.
A hand router is a universal mechanical tool in the home workshop. To use it correctly, you need to get basic lessons in working with a wood router. There are many Chinese-made milling cutters on the market, they are all of the same design and differ only in engine power. Experts recommend purchasing a more powerful tool, since the list of work performed will expand significantly. The craftsman will be able to cut out a pattern, make a quarter cut, cut tenons and perform other operations related to the manufacture of furniture.
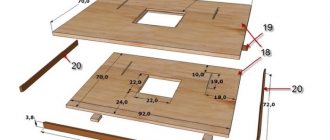
HOMEMADE DEVICE FOR SELECTING GROOTS
The device consists of two rulers (one for each groove shoulder) and two strips that rest on the edges of the workpiece. One ruler and one strip are T-shaped fastened at right angles. Gaps along the other strip and ruler allow you to install boards up to 300mm wide and select grooves up to 38mm wide. Two clamps in an adjustable bar rest against the workpiece and lock the fixture in place.
To operate, you need a set of guide bushings for the router. With bushings, the rulers should be slightly offset to the side relative to the width of the groove itself.
The device is made of poplar, but Karelian birch plywood or MDF is also suitable. The T-nuts and MB screws are recessed, so the router can slide along the rules without hindrance.
Having finished manufacturing, you need to make inserts for installing the rulers. Plane a piece of cutting board approximately 450 mm long, 150 mm wide and 20 mm thick to the same thickness along the entire length. It all depends on the size of the sleeve and the cutter. Leave the jig in place while you make and fit four inserts, each approximately 50mm long, about 25mm wide and equal to the thickness of the gaps. Ideally, the thickness of the inserts should be equal to half the difference in the diameters of the cutter and sleeve.
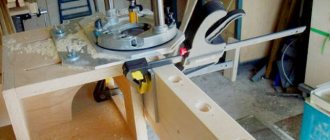
Precise adjustment of the inserts is accomplished by using them with rulers installed when routing on a short piece that has been sawed off previously. Loosen the adjustable ruler, place the scrap between the rulers and two inserts on each side.
Tighten the screws. Remove the inserts and trim and mill the groove. If the trim does not fit into the groove, adjust the thickness of the inserts.
Although the device looks complicated, it is quite easy to make (Fig. 10). Cut the workpieces to size, and then carefully plane the planes and edges. Then select a groove in the fixed bar for the fixed ruler using a few cuts on a circular saw. Then, to ensure a tight fit and square edges, use a sharp chisel to trim its shoulders. The half-wood connection on the adjustable ruler is made so that its upper surface is in the same plane as the fixed ruler.
Mill out all the cracks in the planks and rulers using a ruler pressed to the base of the router (Fig. 8). First, releasing the cutter approximately 3 mm in each pass, mill narrow through slots in several passes. Next, mill out pockets for the screw heads and T-nuts.
We suggest you read How to choose a groove in a board with a drill
Small clamps are used as clamps. The pressure pad is a T-shaped nut at the end of the screw. The locknut prevents the pad from coming loose when it presses against the workpiece. Select the grooves in the adjustable bar so that the clamps can hide behind its edge. Fig. 10. Device for making grooves.
Hello! In principle, you can put a cutter in a drill if we are talking about a hand router cutter. But the effect will not be very good. I tried to install and process it manually, but the quality of course left much to be desired. And the chuck constantly relaxed and the cutter flew out. I made a special table and installed a new cartridge.
If the only question is what is possible or not!, then you can certainly adapt the cutter to a drill and you can mill with it, but what the result will be is a completely different question.
At first, the rotation of the drill is not enough; for a clean cut of the cutter, the cut will be torn and unsightly - you will have to additionally process everything with sandpaper, and perhaps there will not be a smooth surface at all, since due to the lack of rotation, wood fibers will be torn out!
Secondly, in order to work with a drill with a mounted cutter, you will need to construct a holder device, because a working cutter will constantly be pulled out of the processing area and it will be very problematic to hold it with your hands!
Thirdly, if it is a large shaped cutter with a significant diameter, then working with such a cutter is not possible at all, and even more dangerous!
In general, the conclusion is this: if there is some rough work, such as cutting or grooves, for example, for a lock or internal parts, then it is quite possible to cope with this work with a drill and a cutter!
Advantages and disadvantages of a router
The main advantage of a machine for milling with an electric drill is that you do not need to buy an expensive milling machine to perform single operations. Using a homemade device, it is easy to make several grooves and process the edge of the shelf.
In an electric drill, the drill is inserted into a chuck. When working on a homemade router, you must use a drill cutter. The stores have a large selection:
All of them have a shank and are easily mounted in the chuck. Tool replacement is quick. The disadvantage of the chuck is that it can unscrew during operation, especially if the tool vibrates. The fastening must be constantly checked and tightened.
Before you make a router from a drill, you should decide on the amount of work. A homemade router is suitable for performing home repairs and individual operations on processing wooden parts using an electric drill. It is impossible to mill with a drill for a long time and with heavy loads.
The main disadvantage of a milling machine made from a drill is the low speed. When drilling, cutting occurs over a small area. There is no need for cleanliness; the wood is processed into chips. On the drilling tool, the maximum rotation reaches 3000 rpm. While the lightest router has a minimum value of 4000 rpm. Every specialist knows that the cleanliness of the processing depends on the rotation speed of the tool. The faster the cutter rotates, the more beautiful the edge and end of the key. After processing on a homemade machine, the treated areas will have to be sanded for a long time.
The motor on a drilling tool is much weaker than a milling one. It is designed for short-term use. He will not be able to work at maximum power for a long time. When milling with a drill, you must constantly turn it off and let it cool.
A homemade machine is suitable for one-time work. For continuous milling of wood, it is better to purchase a router.
Source: stankiexpert.ru
Selecting a fold on the edge of a board
To select a rebate with a width of 10 mm and a depth of 4 mm, proceed as follows. You will need a straight cutter that is smaller than the width of the rebate (for example, 5mm in diameter). Set the stop at a distance of 5 mm from the rear edge of the cutter, and the cutter at a height of 2 mm. Place the board against the stop and select a 5 mm wide fold.
Cutting shaped edges with a router is very simple. Attach the router to its table and insert the cutter of your choice - round, radius or shaped. Use a cutter with a support roller.
Milling shaped edges with a round cutter
Move the stop so that it is not in the way. Press the workpiece against the table and make several passes with the cutter from left to right. Continue routing until the workpiece begins to press against the support roller - at this point the cutter stops cutting. If the shaped edge looks burnt, it means either the cutter is dull or you were pulling the workpiece too slowly.
Milling shaped edges with a radius cutter
Design of a milling cutter from a drill
Considering the power and number of revolutions, you can only make a light router from a drill. For high-quality processing of the board, the working tool must be fixed on the table, and the workpiece must move. The top-tool design allows for the production of complex parts. Each craftsman comes up with his own design. They differ in the mounting and location of the electric drill.
Table with router
Processing the ends and milling grooves for the tongue-and-groove connection can be conveniently done using a milling table with a protruding tool. It has a simple design and the drawings are easy to develop yourself. A small workbench will do.
The lid turns over. A hole is cut in it. Its size is approximately 5 mm larger than the maximum diameter of the cutter that will be used. A bar is mounted perpendicular to the table. It is installed parallel to the side at such a distance that the spindle axis of the attached electric drill coincides with the center of the hole.
The body of the power tool is secured to the bar with clamps and stops. In the normal state of the table, the chuck should be located under the cover, and the cutter inserted into it should protrude. During processing, the wooden part moves along the table, resting against the template, and milling occurs.
The tool can be secured in another way. The main thing is that the center of the hole coincides with the axis of the cutter. The switch and socket were accessible. All elements of the machine must be fixed rigidly, without distortions.
OPERATING THE DEVICE
Marking the grooves is very simple. Determine the shoulder line for each groove by making a pencil mark on the face of the piece to be worked. You can put the two side walls together and mark all the grooves at once, or mark the second side wall after routing the first.
Once the jig is aligned and the cuts are marked, align the straight edge with the mark (photo C), lightly tighten the clamps and make a pass with the router, then move the jig to the next mark. A well-chosen groove should fit the tenon without gaps or backlash (photo D).
Hazardous factors
Milling machines require complete safety and high qualifications of the worker. When using electric machines, accidents may occur due to material ejected during milling. Therefore, the performer of the work must have special work clothes.
If heavy dust is generated during the milling process, you must wear safety glasses. Maximum safety in this situation is provided by special clamps and vices that effectively hold the workpiece, preventing it from being thrown out. Do not hold the workpiece in the rotation zone of the cutter with your hands or directly touch the rotating tool. It is necessary to use special clamping devices to advance the part during milling.
The type of connection based on the insertion of a tenon into a groove appeared in Europe almost simultaneously with floorboards and lining. The finishing material is simple and easy to install and has a lot of advantages. True, the cost is more expensive than ordinary boards and strips, but the joints are much neater, and the service life is much longer.
SAWING A GROOVE/TENK CONNECTION ON A CIRCULAR
Since this is a very simple connection, it is easier and faster to combine marking and installation. Check the settings on the scrap boards (Fig. 6 and 7).
It's easier to fit the tenon to the mortise, so make the mortise first. Set the depth of the cut by measuring or by eye, pressing the disc against the part in which the groove will be. Then set a ruler to cut out the inner shoulder of the groove (Fig. 6, step 2), make a cut in all parts with grooves, rearrange the ruler and cut out the second shoulders.
Narrow parts, such as the sides of bookcases, can be sawed using a dividing head, keeping the end of the work piece in contact with a straightedge as you work. You can also attach a limiter to a ruler in front of the disk so that the end of the part rests against it.
The most accurate way to select a groove on a circular saw is to place the workpiece on the table and, pressing it against the ruler, cut out the shoulder. Then place the part on the end and cut out the thickness of the tenon. This method allows you to accurately control the thickness of the tenon, but it is inconvenient for long parts or those that are sawed across.
No matter how carefully the tenons are made, there is usually some variation in their size, especially when sawing into solid wood. Here we can advise you to cut the tenons a little thicker, and then, when fitting, trim them with a plane for the shoulders. The blade of a shoulder plane runs across its entire narrow sole, so you can cut right into the corner of a tenon shoulder.
Laying timber flush
The basis for connecting beams flush is the folding method, but the protruding sections of the logs are removed from the end. And to increase the reliability of fixation, “presecs” are used; they are made in the form of protruding spikes that are attached to the edge of the frame.
When the connection has a regular groove with a “presec”, the stacked logs will be blown through at the place of laying.
Important! To prevent such defects, the cut in the timber is made in the form of a “dovetail”.
By using inclined tenons for connection, a tighter clamping of the timber is created, and as a result, thermal insulation increases.
Important! When a log house is mounted using dowels, dowels or fat tails, then before selecting a groove in the timber, you need to ensure there is a sufficient gap between the groove-tenon connection so that during shrinkage of the material the wood can move sufficiently.
Tags: block, make
« Previous entry
Milling according to template
Use a template if you need to make several parts with the same edges. First, cut out the approximate shapes with a saw, leaving no more than 4-5 mm of excess wood on the edges to be milled. Install the guide roller on the base of the router. Cut a template from plywood with an allowance for the edges and nail it directly to the surface of the workpiece. Turn on the router and guide it along the edge of the template.
As a template, you can take an already made part and use a straight-cut cylindrical cutter with a support roller (it can be on top or bottom of the cutter).
Types of cutters for processing wooden workpieces
By purpose they are as follows:
- Copy edge, equipped with a bearing
- Profile figured
- Facade double
- Conical
- Kalevochnaya
- Rebated, it is used to make grooves and select quarters in wooden products
So, we have decided that it is most convenient to use a rebate cutter to select a quarter. It has a cylindrical shape and is equipped with a bearing. The diameter of its cylinder is larger than the diameter of the bearing, which allows you to select a quarter of the desired depth in several passes of the cutting tool.
It is convenient to use a template when milling. The bearing, rolling along the template, forms the exact direction of movement of the tool, simplifies the work and makes the result neat and even.
Driving screws
You have a choice of mild steel, stainless steel, brass or aluminum screws with straight or Phillips slots and countersunk or pan heads. Semicircular heads stand out clearly on the surface of the wood, countersunk heads are either flush with the surface, or edged with brass washers, or hidden by wooden plugs. The screws are screwed in with a hand screwdriver, a drill with an appropriate attachment, or a screwdriver.
Driving screws with a drill or screwdriver
When using a drill, install the locking mechanism so that the screw is screwed in to the required depth. If the wood is soft, the installation hole can be made with an awl; if it is hard, drill it with a drill of a smaller diameter.
The installation hole can be made with an awl
To be able to hide the screws under the wooden plugs, you will have to drill a hole for the plug with a countersink drill and a corresponding cutter for the plug. Don't use steel screws on oak - they react with the wood and moisture and cause stains. Instead, choose plated steel, brass, or stainless steel screws.
What is the best way to make a cut?
Circular saw
This is the most convenient tool for sawing boards. Compared to some other power tools, it has better performance. But it is worth remembering that circular saws differ in characteristics and scope of application.
Before buying a saw, decide for what purpose you will use it. The main use of circular saws is cutting or cutting boards.
When choosing a saw, you need to consider the depth of the saw. There are circular saws on sale with cutting depths from 30 to 130 mm. You need to find out what thickness of boards you will be sawing and, based on this, give preference to one saw or another.
It is also worth taking a responsible approach to choosing a blade for your circular saw. If you need to make a neat cut, you should choose a saw blade with a higher tooth frequency. If the teeth on the disk are sparsely spaced, the work will be faster, but much rougher. It is important that when working with a circular saw, the cuts are smooth and practically without chips. This is discussed in more detail in my book. More details about it in the “BOOKS” section.
To start working with a circular saw, set the depth of cut equal to the thickness of your board. Thanks to this, you can make the most beautiful cut on almost any surface without leaving marks.
But it is worth remembering that if you make a cut at 90 degrees, the cutting depth will be the same, but for a 45-degree cut the cutting depth will be much greater. Then check that nothing interferes with the protective casing, otherwise it simply will not open.
Fix the board so that it does not slide on the table during work; this requires a stop along and at the end of the workpiece. By the way, some saws are equipped with a thumbscrew that allows you to set the cutting angle. Typically, circular saws have a range from 90 to just under 45 degrees, allowing you to make neat, angled cuts.
Don't forget about safety precautions when working with a circular saw. Always wear safety glasses or, better yet, a full-face mask. Remember that almost all tools are designed for right-handed use, which means that all sawdust and other debris will fly out from under the saw on the left side, so left-handers should be more careful about eye and respiratory safety.
Angle grinder or grinder
Some craftsmen advise using an angle grinder if you have a large amount of work and low quality requirements.
Do not try this method under any circumstances. The grinder is designed to give a beautiful look to a welding seam or to cut bricks, and you simply can’t do it without a saw. Cutting boards with a grinder is dangerous.
When cutting boards with this tool, craftsmen advise placing a notched disk for a circular saw on it. Imagine that while working, the grinder caught a piece of wood in one of the notches, you immediately release the power button (those who worked with it know that after turning off the disk will make a few more revolutions) and it is not known where you will find your tool after that, on the floor a couple of meters away from you or in your body.
Or, for example, the disk got hot and burst, which is also quite possible; pieces of the hot cutting wheel scatter over the entire area, and some of them may land on you. Other craftsmen use a disk with a victorium solder, which can also easily end up in your foot.
Therefore, it is better not to take risks, but to use a tool specially adapted for this work.
Hacksaw
In order to make an even cut with a hacksaw, first you need to draw a cutting line with a pencil on the board, then position the workpiece so that it is convenient for you to work with it, and secure it in this position. The next step is to set the hacksaw at a position of approximately 60 degrees to the product, guide the saw with your thumb so that it runs exactly along the cutting line.
Start cutting as soon as your cut is so deep that the saw can easily “walk” in it without losing its mark, you can turn it to a position that is convenient for you, usually 90 degrees, and continue cutting until you achieve the desired result. If the wood is damp and soft, the hacksaw teeth will get stuck in it, making the job more tedious and time-consuming.
Installing hinges
The two most common types of hinges are decorative brass overlay hinges (attached with countersunk screws that are screwed flush to the surface) and steel mortise hinges (attached into sockets with steel countersunk screws). In the latter case, outline the hinge flap with the point of a knife, cut the outline with a chisel, and then select the wood with a chisel to the desired depth. The sash should fit tightly in the socket. Always buy suitable screws along with the hinges.