Varieties of shank diameter
Before choosing a cutter, you must first decide on the method of its attachment, or more precisely, in what units the diameter of the shank is measured - inches or millimeters. It depends on what collets are included with the router - bushings in which the shank is clamped:
- If they are measured in millimeters, then the most common are 6, 8 and 12 mm.
- When the size is indicated in inches, you usually have to choose from only two of them - a quarter and a half inch.
It is important! When converting inches to SI units, the results are 6.35 and 12.7 mm, but despite such a slight difference, a millimeter shank is not compatible with an inch collet and vice versa. The shaft of the milling machine rotates at speeds of up to 25,000 rpm, so the slightest discrepancies will, at best, lead to damage to the tool.
GROOTS CAN BE MADE EVERYWHERE
With a groove connection, the end of one part fits into a shallow groove cut across the grain of the other. This connection is an improvement on the simple butt connection. The groove shoulders provide decent strength. In fact, such a connection cannot be broken, for example, by pressing on a shelf. If it fits tightly, it can withstand oblique loads well, when the force is directed diagonally across the body. Installing back walls in cabinets or chests of drawers and bottoms in drawers further strengthens the entire structure. Finally, the groove makes assembly easier by defining the position of the parts and keeping them from slipping.
Using just two types of groove connections, you can make almost any body part. The main joint, where the groove engages the full thickness of the adjacent piece, allows for the assembly of bookcases, toy chests, wall shelves, or any other cabinets in which the side walls extend beyond the adjacent pieces (Figure 1).
Rice. 1
.
Main groove connection. Rice.
2 . Modified groove/tenon connection.
If these "through" angles are unsuitable or unsightly, use a modified joint (Figure 2) called mortise/tenon.
Types of cutter design
Depending on the cost and purpose, they are produced in the following design modifications:
Prefabricated
It is based on a steel blank of the required shape, to which the cutting edges are welded. Due to the ease of manufacture, there are the majority of such models on the market.
With replaceable cutting edges
They have a long service life, since the knives for them are made double-sided - when the blade becomes dull, it is turned over.
Monolithic
The cutting edges are machined directly into the base - when working with such tools, even the hypothetical possibility that the knife will break off disappears, but after several sharpenings the cutter will have to be changed.
Start with the Basics: Basic Rules for Male-Socket Joints
Regardless of how you form your tenons and sockets, these tips will help you achieve perfectly-fitting, strong joints for any project.
- Correct connections always start with careful markings. Use a proven steel ruler and square, and mark the marking lines with a sharp pencil, surface planer or marking knife.
- A simple rule that is easy to remember: when marking a socket on the end or edge, the thickness of the workpiece must be divided into three equal parts. The outer two thirds will become the walls of the nest, and the middle third must be removed. So, in a board 18 mm thick (picture below), a 6 mm wide nest is made in the center of the edge of the workpiece. When using material with a thickness of more than 18 mm, the width of the socket can be more than one third of the thickness of the workpiece, provided that the thickness of the walls of the socket is at least 6 mm - this is due to strength considerations.
Fitting a crossbar tenon to a socket with rounded edges is easier than making a rectangular socket. To round corners, use a rasp or a knife with replaceable blades.
Types of cutter blades
Milling cutters come with vertical, inclined or spiral blades. If they are straight, then the pieces of wood will be cut from the workpiece, and the inclined ones will be cut off, which reduces the likelihood of chipping and increases the overall quality of the milling.
Depending on the material and characteristics of the blades, they are available in two types:
- HM – high-speed. Used for processing soft wood or aluminum.
- HSS – carbide. Designed for hard materials, therefore such cutting edges have a better temperature coefficient and other characteristics, which is also reflected in their price.
In addition to blades, depending on where and what shape you need to make a recess in the workpiece, the appropriate types of cutters for a manual wood router are used.
HOMEMADE DEVICE FOR SELECTING GROOTS
Although the device looks complicated, it is quite easy to make (Fig. 10). Cut the workpieces to size, and then carefully plane the planes and edges. Then select a groove in the fixed bar for the fixed ruler using a few cuts on a circular saw. Then, to ensure a tight fit and square edges, use a sharp chisel to trim its shoulders. The half-wood connection on the adjustable ruler is made so that its upper surface is in the same plane as the fixed ruler.
Mill out all the cracks in the planks and rulers using a ruler pressed to the base of the router (Fig. 8). First, releasing the cutter approximately 3 mm in each pass, mill narrow through slots in several passes. Next, mill out pockets for the screw heads and T-nuts.
Small clamps are used as clamps. The pressure pad is a T-shaped nut at the end of the screw. The locknut prevents the pad from coming loose when it presses against the workpiece. Select the grooves in the adjustable bar so that the clamps can hide behind its edge. Rice. 10
. Device for making grooves.
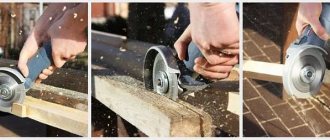
Hello! In principle, you can put a cutter in a drill if we are talking about a hand router cutter. But the effect will not be very good. I tried to install and process it manually, but the quality of course left much to be desired. And the chuck constantly relaxed and the cutter flew out. I made a special table and installed a new cartridge. The quality has certainly improved, but the processing speed is low and the processing depth is difficult to regulate. In general, you can install it, but there will be some inconvenience and the drill has a small rotation, not for milling, and the motor may burn out!
If the only question is what is possible or not! , then you can certainly adapt the cutter to a drill and you can mill with it, but what the result will be is a completely different question.
At first, the rotation of the drill is not enough; for a clean cut of the cutter, the cut will be torn and unsightly - you will have to additionally process everything with sandpaper, and perhaps there will not be a smooth surface at all, since due to the lack of rotation, wood fibers will be torn out!
Secondly, in order to work with a drill with a mounted cutter, you will need to construct a holder device, because a working cutter will constantly be pulled out of the processing area and it will be very problematic to hold it with your hands!
Thirdly, if it is a large shaped cutter with a significant diameter, then working with such a cutter is not possible at all, and even more dangerous!
In general, the conclusion is this: if there is some rough work, such as cutting or grooves, for example, for a lock or internal parts, then it is quite possible to cope with this work with a drill and a cutter!
Grooving cutters
Designed for making a groove of the required width and depth in the middle of the part or from its edge and towards the center. Most often used when creating a tongue-and-groove connection. If necessary, if the design of the milling machine stop allows, the width of the groove can be adjusted without replacing the cutter with a larger diameter one.
Grooved straight
The simplest cylindrical tool, after use of which a rectangular groove in cross-section remains in the workpiece. Mainly used with plunge milling machines, although they can also be used with other models.
Grooved fillets
Their cutting head has a rounded shape, due to which the groove in cross-section resembles the letter “U” - depending on the depth of the cut, the walls are rounded immediately from the surface of the workpiece or initially go from it at a right angle for some time.
Groove fillet V-shaped
Although, by definition, a “fillet” is precisely a semicircular recess, a milling cutter that gives a “V”-shaped groove in the section also belongs to the fillet category. If the work involves making grooves with different angles of inclination of the walls, then you need to have the appropriate set of tools.
Groove structural (T-shaped and dovetail)
In cross-section, the resulting grooves form an inverted letter “T”, the base of which extends to the surface or a regular trapezoid, the larger side of which faces the center of the workpiece. This is one of the most reliable connections; the workpieces slide into one another and cannot be separated in any other way.
Grooved shaped
Along with fillets, it is used to produce figured carvings and edge processing. In cross-section, the grooves resemble curly braces. You can mill as grooves in the center of the workpiece or remove edges from its edges. If a complex pattern is being made, it is recommended to first go along its contour with a straight groove cutter - this will simplify subsequent alignment and reduce the load on the milling machine when using a shaped cutter.
Wood cutter "Dovetail"
For mortises and tenons under similar circumstances: only half the normal width. This is explained by the characteristics that compounds of this type have.
The main thing is to set up the device correctly and fix it in a suitable position.
The tongue-and-groove joint should end up with some clearance. It is necessary so that later you can conveniently use the adhesive composition.
Edge cutters
Most often they are made with a bearing, which allows processing the edges and ends of workpieces not only by adjusting the support table, but also according to a template.
Edge straight
To obtain a workpiece end plane perpendicular to the face (top of the workpiece). If there is a bearing on the cutter, rounded edges can be processed. The bearing itself can be configured flush to the cutting blades or have a larger/smaller diameter, which expands the possibilities of using the equipment.
Edge molding
To obtain a straight, arched or wavy figured edge - depending on the part of the cutter used, you can soften the edge of the workpiece, round it (double cutters allow you to do this in one pass), make an edge with a rebate and a jaw, or get a semi-rod protrusion. Widely used for making ornaments of complex shapes. When choosing a double cutter, you need to pay attention to the possibility of adjusting the distance between the cutting blades.
Adjustable edging cutter.
Edge seam
Used when it is necessary to select a rectangular or quarter groove on a flat or curved workpiece. Using a double pass, a tenon of the desired size is obtained. The cutting depth is controlled by the position of the milling machine or by a thrust bearing.
Edge cone
Depending on the angle of inclination of the edge of the cutter, they are used to prepare workpieces before joining, obtaining a decorative chamfer, or for processing furniture parts, which will then be joined into products of a round (polygonal) shape.
Edge fillets
They are used to produce a rounded groove on the edge of a straight or shaped workpiece. To eliminate the possibility of the cutter being skewed, it is manufactured with two bearings. The result of the work is the same as when using groove fillet cutters, but in some cases it is much more convenient to use edge cutters.
Edge curly
Another name is multidisciplinary. Since they are quite massive and simultaneously work with a large area of the workpiece, the use of such cutters is recommended on milling machines with a power of at least 1600 watts. For work, the entire profile of the cutter is used at once or in various combinations, which allows you to obtain an edge of a standard shape or a shape specified by the master.
Edge half-rod
The direct purpose of the cutter is to process the edges of workpieces to obtain a semicircular protrusion. There are also many additional ways to use it - for example, if you process a rectangular workpiece on both sides with such a cutter, it will become a rod. In addition, it can be used to produce profiles with a chamfer and an edge of complex shape, as well as hinged joints (when processing a workpiece in conjunction with a fillet or molding cutter).
Do-it-yourself half-tree corner joints
Half-timber corner notch (overlapping) is the most common type of frame connection. Its logic is extremely simple: at the ends of both parts, recesses (folds) are cut out along the width of the counter part. The fold forms an edge and a shoulder - they must be perfectly smooth and strictly perpendicular to each other. In a high-quality connection, the surfaces of both parts fit tightly and form a joint without the slightest gap.
Connection marking
Create markings for the fold selection. To do this, use a carpenter's square, a surface planer and a marking knife.
Measure the length of the edge along the width of the mating part. Draw marking lines on the edges. Set the thicknesser to half the thickness of the part and make side markings.
Rebate cutting
Using a back saw, saw off the waste part on each part, carefully following the markings without strong pressure or jerking.
Stripping the connection
Using a wide chisel, clean the edge and shoulder, achieving the tightest possible fit of the parts.
Combined cutters
They are used for joining and splicing wooden blanks - combining them along the edge (for corner joints) or the end part (to obtain a wide board from several small ones). Combination cutters combine groove and tenon cutters and are designed to create both of these elements in one pass. Using milling for this purpose increases the bonding area of the boards and polishes the surfaces for maximum adhesion to each other.
Combined universal
Allows you to obtain compatible planes with a tongue and groove located at an angle to each other. The same cutter is used for both jointed workpieces - since it does not have to be changed, this significantly reduces processing time.
Tongue-and-mortise
A set of two separate cutters is used - to create a groove in one workpiece and a tenon in the other. Additional measurements and adjustments are not required, since the dimensions of the cutting edges are already calculated during the manufacture of the tool.
For the manufacture of lining
They are used on the same principle as tongue-and-groove joints, but make it possible to obtain a shaped connection with a larger contact area between the workpieces, which improves the characteristics of the lining produced in this way.
Combined frame
Set cutters allow the cutting blades to be placed on the axis in the order desired by the master. Consists of a base, cutting blades, thrust bearings (one or more), a lock washer and a lock nut. When changing the configuration of the cutter, its base is not removed from the collet of the milling machine to maintain its original setting.
Board with a groove: varieties, making a groove with a circular saw, drill and hacksaw
All photos from the article
The type of connection based on the insertion of a tenon into a groove appeared in Europe almost simultaneously with floorboards and lining. The finishing material is simple and easy to install and has a lot of advantages. True, the cost is more expensive than ordinary boards and strips, but the joints are much neater, and the service life is much longer.
The groove connection increases the strength of the coating.
Conclusion
For small volumes of finishing work, and especially for household DIY projects, it is not necessary to buy ready-made, expensive material. All you need to do is take some free time and make the preparations yourself. Moreover, for a thrifty owner this will not be difficult.
What types of beam corner ties are there?
To efficiently connect a wooden frame at the corners, you can use a tie with or without residual ends.
In the first case, the connected beams will have leading ends; this option is good because it provides better piping and protection of the corners from precipitation.
But with this connection method there is an increased consumption of material. In the second case, laying the timber is much more economical, and the corners are smooth.
Examples of the above connections are shown in the photo below.
If we consider this connection option as with the remainder, we can distinguish the following types of grooves:
- Connection using the “slam” method;
- A similar method is “to the point”;
- The simplest type is a bowl or “oblo”, also known as “in the paw”.
Although the “oblo” is simple, there are three types of its grooves:
- cut on one side;
- double-sided cut;
- cut on four sides.
Examples of such connections are shown in the photo. Let's look at each of them separately.
One-sided cut
For single-sided masonry, a simple connection technology is used, which is used by many construction companies.
To implement it, a perpendicular in the form of a bowl is sawed into the timber.
The size of this cut is selected in such a way that each previous log fits without gaps and matches in size.
Double-sided cut
This connection option is a little more complicated than the previous one, because the groove is cut from both sides.
It looks like the first one, only two perpendiculars are cut out at the top and bottom at ¼ of the thickness of the frame on each side.
If you do the sampling yourself, you can use a chainsaw as a tool or purchase a special milling cutter.
Four-sided cut
This connection method is the most complex, but at the same time very high quality and durable, because the correctly chosen groove allows you to fit the logs together like a children's construction set.
The bowl in this method is cut through on all four sides and, as in the second option, each cut is made to ¼ of the thickness of the timber.
https://www.youtube.com/watch?v=cUQR2T_UEfw
To make sampling easier, the ideal solution would be a timber groove router; with its help, the cuts will be smooth and neat, especially when compared with a chainsaw or jigsaw.
We connect the beams using the “oblo” method at the corners
When making a corner connection of a log house using the bowl method, there are three possible methods:
- sampling with an oval comb;
- groove in the tail;
- half a log sample.
Of the above methods, the last one is the most used and simple.
Technologically, making a groove is similar to a “groove”, but in addition, a laying groove is selected along the length of the beam.
During the installation of logs, the laying cutout is filled with insulating material, and this procedure is repeated during the installation of each subsequent log house.
Important! For reliable and high-quality fastening, in addition to the groove, the logs are attached to dowels. They are round dowels that are driven into drilled holes in the logs being joined.
When laying using the oval ridge method, in addition to the main and laying grooves, an oval protrusion is left in the bowl, and a cut of the same shape is left in the lying log. Thanks to this protrusion and cutout, reliable fixation of the log house is ensured.
The fat tail laying is the most complex of the three listed, because the groove made in the log has an unusual shape (most often it is rectangular) and is located across the log, and in the next log the cutout has a longitudinal cut of the same shape. Although making a selection in this way is very problematic, such a connection is very strong. When building and installing it yourself, you will have to acquire not only a chainsaw, but a router and an electric jigsaw.
Considering other installation methods, it should be noted that they are all very similar to each other. For example, “Oblo” and “Okhlop” have a difference in the location of the cut; in the latter, the groove is cut from the bottom of the log.
If we consider the “ohryap” method, then the groove in the beam is cut longitudinally and transversely, that is, there is a double cut in the bowl, and at the same time it is made in both logs.
Laying timber flush
The basis for connecting beams flush is the folding method, but the protruding sections of the logs are removed from the end.
And to increase the reliability of fixation, “presecs” are used; they are made in the form of protruding spikes that are attached to the edge of the frame.
When the connection has a regular groove with a “presec”, the stacked logs will be blown through at the place of laying.
Important! To prevent such defects, the cut in the timber is made in the form of a “dovetail”.
By using inclined tenons for connection, a tighter clamping of the timber is created, and as a result, thermal insulation increases.
How to make a groove in a board with your own hands
For a long time, a tongue-and-groove connection has been used in carpentry and carpentry. Ancient architects, using this method, managed to create unique wooden buildings without a single nail or screw.
And although a wide variety of hardware is now quite accessible, the articulation of individual parts of various structures by this method not only has not lost its relevance, but is also widely used in modern products and materials.
The principle of connection and its varieties
In terms of design, all tongue-and-groove joints are made according to the same principle: a protrusion is made on one part, and a recess is made on the second. They are exactly the same in configuration and size.
When these two parts are tightly joined, a strong technological unit is obtained.
When building houses, such a connection prevents the shift of one part of the structure relative to another; in the manufacture of furniture, it significantly increases the area on which glue is applied, thereby providing additional strength to the product.
Based on the geometric shape of the protrusion and recess, such joints are divided into two main types:
- rectangular cross-section (sometimes with rounded edges of tenons and grooves);
- in the form of a trapezoid (also called a “dovetail”).
Based on the number of spikes and grooves that need to be made for one joint of parts, these connections are divided into:
- single-spike;
- multi-spike.
Figurine cutters
The main purpose is decorative processing of the edges of parts intended for creating panels. Shaped cutters are equipped with a bearing, so you can work with rectangular and shaped workpieces. Since panels are usually large parts, the average diameter of the cutters is 50-70 mm - to use them, it is advisable to use a milling machine with a power of 1500 watts or more.
Figurine horizontal
Used for partial processing of panels. Since the shape of the cutter involves sampling, starting from the thrust bearing, this does not allow you to immediately obtain a tenon for inserting the panel into the frame. To form it, additional edge processing is required.
Figurine horizontal double-sided
They significantly simplify the work process, since the part can be processed in one pass of the cutter, simultaneously forming the figured part of the panel and the tenon for the groove cut in the frame.