The use of septic tanks from barrels
It is advisable to build a septic tank at the dacha with your own hands from barrels in the following cases:
- as a temporary structure during the construction phase of a house before the sewer system is installed,
- with a minimum amount of waste, typical for periodic visits to a suburban area without permanent residence.
Such requirements are due to the small volume of tanks. The capacity of large barrels is usually 250 liters
Therefore, the volume of a septic tank from three tanks will be 750 liters. At the same time, according to the terms of sanitary standards, the septic tank must accommodate three daily “portions”.
It is advisable to build a septic tank from plastic barrels with your own hands as a separate treatment facility, for example, for a shower or bath
.
The advantages of such designs are:
- low cost (used containers are often used),
- simplicity of design and installation,
- less excavation work due to the small volume of tanks.
Septic tank installation
Do-it-yourself sewerage from barrels requires certain preparatory work to be completed before installation. We will consider the option of making a septic tank from three barrels, but the same remains for a septic tank from two tanks.
Technological holes are made in each barrel.
In each of their barrels, in addition, holes are made at the upper end (or lids, which are often provided with tanks for ease of cleaning) for ventilation pipes.
In each tank, the inlet is located 10 cm above the outlet.
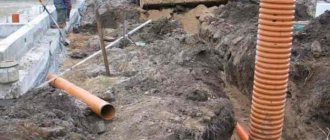
The pit for the septic tank is dug out of the barrels in such a way that when installed, there is a gap of 25 cm on each side of any tank. The bottom of the pit is covered with crushed stone or a sand cushion is arranged.
To fill the foundation, step formwork is installed
When placing barrels with a sequential decrease in level (each is 10 cm lower than the previous one), the volume of the tanks will be fully used, which is very important with the small capacity of septic tanks of this type. If the removal of purified liquid is provided through the bottom filter of the third barrel, the last tank is installed directly on crushed stone, without a foundation.
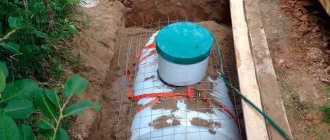
After pouring the foundation at the stage of solidification of the solution, rings or hooks are installed in it, to which clamps will cling to fix the containers
Just in case, it is better to “anchor” not only plastic, but also iron tanks.
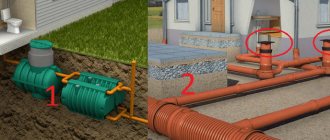
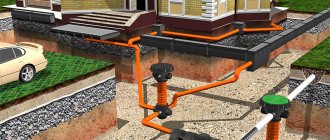
If wastewater removal will be carried out through a filtration field, then trenches for laying corrugated pipes can be dug at this stage.
Once the foundation has gained strength, you can begin installing and securing tanks, installing pipes and sealing joints at their entry points. Experts recommend not using silicone for these purposes, preferring other types of sealants, for example, epoxy.
The trenches of the filtration field are covered with geotextile, and after laying the perforated pipes, the material is wrapped with the edges overlapping each other.
A fully assembled septic tank made from barrels is filled with soil. It is better to fill plastic containers with water at this time to avoid deformation.
During the backfilling process, the soil is periodically carefully compacted.
Installation of drain structures
On personal plots, a special pit is built using building materials. When it is planned to use the dacha only on warm days, and there is no expectation of drainage from the water supply at the dacha, a regular drainage well is made. In a water collection pit with a volume of 1 cubic meter, sewage decomposes quickly and does not pose a threat to the environment. For non-professionals, it is enough to dig a small pit, add sand, gravel, broken brick, and after rough cleaning, the wastewater dissolves in the soil.
A fundamental drainage system requires a thorough analysis of the territory, and not all summer residents know how to make a drainage using building materials and tools. Water from the house is directed outside through holes in the wall or foundation to a septic tank. The pipes are laid in special trenches and brought to the place where the pit will be built. For arbitrary drainage of water, it is necessary to take into account the angle of inclination of the ditch: as a rule, it is 2 or 3 cm per 1 linear meter of the entire structure. Typically, elbows and plastic pipes are used.
Do-it-yourself system installation in a private house
After the cesspool is placed on the site, you can begin to dig a trench to the required depth. In the central part of Russia it is 2-2.5 meters, in the northern regions it is a meter more, and in the southern regions it is 1-1.5 meters. They begin to dig a trench from the wastewater intake point to the top, towards the house.
Now a fine sand and gravel mixture, a “cushion,” is poured onto the bottom of the pit along its entire length. It’s better to immediately “shoot” the slope at least a little and level the sand.
The next step will be laying the pipeline itself. First, the end is inserted into the well so that the socket faces towards the house. It is advisable to immediately secure the pipe in the hole with mortar or foam. Then they are connected in series with the blank end into a socket. To simplify the process, the rubber bands are lubricated with motor oil or special lubricant.
Each pipe is measured to ensure it meets the required slope. This can be done with a building level, but it is better to take a level.
After assembling the outer line, the line is aligned along its entire length so that the entire straight section is visible through the hole.
Now the thread is sprinkled with sand and the edges are carefully tucked. Then a so-called protective layer of the same sand is poured.
Depending on the length of the outer section of the system, a fan riser is pulled to the surface every 8-10 meters. To do this, a connecting tee is inserted with the socket up, and a pipe of the same diameter is inserted into it. The fan riser needs to be mounted at the level of the soil backfill so that it sticks out slightly from the ground.
Once the route is laid, it’s time to install the system in the house. Often they dig a hole right under the foundation of the dacha and make a hole in the floor of the room where there will be a bathroom or kitchen. This is the most practical way to plant a pipe.
There is no need to insert any sleeves between the ceiling, foundation or floor. After installation, the hole must be sealed well and tightly to avoid the joints opening during operation.
If it is not possible to dig a ditch of the required depth, the drain must be insulated. Insulation of external sewerage is carried out using the following materials:
- Mineral wool.
- Fiberglass fabric.
- Expanded polystyrene shell.
- Large sawdust and roofing felt.
The method of thermal insulation for all materials is almost the same. There is no need to completely cover the line; you just need to put the insulation on top, and you can add a protective layer. However, this does not apply to the polystyrene foam shell, since it consists of two half-cylinders, which are placed entirely on the pipe and only then joined together in trenches.
Instructions on how to drain the water
1. We will need a piece of hose 2-3 meters long; the most affordable one will be a corrugated plastic hose. The hose must have no damage to the walls and no plugs from foreign objects or ice.
2. You need to tie a weight to one end of the hose with your own hands so that the hose, when immersed in the barrel, is closer to the bottom of the barrel.
3. We cut out a hole in the ice of the barrel with an axe. The end of the hose with the weight should fit into the hole.
4. Lower the hose into the hole. There's a secret here. We lower almost the entire hose under water and observe the appearance of water at the level of the hole in the hose. then with a sharp movement we pull the hose and immediately lower it below the water level - water will begin to flow through the resulting siphon. If your thumb size allows, you can plug the end of the hose and work more slowly. The main thing is not to get your hands wet at -15°C.
5. Lower the hose below the bottom of the barrel and wait for the water to drain. Then you can either close the barrel from above or tip it over. A small amount of remaining water will not harm the barrel.
6. If you need to drain several barrels, then immediately transfer the hose to the next barrel to avoid the formation of ice plugs. It was the quickly formed ice that made it difficult to fill the hose with water in the video.
This method of draining water is a full-fledged life hack and is also suitable for barrels of smaller volume, because when a metal barrel with water is tipped over, the latter can become deformed, and the plastic barrel can crack. There is also a useful effect. If your area is turbulent, then a barrel with ice along the walls and an ice plug becomes a very difficult object to move until a strong thaw sets in.
Contents
Many people solve the issue of drainage for showers in the country using “old-fashioned methods”. Some people drain water under garden plantings, others drain the drain into the sewer, and some do not care about this problem at all, believing that it is enough to install a grate under the shower frame, and then all the waste water will seep into the ground. How to drain a country shower competently and effectively?
The simplest drainage system for a summer residence.
Simple drainage sewer system for a summer residence
It is not enough to supply water to the house; after use it needs to be disposed of somewhere. It’s hard to carry it out with buckets, and it’s somehow pointless: the water comes into the house on its own, and then you have to carry it out on your own two feet. You need at least basic sewerage for your home or cottage. The option of simply removing the pipe from the house and draining the water onto the ground or a small hole will not suit everyone. It doesn't look very good, and an unpleasant smell from this puddle or hole is almost guaranteed. What to do? So, we will need: an old metal or plastic barrel, a certain amount of sewer pipes (at least 6 meters, preferably 110mm PVC), a tee, an outlet, about 0.5 cubic meters of medium-fraction crushed stone, a shovel and several hours of our precious time. We choose a place for our drainage well. Preferably, no closer than 5 meters from the house, no closer than 20-25 meters from the well or borehole and below them along the groundwater flow. We dig a hole with a diameter larger than the diameter of the barrel by at least 0.5 m (the diameter of a standard barrel is 0.6 m, height 0.9 m, volume 0.2 cubic meters) and a depth of about 1.5 m (deeper is better). We make holes in the walls of the barrel, if it is metal, then with a grinder, if it is plastic, then with a wood saw with a fine tooth. We make a hole for the incoming sewer pipe in the wall, near the bottom of the barrel. We fill the bottom of the hole with at least 20 cm of crushed stone and place the barrel upside down, oriented the hole for the pipe towards the house. Now you need to dig a trench under the sewer pipe, bringing it to the place you need. The pipe must be laid with a slope of at least 3 mm per meter towards the barrel. It can be brought into the house either under the foundation or through a hole in it. There is no need to insulate the pipe; the water flowing through it will warm it up perfectly. Not far from the barrel, we place a tee with a small piece of pipe extending above the surface of the ground to circulate air inside the barrel and allow air to exit the sewer when it is filled from the house (so that the air from the barrel does not go into your house). We insert the pipe into the barrel through the hole made for this. We fill the gap between the barrel and the wall of the pit with crushed stone to the full height of the barrel. It is advisable to put some kind of non-rotting material at the bottom of the barrel (a piece of old slate is perfect). We fill both the trench and the hole with soil, compacting it thoroughly. We make a hole in the floor or wall of the house, finally introducing the sewer into the house. Further at your discretion. On a piece of pipe sticking out of the ground not far from a buried barrel, you can put a plastic mushroom, which is difficult, but can be found in stores. And now the nuances. This is an exclusively drainage sewer system for the home; it cannot cope with fecal waste, it cannot be cleaned or maintained in any way, and it is not intended for this. This sewer can be used for drains from the kitchen or bathhouse. Drainage wells from a septic tank have the same device. The microclimate for bacteria that process wastewater depends on the depth of the pit. Ideally, the depth of the pit should be: depth of soil freezing + height of the barrel + height of the crushed stone cushion (for the Leningrad region: 1.2 m + 0.9 m + 0.2 m = 2.3 m). But digging so deep is difficult and not necessary. The effluent also warms the barrel.
Simple drainage sewer system for a dacha with drainage
If the soil at the site where the sewage system is installed is clayey, and the water leaves the barrel slowly, then the sewage system for your home can be slightly improved. To do this, you need to lay another sewer pipe, or better yet, a drainage pipe. This pipe may discharge water into a drainage ditch at the border of the site, or it may lead nowhere, ending in a dead end. The purpose of this pipe is to drain excess water from the barrel, thus increasing the area of water absorption into the soil (irrigation area). The pipe is laid in a trench on a crushed stone bed and is also covered with crushed stone and then with soil. The depth of the trench is greater than that of the supply pipe, and the slope is directed away from the barrel. Naturally, the sewer pipe will have to be damaged by a number of holes in the lower part to improve water flow, making it like a drainage pipe. This is not required if the pipe is placed in a drainage ditch.
You may be interested in similar materials::
- What to do if the sewer is frozen. To be honest, I am a little surprised that someone’s sewer can freeze. Sewage pipes, in principle, cannot freeze there.
«>
Laying external channels
The difficult stage of withdrawal has been completed; now it is necessary to correctly install the pipe into the septic tank:
- The first step is to clear the area. The top layer of turf is removed along the entire length of the future trench.
- Correct measurements of the length of the pipe from the transition point to the wastewater collection point are made.
- Now it is necessary to calculate to what depth the trench will need to be made. To do this, it is fundamentally important not to forget that the slope of the pipe should be 1–2 cm per meter. If the starting point of transition from the internal sewerage to the external one is at a depth of 50 cm, and the distance to the septic tank is 10 m, then the entry point into the drainage pit should be at the level of 60–70 cm. In the case when the landscape goes under slope, you need to calculate the difference and subtract it from the final result. This can be done quite simply. A line is projected using a laser level. From it, measurements are taken to the surface near the house, and near the septic tank. For example, if the slope is 20 cm, then a recess of only 40–50 cm will be required near the septic tank.
- The trench is constantly dug 20 cm deeper than planned (the width in most cases is 40 cm). This is done to add sand to this thickness. The sand is well compacted and spilled with water. Then he will most likely sit down, based on this it will be necessary to supplement this level.
- It is better to assemble the structure on the surface, this way it is possible to ensure the best joining, and it is simply more ergonomic.
- The pipe is being laid. A fill of sand is also made around it and compacted well. But do this only on the sides, because pressing from above can easily damage it.
- The entrance to the septic tank is sealed using a rubber cuff.
- It is necessary that the installation site is not an area with intense traffic. If this is the case, then it will be necessary to lay corrugated sewer pipes or additional sleeves, which will compensate for the pressure.
Advice! In certain cases, external installation is permitted. In this case, you will need to take care of good thermal insulation of the pipe by wrapping it in a couple of layers of mineral wool and securing everything with thick foil. If you are not sure whether the pipe in the ground is really below the freezing point of the soil, then it is also possible to insulate it or lay a heating cable along it.
For external installation, take a special pipe that is designed for this purpose. In conditions of enormous load, it is possible to use corrugated. In addition, take care of the ventilation of the septic tank by installing fan ventilation.
How to arrange water drainage at your dacha
In the place where the future shower is planned to be built, you need to dig a small depression and line it with plastic film or roofing felt.
Draining water at the dacha for a summer shower
It is better to concrete the recess under the shower, forming a kind of waterproof pan, so that the ground under the summer shower does not silt. Water, removing labor sweat and dust from the skin and hair, also washes away fat. These wastes, gradually settling on the soil surface, lead to siltation. Eventually, the soil will no longer allow the water used in the shower to pass through, and an unpleasant puddle will begin to appear on the floor of the shower stall.
Water flows from the pan into the gutter, so the pan should be placed on a slope. In addition, the drainage gutter must also have a slope. To drain water to a certain distance from the summer shower, you need to dig a trench under the drainage pipe. To unhinderedly drain water in a dacha, it is necessary to lay the pipe so that it has a certain slope towards the drainage pit.
Draining water in the country house for the kitchen
To drain water at the dacha, you need to connect a corrugation to the kitchen sink and create a water valve by bending the corrugation in an N shape so that water always remains in it. Then connect the corrugation to a plastic pipe with a diameter of 50 mm and bring it outside the house.
By the way, the kitchen sink should be equipped with a grate to prevent large food waste from falling into the drain pipe. An intermediate siphon must be installed on the line between the kitchen and the drainage tank. so that all foreign particles that are heavier than water settle at the bottom and do not fall into the container.
The siphon should be equipped with an inspection window so that you can unscrew the lid and drain the water with solid particles into a bucket. This will reduce the entry of organic matter and sand into the drainage container. In this case, the volume of the barrel will be enough for a longer time, the barrel will last longer, and otherwise the rotting processes will lead to its silting.
Then you need to take a metal barrel; if it is closed at both ends, then on one side you need to cut out the bottom using a chisel and hammer. Place the barrel with the open end down in the hole on a pre-filled bed of gravel and small crushed stone. The prepared pit must be larger than the height of the barrel. At the other end of the barrel, you have to make one hole for the pipe, connect the barrel and the pipe taken out of the kitchen with a tee with flanges. All joints: pipes with the barrel, as well as with the outlet pipe from the sink, must be sealed.
For better resorption of water drainage at the dacha, you can additionally dig drainage trenches on the sides of the barrel as wide as it is, approximately 1.5–2 m long. The trenches must be filled with crushed stone and large boulders. Cover the top of the trench and barrel with a layer of earth 30 to 100 cm thick, flush with the surface of the site, and cover it with turf. On top you can plant flowers, grass and a couple of birch trees - they love water. This design will last approximately 7–10 years.
Brick cesspool at the dacha
A householder’s arsenal always has available tools at hand, but if someone has not yet had time to purchase the necessary gardening and construction equipment and protective equipment, then the following will be useful for the work:
- shovels, trowels;
- limiters;
- ropes, ladder;
- container for solution, buckets;
- drainage: cement, sand, gravel, water;
- slab (reinforced concrete).
Before starting work, the top layer of soil is removed, it is scattered over the site, and a pit of a predetermined size is dug at the selected location. Experienced summer residents always laid brick on the side walls on a light foundation, and left gaps between the bricks for filtering. Durable natural stone is often used in construction. The bottom of the pit is filled with construction waste and gravel. The gap between the ground and the walls is usually left 20-25 cm. For safety reasons, install a slab with a hatch and a small hole for ventilation. The entire structure is covered with a lid that can withstand more than 100 kg, so that the flow of water from the system is reliably protected from accidents.
How to make proper sewerage when the groundwater level is high
If, when digging a trench, water has already appeared in the upper parts, you will still have to dig to the required depth.
If the sewage system is assembled correctly, groundwater will not affect further work. To prevent water from interfering when laying pipes, the trench needs to be dug a little wider and a recess of 20–30 centimeters must be dug along its very bottom along the edge along the entire length. Liquid will accumulate in this groove, and the ditch will remain dry.
Since the cesspool, VOC, septic tank and drainage system are sealed, high groundwater levels should not affect the treatment process. However, if a VOC or septic tank is installed at the dacha, then a waste pipe or dry well is required, through which water can penetrate back into the septic tank. To avoid this, a check valve is installed on the discharge pipe.
Another solution to this problem is to place the discharge pipe from the septic tank on top into the nearest ravine, since the water comes out almost clean, and this will not harm the environment.
Connecting a pipeline is a labor-intensive process; you will need:
- fittings, tees and couplings;
- grinder to cut off some sections;
- building level;
- hammer drill and screwdriver;
- special brackets - to secure pipes.
To independently install a drainage system to a sink, bathtub or shower stall, you will need a pipe with a diameter of 50 mm; for a toilet the size will be 100 mm. If there is a bathroom on both the first and second floors, then a hundred square meters are extended upstairs, regardless of what appliances will be there.
Don't make a swamp
When deciding where to put water from the shower, first of all you need to remember that it cannot be drained into open reservoirs and public storm sewer networks in villages. Well, when discharging water within the site, the main thing is not to create a swamp from your own garden.
Well
You can, for example, send such water into a ground filtration well , the walls and bottom of which allow water to pass through - from there it will slowly seep into the ground. The most common option is to dig concrete rings into the ground with holes punched with a hammer drill, and instead of the bottom, pour a layer of crushed stone 20–30 cm thick. When calculating the volume of such a structure, it is important to take into account the volume of one-time water discharge and the filtration capacity of the soil. You can conduct an experiment: dig a test well, for example, 1 m deep and 50 cm in diameter, and by pouring measured portions of water into it, calculate how long it will take for the water to go away, and then recalculate for a “large” well.
If the soil on the site does not filter water well, you can make a sealed receiving well , from which a sewage disposal truck will pump out the wastewater.
Filter field
The second option for wastewater disposal is a filtration field . The simplest example is to distribute water along a series of grooves (for example, between beds), where it will be absorbed into the soil. The filtration field can also be made underground : lay drainage pipes (with holes) in crushed stone in underground trenches. In this case, it is also important to study the drainage capacity of the soil in order to avoid flooding.
Rules for choosing the volume and location of septic tanks
The daily water consumption rate is 200 liters per person, and the septic tank must be able to accommodate wastewater. Collected within 72 hours or 3 days. Thus, subject to permanent residence, a three-chamber septic tank made of 250-liter barrels is suitable only for one person. Therefore, septic tanks of this type are used only for temporary residence or for treating wastewater from one point (for example, from a bathhouse). In most cases, they try to somehow increase the capacity of septic tanks, which is why among treatment facilities made from barrels there are practically no two-chamber options (they have too small a volume).
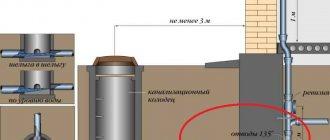
It is important to comply with sanitary requirements regarding permissible distances from the septic tank to certain objects. For example, the distance from the source of drinking water should be at least 50 meters
Garden plants and fruit trees must be located at least 3 meters from the treatment plant. The distance to the road is at least 5 meters.
Conditions of a homemade pump for overflowing water...
To get started, I suggest you watch a video about this homemade product:
Probably many people have ever had the problem of pouring water from one vessel to another... Of course, you can simply lift and turn one vessel over another, but... this method is not always good, since the vessel can be large, that is, you will have a lot of weight containers and you simply cannot physically lift the container...
The second way is to pour, for example, in mugs... But this method is also not always good, since, for example, the shape of the vessel may not allow you to scoop up water in mugs or some other circumstances... And then the old proven method of pouring liquid comes to mind - take a flexible hose, lower one end of the hose into a container of water, and take the other end of the hose into the oral cavity and sharply blow air into yourself... Pressure will be created and then water will pour out of one container into another by inertia until you pull out the hose... Simple physics , but... this method is not very hygienic, and if the circumstances are bad, you can even choke on water... Therefore, this method is quite dangerous...
So, let's begin…
In order to make a pump we will need: - a bottle cap; - a drill and an 8 mm drill bit; - scissors or a knife; - a threaded bottle “neck”; - a flexible hose; - a small piece of pipe...
To begin, remove the gasket from under the lid and cut off its edges as shown in the photo, leaving a small “tail”...
Now we carefully place the cut gasket inside the lid and tighten it as shown in the photo... Our cut gasket will serve us as a valve...
We cut off the “neck” from another bottle and do something like a turbo water intake...
Now we put on a flexible hose from the other end of the pipe...
That's all!!! Our water overflow pump is ready...
Now we lower the side of the pipe where the valve is located into a container with water, and with sharp up and down movements we build up pressure... Water flows through the valve into the pipe and then into the hose, and from there it pours out...
Where to drain water from a summer shower in the country
Equally important when designing a summer shower is the drain for water drainage. The easiest way is to connect the drain to a special drainage ditch, if it is located on the site. A tray made of galvanized metal sheet should be installed at the base of the summer shower. The tray will prevent soil erosion under the shower.
There are several options for where to drain water from the shower at the dacha:
you can connect the drain to the central sewer, drain the water into a drainage hole, there are other ways.
Before making a drain for a shower in the country, if the pan will be located directly on the ground, you need to dig a small depression in the place where the building will be located. The pit should be filled with crushed stone, stones or completely concreted. Before concreting, this depression must be covered with roofing material so that the ground does not get wet. The pallet should be installed on, for which you can use large stones or other available materials.
Then you need to connect the pan to the drain using a pipe laid in the trench. Sometimes you can do a DIY shower drain in a country house together with a collection of soapy water located outside the shower stall. Its volume must be at least 200 liters. Not far from the summer shower, you should dig a regular hole. Its walls must be strengthened, otherwise they can collapse very quickly during operation. It is better to make the bottom and walls of the collection concrete, then water will not be absorbed into the soil and erode it.
You can arrange a septic tank for a summer shower, but it should not be located directly under the shower stall itself, since due to large volumes of water it will begin to fill with soapy water and will begin to work worse. All this can lead to the destruction of the soil, and then the foundation of the summer shower stall. To preserve the soil and the structure itself, a drain for a summer shower must be built a few meters from the shower stall, and placed next to the drainage. The drain from the summer shower should be on a slope so that it goes towards the drainage tank or trench.
It is not recommended to use clay to create a waterproof drainage layer, as over time it can erode and fill the drainage ditch. The drain must be constructed in such a way that it is ventilated. In this case, there will be no problems with unpleasant odors.
Installation of drain structures
On personal plots, a special pit is built using building materials.
When it is planned to use the dacha only on warm days, and there is no expectation of drainage from the water supply at the dacha, a regular drainage well is made. In a water collection pit with a volume of 1 cubic meter, sewage decomposes quickly and does not pose a threat to the environment. For non-professionals, it is enough to dig a small pit, add sand, gravel, broken brick, and after rough cleaning, the wastewater dissolves in the soil. A fundamental drainage system requires a thorough analysis of the territory, and not all summer residents know how to make a drainage using building materials and tools. Water from the house is directed outside through holes in the wall or foundation to a septic tank. The pipes are laid in special trenches and brought to the place where the pit will be built. For arbitrary drainage of water, it is necessary to take into account the angle of inclination of the ditch: as a rule, it is 2 or 3 cm per 1 linear meter of the entire structure. Typically, elbows and plastic pipes are used.
Norms for the distance of treatment facilities on the site
According to SNiP, treatment facilities and pits must be located at a considerable distance from the house, water well and other engineering facilities.
- From a residential building - at least 5 m to a septic tank, VOC, cesspool to avoid unpleasant odors entering the room. And also prevent in advance the possible disastrous consequences of the influence of a humid environment on the foundation of the house.
- It is 30-50 m to a water well. Of course, it is very difficult to follow this rule, since the size of the plots is very limited. It is still necessary to remove the septic tank from the water supply system as much as possible, to the extent technically possible.
- To the borders of the neighboring plot - at least 2 m.
- From the collector to plants and trees - the location is 2-4 m if the tree roots are large.
If there is not enough space on the site
In some cases, standards indicate distances greater than the site itself. In this situation, sealed structures should be installed on the territory that do not require strict adherence to distances. You can install a septic tank or other types of structures that are sealed and can be built on the surface. These devices will be more expensive, but their use will be safe for others and will not pollute water or soil.
Attention! It is important to comply with SNiP standards when locating a drainage pit in order not to pay fines or cause harm to health.
Materials and tools
- To dig a trench, you will need a small excavator. If there is no possibility of heavy equipment coming in, you will have to take up shovels.
- The pipes need to be cut with something, some people use a grinder with adjustable speed, or you can use a hacksaw with fine teeth.
- Jackhammer, perforator - make holes in the well and foundation of the house.
- Sand or fine ASG for fixing the pipeline in the trench.
- Insulation, thermal insulation in places where laying sewerage through an external network to a depth below the soil freezing layer is impossible.
The main segment of the drainage system is the pipe, here are its main options:
- Red PVC is available in various sizes.
- Black polyethylene ones also come in diameters from 50 to 159 mm.
- Ribbed - pragma. The length is 4 and 6 m, the diameter is from 100 mm to 500 mm.
- Gray polypropylene (plastic).
Brick cesspool at the dacha
A householder’s arsenal always has available tools at hand, but if someone has not yet had time to purchase the necessary gardening and construction equipment and protective equipment, then the following will be useful for the work:
- shovels, trowels;
- limiters;
- ropes, ladder;
- container for solution, buckets;
- drainage: cement, sand, gravel, water;
- slab (reinforced concrete).
Before starting work, the top layer of soil is removed, it is scattered over the site, and a pit of a predetermined size is dug at the selected location. Experienced summer residents always laid brick on the side walls on a light foundation, and left gaps between the bricks for filtering. Durable natural stone is often used in construction. The bottom of the pit is filled with construction waste and gravel. The gap between the ground and the walls is usually left 20-25 cm. For safety reasons, install a slab with a hatch and a small hole for ventilation. The entire structure is covered with a lid that can withstand more than 100 kg, so that the flow of water from the system is reliably protected from accidents.
Some tips from the professionals
In order for the sewer system in a private house to work for its intended period, you must first install it correctly. This is 80 percent of success. But even after startup, it is necessary to properly monitor the system.
- Initially, correctly organize and calculate the volume of waste.
- Pump out the cesspool in a timely manner. And not only the liquid fraction, but also the sediment at the bottom of the wells.
- Make sure that no foreign objects get into the pipe that could cause a blockage. For example, small parts of children's toys, rags, etc.
- Conduct a timely external inspection of septic tanks and pits to check their tightness.
Options for sewerage depending on the type of foundation
The complexity and method of laying sewer pipes largely depends on the type of foundation.
Sewerage and columnar base
The simplest method is to install sewer pipes through a columnar or pile-type foundation. This foundation allows for communications to be carried out both before the installation of pillars and after completion of the construction process.
When carrying out work, it is important to ensure that the trench is located at the optimal distance from the pillars. In this case, there will be no weakening of the soil around the supports, which can lead to a decrease in their bearing capacity
Sewerage in a columnar foundation
Sewerage through a strip foundation
It is better and easier to plan and lay sewer pipes before the process of pouring the concrete base strip. In this case, the method of laying communications depends on the type of strip foundation:
- With a shallow foundation, the pipes are laid below the freezing level of the soil, directly under the foundation. It is recommended to dig a trench before constructing the belt. Moreover, it is recommended to place the piece of pipe that will be located under the tape base in a sleeve, which is a piece of metal pipe.
- A deep strip foundation requires actions of a different nature. A hole is cut into the formwork into which an asbestos-cement or steel sleeve is inserted. It is fixed in the formwork and filled with concrete mortar. Communication pipes are subsequently inserted into this sleeve.
Sewerage in strip foundation
The second method is done as follows:
- A mark is made on the foundation where the sewer pipe should pass. The hole must be large enough to allow the pipe protection sleeve to be inserted.
- Using a hammer drill, a hole is made in the concrete.
- Occurring reinforcement bars are drilled out using a drill.
- A sleeve is inserted into the prepared channel and the space around it is sealed with cement mortar.
- A sewer pipe is passed through the protective sleeve, and the gap between them is filled with foam. It serves as a good heat insulator.
Sewerage in a slab base
The answer to the question “how to make a sewer system in a slab foundation” is simple. If the project provides for a base in the form of a monolithic slab, then sewerage must be carried out before pouring the concrete solution. The process looks like this:
- According to the layout of sewer pipes, trenches are dug.
- Select pipe sleeves.
Firstly, it will not allow the slab base to put pressure on the pipe, and also prevents damage to communications in the foundation slab when pouring concrete. Secondly, if an emergency occurs, for example, in the event of a rupture, you can pull out the damaged pipe and replace it with a new element. The absence of a sleeve does not allow such actions to be performed. In this regard, you should choose sleeves made of particularly durable material.
Place the pipes in protective sleeves.
Sewerage in the slab
The sewer system makes living in the house more comfortable
Therefore, special attention should be paid to the communication so as not to damage the foundation and ensure the flawless functioning of the sewerage system
When performing this type of work with your own hands, it is important to take into account all the features of laying sewerage in the foundation, depending on the type of foundation under the house
Year-round accommodation and summer
If no one lives at the dacha in winter, then it is enough to assemble a summer sewage system. In this case, there is no need to dig a deep trench and lay a larger diameter pipeline.
The outlet from the house also does not need to be installed at the very bottom of the foundation. The exit is made directly from the top point of the plumbing fixture. A simple scheme for collecting summer sewage in the photo:
As for the collector into which the water will be drained, it must still be sealed and securely installed. There is no need to install a septic tank; a regular drainage pit will do just fine. At the end of the summer season, it will simply have to be pumped out and preserved for the winter.
If you live year-round in a private house, you will have to complicate the task a little. To use water and a toilet in cold weather, it is necessary to ensure good insulation of external sewer pipes. In addition, there are still some difficulties during installation. This includes the depth to which the external sections of the water supply system are buried, its insulation, and many other factors.
Simplest cleaning
If there is a lot of wastewater and you are afraid of rapid siltation of the filtration well or filtration field, it is better to supply wastewater to it after preliminary treatment . The easiest way to do this is with a sump tank - an open, wide container located between the water discharge points and the filtration system. The pipe draining water from the tank should be located 0.2–1 m above its bottom. In the sump, the water is aerated, which helps purify it, and solid waste falls to the bottom. Purified water goes further. Of course, the bottom of the sump will have to be cleaned periodically.