Details
Most often, polished shafts are used, which are inexpensive. Purchasing these items will not be difficult. They are subject to mounting and processing. Most often made of durable steel.
After this, the top layers are subject to induction hardening, which has a beneficial effect on the period of use and wear rate. Ideal smoothness makes it possible for the carriage to move over the polished layer extremely successfully. The shafts can be fastened at both ends with two hands without unnecessary problems.
But there are also many counterfeit elements made of low-quality metal on the market, since the likelihood of an accurate on-site inspection is zero.
Flaws:
- The base is not fixed. The shaft can only be supported by two fastening devices. This makes it possible to significantly facilitate installation by hand, but at the same time independent of the table support. Because of this, the possibility of defects during product processing increases. Over time, lathe carriage guides roll and become bent.
- There is sagging at long intervals. Due to sagging, a shaft with a length of more than 100 cm is not used when processing for a machine. The thickness and length of the gross surface also matter. The best option is 0.05, and even more profitable is 0.06 - 0.1.
Do-it-yourself carriage for a milling machine – Machine tools, welding, metalworking
We will try to answer this question in our article. For those who make wooden products on their own, a router (especially a manual one) is an indispensable assistant.
The power tool itself, even if equipped with an excellent set of cutters, is completely useless without additional accessories. It is impossible to hold a working milling cutter within a given trajectory with your hands.
The rotating cutter will move chaotically, reacting to the vibrations of the tool and the structure of the material being processed. Even the owner of steel muscles and a hawk's eye will not be able to work with this tool without the use of guides and fixing devices.
This is what a wood router looks like
Basic devices are usually included with power tools, but they can only be used to perform simple tasks. More complex guides and templates have to be purchased for additional money, while many of them can be made by hand.
The main thing is to have an idea of how this device looks and works. There is no need to look for ready-made drawings and complex technical calculations. Any master knows better how to make this or that device. The efficiency and convenience of work will be higher, not to mention the savings.
Mechanical assistants for hand router
The most common device that is included in the basic kit.
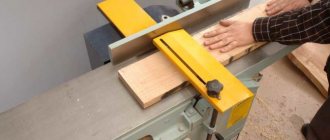
Rip fence
Accessory - Rip fence
The design is so simple that making it yourself will not be difficult. A guide plane is selected relative to the line of passage of the cutter (in some cases this may be the smooth edge of the workpiece itself), along which the milling cutter moves.
The stop can be any flat, oblong object connected to the tool with a fixed rod. For reliability, there can be two rods.
The surface of the guide must be smooth for free sliding. The stop needs to be calibrated.
To do this, a control groove is cut in the workpiece, the distance to it relative to the edge of the workpiece is measured, and the zero mark is fixed. By moving the stop along the rod, you can set any distance with high accuracy.
The rip fence is used for milling grooves and processing the edges of the product, including selecting a quarter. It is also possible to cut blanks of the same width.
Compared to an electric jigsaw, the cut obtained with a milling cutter is smoother and of higher quality. Only the cutter should be of small diameter to save material.
The device can be used when processing rounded surfaces. To do this, a gasket with a cutout in the form of an obtuse angle is installed between the stop and the rounded end of the workpiece.
Popular: Types of wood cutters for a hand router
Guide rail
This device is no different in function from a rip fence, and is designed to ensure directed movement of the cutter along a given path.
A useful assistant when working with a router - a guide rail
The main difference is the ability to choose the angle of movement of the router. To do this, the guide is fixed on the surface to be treated using clamps or suction cups. You can make such a device yourself from a profile or corner of a suitable size.
It's good to use an old curtain rod. The main thing is to ensure free movement of the carriage along the guide. For a more stable fixation, it is better to use not one, but two rods. If the width of the workpiece being processed is greater than the length of the rip fence bar, you cannot do without a guide bar.
Using such a device, you can mill grooves along a broken line or trim the edge of a product along a complex trajectory. To do this, the milling cutter stops at the break point, the fastening is given to the guide, which rotates at a given angle relative to the previous direction.
In this case, the cutter remains in the workpiece, acting as an axis of rotation. The guide is then fixed again and milling continues in the new direction.
More advanced models have the ability to change the angle of inclination of the router relative to the vertical. This allows you to significantly expand the possibilities of using power tools.
Compass for router
The purpose of this device is clear from the name. Used for milling grooves in a circle or cutting out circles.
Want to make a perfect circle? You will need a compass for the router
The principle of operation is simple. A guide rod with a groove or a plate with calibrated holes is used as a compass leg, allowing you to cut circles of any diameter. A pin is fixed in the center of the proposed circle, around which the entire structure moves. But at the other end of the guide there is a router.
Factory compasses for a router can have a variety of designs. A rod with a support platform and a hinge (the design with two rods is more stable), a plate with a slot or calibrated holes.
Template for cutting circles
The main thing is to ensure reliable fixation of the central pin, otherwise the structure may shift due to vibration and the workpiece will be damaged. You can make such a device yourself from any durable and smooth material, for example, textolite.
Homemade device for cutting circles
A carriage with a fixing device moves in a sawn groove; holes are provided for attaching the router. There are also more complex devices for forming ovals.
It is based on the same design as the compass, but instead of an axis of rotation, a support with a cross system of grooves is used. Moving along them, the virtual axis constantly shifts, resulting in the formation of a regular oval.
Device for cutting oval holes with a router
Using such a tool, you can make oval cuts both around the nozzle and next to it. The possibilities for choosing the path of movement of the cutter are practically unlimited.
Copy sleeve
Sometimes it becomes necessary to mill a complex pattern or replicate identical cutouts. For convenience and increased speed of work, pre-made templates are used. For example, a template is often used - a tenon cutter.
Copy sleeve or copy ring
Or it becomes necessary to cut several identical recesses for door hinges. Copy rings are used to move the router along the contour of the template. The sleeve rests against the template, and the cutter exactly copies its profile.
Therefore, when making a template, an allowance is made for the difference in radius (namely, the radius, not the diameter!) When the cutter moves inside the template, the cutout will be smaller. When moving outside the template - correspondingly more.
Bearings in the carriage for a router
There are two types of bearings when installing guides:
- Bushings for ball elements.
- Bearings to provide a sliding surface.
Ball cylindrical fairings, as well as parts for ensuring rolling, have two significant disadvantages compared to rail carriages: an insignificant level of load capacity and a rather large backlash. To ensure weight support, the tenoning carriage is installed on a guide line with several shafts.
Disadvantages of this type of bearings:
- Withstands light load.
- Formation of high pressure due to low operating life. The need to periodically replace the shaft due to the formation of a groove.
- Sawdust and sticky dust clog the slots.
Bearings to ensure sliding on the surface are made from non-hard metals such as caprolon. If all tolerances are maintained, the load-carrying capacity and precision of the sliding bearing are quite high. However, sawdust and dirt cannot harm the unit. But this only applies to bronze parts that are well processed.
Over time, wear occurs on the product, which requires periodic adjustment to get rid of gaps. As a rule, more affordable bearings are used for making them yourself.
DIY milling table: drawings and diagrams
When milling any parts using a manual milling machine (we don’t remember industrial machines, they have completely different dimensions and capabilities), it is necessary to move the device along the surface of the stationary part.
If the router has guides for the task of moving, the task becomes a little easier, but their length does not usually allow working with any large parts.
Therefore, there is a need for a special milling table.
What is a milling table?
This is a fairly large plane, made of durable material that can withstand loads well. The horizontality of the surface and the absence of unevenness are important - otherwise the work will be very difficult. Typically, the countertop is made of wood or its derivatives.
This is due to the fact that wood (plywood, chipboard and similar materials), produced in the form of a slab, already has a flat and smooth surface and dampens vibrations well during operation. A cutout (hatch) is made in the tabletop, and a manual router is attached to the bottom.
Standard models provide for fastening to a horizontal plane, and which side to do this on – top or bottom – is left to the user’s discretion.
In addition to the tabletop, supports are needed - strong, stable, capable of withstanding significant loads. Suitable for them are massive timber (section from 40x40 mm), flat panels, metal racks or a welded metal frame (assembled on corners and plates).
In addition to the already listed mandatory elements of a do-it-yourself milling table, there are additional ones that significantly facilitate the work:
A metal plate placed on the tabletop at the cutout location
It protects wood from excessive loads and mechanical damage, and simplifies work with cutters. Another important advantage is the reduction in the thickness of the table, that is, providing a larger working stroke of the cutter compared to a thick tabletop.
When using a plate with a thickness of 2...3 mm, you can use almost the entire stroke of the cutter (35...70 mm, depending on the model), and for a tabletop with a thickness of 20 mm, all these millimeters are “subtracted” from the possible processing depth.
The plate is attached to the tabletop with screws (self-tapping screws) and must be quickly removed if necessary, so it is better to reinforce the mounting sockets with nuts or other elements with an internal thread of a suitable diameter driven into the wood.
In this case, the router itself is attached from below to the plate, and not to the tabletop, and can rise with it - this is convenient if you need, for example, to replace the router with an electric jigsaw or drill for drilling numerous holes in a long part.
The plate for a router for a table with your own hands must be made of high-quality, preferably non-rusting steel, rigid and durable, at least 2 mm thick (depending on the weight of the router and the properties of the steel).
The hole for the cutter must be processed along the edges, since the cutters will have to be changed quite often and it would be stupid to remove the device for this each time.
I feel sorry for my fingers; they don’t need wounds from metal burrs.
Guides
Designed for uniform, smooth displacement of the workpiece along a given direction. The simplest guides are a flat beam screwed/nailed/glued to the tabletop at the required distance from the cutter. A more “advanced” option is guides with the ability to shift and/or rotate.
The easiest way to do this is to fasten the guide to the table with clamps, but this option does not guarantee a strong fastening - under the influence of vibration, the threads on the clamps “relax” and the guide begins to move out of the given position.
Therefore, it is better to provide a number of fastenings for the guides - with the ability to move the guide relative to the cutter axis, with the ability to rotate by a given degree.
By gluing (cutting) markings in the form of a regular measuring tape along the side edges of the tabletop and providing latches at the ends of the longitudinal guide for tight fastening, you can quickly change the distance from the working tool to the extreme plane of the workpiece.
You can also make a parallel stop for a milling machine with your own hands using screw fastenings, but then you can only move it with a certain pitch corresponding to the pitch of the threaded holes for fastening in the tabletop.
Another convenient option is to fasten aluminum (steel) guides along the end sides of the tabletop and equip the parallel stop with sidewalls with screw fastenings for these guides.
Then smooth movement is possible.
If you make a horizontal insert from an aluminum (steel) profile with vertical stops moving along it in a displaceable guide, it will be easier to secure the workpiece.
You will still have to press it with your hands, but at least initial fixation can be ensured. Also, these stops can be end stops, that is, they limit the movement of the part from and to - for the entire milling length.
You can make your own guides for a milling table using ready-made elements (from other machines, purchased at a hardware store) - for example, a factory-made clamping stop with grooves for vertical movement, or even the entire upper part, mounting only the support.
Another important point: in the rip fence, in the place where it will be closest to the working cutter, it is worth making a rectangular or rectangular cut with a rounding at the top of the shape. On the reverse side, a vacuum cleaner hose or at least just a dust bag is attached to it.
Vacuum cleaner
A very useful addition when milling. A pipe attached to the work area helps remove small chips and dust directly to the receptacle without polluting the atmosphere of the workshop.
Additional switch
It is better to mount it on the side surface of the table (on a support) under the right hand (under the left for left-handers). Believe me, crawling under the table every time to turn off the router is extremely inconvenient; the switch allows you to get rid of this need. It’s good to make fastenings for the wire there so that it doesn’t get tangled underfoot, and perhaps an additional outlet at a stationary workplace.
Folding wings
They will help to significantly increase the table area if you need to mill large/long parts. They are mounted on special folding brackets or on piano (furniture) hinges with supports.
Drawers and shelves
It is better to arrange them below, under the tabletop, since the upper plane of the table should not be occupied. Boxes can be made with additional plates - holders for replaceable cutters, small equipment, and other things.
Important: the location of shelves and drawers should not interfere with comfortable seating at the milling table! If the width of the tabletop is not sufficient for this, it is better to move the fastenings for the shelves outside, securing them on the side supports of the table in a cantilever manner. If the master is standing while working, this parameter is not important; you can place the boxes as you like.
Wheels on legs will be very useful for a mobile table for a hand-held router - you never know, you will have to move the device from one part of the workshop to another. If the floor is uneven, they can - and should - be replaced with adjustable supports in order to be able to make the tabletop exactly horizontal.
Basic design principles
After the master has roughly decided on the model diagram, it is necessary to draw a drawing of the milling table. In this case, the sequence of actions is as follows:
- choosing a location for installation - the dimensions will depend on this;
- determination of the diagram and approximate dimensions of the parts of the device - length/width of the tabletop, dimensions of the insert plate, height of the tabletop (respectively, the height of the supports with or without wheels or adjustable legs), location of drawers/shelves, switch (if any), guides;
- select suitable materials – their thickness and properties;
- create a future workplace;
- choose the mounting locations for the plate, guides, supports, taking into account the requirements of strength, ease of use and direct manufacturing of the table for the router with your own hands.
Important: if a ready-made table is used as a base, you need to focus on its dimensions and the possibility of correcting them for ease of milling.
Below are several options for milling table drawings.
Desktop version, for a compact router. Although, if the side supports are extended, it may well become a stationary workplace.
A milling table with a homemade lift for securing the tool at the top and the ability to lift it to a given height. Here, instead of the usual rectangular plate, a ring is used, embedded in the tabletop - it protects the panel from accidental damage.
DIY table for a router with drawings and manufacturing tips
Below are step-by-step instructions “in pictures” on how to make a milling table for a manual router with your own hands, using available materials:
- MDF board, chipboard or plywood 19 mm thick, dimensions 1000x1800 mm - 2 pieces;
- steel plate size 30x30 mm (depending on the router model), thickness 2...3 mm;
- aluminum guides, approximately 2.3...2.5 m;
- matching wheelset with brake – 4 pieces.
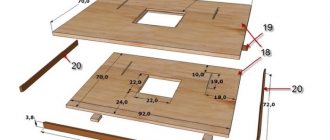
A diagram of the tabletop and stops with a pipe for a vacuum cleaner is presented below.
The following parts are cut from MDF sheets (chipboard, plywood):
1. work surface; 2. support base; 3. stop wall; 4. headscarf (4 pieces); 5. drawer (2 pieces); 6. side bar (2 pieces); 7. connecting strip (4 pieces).
Next, markings are made on the main part (working surface) for the future support plate. The dimensions of the plate are chosen so that the sole of the router can be placed on it freely (with gaps of at least 20 mm at the edges) and there is room left for resting on the tabletop.
First, the internal contour is cut out (for installation of the router), then a selection is made for mounting the plate “flush” with the tabletop.
Accordingly, the sampling depth is equal to the thickness of the plate. Before installation on the tabletop, the attachment points for the router and the hatch for the working cutter are marked on the plate; the sole of the tool is used as a template.
Additionally, holes are made in the corners of the plate for fastening to the tabletop. As shown in the diagram, the places for attaching the plate in the tabletop are reinforced with nuts.
Taking into account the position of the mounting plate on the tabletop, select a place to install guides and stops, assembling them according to the diagram.
1. side bar for fixing to the base; 2. drawer; 3. guide holes, they need to be countersunk; 4. front wall of the stop; 5. self-tapping screws with a countersunk head; 6. headscarves; 7. support base.
Do-it-yourself parts for the base of the table for the router are made and assembled.
1. outer side stand; 2. internal side stand; 3. rear support; 4. bottom of the table.
The video will help you understand in more detail how to make a table for a manual router with your own hands according to this diagram.
This is roughly what a finished homemade table looks like from the side with a connected rigid pipe for a dust collector/vacuum cleaner.
Conclusion
If for such a homemade workbench you organize not one, but several mounting plates (possibly of an increased size), it can also be used for cutting boards and beams with an electric jigsaw or circular saw, and with due imagination - for other work.
Shafts for splined bushings
Certain bushing balls move inside the longitudinal shaft. The design has a high level of rigidity, much stiffer than conventional shafts after grinding. They also have a longer period of use. Torsion shaft reinforcements are of additional importance. They can be very successfully installed on the shaft mounting structure.
A significant disadvantage of the spline guide is its high cost. This is the reason for the rare use of CNC in standard units.
Shafts with a cylindrical cross-section
The cylindrical design makes it possible to maintain balance along the entire length, preventing sagging elements due to the weight of the tenoning carriage. This type of guide is also called linear support shafts. They have precise fixation along the mechanism body thanks to threaded holes. Such guides allow you to move carriages with large weights without sagging.
Disadvantages associated with cylindrical machine tool shafts:
- Short period of operation.
- Significant backlash of rods.
If in linear bearings they interact equally with the loads of different guide vectors, then on shafts with a cylindrical cross-section the tenoning carriage is not so stable.
This is a consequence of the closed sleeve surface, which the tenoning carriage does not have. Therefore, it is necessary to take into account the fact that the CNC hardware will function less stably than a similar machine using ordinary round rail movers.
Modern cylindrical rails are produced by both well-known companies and small artisans. This affects the cost of the device and its technical components. It happens that carriages and rails from one manufacturer do not meet general standards.
Tenoning devices
Such devices ensure the creation of joints based on spikes. Such profiles, which require high precision in processing the material, are easily made with a milling machine.
Using a hand router, the master moves it freely to the material. Therefore, the material needs to be securely fastened for error-free tenoning.
Such conditions can be created by a simple device made from the following parts:
- rigidly fixed guides, lower, upper and side;
- a bar with one degree of freedom that will limit the sample.
The parameters of the parts depend on the specific tool for which the device will be assembled. The assembly procedure is as follows.
Along the edges of the plywood base, vertical ribs of equal size are installed with cutouts in the center. Rails are attached to these ribs on which the tool will move. To ensure safe movement of the router on the rails, they are locked with limiters, which can be simple wooden slats.
A moving part is attached to the plywood base - a regulator for selecting the edge of the part. The lock can be a wing screw or another fastener of the technician’s choice.
Regardless of the manufacturer, a hand router with the addition of such a structure can easily cut out a simple tenon profile.
Another means for producing spikes is a conductor. It consists of a base, stops and a moving part in the form of a slide. Experienced users begin to manufacture and use it for very fine and precise work.
Guides with configurations
Standard guides have a track on which special carriages are installed. This makes it possible to distribute the load along the entire length of the track - the ball is attached to the rail mover along an arc with a high degree of accuracy. Heavy weight carriages do not stop moving in a straight line. They have high durability with low backlash.
Disadvantages of ball rails:
- The attachment points must be straight and without any roughness.
- Difficult process of mounting on the machine.
There are many models of carriages on the open market that are very ambiguous in terms of load capacity and tension elements. For this reason, their production is not homemade, but rather high quality market products. The best guide elements are produced under the TNK brand, as well as Khivin.
Guide rail
Having a similar purpose to the rip fence, the tire is responsible for the accurate movement of the cutter in a straight line. The time spent on work is noticeably reduced due to the use of the tire. It also allows you to guide the tool on the table at any angle to the edge.
Note! You can secure the tire to a tabletop or material using clamps.
Some mass-produced tires include a separate component - a shoe. It is connected to the router by rods and, passing along the bus, moves the milling head along a given path.
The tire is best combined with a tool whose base stands on retractable legs. This eliminates the height difference between the guide rail and the router.
It happens that the functionality of commercially produced tires is not suitable for the user. You can always create an individual version of the router guides with your own hands. The most elementary one is a long, even beam - in other words, a ruler. The master only needs to provide it with fasteners, and the tire is essentially ready. To make a simple device, you don’t even need a drawing.
Of course, such a homemade version will not be stable. The combination of a plywood base with a board nailed to it will be more stable in operation. The edge of the router base will rest against the board, and the edge of the base will mark the processing area. This design is used when using cutters of the same diameter.
Another option works when wood cutters can be of different sizes. Here the board acting as a ruler is not nailed to the base, but is reinforced with clamps. Thanks to this, it can adjust the distance from the working area according to the diameter of the cutter.
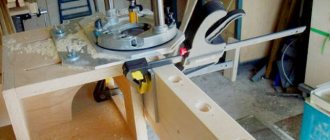
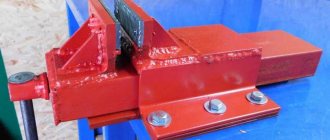
How to make a carriage for a router with your own hands
What can be used to make a homemade carriage or sled at home:
- corners;
- bearings;
- nuts;
- bolts.
Only steel angles are used, never aluminum. Steel or round timber can be further hardened or nothing can be changed. But be sure to polish it. For installation, you do not need to choose wide bearings; narrow ones, but with a high degree of friction, are better. The diameter of the bolts cannot be larger than the internal diameter of its roller.
Republished by Blog Post Promoter
DIY accessories for a wood router
The functionality of milling equipment can be significantly expanded by using special devices. Serial accessories that can be found on sale are quite expensive. That is why many craftsmen decide to make accessories for a wood router with their own hands.
Most of the manufactured elements are intended for the correct placement of hand tools in space. In addition, accessories for a wood router can significantly increase the accuracy of processing. Some instruments come with accessories out of the box.
However, they are not highly specialized equipment and are often not suitable for the assigned tasks. Let's take a closer look at the most common equipment.
DIY accessories for a wood router
Templates for the router
Templates have become very widespread. They are manufactured for the production of specific products. That is why the question of how to make a template for a router with your own hands has become quite widespread.
The milling template is characterized by the following features:
- Some versions are designed for milling a workpiece along a straight contour, others at an angle or a rounded shape. Very often a template is used for milling rounded corners of various radii.
- Some models of the equipment in question are equipped with rings or bearings. They are suitable for hand routers. If a ring is used, it should be taken into account that it should not come into contact with the installed cutting tool while milling the workpiece.
- Creating grooves of unusual shape can be called a rather difficult task. Recently, groove milling has been carried out using the equipment in question. For example, you can quickly make a stencil for wood carving with a router or to create a groove that fits door hinges.
Templates for a DIY router are often made of wood. This choice can be attributed to the fact that such a material is characterized by a high degree of workability. That is why it is much easier to obtain patterns on wood with a hand router, since the template will completely repeat the geometry.
On sale you can find a variety of patterns, for example, dovetail. However, almost all craftsmen are faced with the fact that they have to create a similar product with their own hands when making unique parts for furniture or other products.