For many craftsmen, purchasing a hand router becomes one of the most significant events that pushes them to move to a higher level of skill. It’s one thing when a workpiece is processed with simple tools: a plane, chisel, chisel, after which clear edges and reliable joints are obtained. It’s another matter when working with a milling cutter allows you to make wood more interesting, give it new shapes and create something that can highlight craftsmanship. But this is ideal, in fact, before you get a smooth edge, with clear lines and the absence of burnt areas, you will have to study and do it thoroughly.
Device - rip fence
This device, as a rule, is already sold along with the router. Therefore, there is no need to develop and create it independently. For reliable support of the processed material, this element is used. With it, the movement of the cutter becomes rectilinear relative to the base surface, which can be a table guide, slats or a straight edge of the part .
This device makes it possible to quickly mill various grooves and process edges while firmly holding the material.
Guide rail
If you need to make a straight cut with a router, then you cannot do without this device. To make it you will need any flat board, for example, you can use a piece of chipboard .
First you need to find out the distance from the edge of the milling base to the center of rotation, and it is always the same. To do this, you need to screw a guide to the unnecessary part of the material and make a test cut. Then you should measure the gap from the edge of the cut to the tire, to which the radius of the cutter is added. As a result, it will be possible to obtain the required value. For example, it is 59 mm, and the diameter of the groove cutter is 14 mm, that is , its radius is 7 mm .
Then you should draw a line for the cut, from which we retreat a distance of 52 mm (59-7), and draw another one. We fix the guide along it and make the cut.
Circle milling
Compasses are used for such purposes. With their help, the router can move around a circle. The simplest of them is a device consisting of a rod, one end of which is equipped with a screw with a pin, and the other is attached to the base of the tool. Of course, it is better to use a compass equipped with two rods.
Read also: Impact drill and corded screwdriver
In general, there are many proprietary and even homemade devices for a router for cutting circles, which differ from each other in ease of use and dimensions. Quite often, compasses have a mechanism that changes the radius of the circle . As a rule, it is a screw with a pin at the end that moves along the groove of the router.
When it is necessary to mill a small circle, the pin should be located under the base of the tool. In these cases, other devices are also used, fixed at the bottom of the device base.
But you don’t have to buy a milling compass to cut out circles. Instead, you can use a rip fence. To do this, the device is attached to a groove on the sole. A screw is screwed into it, which is recommended to be equipped with a sleeve so that its diameter matches the size of the hole. That's it, the compass is done. The radius can be adjusted using the stop.
Safety regulations
Methods for safe operation of the device must be prescribed in the manufacturer’s instructions; do not neglect them to avoid injury. The basic rules for safe work include:
- Be sure to wear protective clothing and no hanging parts that could get wrapped around the router.
- Protect your eyes from chips by wearing safety glasses or a mask.
- Protect your respiratory system with a respirator.
- Be sure to unplug the device from the outlet when not in use.
- Hold the tool firmly in your hands to prevent it from slipping when touching the workpiece.
- Be sure to study and follow all requirements of the manufacturer's instructions.
Fulfilling these simple requirements will allow you to avoid injuries when working with a router, because this is a rather dangerous device. Learning to work with wood requires not only a strong desire, but also special patience and attentiveness. Only the combination of all these qualities will allow you to gain experience and achieve high peaks of skill.
A hand router is a universal mechanical tool in the home workshop. To use it correctly, you need to get basic lessons in working with a wood router. There are many Chinese-made milling cutters on the market, they are all of the same design and differ only in engine power. Experts recommend purchasing a more powerful tool, since the list of work performed will expand significantly. The craftsman will be able to cut out a pattern, make a quarter cut, cut tenons and perform other operations related to the manufacture of furniture.
Using copy templates and rings
Copy rings are a round plate with a protruding edge that slides along the base surface along the template. This device provides an accurate path for the cutter to move. Basically, this element is installed on the base of the workbench. There are several methods for attaching it:
- Installation of special antennae in the holes on the sole;
- Screwing the ring into the threaded recess.
Using a template also allows you to achieve more efficient and accurate work. It is attached directly to the workpiece with double-sided tape, and then both parts of the device are pressed to the machine with clamps. Moreover, experienced milling operators advise checking how tightly the ring is pressed to the edge of the template.
In addition, with such a device you can not process the entire edge, but only the corners. Therefore, the procedure for processing material using a template is an excellent option for cutting grooves for a product.
Hazardous factors
Milling machines require complete safety and high qualifications of the worker. When using electric machines, accidents may occur due to material ejected during milling. Therefore, the performer of the work must have special work clothes.
If heavy dust is generated during the milling process, you must wear safety glasses. Maximum safety in this situation is provided by special clamps and vices that effectively hold the workpiece, preventing it from being thrown out. Do not hold the workpiece in the rotation zone of the cutter with your hands or directly touch the rotating tool. It is necessary to use special clamping devices to advance the part during milling.
Dust removal devices
Professional craftsmen, in order to ensure dust removal, specially buy a technical vacuum cleaner, which is connected through an adapter with a hose to the router. Moreover, it does not interfere with operating the tool, and the markings and place of processing of the product are always open for visual inspection.
It is very difficult to work without a suction unit. But not everyone decides to make such a purchase, since it is too burdensome in terms of money and, moreover, is not always justified. True, there is another solution; you can get rid of dust with a household vacuum cleaner.
A hermetically sealed tank is installed between the milling machine and the vacuum cleaner . It will catch the bulk of the dust. It is equipped with an additional hose, and a fabric mesh is inserted inside. Moreover, these designs can be purchased ready-made or made with your own hands. By the way, a homemade device will help a household vacuum cleaner to collect even large construction debris and wood dust.
Slot milling device
This device is used for processing longitudinal grooves on posts, balusters and other rotating bodies. The principle of its operation is as follows. A baluster is installed into the body and fixed. Using a locking screw and a disk, the workpiece is secured in a strictly defined position.
After which the carriage is set in motion, and a groove is milled along the length of the product . Then the part is unlocked, rotated to the required angle, locked, and the next groove is created.
Safety precautions when working with a hand router
Each tool comes with manufacturer's instructions. It describes the technical specifications and provides recommendations for safe use of the tool. When using a wood router, you must strictly follow a number of rules that help minimize the risk of injury.
When you finish using the router or take a break, be sure to unplug the power cord from the outlet.
When working with a hand router, be extremely careful and concentrated. Take a stable position so as not to lose your balance and hold the instrument firmly in your hands.
The part being processed must also be firmly and securely fastened. Hold the router very firmly. When the product comes into contact with the workpiece, a fairly noticeable blow back can occur. If you do not hold the tool firmly enough, it may break out of your hands and cause injury.
Wear suitable protective clothing. Make sure there are no hanging pieces of material that could wrap around the router. The clothes themselves should not be too loose. It is also recommended to wear a respirator to protect your lungs from harmful fine dust.
Thus, working with a hand router is not that difficult. Be sure to remember the safety requirements, do everything according to the instructions, and you will succeed. Good luck!
Many well-known companies are engaged in the production of wood processing equipment. Manual milling cutters have always been in greatest demand and popularity, with the help of which you can obtain exclusive and uniquely shaped products.
Instructions for wood carving with a router
Beginning craftsmen may find working with hand tools difficult because the process of operating them seems difficult. That is why, before you start milling, you need to familiarize yourself with the principle of its operation.
Router assembly
The first step is to check the mounting location of the cutter in the machine; as a rule, a collet chuck is used for this. First, you need to select the desired cutter that matches the size of the chuck. If necessary, you can replace it.
But when deep processing is necessary, an option with an extended shank is used, which is inserted into the chuck hole and secured with a key . This must be done carefully without applying force, otherwise you will overcook, which is not the norm for the correct operation of the router. Although it is worth trying to reach a good stop so that the cutter does not wobble. All that remains is to tighten the spindle lock and you can get to work.
Read also: Edge banding machine operating instructions
After this, the router turns on, you need to get used to the sound and feel the start. It is often because of surprise that many people start getting married.
Depth selection
In addition, you will need to install a milling depth limiter. First, the machine is applied to the product from the edge, while the cutter should not come into contact with the material. You will have to press on it until it reaches the required depth, after which the position is fixed .
For a more accurate value, use a phased limiter. You can find out its pitch in the manual for the router. In this case, the regulator is rotated by the required number of degrees.
A few recommendations
First of all, the required speed is determined. This is done according to the table in the instructions, based on the diameter of the cutter and the material being processed.
If you have never worked with a router before, then it is better to try your hand at a rough version. In addition, this will help set the necessary parameters directly in the processing mode .
It is also advisable to compare the results after moving the tool clockwise and counterclockwise, toward you and away from you. When milling a product around, the correct direction is counterclockwise, and on the flat side, on the contrary, away from you. Then you can start carving the main workpiece.
Sometimes it becomes necessary to produce different numbers of identical workpieces of different shapes; this is why template milling exists. There is no great difficulty in producing various numbers of rectangular products with equal sides. Let’s say you need to make identical crafts of a curvilinear shape, then a template will be a means to speed up the work. See our recommendations on how to replicate products with your own hands of complex shapes.
Preparation
To install the cutter in the chuck, the router is laid on its side. Some types allow you to disconnect the engine with the cartridge from the platform without changing its settings. Others do not provide this option, so most often you have to lower the base as far as possible. The cartridge is unscrewed using a wrench, which is included in the package.
The cartridge is fixed in immobility using a special button located above the point where the shaft exits the housing. It is not present on all types of milling cutters; sometimes you have to fix the shaft with a wrench and unscrew the chuck with another.
It is not necessary to remove the union nut completely, but sometimes this has to be done if the cutter is clamped too tightly in the collet. By gently tapping on the side surfaces and turning the shaft, the collet is loosened and the jammed cutter is removed.
The nut is screwed on, the new cutter is inserted into the collet approximately 20 mm. Some cutters on the shanks have special marks indicating the minimum and maximum immersion depth, but most of them are installed by eye. If the installation depth is too small, sharp feed may cause deformation of the cutter and damage to the workpiece. This is dangerous, since the maximum rotation speed of the router shaft is 30,000 rpm or more. A cutter flying out of a collet while moving has great destructive power; if it hits a person, the consequences can be very undesirable.
Attention! It is prohibited to screw the union nut without a cutter installed, as this will break the collet.
Setting the milling depth is as follows:
- The router with the base lowered is installed on a flat platform;
- The cutter is lowered all the way and fixed;
- The depth indicator slider is set to zero;
- The depth stop is raised to the required amount and locked with a screw;
- The cutter is unlocked and lowered until the depth stop stops against the adjusting screw, after which it is fixed again.
It is recommended to check the set depth on a test piece so that adjustments can be made if necessary. You should not immediately make the depth too large; this will cause the router to overheat and create an excessive load on the electric motor. The recommended depth per pass is 4-6 mm.
Bushings and bearings: differences in pattern milling.
Pattern milling can be done in one of two ways. The follower sleeve and ball-bearing cutter (right) cut the stock on the workpiece flush with the template. The copying sleeve (left) slides along the edge of the template, which should be larger (for the inner contours) or smaller (for the outer contours) of the part. Although the follower sleeve works well with cheap straight cutters, we prefer the more convenient bearing cutters and templates that follow the contours of the parts exactly.
Milling according to a template, tip one. Make a template, preferably choosing a durable material. Draw a life-size outline of the part on the template blank or glue a copy of the template drawn on a sheet of paper. Next, drill holes for a jigsaw or jig saw and trim off the excess material. Place an allowance of up to 1 mm along the contour line, sand the edges and remove the template paper sheet.
Milling according to a template, tip two. Using the template, make the required number of parts. Place the template and trace it with a pencil on the part blank. Cut off unnecessary material by filing with an allowance along the contour line of up to 1.5 mm, as shown in the various devices. Do all of the above on all workpieces. Use double-sided tape and install the template on any workpiece. To increase the speed of work, install a cutter with a bearing on the shank into the collet of the router (the router can also be installed in a milling table). The bearing of the cutter contacts the edge of the template, and the cutter blades trim the left seam allowance flush with the edge of the template.
First you need to decide on the type of cutter. There are two types of bearing cutters available for sale; they are suitable for template milling when the router is in hand or when it is installed in a milling table. A cutter with a bearing at the end gives the best result when milling on a milling table, the part is moved along the table and the template is on top. With bearing cutters, the entire thickness of a part can be processed in more than one pass.
Useful DIY crafts
In order to make something useful, for example, a box, it is not necessary to have a whole arsenal of complex equipment and expensive tools. You can get by with a minimum of tools and mechanisms . To perform carpentry work you will need:
- milling cutter;
- electric jigsaw;
- Sander;
- several clamps;
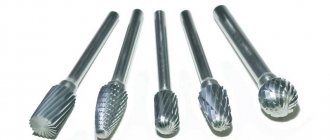
- set of cutters
You can use absolutely anything as a material - for example, scraps of parquet boards, pieces of plywood and waste chipboards, but always at right angles. To simplify the work, you need to make a simple milling table. To process workpieces, you will need a large-diameter straight groove cutter. The process looks something like this. On a makeshift table, plan the ends of parquet board scraps. Mark the sides of the box and use a jigsaw to remove all excess.
The resulting blanks must be processed with a thicknesser to maintain the size of all sidewalls. If you don't have a surface planer, you can use a milling table. To do this, set the stop to the size of the workpiece and move the part between the stop and the rotating cutter towards you. The next operation to calibrate the sidewalls in length is performed with a jigsaw.
You can connect the sidewalls together with a mustache. To do this, you need to mill the ends of the sidewalls with a conical cutter with an angle of 90 degrees. This can be done using a router. Thus, the ends of the sidewalls have the same bevels of 45 degrees. Next you need to make grooves in the sides for the bottom. For this, an end mill with a diameter of 6 millimeters is used, equal to the thickness of the plywood. The parts are connected using glue. The product looks neat and beautiful both outside and inside. What else can you do with a hand-held wood router? Anything: for example, a shelf for things, drawers for storing vegetables or tools, kitchen furniture.
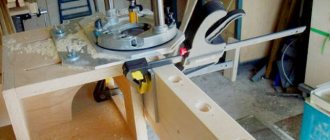
Toolbox
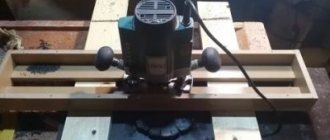
In order to make a tool box, it is necessary to strengthen the carpentry joint of the sides by inserting additional tenons. The operation is called cutting tenons with a hand router. It is very difficult to do it manually, so you need to make a simple device - a milling table . The principle of its manufacture is simple:
- Assemble a simple wooden table consisting of a table top and legs.
- Attach a hand-held milling machine to the bottom of the tabletop, making a hole in the tabletop for the cutter to exit.
- Make a carriage with a stop bar from thick-layer plywood according to the size of the table top. A groove is cut in the carriage for the cutter to exit.
A device for cutting tenons in a board works as follows. Mark the place to be milled and, pressing the board against the stop bar, move the carriage, directing it towards the cutting tool. The resulting finger joint between the parts will be strong and reliable.
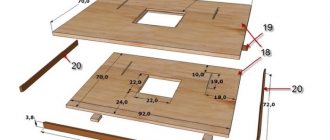
How to make a panel
One of the most commonly performed carpentry operations is making paneling. It is performed with a special cutter. To perform the work efficiently, it is necessary to make a simple device for the tabletop of the milling device. To do this, you will need thick-layer plywood measuring 500 x 300 x 10 millimeters. To exit the cutter, a hole with a diameter of 100 millimeters is cut. The parallel stop is attached to the table with clamps. The cutter is set taking into account the distance from the table surface to the sharp edge of the cutting tool of one millimeter. All sides of the workpiece are processed sequentially. The thickness of the panel is adjusted by lifting the cutter.
Using a hand router, it is very easy to create a furniture facade on the doors. To do this, you will need a shaped end mill, a copy sleeve and a plywood template. The technological process is very simple:
- attach the template to the workpiece using thin nails;
- set and record the depth of immersion of the cutter into the wood;
- install the copy sleeve on the milling mechanism;
- press the milling machine against the template and follow its contour.
The result is a neat design of the furniture facade.