There are only two ways to attach reinforcement to a frame: electric welding and knitting. We will not open a debate about which one is preferable. Let’s just say that knitting does not reduce the strength of the working rods.
Any welding weakens the metal because it creates local stresses in it. This negatively affects the reliability of the entire structure.
Compared to welding, knitting work is more labor-intensive.
Despite this, in private construction with its small volumes it is better to choose them. Especially when it comes to such critical structures as foundations and floor slabs.
In this article we will tell novice builders how to knit reinforcement correctly. Let's look at the tools, materials and technologies used for this work. We hope that the information received will help you confidently handle metal, assembling strong and reliable frames.
Methods of knitting reinforcement
There are two ways to fix reinforcing bars: manual and automated.
The manual method uses four types of tools:
- Pliers;
- Hook (simple and reversible);
- Screwdriver with attachment.
Using pliers is not very convenient. Therefore, they are rarely used and only for assembling small frames. Crochet is used more often. This simple device, with some skill, helps to quickly connect steel rods.
There is an improved modification of the simple hook (reversible). Its basis is a screw that rotates when the handle is pulled back.
By combining a hook with a screwdriver, home craftsmen have created another convenient device for fixing steel rods in a frame.
Automated knitting is performed with a so-called pistol. This is a rather complex and expensive device used at large facilities. Its performance is such that tying one knot occurs in 1 second.
The device is equipped with a compartment in which a spool of wire is installed. The working body of the gun delivers it to the fittings and ties it into a knot.
Types of tools for knitting reinforcement
The knitting method involves using steel wire to manually fix rods perpendicular to each other in places where they intersect crosswise.
A crochet hook is a simple and safe tool that allows you to tie reinforcement bars quickly, securely and evenly.
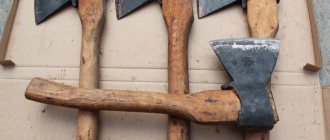
Today, there are three types of ready-made hooks for knitting reinforcement bars, which can be purchased in the store. In addition, you can make a hook for the reinforcement yourself.
Manual
Photo of a purchased hook. The handle rotates freely.
A simple hook is a rod attached to a handle with bends that grip the wire. The hook for tying the reinforcement is rotated manually. The advantage of hand tools is their availability, durability and ease of use.
A hand crochet hook is an excellent option for novice builders, which will allow you to understand the knitting algorithm and feel the optimal degree of wire tension to obtain high-quality knots.
Screw
The knitting wire is selected with a diameter from 0.8 to 2 mm.
A semi-automatic hook is a reversible tool that operates by forward movements of the handle. The device has a rod with a hook in the form of a drill, which fits into the funnel of the handle along the thread, tightening the wire.
The cost of such a tool is higher than a manual one. But the screw tool makes it possible to cope with a wide range of work in a short time - in order to completely tighten the knot, it is enough to make only a couple of movements.
Mechanical
Builders who value every second choose an automatic hook (gun) for tying reinforcement. The operating principle of the gun is based on fully automatic rotation of the hook. This device is the most modern and advanced, allowing you to achieve maximum results and speed without large labor costs on the part of the builder.
Operating principle.
Buying such a hook for household purposes will not be justified: working with a gun requires a fairly large consumption of wire, and the cost of the device is high. But on large projects or when performing work that needs to be completed in an extremely short time, this option is ideal!
Homemade
Photo: hook made of wire with a diameter of 3-4 mm.
Purchased hooks are not always able to fully satisfy construction needs. Often, the shape of their rod has incorrect bends, and the length of the tools is made too short, which significantly affects the quality of work. So how then to make a hook for tying reinforcement correctly?
To make a device for tying reinforcement with your own hands, we will need a welding electrode or steel wire with a diameter of 4 mm.
In order to make a hook, you need:
- Make a handle for the device from a piece of thin hose to the size of a rod or trowel without a spatula.
- Insert the electrode into the hose or insert trowels into the funnel and secure (for example, using epoxy resin).
- Bend the rod at an angle of ninety degrees at a distance of about 5 cm from the handle (the bent rod should resemble a rocker in appearance).
- Bend the end of the rod in an arc.
- Before work, sharpen the sharp edge of the electrode using a file or sharpener.
A hook can be made from an unnecessary screwdriver or a handle from a construction roller, bending the sharp end at the required angle and sharpening it slightly. An automatic mechanism can be made by inserting an electrode rounded at the end into a screwdriver.
A homemade tool is perfect for household purposes, will save money and allow you to quickly knit even and reliable knots.
Crochet technology
There is nothing complicated in this operation. After doing it several times, you will quickly get used to it.
The essence of the method is as follows: the intersection of the rods is covered with steel wire folded in half. The crochet hook is inserted into the loop and the other free end is grabbed with it. After this, the tool is rotated until it is tightened. The ends of the wire are bent inside the frame.
The craftsmen know one little secret that guarantees tight contact: after not tightening the loop a little, you need to pull it towards yourself and only then tighten it to the end.
Scheme for knitting reinforcement using a hook
Working with a screwdriver is not fundamentally different from crocheting. The advantage is higher speed and less labor intensity. When using a screwdriver, do not forget to set the rotation speed of its chuck to minimum.
You should not knit reinforcement with an electric drill. The large inertia of this tool does not allow you to accurately determine the moment of completion of tightening.
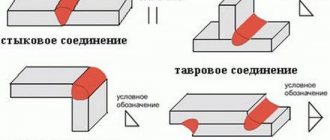
Methods for connecting steel rods and the main types of nodes are shown in the diagram below.
Laying reinforcement in a slab foundation
A typical TTK map for installing reinforcement in the formwork of a foundation slab provides for the following sequence of actions:
- control of formwork - linear dimensions, compliance with the axes of the walls;
- the first row of the lower mesh - polymer clamps for the lower protective layer are placed on the concrete base, longitudinal rods are laid out in their nests (increased in length with an overlap of 40 cm if necessary);
- second row - ladders are laid on the rods, shifted as needed, transverse rods are laid out sequentially with the design grid spacing;
- knitting - at the intersection points, the reinforcement is tied (less often welded);
- stands - have several names (spider, frog, table, supporting frame), designs, tied to the lower grid in a checkerboard pattern;
- upper grid - made in a similar way or large format cards tied in the building spot are placed;
- knitting U-shaped clamps along the ends of the slab;
- under load-bearing walls, the grid spacing is reduced by 1.5-2 times.
Longitudinal overlap of at least 50 reinforcement diameters.
Depending on the design of the foundation slab (smooth, with a strip, side walls), at the last stage vertical rods are installed to connect with the structures that will be concreted on its surface. These are L-shaped or U-shaped clamps with design dimensions. When bending rods yourself, it is prohibited to use metal heating to avoid changing the structure. All elements of the slab foundation must be bent using jigs, clips or manual pipe benders.
The slab is reinforced at the ends with U-shaped clamps.
To provide a lateral protective layer, plastic supports of various shapes can be used. This is necessary to prevent accidental shifting of the frame while laying concrete and workers walking along the ladders.
Knitting of reinforcement is done in several ways:
- hand hook - standard twist;
- mechanized hook – has a spiral handle, doubles the knitting productivity;
- a gun for tying reinforcement - is expensive, more often used by professional teams on large volumes.
A special plastic cup provides a protective layer.
Experts often soak the reinforcement to increase adhesion to concrete. The SP standards only prohibit flaking rust; there is no information about fresh corrosion. For example, in ACI-318 this point is specifically highlighted; rusty reinforcement is allowed inside concrete.
This guide covers the key points of reinforcing slab foundations. This will allow the individual developer to implement the project independently to reduce the construction budget.
We recommend reading: Do-it-yourself slab foundation.
Good publicity
Materials
To assemble the frame, special annealed wire is used. It is durable, but at the same time quite soft. This allows you to tighten the knots without the risk of tearing it. The recommended diameter of this material depends on the cross-section of the reinforcing bars and ranges from 1.0 to 1.4 mm.
Cheap wire comes without coating and is called black. It is more resistant to corrosion and has a protective layer of zinc.
Knitting wire is produced in two versions: in coils and measured (in segments). Working with a skein is more difficult because it has to be cut into pieces by hand. The measuring material can be used immediately. Wire with loops at the ends is especially convenient.
How to make your own hook
It is best to buy the device in a specialized store, but this is not always possible. Especially big problems arise for residents of remote villages; they have to travel several hours in one direction, and only if the dirt roads are passable. There is a solution - you can make a hook yourself within just one hour.
Hook diagram
You will need a piece of wire with a diameter of approximately 6 mm and a length of ≈ 20 cm.
Hook wire
A small piece of wood with a hole for a handle and two washers. The hole should be approximately 0.5 mm larger than the wire diameter to ensure free rotation.
Bar with hole
Step 1: Mark the wire. You need to know the length of the handle (make the mark with a margin of 4–5 mm for the washers and for free rotation), the place of the first bend, after 5 cm the place of the second bend, and the bend area under the hook.
Marking
The wire rod bends well, which simplifies the manufacturing process; steel cracks with such sharp bends. If there is no wire rod, then anneal steel. Heat it until bright red and cool gradually. During this time, changes occur in the metal crystals, cementite turns into ferrite, it becomes soft.
Step 2. Using an emery machine or grinder, sharpen the tip of the hook to a cone.
Sharpening the end of the wire
This must be done, otherwise it is very difficult to remove the tool after tying the reinforcement. But this will require a lot of time and effort, and the conical shape solves all the problems. The length of the cone is approximately 3–4 cm.
Sharpened wire
Step 3. Clamp the workpiece vertically in a vice and begin bending it with the blows of a heavy hammer. The point of the hook should be at an angle of approximately 80°. Do not make a large bend, this complicates the process of tying the reinforcement. When removing it, you have to tilt it strongly, and this is not always possible and is quite inconvenient.
Bend the tip of the wire
Step 4. Bend the wire under the handle. To do this, you need to clamp it again in a vice and press it with your hand in the desired direction. Periodically check the angle using a pre-drawn sketch of the fixture.
We suggest you read: How to make a concrete foundation blind area
Wire bending
Step 5. Make a bend according to the applied mark so that you can give the hook rotation when twisting.
Continuation of the bending process
Step 6. Place the finished product in the vise and level it so that all sections and elbows are in line.
Curved hook blank
Step 7. Weld the lower thrust washer of the handle. It is located at the very bend; align it perpendicular to the axis of the wire. Cook carefully, adjust the current correctly, and do not burn through thin metal.
Thrust nut
Step 8. Insert the handle into place and weld the second washer, it will prevent it from falling out during operation. Here you also need to weld carefully; the wooden handle may ignite due to overheating.
To reduce friction when rotating the hook in the handle, it is recommended to lubricate the metal wire with grease or other thick lubricant. Additionally, the tree will be protected from decay processes. If the wood quickly catches fire during welding, it is recommended to soak the ends in water; the damaged areas can then be cut off.
Step 9. Check the functionality of the hook.
Ready hook
If problems are found, they must be corrected.
- The product does not rotate well around the spine. The adjustment is made by changing the rotary arm. The larger it is, the higher the force of twisting the wire, but the work becomes a little more complicated. The hand should move with increased amplitude.
- The hook is difficult to remove after tightening the wire. There may be three reasons: a large bend angle, a small sharpening cone and a rough surface. Each of them can be easily eliminated; the problem must be corrected until it becomes convenient to work with crochet.
Try to bring the device to perfect condition, you will have to tie a lot of knots with it. The distance between the fixation points depends on the diameter of the reinforcement, the size of the cage and the specific purpose of the reinforced concrete product.
There is nothing complicated in this operation. After doing it several times, you will quickly get used to it.
The craftsmen know one little secret that guarantees tight contact: after not tightening the loop a little, you need to pull it towards yourself and only then tighten it to the end.
Scheme for knitting reinforcement using a hook
Working with a screwdriver is not fundamentally different from crocheting. The advantage is higher speed and less labor intensity. When using a screwdriver, do not forget to set the rotation speed of its chuck to minimum.
You should not knit reinforcement with an electric drill. The large inertia of this tool does not allow you to accurately determine the moment of completion of tightening.
Methods for connecting steel rods and the main types of nodes are shown in the diagram below.
Guidelines for the design and manufacture of reinforcement cages are contained in two regulatory documents. GOST 10922-2012 specifies technical conditions for knitted and welded connections of reinforced concrete structures. The set of rules SP 52-101-2003 regulates the requirements for the design of frames.
Based on these standards, standard patterns for tying reinforcement under a strip foundation, dimensions of overlaps, diameters of the reinforcement used and other rules for the execution of work have been developed.
When joining rods on straight and corner sections, the length of the overlaps is important. SNiP sets this parameter depending on the diameter of the working fittings (in millimeters):
- 300 mm for rods with a diameter of 10 mm;
- 380 for 12 mm;
- 480 for 16 mm;
- 580 for 18 mm;
- 680 for 22 mm;
- 760 for 25 mm.
Norms and rules for performing work
Guidelines for the design and manufacture of reinforcement cages are contained in two regulatory documents. GOST 10922-2012 specifies technical conditions for knitted and welded connections of reinforced concrete structures. The set of rules SP 52-101-2003 regulates the requirements for the design of frames.
Based on these standards, standard patterns for tying reinforcement under a strip foundation, dimensions of overlaps, diameters of the reinforcement used and other rules for the execution of work have been developed.
When joining rods on straight and corner sections, the length of the overlaps is important. SNiP sets this parameter depending on the diameter of the working fittings (in millimeters):
- 300 mm for rods with a diameter of 10 mm;
- 380 for 12 mm;
- 480 for 16 mm;
- 580 for 18 mm;
- 680 for 22 mm;
- 760 for 25 mm.
Options for different foundations
The easiest way is to knit a reinforced frame for a slab foundation. Essentially, it is a lattice of longitudinal and transverse rods, the distance between which is determined by the loads. More often these are cells of 20 x 20 or 30 x 30 cm. For this design, knitting with one loop is used.
The same can be said about the frame for a strip foundation, because its design is made up of several gratings connected by transverse short rods. But there is one subtle point in knitting the reinforcement of a strip foundation - this is the joining of the corners of the structure. Here it is very important to evenly distribute the connection points along the entire length of the bent and mating rods, which create the corners of the reinforced frame.
Knitting the strip foundation frame
The estimated number of longitudinal rods (diameter 12-18 mm) are placed at the bottom of the trench on supports (bosses) 4-5 cm thick. The distance between them depends on the size of the foundation and can range from 5 to 20 cm. If the standard length of one steel rod (6 meters) is not enough for the entire “ribbon,” then several rods are used. They are connected to each other, observing the regulatory overlap.
Supports for reinforcement cage
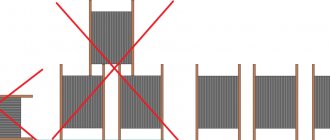
Clamps made of smooth or corrugated steel with a diameter of 8-10 mm are attached vertically to the working rods. According to building codes, the pitch of the clamps must be at least 3/8 of the height of the foundation (20-50 cm).
Having installed the clamps, the upper chord of the working reinforcement is attached to them with wire, observing the design distance between the rods.
At corners and junctions, clamps are placed more often (1/2 step), and the working reinforcement is bent, connecting to the rods of the intersecting section of the “ribbon”.
The length of the bend must be at least 50 diameters of the working reinforcement.
Making a reinforcement cage in a trench is labor-intensive and inconvenient work. That's why experienced builders use this simple device.
Having laid the longitudinal whips on wooden stands, clamps and the lower belt of the working rods are tied to them. The finished structure is transferred and placed in a trench.
Assembly of the reinforcement frame of a monolithic slab is simpler than that of a strip foundation. The design here consists of two flat meshes. The lower rods are laid perpendicularly with a given pitch and connected to each other. Then, at the points of their intersections, stands made of steel rods are placed and the upper mesh is screwed to them.
Stand for mounting the upper frame of a monolithic slab
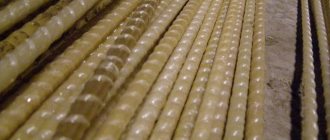
In recent years, fiberglass reinforcement has begun to be used to assemble frames.
You can knit it in several ways:
- annealed steel wire;
- plastic zip ties;
- plastic clips.
How to knit reinforcement for a monolithic slab correctly
Monolithic foundations are used more often than standard concrete slabs. When installing this type of base, a reinforcing mesh is first made, which is then filled with concrete. The reinforcing mesh gives the concrete additional strength and allows the slab to withstand higher loads.
Ready-made frame for a monolithic slab
Video on Youtube:
How to knit reinforcement yourself or the correct sequence of knitting reinforcement for a monolithic slab:
- The lower level of reinforcing bars is laid in a cross. It is necessary to observe the main thing correctly - to monitor the size of the cells, which should be 30*30 cm. This size cannot be exceeded, otherwise the monolithic slab will not be strong enough.
- The joints of the slab foundation rods must be tied with steel wire using a standard tying pattern. Using a special tool, such as a hook for tying reinforcement, will greatly simplify the task.
- The reinforcement of the lower level of the slab must have a margin in length so that it can be given a U-shape. Thus, the lower rods go into the upper level of the slab foundation.
- The rods of the upper level of the slab or ceiling are also stacked on top of each other and tied with steel wire or plastic clamps at the points of contact.
- The structure for a monolithic slab should be placed at a distance of 4 cm from the ground; for this, special stands are used, which can be purchased at a hardware store. The stands are made of plastic and can support frames with a fairly large weight. An example of plastic stands for the lower tier of the structure
- To maintain the upper level of the ceiling reinforcement, special stands should be made from rods, which are called tables. It is enough to take a small piece of reinforcement and bend it in a zigzag. Now the upper tier can be conveniently installed on the resulting stands. When pouring concrete, the supports are left together with the main structure.
Example of a finished table
This method of reinforcement is used not only when pouring a slab foundation in several layers; in this way, you can make a monolithic slab with your own hands, which can later be used, for example, as a floor between floors.
Approximate prices
The cost of tying reinforcement, as estimators say, “sits” in the total price of 1m3 of reinforced concrete. In square or linear meters it is calculated individually for each type of structure. In this case, it is necessary to take into account various parameters (the width and height of the grillage, the thickness of the slab, the cross-section of the reinforcement, the level of complexity of the frame, etc.).
For approximate calculations, builders use prices in rubles per 1 ton of metal used. Today in 2017 it averages from 20 thousand rubles.
Knots and twists - diagrams
Techniques for tying rods vary and depend on the type of knot and the angle of access. As a rule, when tying by hand:
- The areas connecting the horizontal reinforcement to each other are tied with diagonal double loops, with 2-3 turns of the ends until there are no backlashes.
- The connection nodes of vertical and horizontal reinforcement are fixed with cross-shaped or mutually diagonal loops. The ends are scrolled at least 3, but no more than 5 times.