How to choose the angle of inclination?
In the process of laying sewer systems, when considering the issue of sloping pipes, craftsmen resort to the correct methods for installing a slope; let’s look at what should not be done :
- Make a slope based on considerations of the formation of an acute angle of inclination. On the one hand, this method is convenient because the water will reach its destination faster. On the other hand, the operation of the pipe will be significantly reduced. Particles of debris, dirt or other impurities may remain in the pipe during rapid drainage, causing it to become clogged. In addition, fecal fractions will not be able to leave the pipe. Too large an angle or counter-slope will especially negatively affect the operation of the sewer system. Thus, this method is not entirely correct, since it is worth taking into account the minimum and maximum angle values. This is written in the regulatory documentation (see below).
- Arrange a minimal slope or do not take this point into account at all when installing sewer drains. The method is absolutely wrong, since ignoring the slope device will lead to stagnation of water.
Carry out the slope based on the requirements of standards and specialized literature. The surest way to follow.
Why calculate the slope?
By organizing the sewer slope, you can avoid:
Stagnation of water . A fairly common problem for everyone who has a sewer system.
Siltation . If this happens, then very soon the air siphons (check valves) will become unusable and there will be an unpleasant smell around. If a similar problem occurs on the walls of the main pipeline, the entire sewer system will break down.
Pipeline breaks.
Thanks to optimal fluid flow, no unwanted accumulation will occur. It will also be possible to get rid of corrosion on the surface of structures.
Previously, when installing sewer systems in apartment buildings, the slope of the sewer pipe by 1 meter was not calculated, and often it was not satisfied. This led to constant system breakdowns and regular repair work.
Providing a slope is required not only in urban apartment conditions. Recently, sewage systems have been installed in private homes and even bathhouses. Instead of ordinary cesspools, special wells (septic tanks) began to be used to receive wastewater.
With what slope should sewer pipes be laid?
The installation of a sewer system requires compliance with certain standards. In particular, the correct slope of the sewer pipe, which is in accordance with SNiP and the length of communication pipelines, is very important.
HOW TO CHOOSE AN ANGLE
There are several positions that guide home craftsmen:
1. Make the angle as sharp as possible;
2. Make the slope minimal or skip this point altogether when installing sewer drains;
3. Create a slope in accordance with the rules and GOSTs.
At first glance, an excessive slope of the sewer pipe will help water that requires treatment to reach the well faster. But on the other hand, the pipe is exposed to the harmful effects of wastewater. Because water moves through the drain too quickly, sewage solids, food debris and other debris that is often flushed down the toilet remain in the pipe. Silting of the pipe will also be a problem. Over time, the sewer will become clogged and you will have to work to repair it. The service life of such a system is much shorter than the standard one and is less than a year.
A minimal slope or its absence is a serious mistake when installing a sewer pipeline. In this case, the pipe not only silts up, but is practically not cleaned naturally. Only the angle at which the septic tank is located in relation to the sewer can save the situation.
It is best to work with certain standards, which indicate the ratio of the angle to the diameter and length of the pipe. Of course, this requires a lot of time and special care, but after such painstaking work, the sewerage system will serve you for many years.
Why is slope needed:
When the pipe becomes silted, the air siphons are broken, which serve as protection against unpleasant odors in the room;
Siltation of the main pipe threatens to completely disrupt the basic functions of the sewer outlets, which, in essence, is the cessation of the system’s operation;
Protecting the basement of a residential building from leaks and breakthroughs depends on the correct slope.
Also, if there are no problems with corrosion during unsloped installation of plastic, then holes may appear in the cast iron pipe. It will begin to leak water and sewage into the basement. Previously, in multi-storey buildings, sewers were not installed with a slope, which is why there were so many cases of flooding in an apartment on the first floor or a breakthrough of the entire sewer system.
HOW TO CHOOSE SLOPE
To determine the minimum pipe slope that will be optimal for you, you need to know the length of the entire sewer system. In reference books, data is used immediately in ready-made form, they are depicted in hundredths of an integer. Some employees find it difficult to navigate such information without explanation.
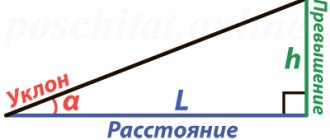
For example, a slope for a pipe with a diameter of 50 mm and a length of 1 meter needs 0.03 mm. How was this determined? 0.03 is the ratio of the height of the slope to the length of the pipe. Depending on the diameter, it can be from 0.03 to several millimeters. Let's look at how the rule works:
Suppose you need to calculate the optimal slope for a 110 mm pipe; according to GOST it is 0.02 mm. To calculate the total angle, you need to multiply the length of the pipe by the slope specified in SNiP or GOST. It turns out: 10 m (length of the sewer system) * 0.02 = 0.2 m or 20 cm. This means the difference between the installation level of the first point of the pipe and the last is 20 cm.
Also, the fill level of a cast iron, plastic or asbestos-cement sewer pipe must be calculated. This concept determines what the flow rate in the pipe should be so that it does not become clogged. Naturally, the slope also depends on the fullness. You can calculate the fullness using the formula:
WATER LEVEL HEIGHT / PIPELINE DIAMETER
The maximum fill level is 1, but in this case the sewer pipe is full, and therefore there is no slope, which means you need to choose 50-60%. This is a coefficient, often taken as 0.5 - as the definition of half of the pipe cavity. Much depends on the material of the pipe (cast iron and asbestos fill faster due to the high roughness of the internal walls), and its angle in relation to the septic tank.
Your goal is to calculate the maximum allowable speed for the sewer drain installation. Professionals say that 0.7 m/s allows waste to quickly pass past the walls without sticking. Investigator, the correct calculation looks like this:
0.5 / 110 = 0.04 – this is the level of fullness
0.5 ≤ 0.7 / 0.042 = 0.5 ≤ 43.75 – the calculation is correct.
The last formula is a test one. The first number is the fill factor, the second after the equal sign is the speed of movement of the wastewater, the third is the square of the fill level.
The angle can also be expressed in degrees, but then it will be more difficult for you to switch to geometric values when installing an outer or inner pipe. This measurement provides higher accuracy.
In the same way, it is easy to determine the slope of the external underground pipe. In most cases, external communications have large diameters. The investigator will use a greater slope per meter. At the same time, there is also a certain hydraulic level of deviation, which allows you to make the slope slightly less than optimal. In most cases, this permissible pressure pipe size is 0.02 - 0.01 mm less.
According to SNiP 2.04.01-85 clause 18.2 (standard for installing water drainage systems), when installing a corner of sewer pipes in a private house, you must adhere to the following rules:
- For one linear meter of a pipe with a diameter of up to 50 mm, you need to allocate 3 cm of slope, but for pipelines with a diameter of 110 mm you will need 2 cm;
- The maximum permissible value for both internal and external pressure sewerage is the total slope of the pipeline from the base to the end of 15 degrees;
- SNiP standards require mandatory consideration of the level of soil freezing for the installation of an external sewer system;
- To determine the correctness of the selected angles, it is necessary to consult with specialists, and also check the selected data using the formulas above;
- When installing a sewer system in a bathroom, you can make the filling coefficient, and therefore the slope of the pipe, not so strong. The fact is that water comes out of this room predominantly without abrasive particles;
- Before starting work, you must make a plan.
Do not confuse the method of installing sewer pipes in an apartment and a house. In the first case, vertical installation is often used. This is when a vertical pipe is installed from the toilet or shower stall, and it then goes into the main pipe, made at a certain slope. This method can be used if, for example, the shower or washbasin is located in the attic of the house. In turn, installation of the external system begins immediately from the rings of the toilet, septic tank or washbasin.
In order to maintain the required angle during installation, it is recommended to dig a trench on a slope in advance and stretch the string along it. The same can be done for the floor.
| Like |
| Share |
| Comments (+) [ Read / Add ] |
A series of video tutorials on a private house
Part 1. Where to drill a well?
Part 2. Construction of a water well Part 3. Laying a pipeline from the well to the house Part 4. Automatic water supply Water supply Water
supply for a private house.
Principle of operation. Connection diagram Self-priming surface pumps. Principle of operation. Connection diagram Calculation of a self-priming pump Calculation of diameters from a central water supply Water supply pumping station How to choose a pump for a well? Setting up a pressure switch Pressure switch electrical diagram Operating principle of a hydraulic accumulator Sewage slope of 1 meter SNIP Connecting a heated towel rail Heating diagrams
Hydraulic calculation of a two-pipe heating system Hydraulic calculation of a two-pipe associated heating system Tichelman loop Hydraulic calculation of a single-pipe heating system Hydraulic calculation of radial distribution of a heating system Scheme with a heat pump and solid fuel boiler - logic of operation Three-way valve from Valtec + thermal head with remote sensor Why the heating radiator in an apartment building does not heat well How to connect the boiler to the boiler?
Options and connection diagrams DHW recirculation. Principle of operation and calculation You are not correctly calculating the hydraulic needle and collectors. Manual hydraulic calculation of heating. Calculation of a warm water floor and mixing units. Three-way valve with a servo drive for DHW. Calculation of DHW, BKN. We find the volume, power of the snake, warm-up time, etc. Water supply and heating designer
Bernoulli's equation Calculation of water supply for apartment buildings
Automation
How servos and three-way valves work Three-way valve to redirect the movement of coolant
Heating
Calculation of the thermal power of heating radiators Radiator section Overgrowth and deposits in pipes worsen the performance of the water supply and heating system New pumps work differently... Calculation infiltration Calculation of temperature in an unheated room Calculation of a floor based on the ground Calculation of a heat accumulator Calculation of a heat accumulator for a solid fuel boiler Calculation of a heat accumulator for storing thermal energy Where to connect the expansion tank in the heating system?
Boiler resistance Tichelman loop pipe diameter How to choose the diameter of a pipe for heating Heat transfer of a pipe Gravity heating from a polypropylene pipe Why don’t they like single-pipe heating? How to love her? Smart selection of diameters in a heating system Balancing heating radiators - a step-by-step guide Top 5 problems in designing heating systems Heat regulators
Room thermostat - operating principle
Mixing unit
What is a mixing unit?
Types of mixing units for heating Characteristics and parameters of systems
Local hydraulic resistance.
What is KMS? Bandwidth Kvs. What it is? Boiling water under pressure - what will happen? What is hysteresis in temperatures and pressures? What is infiltration? What are DN, Du and PN? Plumbers and engineers must know these parameters! Hydraulic meanings, concepts and calculation of heating system circuits. Flow coefficient in a single-pipe heating system. Hydraulic paradox in a heating system. Riddle No. 4 Video
Heating Automatic temperature control Simple replenishment of the heating system Heat engineering.
Walling. Warm water floor Combimix pump mixing unit Why choose underfloor heating? Water heated floor VALTEC. Video seminar Pipe for heated floors - what to choose? Warm water floor - theory, advantages and disadvantages Laying warm water floor - theory and rules Warm floors in a wooden house. Dry heated floor. Warm water floor cake - theory and calculation News for plumbers and engineers Plumbers Are you still doing hack work? The first results of the development of a new program with realistic three-dimensional graphics Thermal calculation program. The second result of the development of Teplo-Raschet 3D Program for thermal calculation of a house through enclosing structures Results of the development of a new program for hydraulic calculation Primary secondary rings of the heating system One pump for radiators and underfloor heating Calculation of heat loss at home - wall orientation? Regulatory documents
Regulatory requirements for the design of boiler houses Abbreviations
Terms and definitions
Basement, basement, floor Boiler houses
Documentary water supply
Sources of water supply Physical properties of natural water Chemical composition of natural water Bacterial contamination of water Requirements for water quality
Collection of questions
Is it possible to place a gas boiler room in the basement of a residential building ?
Is it possible to attach a boiler room to a residential building? Is it possible to place a gas boiler room on the roof of a residential building? How are boiler rooms classified according to their location? Personal experiences in hydraulics and heating engineering
Introduction and introduction.
Part 1 Hydraulic resistance of a thermostatic valve Hydraulic resistance of a filter flask Video course Calculation programs
Technotronic8 - Program for hydraulic and thermal calculations Auto-Snab 3D - Hydraulic calculation in three-dimensional space
Useful materials Useful literature
Hydrostatics and hydrodynamics
Problems in hydraulic calculations
Pressure loss along a straight section of a pipe How does head loss affect flow?
Miscellaneous
Do-it-yourself water supply for a private house Autonomous water supply Scheme of autonomous water supply Scheme of automatic water supply Scheme of water supply for a private house
Privacy Policy
Possible sewer slopes per 1 linear meter
Two indicators - the largest and the smallest - are determined by the diameter of the accepted pipes. The slope itself is calculated from the definition of one linear meter . So, for example, if the diameter of the structures is 110 mm , it is necessary to ensure a minimum slope of 20 mm (2 cm) . As the size increases, the angle of inclination of the sewer pipe decreases.
To calculate the slope of a sewer by 1 meter, it is necessary to calculate the ratio of its height to the length of the structure. Thus, with d50 mm and a structure length of 1 running meter. you will need to ensure that the bottom of the pipe is lowered by 0.03 m (3 cm) .
In simple words about sewer slope
The regulatory literature also specifies the maximum value of the slope, which should not exceed 15 centimeters per 1 m.
Calculation of pipe d110 mm for the installation of an external system
To understand the sequence of small calculations, it is worth solving one problem. Below we will consider the calculation of a sewer pipe slope of 110 mm for an external sewer to a septic tank , since this design is considered the most common when laying the system. If you read GOST, then the minimum slope of a sewer pipe is 0.02 m (2 cm) per meter.
To determine the slope angle, it is necessary to multiply the slope value from SNiP, SP or GOST with the length of the pipe (in this case 600 mm). Thus, the expression 6 * 0.02 = 0.12 m is obtained. Thus, a pipe 6 meters long d110 mm: the slope angle is 12 cm
Sewer slope
Using this formula, you can take into account any length of the pipeline, be it at least 10 meters or 400 centimeters.
Sometimes the slope is calculated in degrees, but often this perception is inconvenient. There are also online calculators to determine the desired inclination. They have a calculation program.
Useful - external sewage system
How to calculate the slope angle
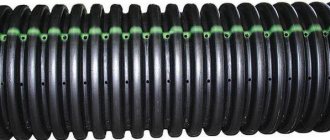
In apartments and private houses, two types of pipes are used for laying sewer systems - 50 mm and 110 mm; an internal small-diameter pipeline leads from the installed plumbing - sinks, bathtubs, showers, kitchen sinks to a central riser or outlet pipe with a cross-section of 110 mm. The toilet is connected directly to a large pipe (110 mm) through corrugation or plastic adapter couplings of a similar size.
Even a junior school student can cope with the task of calculating the total angle of inclination of a sewer line; to do this, its total length in meters is multiplied by the standard slope indicator adopted for one linear meter.
For example, if the bathtub is located 3 meters from the central riser, then the height difference between the ends of the pipes entering the siphon and the riser should be 30 mm x 3 = 150 mm. It can be seen that the difference is quite large, so they tend to locate bathtubs, showers and toilets as close to the riser as possible. Siphons of sinks and sinks are located at a greater height from the floor level, so they can be carried over long distances from the riser.
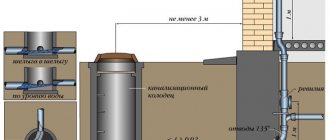
When laying external sewerage, a pipeline with a diameter of 110 mm is used; usually the wastewater is discharged into a storage tank or septic tank for further purification. In this case, slopes play a decisive role in determining the distance from the house to the treatment plant, which is discussed in the examples below.
In a standard septic tank, the neck is located approximately 600 mm above the tank into which the sewer pipe enters. This means that if the pipe extends from the house along the very surface of the earth, and the 110 mm sewer pipe should have a slope of 20 mm per linear meter, then the septic tank will have to be placed at a distance of (600 mm / 20 mm = 30) 30 m from the house. The maximum distance can always be made smaller by increasing the pipeline slope by a certain amount, but for various reasons it is undesirable to do a rapid gravity flow.
To protect the sewer pipe from freezing, it will have to be insulated and lowered underground at the base of the building by at least 200 mm, in this case the septic tank will have to be brought closer to the house by 10 m. With a greater depth of the external sewer pipe with a higher chance of protection from freezing, to for example, at 400 mm, the distance from the house to the septic tank will be only 10 m.
Occupancy level
Sometimes standards require additional calculations, namely, determining the fill level coefficient. Calculation is required if the following materials are used:
- Plastic;
- Asbestos cement;
- Cast iron.
The fill level lets you know how fast the water should move to avoid possible clogging of the system. The fullness is calculated using the following formula:
Y=H/D
- H – water level;
- D – pipe diameter.
SNiP regulates two main pipe fill numbers - maximum and minimum. According to the documentation, Y=0.3 when it comes to the minimum indicator , and Y=1 when the structure is filled to the maximum . The last number indicates that there is no slope.
As for practical calculations, the pipe fill value usually lies in the range from 0.3 to 0.6. Often they take a value of 0.5 or 0.6, considering this number to be optimal.
The material of the pipe can affect how quickly it fills. For example, when using cast iron or asbestos-cement material for a structure, the filling of this structure will occur quite quickly, since the walls of the pipe will be rough.
An example of calculating the fill level of a pipe
The use of all the above formulas indicates the use of a hydraulic method for calculating the slope of pipes.
To make it clearer how to determine this coefficient, it is worth considering a clear example. Let’s assume that the initial data contains pipes with a diameter of 110 mm and a water rise height of H=60 mm. The coefficient calculation will look like this:
60/110=0.55. This number will be the desired Y .
Next, you should check the ratio of the calculated coefficient to the optimal water flow rate. The result should be within:
К≤V√Y
- K – coefficient of filling level. The optimal indicator, as already mentioned, is considered to be 0.5 for plastic pipes and 0.6 for other materials;
- V – flow velocity;
- √Y is the root of the previously determined indicator.
Based on the calculation results, it was determined that the found coefficient passed the test.
Why do you need a sewer pipe slope?
Everyone has probably heard that sewerage pipes must be laid with a slope, and even so, as defined by building codes - SNiP. Why is this so? Because it is necessary that the speed of movement of wastewater through the pipes be such that water and solid particles move together.
When installing or repairing an existing sewer system myself, I often make two mistakes:
- Make the slope less than recommended. In this case, the water leaves very slowly, and the pipeline section often becomes clogged. Even if we are talking about a bathroom, sediment accumulates in the pipes, which causes blockages. If the toilet pipe is laid with a slight slope, then firstly, problems with flushing may arise, and secondly, the smell of decomposing waste may be added.
The sewer pipe must be laid with a certain slope
- The slope of the sewer pipe is made too great. This case is no better. The water drains away quickly, but solids remain in the pipe. They rot, spread odors, and even cause blockages. In this state of affairs, the sewerage system has to be cleaned almost every month.
The standards specified in SNiP are advisory in nature, but they are written based on many years of experience, so it makes sense to listen.
Slope when installing internal sewerage
For the installation of internal sewage systems, pipes made of PVC material with diameters of 50 mm or 100 mm are used. During the connection process, the following permissible requirements must be taken into account:
- If there are branches located in a horizontal plane, an oblique tee or cross must be mounted between them. These designs are representatives of fittings. Also, these structures are necessary for organizing differences. In their absence, problems will arise with the safe supply of water to the main drain.
- Horizontal turns of the sewer system are prohibited. Turning sections should not form a right angle.
- Right angles are only possible if the structures are connected in a vertical plane.
- It is recommended to take the standard pipe slope less than or equal to the maximum value - 1-2 cm per linear meter .
- The outlet of the sewer system must be discharged outside the building on the side of the street where the common wastewater receiver (septic tank) is closest.
- A standardized distance must be maintained between the sewer and hot and cold water pipes.
- It is necessary to arrange a sunbed in the basement, to which it is necessary to connect the lines from all risers. Subsequently, the water will be directed to the nearest wastewater well.
Also, the slope value for domestic domestic sewerage may vary depending on the type of device. For example, for a toilet with a pipe with a diameter of 100 mm, the slope will be 1:20 (per 1 m/2 cm). As for the bathtub, 40 mm pipes are used for it, and the slope size is 1:30 (per 1 m / 3 cm). For a shower this ratio is 1:48, for a kitchen sink - 1:12.
The risers where pipes from household appliances are supplied have a diameter of 50 or 110 mm. The slope of a sewer pipe of 50 mm for internal sewerage is calculated for the risers to which the wiring goes from bathtubs and sinks. The slope of a sewer pipe of 110 mm for internal sewerage is calculated for the risers to which the wiring from the toilets is supplied.
But for the central riser, SNiP does not standardize a sewer slope of 1 meter.
Minimum slopes of external sewerage
Wastewater received by the internal sewer system of the building (domestic, drainage) passes into the external one. The drainage in the building is discharged by gravity. The outlet lines of the yard network can also be pressure, but only if the terrain and soil do not allow creating the necessary slope of the pipeline (to create a flushing speed in particular) or if it is necessary to drain the basement.
The most important stage in sewer design is drawing up its diagram. Tracing comes down to drawing sewerage elements onto the plan of the sewer object: networks, septic tank (storage tank), wells, etc.
The solution to the scheme is individual for each case, since it is influenced by many local factors:
- configuration, size, object;
- the location of the street sewer or reservoir relative to it;
- terrain;
- ground conditions;
- sanitary requirements;
- economic considerations.
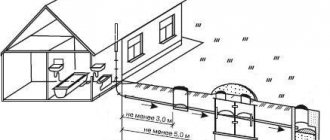
Usually the route is oriented in the direction of large slopes to local treatment facilities, or along the shortest path to the street sewer, parallel to the outer wall of the house, no closer than 3 meters from it.
If the slope of the area is insufficient, then increase the diameter of the pipeline. If the relief falls unevenly, a zone scheme may be required, in which runoff from an elevated area of the terrain is drained by gravity, and from a lower area by a pressure pipeline.
The gravity sewerage pipeline is straight. Only in wells (rotary) can you change its horizontal direction, slope and diameter.
The rotation (without a difference in marks) is performed at an obtuse or right angle.
Inspection wells (for cleaning and inspection of sewers) are installed both in straight sections, if their length reaches four to five tens of meters, and at the point of connection to the street network. They are made of brick, reinforced concrete, polymer materials, with a diameter of at least a meter, and are equipped with a tray connecting the pipes.
Connections of gravity sewerage pipeline parts:
- detachable bell-shaped;
- glued (seam pipes);
- welded (resistance welding), or on threaded metal connections (synthetic pipes).
The thermal elongation of the pipe is less if the water supply is pinched by the soil (due to friction). Temperature deformation is compensated by socket joints (with soft sealing rings). At the edge of the trench, permanent connections are preferred.
The trench along the bottom is made at least 40 cm wider than the diameter. A sand cushion (no thinner than 10 cm) is especially needed for dense, hard soils. The base can also be natural soil (undisturbed, dry during installation).
In order for a hollow horizontal cylinder to withstand greater pressure, it is important to organize a bed that follows its contour - so that it is in close contact with the ground along its entire length, at least a quarter of its circumference.
If the bearing capacity of the soil is weak (or if there is a risk that it will decrease), artificial foundations are needed:
- a layer of crushed stone, gravel, coarse sand 15–20 cm thick (with drainage trays in it) - in water-saturated soil, on a rock;
- pile foundation - in quicksand, peat bogs.
The backfill must be preceded by covering it with soft soil or sand, a layer no thinner than 0.3 m. The backfill is compacted with a hand tool - above the pipe, with a hand mechanized one - at the walls of the trench, every 10 cm.
The crushing resistance of the pipe will increase if you especially carefully compact the soil in the spaces between it and the trench wall.
Atmospheric water can be discharged together with domestic waste and separately - through trays, ditches, ditches. The semi-separated network contains spillway chambers. When rainwater flows are low, they are transferred to the domestic sewer system, and during a rainstorm, they are discharged into the street drainage system or reservoir.
The pipeline is insulated if it is located above the freezing depth: with slag, expanded clay, heat-insulating sleeves.
Organization of slope in a private house
It is worth noting that in a private house, wastewater disposal can be carried out:
- Pressure type. Pumps pump out wastewater, and there is no need to calculate the slope, since its purpose becomes meaningless. Solofits, or solofit in English, are sometimes used as pumps. These units are additionally equipped with special particle grinders. Pumps can also be used to remove feces. They have the letter F written on the body, indicating the brand and purpose (f70, f100). However, this method is quite expensive, so not many people resort to it.
- Gravity type. This method involves independent flow of wastewater through inclined pipes.
Read more in the article - Sewerage in a private house - step-by-step installation with your own hands
Non-calculation method for determining the angle of inclination
Using formulas, it will not be possible to determine the slope of the pipes of your own houses or dachas, since without special instruments it will not be possible to find out about the possible degree of filling of the pipes. Therefore, in order to determine the sewer slope of 1 meter for a private house, they resort to a non-calculation method.
This technique involves the use of the largest and smallest slope values. So, for example, for an external highway d110mm, a slope of at least 2 cm per linear meter is applied. As a result, this affects the organization of pipeline distribution indoors, and the optimal slope will be 0.02 per linear meter.
Prices for materials and installation
The length of communications and their cost will be reduced by the compact location of objects (houses, septic tank - if the sewerage system is autonomous, the connection point to the city sewer - if the drainage system is centralized). When choosing bends, they are guided by their price, costs of delivery, installation, drainage during work.
The cost of construction per unit length of the sewer system is affected by diameter, material, laying depth, and hydrogeological conditions. The volume of excavation work will decrease if the average slope of the terrain and the actual pipeline coincide.
How to choose sewer pipes in a private house, details here.
Everything about connecting to the city water supply network in a private house: documentation, work, prices, sample documents.
The total cost of installing a street sewer system without connecting to a collector in a small suburban area varies from 40, 50 thousand rubles. up to 100. The figures are approximate, reflecting the “order” of prices, since the factors for each individual object vary too much.
The main expense items that form the final amount:
- installation of septic tank or filter pit rings, engineering work (one ring with work - ~ 5,000 rubles);
- digging wells (~ 20,000 for 2 glasses, with lowering rings);
- treatment of rings with bitumen mastic (~ 2000 rub.);
- removal of earth when constructing wells (RUB 2,000–4,000);
- hatch with a lid (depending on the material and load withstand (plastic - 3000–4000 rubles);
- bottom of wells (RUR 3,000–3,500, including work);
- pipeline laying (~ 1000 rubles per cubic meter of excavation work, with laying - ~ 1500 rubles).
If there are problems with the delivery and installation of concrete rings, a brick well may be advantageous.
Storm sewer and its slope
Storm drainage is necessary to organize the removal of water from the roofs of houses after precipitation in the form of rain or sleet. The main structures of the system are rainwater inlets. The slope of these structures is usually 0.02 m (2 cm).
It’s interesting, but sometimes this can include organizing the drainage of water from the air conditioner.
Installation features
In order to properly install storm drains, you must consider:
- Type of soil on the site;
- Average precipitation per month or year;
- Total drainage area;
- Location of underground communication systems.
If it is impossible to organize the installation of the sewerage system strictly according to the standards, the documentation allows you to reduce the slope of the rainwater drainage system by 2 millimeters for each meter of the system. The same thing happens when providing water drainage.
Common mistakes when choosing the angle of inclination of sewer pipes
It is generally accepted that the main mistakes in choosing the slope of sewer pipes come down to insufficient or excessive slope angle. In fact, some factors sometimes not only complicate installation within the design parameters, but also prevent the effective removal of wastewater even when the pipeline is laid correctly.
- Poor placement of plumbing fixtures often increases the length and complicates the configuration of the sewer line, making it difficult to maintain the required slope.
- Errors in selecting pipe diameters. In gravity sewer systems, it is the diameter of the pipeline that ensures unhindered drainage of wastewater. In addition, it is the size of the cross-section that determines how many centimeters the edge of the pipeline should be lowered in order to organize the desired slope. As it moves away, the diameter of the sewer line should gradually increase, rather than decrease.
- Sharp corners. Connecting sewer pipeline elements at right angles changes the flow speed and increases the load on the joint areas, gradually rendering them inoperable.
- The absence of a fan pipe leads to a decrease in pressure inside the circuit and disruption of gravitational processes.
- You should also not forget about the quality of materials, the presence of seals, sealing and other nuances of the installation process.
What should you follow when determining the slope?
If we take into account all the SNiP rules for organizing the inclination of sewer pipes, the general list will look like this:
- The maximum possible slope is 15 cm.
- When installing an external sewerage system, it is necessary to take into account the factor of soil freezing depth.
- When determining the slope of structures, it is recommended to seek the help of specialists and additionally check the calculations using regulatory literature. (possibly on your own)
- When installing a sewer system in a bathroom, you can resort to a minimum slope, since there is no risk of clogging the pipe with large particles.
- You can determine the slope using a bubble level. It needs to be laid in the place where the pipe is located, and depending on the position of the bubble, calculate the amount of inclination.
Also, before carrying out work, it is necessary to draw up a plan for the sequence of actions to avoid possible mistakes. The sewerage profile is also applied to the plan, and this item is prescribed by GOST 21.604-82.
If you take into account all the requirements of the documents, you will be able to organize a sewer system and ensure a normal slope with your own hands.
How to maintain the required slope
Determining the slope of the sewer is not enough. It still needs to be maintained during installation. The most convenient option is to have a special level with a protractor. If you don’t have professional equipment, you’ll have to be cunning.
Construction level with protractor
There are ways to control the angle of a sewer pipe using a regular level:
- Having drawn a line on the wall with the desired slope, apply a building level to it and make a mark on the plastic in the place where the edge of the bubble is located. When placing the pipes, position them so that the bubble is in the desired position.
- If you take a meter level, you can attach a pad of the required width to one side. This method does not work in short sections, but it is convenient to install a long pipeline.
Internal sewerage
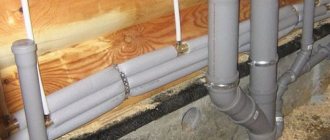
When laying a pipeline, it is necessary to maintain a given slope and prevent deflections and sagging. By the way, when laying outlet pipes from different plumbing fixtures, it is necessary to withstand different slopes (see photo below).
Slope of drain pipes from various plumbing fixtures
When laying an internal pipeline, you can draw the required slopes on the wall and align the pipes along them. You should not focus on the floor level; it is better to mark a horizontal line. It’s easier to do this if you have a level; if you don’t have one, you can use a bubble level. After this, having calculated the required difference (described above), you “lift” the far end. Once again check the accuracy of the calculations and drawn lines. Afterwards you can begin installation.
Example of internal sewerage layout
In bathrooms and toilets, the required level is usually laid out using a thick sand-cement mortar. Anyway, then the pipe is finished off - a plasterboard box is placed, onto which the tiles are then glued. A more modern option - laying pipes in a groove is not available to everyone - panel houses do not have such thick walls. When laying sewer pipes from the kitchen, stands and wedges are often used. After the pipeline is laid with the required slope, it is fixed to the walls using special holders. They are installed in increments of no more than 40 cm.
Advice! When installing, turn the sewer pipes against the flow. This way there is less chance of leaking joints.
What documents should I pay attention to?
First of all, the main document is SNiP. There will be several such documents. The main decisions and requirements for the design of the sewer system can be gleaned from:
- SNiP 2.04.01-85 “Internal water supply and sewerage of buildings.”
- SNiP 2.04.03-85 “Sewerage”.
- SNiP 3.05.04-85 “External networks and structures of water supply and sewerage.”
Additionally, you can study reference educational literature, teaching aids and recommendations for laying sewer pipes and organizing their slope.
Features of intra-house sewerage
The function of the indoor sewer system is reduced to collecting and discharging household wastewater outside the house, which means that when planning the internal wiring diagram, you should start from the location of the external circuit. The path to it should be as short as possible, for which:
- As a rule, a single central outlet is installed.
- The so-called “wet zones” are located as close as possible - wall to wall or under each other, if we are talking about several floors.
- Two- and multi-story buildings are equipped with one or more vertical risers installed directly in the “wet areas”.
If it is impossible to reduce the length of the waste line, it is allowed to raise part of the plumbing fixtures onto the podium. This will help maintain the required slope angle. Otherwise, to optimize the drainage of wastewater, a circulation pump is built into the network.
Also, it would be correct:
- Make a slope in the direction from the plumbing equipment towards the riser or the place where the internal circuit transitions to the external one.
- Minimize the number of sewer circuits and connect plumbing to them in series.
- Select the diameter of the sewer pipes depending on the expected volume of drains, calculated for each plumbing fixture separately (outlets for sinks, bathtubs, dishwashers or washing machines, etc.) and in total for common main pipelines.
- Place the toilet as close to the riser as possible.
- Avoid sudden changes in height and minimize the number of turning elements.
- Provide for the location of inspection hatches, ventilation equipment (valves, vent pipes) and a method for thermal insulation of sections located in unheated rooms.
Important! To perform a 90° turn, 2 45° corner elements or 3 30° turn signals are used.
Sewer fullness
The fullness is as important as their slope; it is calculated using the formula K=H/D, in which K is the fullness; H is the height of the wastewater and D is the diameter. The indicator always ranges from 0 to 1, where 1 is complete filling, and accordingly 0 is an empty pipe. For normal operation of the system, K = 0.5-0.6 must be, that is, the pipe must be filled with waste by no more than 50-60%. More accurately, the fullness can be determined by the material from which they are made. Asbestos and ceramics assume 60% fullness, that is, the calculation result should be 0.6, for plastic the maximum is 0.5, because it is more slippery. If installed correctly, in compliance with all indicators, the speed of passage of wastewater through the pipes will be 0.7 m/s.
This speed is suitable so that solid waste does not settle on the walls and the sewer does not become clogged. The design parameters for sewer pipes can be checked using the formula K≤V√y. K – fullness with a value from 0.5 to 0.6; V – flow velocity; √y is the square root of the fullness of the sewer pipe.
What to do if it is impossible to maintain the desired tilt
There are cases when difficulties arise during installation, leading to the fact that the angle of inclination of the sewer differs significantly from the permissible standards. In this case, take the following measures:
If calculations show that deviation from the specified standards is possible, then lay the pipes, but at the same time make additional tees at a certain distance through which the pipes will be cleaned.
When laying the pipe, still adhere to the recommendations, but in difficult areas, establish height differences, which are organized through additional wells. Thanks to this solution, it will be possible to install the pipe at the desired angle. There can be one or several such wells, but correct calculations and installation guarantee proper operation of the sewerage system.
There are several ways to achieve the desired slope of sewer pipes Source vodasovet.ru
As a last resort, if it is impossible to maintain the required slope and calculations show that the operation of the sewage system by gravity is impossible, then you will have to use a fecal pump. This device can be installed both on a local sewer branch and for the entire system.
When laying pipes made of plastic, you can be sure that they will need to be cleaned much less frequently than cast iron, since the smooth inner surface of the walls allows solid substances to slide.
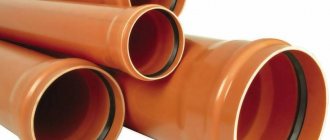
How to choose pipes
When choosing pipes, you need to pay attention to their color - sewer pipes are painted gray. The different cross-sectional diameters indicate that each type is designed to perform separate functions.
If an existing sewer system is being reconstructed, the operation of which has had no complaints, then the easiest way is to compare the diameter of the old pipes with the new ones - errors in this case are practically eliminated.
Depending on the purpose, sewer pipes and tees come in different diameters Source besplatka.ua
In addition, during installation you need to take into account what household appliances will be connected to the system. To drain water from a dishwasher and washing machine, a diameter of 2.5 centimeters will be enough; for a bathtub and shower you will need 3.5 centimeters. In general, pipes no larger than 5 centimeters in diameter are installed throughout the house, but for the riser you will need to purchase a pipe with a cross-section of 11 centimeters.
In order not to buy unnecessary materials or miscalculate, it is best to measure the old pipes and make a purchase accordingly. In addition, in accordance with the old design, the same number of connecting elements is purchased.
Preparing for work
Before you begin installing the sewer system, you will need to prepare the following tools and materials:
- plastic pipes that have a cross-section of 5 and 10 centimeters;
- elements that will be used to connect pipes;
Pipes and connecting elements for sewerage installation Source 911stroy.ru
- cuffs for sealing joints;
- glue intended for gluing plastic;
- marker, tape measure, level and saw;
- cement.
If the sewer system is not being made new, but the existing one is being reconstructed, then before proceeding with installation, you need to study the old structure or photograph it. After this, you need to draw up a plan for installing the new system:
- a drawing is drawn onto graph paper, where all wiring points and bathrooms are displayed, distances are determined and the riser is marked;
- it is checked that the new plan coincides with the existing sewer system;
- then calculations are made and the amount of material required is determined.