Craftsmen buy inventions from the best Chinese online store. First we have to make a wooden handle. To do this, we measure this part of the water heater. We get about 6-7 cm, transfer the dimensions to a wooden beam. Please note that we are transferring the dimensions twice because the handle will be made from two pieces of wood. Now we have to cut them and make a small indentation in order to glue the handles and not have any inconvenience with the core. Then we're going to round it out with sandpaper or a file to make the handle more comfortable. I have a wooden handle like this. Then we must wrap this part of the water heater with Teflon tape to prevent the wood from heating up and fading. And then we glue the two pieces together using a drywall screw or electrical tape. We approach the chamber for hot melt glue. I think my comments are unnecessary here. So, let's begin!
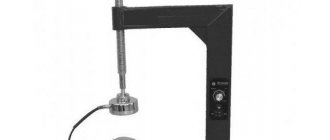
DIY electronics in a Chinese store. The glue gun is ready! Now we need to check this. I suggest you don't plug it directly into an outlet. It is better to switch it through the power control unit, which we previously made for a soldering iron. Due to the fact that there is no water in the water heater, its temperature rises very quickly, it overheats and can break down very quickly. Thanks to the power control unit you can choose the right temperature. The glue gun is quite easy to use, you just press the handle and the glue will start to come out. You can use a simple jar lid as a stand.
This is all! Thanks everyone for your attention. Source: crazyinvent.com
How to make a hot glue gun
An educational video demonstrates how to make a heat gun from improvised materials: soda cans and lighters.
A hot glue gun is an electromechanical device for melting and dispensing hot glue. This fairly simple device consists of a heater and a feeder, which you can easily make yourself using simple items.
How to make a glue gun yourself?
mplast.by
How to make a glue gun yourself? Today we will consider an option that involves the use of 3D printing.
TanyaAkinora shared her real experience in this matter on the pages of the industry publication 3D Today . We present to your attention her story. The author's punctuation and spelling have been traditionally preserved.
As a maker, I use various tools in my creativity, including a glue gun . For miniature work there is a small gun with a 7 mm rod. But in any case, you have to press the trigger, making some effort. And this is not always convenient.
This is how the idea of making my own instrument came about. A 3D printer is an indispensable assistant in this regard.
The experience of using 3D pens suggested a housing option. The result was a device that I called GlueDart . This is a pen shaped glue gun with an electric extruder for 7mm sticks.
The feed button is located on the front side under the right thumb. Thus, we have a convenient tool that makes the gluing process more accurate and precise.
All plastic parts are 3D printed, ABS material. During use, the case practically does not heat up.
The only part that has been carried over from a standard glue gun is the nozzle. As a heater, I used a regular ceramic heater from a 3D printer, which does the job perfectly. With a supply voltage of 5 V, its power is 7.2 W.
The extruder uses a reciprocating mechanism and a small motor with a gearbox. An attempt to make an extruder similar to a 3D printer was unsuccessful, since the glue stick is much softer than the filament rod.
Thus, the result is a convenient and lightweight tool with safe 5V power supply. A blue LED is used as an indicator of the on state.
An option with speed control was created, but this option turned out to be superfluous.
All modeling was done in Autodesk 123D Design, and some details (axial cam) and partly video in Fusion 360.
I wish all makers creative success.
Tatiana.
Printing a glue gun on a 3D printer - video
Equipment: Anet A8 3D printer
the Anet A8 3D printer was used . This is an updated version of the previous Chinese printer model - Anet A6.
The print area is 220x220x240 millimeters. The printer is equipped with a heated bed, a display and can print with polymer materials such as ABS plastic, PLA, HIPS and some others.
Source: https://izobreteniya.net/kak-sdelat-kleevoy-pistolet-svoimi-rukami/
Creating useful things
When asking what can be done with a glue gun, you should choose a craft that will interest the child as much as possible.
- Older children will not refuse to create a phone case with their own hands, because only they will have such an exclusive accessory.
- After applying an arbitrary pattern to the back panel of the bonding device, you just need to wait until the material hardens completely and remove the workpiece.
- At his own discretion, the child chooses the shade of acrylic paint; it must be applied with a thin brush, having previously covered the work area with cardboard.
- Rhinestones are suitable for decoration; young fashionistas will appreciate this creative approach.
- Boys can leave the cover unchanged or add any themed element.
Refinement and improvement of the glue gun
Actually, the use of Kapton tape surprised me. This is not a material that conducts heat well. I carefully disconnected the heating element (it is located in a special groove and is simply pressed by a spring plate), then unwound it from Kapton tape. Next, I took a thermal pad (they are often used instead of thermal paste for cooling chips), cut out several parts from it and lined the groove for the heating element with them.
It (thermal pad) does not conduct electricity, but transfers heat well. Now the most difficult part: you need to put the sandwich back together (plate-thermoelement-plate) and press it with a spring plate.
We insulate the top plate relative to the pressure plate with the same Kapton tape. Then we take a tester and check whether there is resistance between the terminals on the plug of the thermal gun: if not, we sort out the sandwich again, if 0 ohms, we again disassemble the sandwich and see where the short circuit is. It should be on the order of several hundred ohms.
We also make sure that there is no contact of any of the wires with the melting chamber. If everything is fine, then we collect and check. My gun began to heat up much better, although I need to control the heating, as I said above, it does not have a thermal cut-off. This will be the topic for the next modification of the pistol.
Source: https://elschemo.ru/instrumenty-elektronshhika/dorabotka-i-uluchshenie-kleevogo-pistoleta/
Updating the glue gun
The unpredictable behavior of the heating element in a Chinese glue gun has become the talk of the town. The service life, according to information from Internet users, varies from a few seconds after switching on to five years of proper operation.
About the power of the heating element, we came across statements ranging from “virtually does not heat at all” to “heats quite satisfactorily.” This was the reason for the curiosity that arose, which prompted me to buy, first, an inexpensive Chinese glue gun for the purpose of “opening it and looking.”
That is, thoroughly familiarize yourself with the design of the device, and that’s all. I didn’t take any glue sticks; I probably won’t need them.
Glue gun diagram
And now the melting chamber with a heating element installed on it appeared to the eye. Looks like a small jet turbine.
The clamp and thrust pad have been removed. Here is the heating element itself. I note that at the installation site it lay flat, in the center and was in direct contact with the body of the melting chamber with only one of its planes.
I unwrap the rather careless packaging - an insulator. Inside there is simply a miniature ceramic heating element and two contacts for supplying 220 volts to it.
I took a closer look at the heater and rang the two sides with a multimeter. They call, but not everywhere. The darkening visible in the photo at the bottom is present on all sides and completely covers the adjacent end side. It doesn't ring. This is a ceramic coating on top of the heating element.
Designed for direct contact with the body of the heating chamber and transfer of heat generated by the heater, without placing a dielectric spacer between them. This spraying is the dielectric gasket. It became clear that the heater was installed incorrectly by the manufacturer. He was lying on his side, and was also wrapped three times in insulating material.
According to the existing dimensions of the heaters, 4 of them will fit on the installation site.
Guided by common sense (as far as God has given), I began to correct the manufacturer’s “jambs”. The dimensions of the contacts were brought into line with the dimensions of the ceramic heater. Exactly in length, and 1 mm less in height.
I made a millimeter-long bend at a right angle to prevent the contact from sliding down onto the body of the heating chamber.
Graceful tulip
1. A diagram will help you cut out petals and leaves of the correct shape. Start with the petals.
3. Fold the figure in half. If you unfold it completely, you will get a square with stripes from the folds.
This tulip is perfect for decorating postcards. Or stick a flower on cardboard, add elements - and you will get a beautiful mini-panel!
More homemade products: How to prepare canned fish at home - step by step
A luxurious bouquet of corrugated tulips is an excellent gift for Mother’s Day, which is celebrated in Ukraine in the first week of May. Shall we try to make one?
2. Bend the square in half and straighten it. Fold the top and bottom edges of the sheet, aligning with the center.
To make this type of weapon, you need to print out a diagram and transfer the base and three-dimensional parts onto cardboard. Glue the structure with PVA glue. If desired, the surface of the product can be painted.
How to make a glue gun with your own hands
Many craftsmen and craftswomen have already fallen in love with electric glue guns, which allow them to quickly glue a variety of materials. However, there are situations when this convenient tool is not at hand and you have to look for an alternative solution. There are two ways to use glue sticks by constructing a heating element from improvised materials.
Boiler gun
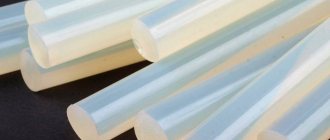
The first way you can build your own gun is to use a small household water heater . To create it you will need some supplies and tools.
What is needed:
- wooden block;
- a piece of tin;
- non-stick or Teflon tape;
- copper wire;
- small boiler.
Having prepared the materials, you can start working:
- At the first stage, a comfortable and safe handle is made. To do this, take a wooden block onto which the contours of the lower part of the boiler are transferred. The dimensions are copied twice, since the handle will consist of two halves.
- After transferring the dimensions along the contour, a recess is made in two parts of the block equal to half the thickness of the lower part of the device. By folding the halves around the device, you get a finished handle. For convenience, it can be rounded and processed with sandpaper. The halves of the handle are connected using small self-tapping screws or wrapped with insulating tape.
- Before installing the handle, the middle part of the heating element is treated with Teflon tape or other non-stick material. This is necessary in order to protect the wood from excessive heat during operation of the device.
- The next step is to make a heating chamber in which the glue stick will melt. To do this, take an ordinary can of lemonade or beer. It is necessary to cut two rectangular blanks from it, each about 80x150 millimeters.
- A cylinder is twisted from the first plate, the outer diameter of which should be equal to the inner diameter of the boiler. A cone with a small outlet hole is twisted from the second blank.
- To work with metal, it is better to use pliers, round nose pliers and a hammer. The cone must be attached to the cylinder, crimping the edges, and this structure must be inserted inside the spiral. To securely fasten the part, you can use copper wire.
The device is almost ready. To begin operation, a glue stick is inserted into a cylinder made of copper or tin and the boiler is connected to the network. Just wait a few seconds to start working. To do this, you need to lightly press on the glue rod so that a liquid mass comes out of the outlet hole.
A gun from a household boiler must be used with extreme caution. Without water, it heats up very quickly to a critical temperature. This can lead not only to its failure, but even to an explosion.
To avoid these troubles, it is better to use a wire with a regulator to turn it on, which will allow you to control the voltage supplied to the device and its heating.
From a lighter and an aluminum can
The second method of making a pistol from improvised materials produces a device that is safer to use. Consumables for such a device are much easier to find than in the first case.
You will need:
- a can of beer or lemonade;
- stationery eraser;
- stationery tape;
- glue stick;
- any gas lighter.
The following tools are required during the manufacturing process:
- stationery scissors;
- stationery knife;
- small pliers;
- black marker.
Procedure:
- In the first step, a square blank is cut out of the prepared jar. This is done using a stationery knife, aligning the edges with scissors. Using round-nose pliers, a part is twisted from the workpiece into a cone with a small outlet hole at the end.
- The edges are trimmed with scissors and secured with tape. It can also be replaced with simple insulating tape. Regardless of the material, fixation must be carried out as far as possible from the working edge of the cone. The tip will become very hot and may cause the tape or tape to melt.
- Next you need to assemble the device into a single structure. To do this, the cone is attached to the lighter so that the flame heats the tip of the device. The same adhesive tape or insulating tape can be used as a fixing element.
- As for the rubber band, you will need it to continuously feed the glue stick into the working cone. A longitudinal cut is made at one end of the stick, like on screws for a flat-head screwdriver. The rod is inserted into the cone, and the rubber band is placed on one side of the lighter and the other goes into the groove.
- A pistol-type lighter can be used as a heating element in a homemade glue gun of this design. This will make the application more convenient and will allow you to quickly regulate the supply of fire, and attaching the working cone to the “barrel” will be much easier to perform.
Conclusion
In conclusion, we emphasize that the above methods for making glue guns “on the knee” are not the optimal solution. They are more suitable for hiking conditions or when there is an emergency need for a device in its absence. For high-quality and long-lasting work, it is better to purchase a factory-made tool.
Source: https://kraska.guru/instrumenty/elektro/kak-sdelat-kleevoj-pistolet.html
What will you need?
And after getting a little confused and showing a bit of imagination, build a toy paper revolver with your own hands:
To hold the bolt against the barrel, you need to attach a strip of thin paper to the bottom of the front edge of the bolt. Then we put the bolt on the barrel, move it back so that it merges tightly with the frame, and under it we fix a strip of paper, approximately 3 cm from the rear edge.
We place the paper shutter over the barrel and move it back, mark with a pencil the place where the hole is located near the barrel, and do the same in the shutter. This hole will serve to eject bullets.
More homemade products: How to get rid of condensation in a polycarbonate greenhouse - with photos
Carefully secure the barrel to the frame using tape, leaving a small space between them so that the receiver mount can move freely.
To understand how to make a gun out of paper, you can study the instructions in the video. During manufacturing, you need to fold the barrel especially carefully: if it is too wide, the toy will lose its attractive appearance.
Take a square sheet. It is better to choose a denser option, and choose the color at your discretion - dark green, brown, brown or golden. The algorithm for making a paper gun with your own hands is very simple:
Glue gun - what can be glued, types of consumables, characteristics of popular models
The objects and structures around us consist of parts that are connected into one whole in one way or another. They can be fixed with fasteners, but in many cases it is much more convenient to do this if you have a glue gun. What can you glue with it?
What criteria should be used to choose a device to solve a given problem? It is easy to answer these questions if you know what types of devices are available on the market, what consumables are used and how to use them correctly.
Glue gun device
The schematic diagram of all models is the same. In the process of evolution, the optimal design of the device was determined. One glue gun can differ from another only in the quality of the material from which it is made, power and a set of additional functions. The device consists of:
- mechanism for advancing the glue stick;
Power can be supplied from the mains or autonomously from a battery. Having the device at hand, repairing broken items at home can be done within a few minutes.
The operation takes much less time than using traditional adhesives. The device is reliable and does not consume much energy. If you have an electric glue gun, you need to know what you can glue and how to choose the right model.
Professional and household hot glue guns
The first thing potential buyers pay attention to is the price. Why is there such a significant difference with the same design? The answer is simple - professional equipment is designed for uninterrupted operation, so during production a power reserve is built in.
The trigger and rod feed mechanism are made of more durable, wear-resistant material. For more precise adjustment to the special rods used, a temperature regulator can be built into a professional glue gun. What can be glued and what is the difference compared to a household analogue? Basically none. The list of materials is the same.
Household models typically range from 40W to 150W. This is quite enough for home use, making crafts, and practicing your favorite hobby. Industrial designs can have a power of up to 500 W.
This is needed to quickly melt the glue, when it is important to constantly maintain high consumption, for example, when assembling boxes or fixing tags on packaging. For a home user, such performance is not needed.
Application area
To solve certain problems, rods are produced in both a wide range of shades and transparent ones. This is very convenient for those who love handicrafts. Having selected the desired color, the product will look solid, no traces of glue will be visible. Models of filled rods have appeared.
For example, glitter and mother-of-pearl are added to the mass. The glue itself becomes a decorative element of the product, part of the composition. Thermal gun can be used in construction and repair. However, it is worth remembering that setting time is limited. After application, it is advisable to fix the part in place in the first few seconds.
There are also some restrictions. For example, where heavy loads are expected, it is not recommended to use a hot-melt adhesive connection; it is not designed for this.
You can glue decorative elements to shoes, but the soles will not last long. Do not use a gun to secure power structures during construction and repairs. It is not recommended to apply glue to plasters and putties without first treating them with primers and paints.
Sealing and insulation of seams
During operation, cracks and gaps appear in various structures. They appear in window and door systems, openings, and shafts. Often such a defect occurs in finishing materials. In addition to the untidy appearance, there are also undesirable consequences in the form of drafts and further destruction of the structure.
If there are no building mixtures or sealants at home, but you have a glue gun, then you can quickly solve this problem. With its help, you can easily make the desired connection and seal the seams. It is recommended to purchase special black or gray rods for this work. But first you need to clarify whether the gun is capable of maintaining the required temperature.
Video: Glue gun - why and how
The edges of the crack are cleaned of debris, foreign substances, and degreased. Then, after heating the gun for the required time according to the instructions, fill the seam. The result is reliable, durable insulation.
After cooling, you can cut off excess glue with a knife. The connection is not afraid of moisture, is not subject to corrosion, and will not emit substances harmful to health, so it can be used both in utility rooms, and in kitchens and children's rooms.
Tile
What to do when a tile falls off at home? You can get to the nearest hardware store and buy the required mixture. But it is usually sold in large packages and most of it will probably simply disappear. Repairs can be made with a glue gun.
Before starting work, you need to remove all remaining mixture from the tiles and the seat. It is advisable to do this even with a small margin, so that the tiles fall through with a small gap, no more than 1 mm.
Before applying the glue, it is recommended to warm the part with a hairdryer, and after installing it in place, hold it in the desired position for 2-5 minutes
Furniture
The interior will lose greatly if any element is broken or missing altogether. Front parts of furniture often fail during use. Decorative decorations and overlays can be restored with hot glue. There is no need to fix the glass with a gun.
The operating temperature of the glue is from 105 °C to 200 °C. These are critical values for glass; it may crack or break. A wooden surface easily tolerates this temperature.
Excess glue can be easily removed from it later. It is not recommended to glue load-bearing structures and functional mechanisms of furniture. The loads are too great and the glue cannot withstand them.
What can you glue with a hot glue gun?
The steadily growing popularity of the device is due to its ease of use and availability of consumables. You can find out what can be glued with a glue gun with sticks by reading the list of materials that can be worked with with this tool:
The manufacturer usually indicates that it can be glued with a glue gun. In addition to the list of materials, the instruction manual offers optimal operating modes for the device when performing certain operations.
Features of choosing a tool
Having decided to purchase the tool you need for your household, you should follow some rules when choosing. What should you pay attention to first? For size. Will it be convenient to do the intended job? On the design. The weak point of the device is the trigger and the mechanism for advancing the rod.
It breaks down most often and repairing it becomes impossible in most cases. If you are buying a device for needlework, then the best choice is a model with a set of nozzles. You need to check with the seller about the characteristics of the glue gun, what can be glued with it, and what rods to use.
Competition in this segment is high, so prices are reasonable. The difference in cost between models from little-known companies and products from leading manufacturers is not great. Therefore, there is no point in saving.
Source: https://prosto-instrumenty.ru/kleevoj-pistolet-chto-mozhno-kleit/
Making a 12 volt glue gun
No matter how naively the reader may encounter the topic of a glue gun, with a repeated description of recommendations for its acquisition and its further use, I will still share my improvement of this tool.
The glue gun has become popular recently because of its wide capabilities, but for some reason some characteristics of many models could be better.
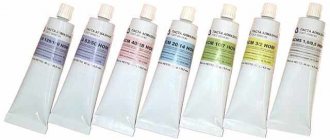
A set of glue sticks with diameters from 3.4mm to 43mm with different compositions and different melting temperatures is good.
Convenient charging of the rod into the heat chamber, convenient supply of glue to the surface to be glued, light weight of the tool, the presence of an additional switch, power indicator and a removable power cord. Everything is fine!.
But there is one significant detail indicated in the passport data of a glue gun used in everyday life - the value of the supplied voltage and the electrical power of the heater.
As a rule, in each model of a hot melt glue gun, a semiconductor is used as a heating element, or more precisely, a semiconductor resistor. It is also a posistor (semiconductor ceramic).
Again, what is there to look for and discuss here? Simple, convenient! But it's not reliable. Why? I'll tell you in more detail.
Hot glue guns are very popular among designers, fashion designers, decorators, in television and radio workshops, and even in funeral service workshops. They use hot melt adhesive for spot gluing or gluing small parts together.
In everyday life, a glue gun is not often used. This is true. It's not every day that we glue something.
But in some cases, the use of hot-melt adhesive remains the only option, which is not feasible due to the failure of the heating element, which bursts from overheating and sometimes even breaks a little.
In my practice, over the course of a couple of months, I purchased several glue guns, and of different models.
The technical passport of each indicated the supplied (connected) voltage and electrical (thermal) power, which in no way corresponded to the actual one.
At the specified 40wt, the pistol could not cross the 8wt threshold. At 65wt the heater did not consume even 20wt. Yes. The glue melted, but only on the basis of ethylene vinyl acetate.
Some people were happy with this, but I wasn’t. It was necessary to glue long products (plinths, baguettes, corners), which were covered with hot glue in 7-12 minutes. The glue on one end had already hardened when, for example, hot glue was just applied to the opposite end of the baguette.
Moreover, several samples of glue guns “showed fireworks in my hands” from the burnout of the heater just at those moments when the ceiling tiles were being glued, because the professional and classic glue guns heat up to a maximum temperature of 220°C. The melting point of polystyrene foam and polystyrene is 240°C, vinyl plastic is 230°C-250°C.
The heater of the glue gun did not cope with its purpose.
Converting a glue gun from 220 volts to 12 volts
What has changed in the design of the glue gun?
Determined the length of the blank piece of nichrome wire. The diameter of the wire was not important. The calculation was carried out using standard formulas (Ohm's Laws for a section of a circuit).
- The starting point was the desired electrical power of the glue gun. I settled on (≈)34-36Wt. It follows from this: 36(wt) : 12(v) ≈ 3.3(a). The average current consumption was determined.
- Now from I=U/R we determine the resistance of the conductor, that is, the resistance of a piece of nichrome wire: R=U/I. 12(v) : 3.3(a) ≈ 3.6(Ω).
- Using an ohmmeter (tester, multimeter) I determined the piece of wire. I placed the probes of the device remotely from each other on the wire so that the device (ohmmeter, multimeter, tester) showed on the scale a resistance close to the calculated one - 3.6Ω.
Then everything was simpler and the time I spent on reconstructing the glue gun did not take more than 35 minutes.
- I removed the old heating element from the camera and the power cord.
- I ground the body of the heating chamber in a circle.
- I wound several turns of nichrome wire through a layer of asbestos paper.
- A switch was installed in the circuit of the new heater, which was mounted on the handle of the gun.
And then the most interesting part. My gun was connected to a dead car battery. Here are the parameters recorded during testing:
- The voltage at the battery terminals is 10.5v;
- heating element resistance - 3.6 Ω;
- current consumption of the glue gun heater is about 3A.
- The temperature in the rod melting chamber is 172°C after 1 minute;
- — 197°C after 2 minutes;
- — 222°C after 4 minutes;
- — 262°C after 7 minutes;
- — 268°C after 8 minutes;
- - 280°C in 9 minutes.
This is it for me! Why wait 7 minutes for a regular glue gun to heat up when this one melts in a few seconds? You can glue in a field, in a basement, in a boat, in a car. The glue consumption is not 20ml per minute (never exceeded the consumption of 12ml-16ml), but 40ml-50ml.