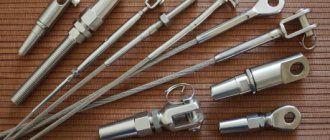
How to attach a cable: rigging equipment, fixtures, fasteners and tools
Earrings, thimbles, carabiners, lanyards - most of us rarely have to deal with such specific objects and, probably, not everyone knows about their existence.
Therefore, information about what is hidden behind these mysterious terms will not hurt anyone. So, in this article we will talk about rigging accessories. And you have to meet them every time there is a need to lift, secure, tension or hang something using wire, cable or rope. Having professional rigging equipment at hand, many tasks can be solved many times easier and more efficiently than using conventional improvised means. Today you can purchase everything that is necessary to carry out these works on almost any construction market.
Cable clamps will allow you to securely fasten the lashes when forming loops at the end of the cable, and turnbuckles will allow you to tension the cable with any necessary force.
Rope cable laying technology
There are situations during electrification when it is necessary to supply electricity to a separate room. At the same time, it is not possible to lay the cable in a trench due to the complexity of the terrain or architecture. Therefore, along with such types of external laying as trays, cable ducts, pipes, corrugations, wall mounting, there is such a type of laying as cable wiring. In this article we will look at the technology of installing a cable on a cable with your own hands.
Application area
According to Chapter 2.1 of the PUE, this method is applicable for networks up to 1000 volts. Most often, cable wiring is used in places where organizing an overhead line does not make sense, and it is enough to throw a cable attached to the cable, and this will be enough to electrify the facility.
In this way, lighting networks and electrical wiring for sockets in warehouses, power cables in production workshops, and also between two separate buildings are installed.
For a home craftsman, this wiring method is of particular interest. This is because with the help of simple technology it is possible to electrify outbuildings in the country. Thanks to cable wiring, it is possible to conduct light from the house to a bathhouse, garage, shed, gazebo and other buildings and lighting devices located at some distance around the plot.
Preparatory work
First you need to decide on the wire and its cross-section. We talked about how to calculate cable cross-sections in the corresponding article. After this, you need to measure the length, taking into account the entire route of wiring from the machine to the distribution panel. When choosing a cable and suspension elements, you need to take into account the weight of the wire in a given area, with a threefold safety margin.
Cable hanger for cable
The easiest way to conduct an electrical network to any nearby building is overhead. There is no need to make trenches on the site or select a special cable. And sometimes another method is simply not suitable, for example, in production facilities, workshops, warehouses.
Having chosen the overhead method of connecting the electrical network, you need to do everything correctly to avoid unpleasant situations with a line break. To do this, use the installation of cable wiring or, if the distance is not large and the cable is light, the string method.
Preparation for installation
The entire process of installing a cable on a cable begins with choosing the cross-section of the wire. This depends on the total power of the devices that are planned to be used. After this, you need to measure the distance between the switchboard and the machine, taking into account all the nuances (turns, lifts).
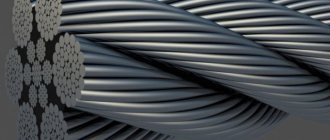
Next, you need to select a cable that can withstand the weight of the cable being laid along the entire route. But its strength and the strength of the remaining suspension elements must be calculated for three times the weight of the cable, since in severe weather conditions the load increases and the possibility of breakage arises. For these purposes, galvanized steel cables are most often used, the diameter of which ranges from 4.5 to 6.7 mm.
For the string method, galvanized steel wire or varnished hot-rolled wire with a thickness of 5 mm or more is used.
Cable fastening
It is good to choose a strong and reliable base, but it still needs to be well secured. The cable and cable are installed using anchors. The anchors, in turn, are secured with studs or bolts on both sides of the wall. This is done in order to distribute the stress throughout the wall, and not concentrate it at one point, which will help prevent the fastener from falling out of the wall
The distance between the two main anchors should not exceed 100 m. Additional anchors are also installed every 30-40 m. Cable suspensions should be located at a distance of 70-90 cm from each other.
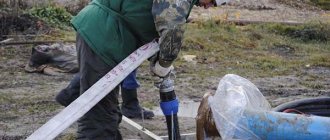
On the one hand, the cable is secured with a special loop clamp; on the other hand, a screw coupling, a hand winch or a pulley block is used. Such structures are needed to lift, tension the cable and give it stability and strength.
When tensioning, you need to take into account that in winter, under the influence of low temperatures, an overstressed cable may burst. That is, you shouldn’t be overzealous, but you shouldn’t leave it sagging too much.
Important! The support cable must be grounded, but under no circumstances should it be used as grounding.
Cable fastening methods
In order to attach the cable, several popular methods are used:
- cable suspensions;
- fastening directly to the cable;
- laying the wire in a tray, pipe, box or other structure that is attached to the cable.
If a tray, pipe or box is used for cable installation, this additionally protects the wiring from the influence of the external environment. This method is very convenient, since neither very high nor very low temperatures have any effect on the wire.
Laying cables in corrugated pipes
To attach the wiring directly to the cable, use plastic clamps, steel strips with buckles, or sheets of galvanized iron. If you decide to tie the wire with plastic, then before purchasing you need to clarify the conditions for which it is intended. Otherwise, after one season, the plastic clamps will have to be replaced.
Attaching the cable and cable to the plastic clamp
If a decision is made in favor of metal fasteners, then you need to pay attention to ensure that the material does not violate the integrity of the cable insulation. In order to avoid such a problem, a little insulating material should be placed under the steel buckles or iron during installation.
Cable fastening system
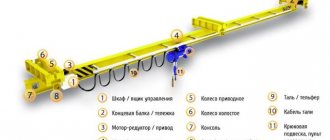
When installing communication networks, often, if the situation requires it, a method of laying engineering systems through the air is used - on cables. Cable suspension significantly simplifies the installation process, and also saves time (up to 90%), money and energy of employees. develops and produces high-tech cables used in a wide variety of structures, especially when installing lighting fixtures and panels.
The cable suspension system for various elements of a communication system is widely used both in industrial structures and buildings intended for living. Thus, pendant lamps are very popular today among lovers of both classic and modern interiors. The cable lighting system is cost-effective, simple and easy to use. Lamps on cables are a suitable option for installing a lighting system not only for public institutions such as a cafe or gallery, but also for a country house.
When installing the cable directly to the cable, a number of mandatory conditions must be observed. So, it is advisable to choose the most durable steel cable for the cable. In addition, you need to choose a cable hanger , with which the cable being laid is attached to the supporting cable. Also, with the help of cables produced by , it is possible to hang cable trays with subsequent installation of lighting fixtures.
Cables with a carabiner or loop for attaching to beams
offers high-quality steel cable with a loop designed for installation on a beam or other load-bearing structures. In this case, the cable is attached to the beams using a loop that is placed over the edge of the beam. Another common type is a cable with a carabiner , which is also attached to a beam, clamps or loops. The cables are made of stainless steel or coated with a special anti-corrosion coating.
Fast Grip System
offers its customers suspensions with the Fast Grip , the principle of which is widely used today in a variety of fields. The technology ensures high-speed installation of systems in any conditions and its name can be literally translated as “quick capture”. The system allows you to securely fix wire trays, cables, air ducts or any other communication systems.
A cable suspension for the tray will help to reliably lay cable-supporting lines at sites where a complex network configuration is required, will facilitate installation work and speed up this process. On our website you can find cable hangers of various configurations. Now all that remains is to determine which design will be the optimal solution for your situation. We are ready to advise you on any questions via a call back.
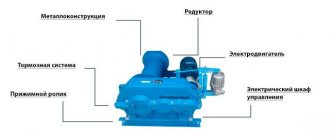
In modern engineering, suspension by cables is a convenient and very common way to install the necessary structures. produces various types of cables - with hook, screw, anchor, bolt, insert, suitable for different purposes and tasks. Hanging a lamp on a cable, as well as aerial laying of various cables on cables, is a fairly profitable alternative to other, more traditional, but costly methods of installing electrical or telecommunication networks.
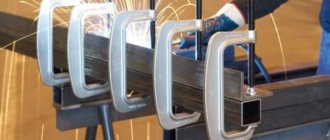
Specialized and wedge clamps - what are their features?
Many construction jobs cannot be done without a strong clamp. Construction has always been characterized by the presence of a large number of operations. You definitely need to lift something up, pull a load, and in this case it’s building materials; you often have to fix various objects. For such work you need strong spring-loaded clamps. Not only do they allow you to connect the cables, but you can also attach a load to them. Such devices are not very different from standard clamps.
In addition to the usual metal arc, they have a pair of levers that are equipped with movable brackets. This design solution helps ensure a highly durable and durable connection. With its help, you can securely fasten any object to a cable of different thickness. Lately, wedge clamps have become the most popular among specialists. This is an excellent connecting element for copper and aluminum wires, the cross-section of which can range from 35 to 100 square millimeters. Only this type of clamp is good for connecting steel-aluminum devices. Such devices consist of a body and a wedge, which is wear-resistant. Forged cast iron steel is used to make the body, and the wedge itself can be made of bronze or various aluminum alloys.
If it is necessary to install aluminum or steel-aluminum wires in bolted clamps, where the cross-sections are very large, then it is necessary to use special gaskets that are made of soft aluminum tape. The use of such an addition in work will give the fastening the greatest mechanical strength. It is important to remember that after installation, such clamps must be tightened again ten days later . The lift should be done like this. The first step is to press the hinge part of the aluminum housing, then you need to insert a steel anchor, and then the aluminum housing is inserted again using a steel mechanism.
Cable clamp: buy ready-made or make it yourself?
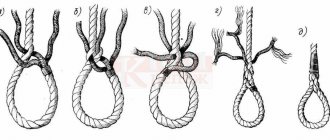
To create loops at the ends of ropes and cables, as well as to connect their ends, different types of aluminum, copper and steel clamps are used. Cable clamps are among the rigging fasteners, used in everyday life, installation work and in elevator facilities.
To ensure the product maximum reliability and durability, all structural elements are made using stainless steel . For products whose operation involves light loads, aluminum, brass or copper can also be used.
Among the considerable variety of cable clamps, the following types are the most popular:
- Wedge clamp . It is considered a specialized product, allowing the fixation of rigging ropes or cables of large diameter (up to 100 millimeters). A reliable grip of the rope or cable is ensured by a washer made of soft aluminum; in addition, bushings made of antifriction bronze are used for fastening, which together guarantees increased wear resistance;
- Simplex single clamps . Their design offers a clamping steel plate between the cable and the cover and a special steel cover with flanges at the edges. All Simplex clamps are equipped with a nut and bolt to secure the elements together. The clamp is mainly needed to secure different ends of the cable when splicing;
- The barrel clamp offers a pair of hollow, flattened half-cylinders that are secured together with a screw. In this case, in one half-cylinder there is a special hole for a screw, and in the second there is a threaded boss. To create a loop and pass the cables, a pair of semicircular grooves are provided at the ends of each half-cylinder;
- Double clamp Duplex . The principle of operation of the device resembles the operation of the Simplex clamp. The only difference is that the plate and cover are longer, which makes it possible to install a second pair of mounting nuts and bolts. Due to this design solution, not only the reliability of the grip increases, but also its size;
Operating rules
Before starting work, you need to check the strength of the connections by applying a load to the cable once. If after several checks the cable and clamps continue to perform their functions, then it can be used. However, it is necessary to regularly check the condition of the clamps, since over time the connections can become loose, the nuts can become loose, and the metal can be destroyed.
The maximum service life of the clamps depends on the operating conditions. If this is a construction site with regular transportation of goods across floors by a construction crane, then replacement should be done every 4-6 months. In a domestic setting, you need to look at the state of wear to determine whether the clamp needs to be replaced or not.
In some cases, proper operation can save lives. This refers to the so-called lifeline. This is a tightly stretched cable with the ends attached to the sides of boats and ships. If a person accidentally falls out of a boat, it will be easier to save his life by grabbing onto it.
Safety requirements for cargo transportation determine the need to adhere to the technique of fastening steel cables and ropes. Before using the fastener, you need to check its load-bearing capacity. And if the connections are actively used, the degree of wear should be monitored.
4.5 meters, the second at most 4 meters, the third 2 meters. We will “increase” the second and third ones; the choice fell on a 50*50*3000mm pipe.
Eye nut Eye bolt Lanyard Anchor with hook Anchor with ring Koush Double clamp Clamp U-shaped bracket
We bought 80 meters of 3 mm cable (with a reserve). With sadness clamps, either giant or micro version. We took a 6 mm double clamp. For the pillars, at first they wanted to take an eye nut/bolt, but the bolt has a length of about 10 mm, and the pipe is 50 mm, so we decided to take an M8 anchor, two with a ring and two with a hook (again, for a reason). We took two lanyards (pulling up on the second post is impossible) M8.
That's it, there is nothing else in the metric.
We took 2 pipes 50*50*3000, roofers 35*4.8, 2 thimbles 3 mm, two sets (two pieces each) of clamps 3 mm. We looked for a U-shaped bracket, but couldn’t find it.
I ask, are there staples?, no. What a misfortune. I had to take different corners (approximately 120*50*60)
How to tension a cable for stretching?
Post by yawlchik » Mar 23, 2009 07:52 pm
Post by Bukin G » Mar 23, 2009 8:03 pm
Post by yawlchik » Mar 23, 2009 09:45 pm
Post 777 » Mar 23, 2009 11:54 pm
Post by Renat Dzhanaev » Mar 24, 2009 01:22
You need it as in the diagram, then everything will be ok. The pillars you choose are not the ones you showed, but with two screws on both sides. The cable is connected to each other with help. specialist. applications with nuts. The banner is attached using small carabiners or homemade pins made from a steel rod. Those. You can replace it without removing the cables in the future. On the left and on the right, they usually do everything differently, some just pull it through the grommets, some make a pocket and push a pipe inside. In a word, who knows what. And it is better to place the cables as shown in the figure, time-tested. If you're interested, I can send you a photo.
lanyards, for some reason they call us stolpers
Post by Bukin G » Mar 24, 2009 08:55
Nuances when working with different types of cable clamps
When using a cable clamp, it is important to take into account such parameters as the guaranteed clamping force and the maximum diameter of the cable. Dimensions are no less important, since regardless of the type, it is recommended to use several clamps at once (at least three!), especially when working with loads whose weight cannot guarantee safe lifting or moving.
In the presence of a nut made according to GOST 5915-70 and a spring washer (GOST 6402-70), for ropes with a diameter from 5 to 62 millimeters, clamps made according to the DIN 741 standard are used. In this case, the design of the element allows the use of a locking bar, which in turn this guarantees a more reliable fastening of the bracket and cable.
The clamping block is made by stamping using steel grade from St. 3kp and higher. The use of cast pads in production is allowed only for products whose operation requires low clamping forces.
It is prohibited to use clamping cables that do not have a galvanized anti-corrosion coating!
As for fasteners with a flat clamp, these should use threads made in accordance with GOST 24705-81. In this case, the plates are used to fix cables with a diameter of 4.6 to 30 millimeters. For the manufacture of linings, steel grade St.3 should be used.
When using several clamps sequentially, the step between them should be at least 6 cable diameters.
Duplex double clamps absorb shear force due to the bolted connection, as a result of which the diameter of the fastener will directly depend on the diameter of the cable. It is recommended to adhere to the following ratios:
- M10 fasteners – for 10-12 mm cables;
- M8 fasteners – for 8 mm cables;
- M6 fasteners – for 6 mm cables;
- M5 fasteners – for 4-5 mm cables;
- M4 fasteners – for 2-3 mm cables.
It is not recommended to use wedge clamps when lifting loads. This is due to reduced operational loads on the fasteners, since the axes of force in this case will coincide, without causing shear stresses. DIN 15315 regulates the performance characteristics of wedge clamps. In the case of a screw clamp of a rope or cable, high-strength fasteners with a strength class of at least 5.6, treated with a special protective anti-friction material .
It is important to note that such a connection occasionally needs to be tightened!
The barrel clamp is often made using aluminum and is therefore not suitable for large diameter cables. The range of diameters is limited to 2-8 millimeters. The advantages of the clamp are its compactness and the absence of any protruding parts, which makes it possible to use it in small spaces.
What are steel rope clamps made from?
In order to obtain high-quality clamps, the manufacturer uses high-strength steel. To make it more reliable, the surface of the product must be covered with a special protective coating - galvanic galvanization.
Using galvanization, you can make all products more resistant to aggressive environmental influences, rust and corrosion. The galvanized cable clamp is considered one of the most durable.
Installation technology
First you need to secure the anchor and the fastening elements of the cable wiring to the selected area. For the most part, these are steel plates pulled together on both sides of the wall with studs and rings welded to them for hanging the cable. The tension of the fastenings is done to strengthen and avoid their falling out, distributing the weight of the load evenly along the wall, and not at the fastening points.
Next, you need to secure the cable on one side with special loop cable clamps, on the other side, tighten it as much as possible, and use screw couplings to get it to the state of the string.
The height of the suspension should not be lower than 2.75 meters above the pedestrian area, and not less than 6 meters above the vehicle passage. All standards for overhead electrical wiring, including the distance between supports, are indicated in the diagram:
After installing the strings, they begin tying the cable with a bandage. To hang cable wiring on the street, you can use plastic clamps, galvanized iron strips, and galvanized binding wire. The distance between the bandage is 50-80 cm.
Elements for fastening the cable to the cable
To securely fix the cable with the cable, there are several devices:
The simplest method is twisting the cable with stretching using ordinary aluminum wire Ø 2.5 - 5 mm with insulation. At connections every 50 -80 cm, 7-8 turns of wire are made, tightly turn to turn. To prevent the cable insulation from being pressed through by the fastening wires, the fastening point is wrapped with a rubber plate, and the wire is wound on top. It is recommended to use rubber for gaskets from old car inner tubes;
Plastic tie for securing the cable. The device is attached to a guy wire, the cable is laid in a groove, covered with a strap, which is threaded into the lock, tightened and securely fixed. The lock is designed in such a way that the strap cannot be pulled out in the opposite direction; to remove it, you can only cut it.
Plastic tie for securing the cable.
Metal clamping plates with loops for cables and guy wires. Plates are produced with loops of different sizes. One plate is put on the cable and the other on the cable. In the center of the plates there is a hole with a thread for a bolt; they are aligned and tightened with a bolt.
Metal clamping plates with loops for cable and guy wires
All connections, regardless of the design, are installed after 50 - 80 cm.
How to make cable clamps with your own hands?
Cable clamps are used in many industries. There is no industry where they would not find application. But often ordinary household work cannot be done without such a small device. Car owners especially need them. You will need a small diameter metal tube, a couple of metal plates and several bolts and nuts. The metal tube must be bent into an arc. The diameter of the pipe must be such that the cable that is planned to be used can fit into it. The cable must be inserted into the hole in the pipe until the end appears outside.
Then the end must be pulled out of the pipe to a distance of 10-15 cm, then the end of the cable and the cable itself will need to be covered with plates from below and above, and the plates must be tightly connected to each other using strong bolts. This device is well suited for making loops. If you need to connect two cables to each other, then you need to choose a tube with a larger diameter. It must be taken into account that two cables need to be inserted into one hole, but only in different directions. The plates are also selected taking into account the diameter of the cables. Such a clamp will always come in handy in household chores, just keep in mind that it is not suitable for heavy loads, but it is quite possible to try to use it as a tug.
- Author: Mikhail Malofeev
Rate this article:
- 5
- 4
- 3
- 2
- 1
(5 votes, average: 2 out of 5)
Share with your friends!
Wire connections.
The wires on the cable are connected to the supply line, which is usually laid on one of the walls between which the cable is stretched, on the side where the cable is firmly secured.
Rice. 39. Wiring on a cable. 1 - cable wire; 2 — tension end fastening with tension device; 3 - end blind fastening; 4 - branch box or clamps; 5 — string suspension; 6 — securing the string suspension; 7 - lamp.
Power supply schemes are possible in which the supply line (the wires of which are also attached to a cable) crosses the lines in their middle part, where the latter are connected to the supply line. Wire connections are made using the already mentioned clamps in insulated sheaths.
Homemade suspension
Special hangers are sold at a hardware store. If the amount of work is small, you can make this design yourself. To assemble the fasteners:
- round nose pliers and wire cutters;
- galvanized steel soft wire;
- a rod whose diameter must be larger than the cable being laid.
Using wire cutters, the wire is cut into lengths from 25 to 30 cm. An air loop is made in the middle of each piece using pliers. It must correspond to the diameter of the cable being laid, which is then threaded through them. The wire begins to be wound around the rod, forming parts to support the cable. First, one free end is wound, and then the other. The spiral pitch should be approximately 2 centimeters. Such simple manipulations allow you to get a homemade canopy. The cable is laid along the cable in a certain order. The cable is fixed to one building. Suspensions are placed on it in increments of 60-80 cm, into which the cable is threaded. Next, the cable and cable are secured to another building. A similar procedure is followed for indoor installation.
What is needed to install cable wiring?
To install cable-type electrical wiring, you will need the following elements:
- the cable is the basic wiring component on which the entire lighting system rests. It is recommended to give preference to galvanized counterparts, as they are quite flexible, corrosion-resistant and durable. It is better to purchase a cable with a small margin (about 10%);
- clamps - selected depending on the cross-sectional area of the cable;
- cable - the best option is copper cable, which is double insulated and has high fire-resistant properties. It is worth immediately putting a corrugated pipe on it, which will eliminate the option of a short circuit and protect the structure from harmful ultraviolet radiation;
- lanyard - a special tensioning device. For a short length of wiring, one lanyard is enough; for longer lengths, it is recommended to take two devices;
- cable fastening elements . There are 2 options here: the first is a mounting tape that allows you to secure the cable with a “lock”, the second is “strips” made of durable plastic - special fastening devices that resemble clamps. The maximum interval between such fasteners is 0.5 m. Based on this requirement, the required amount of fasteners is calculated.
- cable fastening - special hooks that allow you to rigidly fix the structure. If the cable is mounted in a wooden wall, then special metal screws with a hook at one end are used. If the wall is made of brick or reinforced concrete, anchor structures with a hook are used. Of course, the second option is more popular.