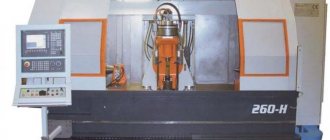
Before stretching a chain-link mesh onto a fence, it is very important to remember that this type of material is made by screwing several spiral wires into a flat coil, usually using German-made semi-automatic mesh weaving machines.
The most commonly used wire has a polymer or galvanized coating, and stainless and steel options are not very common.
Required Tools
To independently erect a fence based on a chain-link mesh, you need to prepare a standard set of tools and material, presented:
- the required amount of mesh with a small margin;
- the required number of support pillars;
- wire for fixing the mesh fabric on the poles;
- clamps, brackets, plates, bolts and nuts;
- hammer and pliers;
- grinder and welding machine;
- material for concreting pillars.
Metal supports require priming and painting, and buried areas are covered with liquid bitumen. Wooden poles must be thoroughly impregnated with an antiseptic and painted, and the part buried in the ground must be treated with bitumen mastic.
To speed up and facilitate the installation of the fence, it is recommended to purchase fully prepared metal support posts that have welded hooks and are treated with a layer of reliable primer.
Preparatory stage
Initially, you need to purchase a sufficient amount of chain-link mesh, measuring the perimeter of the area allocated for the installation of mesh fencing. For this purpose, pegs are driven into the corners of the area, and then a cord is pulled, the length of which will indicate the total amount of material.
Among other things, it is necessary to take into account mesh overlaps in the presence of joining areas. After determining the total length of the fence, the number of support pillars is calculated, the distance between which is most often 2.0-2.5 meters.
Installation of chain-link mesh
When choosing a mesh, it is recommended to give preference to a material with traditional galvanization or with a high-quality polymer coating, which reliably protects the fence being built from high humidity or the formation of corrosive changes.
Support posts for a chain-link fence can be concrete, metal or wood, but only the first pair of types is most preferable, due to the risk of wood rotting as a result of negative external influences.
An insufficiently high-quality and reliable polymer coating can fade quite quickly when exposed to sunlight and crack in the cold, so the choice of such material must be approached very responsibly.
Mounting options
There are several ways to install a chain-link fence yourself:
- Using the sectional method, by securing it with metal corners, the fence looks aesthetically pleasing, is resistant to wind loads, and lasts for many years.
- Simple stretching of the network between ready-made supports - built quickly, low financial costs, but less resistant to wind and snow loads.
When choosing a suitable method for installing a chain-link, you need to take into account the terrain, the size of the sections, and the level of wind load that prevails in a particular region. With frequent strong storm winds, typical of coastal or steppe climates, it is better to secure the mesh very tightly.
Unfolding and alignment around the perimeter
The initially purchased chain-link mesh, sold in rolls, should be laid out and then leveled along the entire marked perimeter to avoid strong twisting and placement of the web elements at unequal heights. Among other things, in order to prevent the risk of further deformation, the end part of the mesh is bent with the obligatory formation of a kind of loop that does not allow neighboring individual wires to jump out.
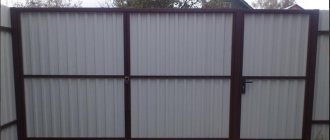
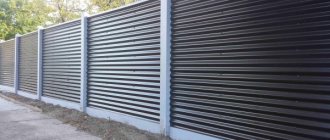
Ready fence
Alignment of a stretched mesh fabric is most often carried out using conventional reinforcement, which not only allows you to smooth out sagging areas, but also allows you to give a finished appearance to the fence being built. To obtain optimal rigidity indicators, reinforcement D = 10 mm is used, and the effectiveness of the application directly depends on the length of such material.
The lower reinforcing bars do not need to be rigidly attached to the supports, which allows the mesh fabric to be leveled and smoothed under its own weight.
Installation of supports
The construction of a chain-link fence is carried out on concrete or metal supports with a minimum diameter of 6-10 cm. They are the strongest and most durable. Special hooks must be welded to the metal posts in advance to help fasten the mesh.
Concrete poles are much more expensive than metal ones. To attach the mesh, you will need to use clamps or steel braiding on them, which does not look very aesthetically pleasing, but holds firmly.
Installation work on the construction of the fence is carried out in stages. Even a novice master can handle every stage of the work. But in order to avoid mistakes when installing the fence, it is better to study the instructions thoroughly.
- Markings are made along the entire perimeter of the future fence. To do this, we place small pegs in the corners of the site. We stretch the cable between the stakes. The length of the cable means the length of the mesh required to decorate the fence, but it is better to buy with a reserve.
- We dig deep holes to install fence support posts. The holes for the posts need to be dug to a depth of 1.2 - 1.5 m. In sandy loose soil it is better to dig even deeper - up to 2 meters.
- At the corners of the entire perimeter we install the main load-bearing supports, which require careful fastening. We install additional supports at a distance of 2-3 m.
- We fill the bottom of each hole with crushed stone, and then add a little sand. We carefully compact and compact all the pillars. Be sure to check the vertical position of each support with a plumb line. While the stand is not filled with concrete, you can fix it in the desired direction to avoid distortion of the entire structure.
- We fill the pillars with ordinary cement mortar, but with the addition of crushed stone for strength. It will take at least a week for the solution to harden.
Attaching the mesh begins at one end
Fixing the mesh should be started from one end.
To pull the mesh onto metal poles, you need to use special hooks, which must be welded to the supports.
The leveling rods of the reinforcement must be level and corresponding to the length of the spans.
A good replacement for reinforcing rods would be a cable stretched between the corner supports, first passed through the mesh cells and eliminating sagging of the fabric.
The reinforcement should be passed through the top cell, and then placed on the top of the support columns with fixation by welding or screwing.
As a generally available option, the use of fastening elements of different designs can be considered. Very severely deformed sections of the fence structure require additional compression of the upper clamps using pliers.
A metal cable D=3.0 mm can easily withstand a load of 220-250 kg and is fixed to the fence being built using special clamps.
About the chain link
Chain-link is a metal mesh that consists of wires woven together using a special technology. Since this type of fencing is quite cheap, it is used in industrial enterprises, in agriculture, in addition to private use in their own homes.
This type of weaving forms an incredibly practical and universal option for zoning areas of different sizes and types.
Most often, chain-link is used in:
- Construction of fences, gates, wickets.
- Construction of enclosures and pens for animals.
- In the repair craft, mesh is used as a basis for plaster.
- With the help of chain-link, bulk materials and much more are sifted.
This type of fencing is also subject to GOST standardization.
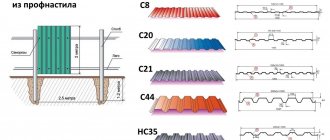
What can the fence be made of:
- Low carbon steel (this type of steel is quite ductile).
- Stainless steel (this type, on the contrary, is hard).
Also, steel has an external coating, which affects the service life of the fence:
- Galvanized and non-galvanized steel (The first will last from 15 to 40 years, depending on use. The second - up to 10 years).
- Polymer steel (Has a palette of colors to choose from and is designed for aggressive environments).
The principle of choice is simple. If you just want to fence your summer cottage, then take stainless steel with a galvanized coating. And if you want to delimit some zones within your area, then stainless steel will be enough.
The well-known GOST standard also regulates the diameter of the wire. For example, with a mesh cell size of 10*10, the wire diameter will be 1.4-1.6 mm.
The larger the size of this cell itself, the larger the diameter, respectively. Moreover, the smaller the cell and the thicker the wire, the more resistant the fence is to external factors.
The marking of this practical zoning tool looks something like this: 100*100*4(2000*12000), where:
- 100*100 – cell size (mm).
- 4 – wire diameter (mm).
- 2000 – roll width (mm).
- 12000 – roll length (mm).
Pulling and fixing it to an adjacent element
After the mesh fabric is secured to the first support post, the chain-link is pulled and then fixed to the adjacent element. This stage of work can be carried out using different methods, directly depending on the main typical features of the frame structure.
The chain-link mesh is installed in a similar manner around the entire perimeter of the fence being built. On wooden poles, fastening the tensioned fabric can be done with ordinary nails.
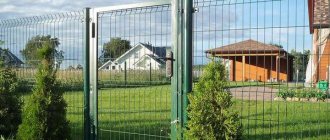
Fence with decorative elements
In order for the tension and fixation of the fence mesh to be of the highest quality and also reliable, it is necessary to concrete the installed metal supports or pillars based on other materials.
Weaving the support wire
The supporting wire, cable or reinforcement is designed to prevent the mesh from sagging under its own weight. With a fence height of up to 1,500 mm, you can only use the top broach. At higher heights (from 1500 to 2000 mm), it is advisable to use two broaches: top and body. If the height of the fence exceeds 2000 mm, you need to use another supporting wire - in the middle of the panel.
As a rule, the biggest problems arise with how to tension a chain-link mesh cable, which is why manufacturers have provided special tensioning devices for different types of broaches:
- wire drawing. The method involves fastening a wire (screwed onto a support post) on one side and stretching it on the other. For this the following can be used:
Pulling chain-link wire– a hook with a long thread, a lanyard of the “hook-hook” image . To do this, the wire is threaded at a distance of 30-50 mm from the edge, and then the lanyard is screwed until it stops. The remaining piece of mesh is loosely tensioned by hand and attached to the support post. Installing a mesh through a cable using a lanyard is one of the most economical and reliable methods.
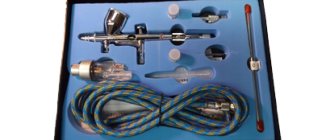
Tensioning the chain-link mesh through the cable with a lanyard– wire tensioner . This is a special device that allows you to easily tension the wire for the chain-link mesh.
Device for tensioning chain-link mesh
Note. If the length of the fence exceeds 7 meters, it is recommended to install additional tension wires on intermediate posts. This is done in order to reduce the load on the outer supports and to improve the quality of the mesh tension. For fastening, special clamps (plastic or metal) are used that keep the wire from sagging.
Chain-link mesh pulling clampScheme for fixing and tensioning the chain-link mesh