When driving on severe off-road conditions, where swampy areas, mud, snowdrifts and other obstacles predominate, the car may get stuck. If you are far from the city or the nearest highway, getting out will not be easy. It's especially bad if you're stuck in an area where there's no cell signal and you can't call for help by phone. Therefore, if your SUV does not yet have a winch installed, it is advisable to install it as soon as possible.
With the help of such a device, you can easily pull a stuck car out of a snowdrift, swamp or hole. You just need to unwind the cable, attach one end to a tree or a rigid power line support, press a button in the car’s interior - and a powerful winch drive will begin to reel in the cable, pulling the car out of the mud. But it is necessary to take into account that the installation of a winch on a car must be carried out in compliance with technology. If the device is not firmly attached to the car body, it will simply be torn off the frame while winding the cable. Read more about how the winch is secured, how to install a metal platform under it, and how to connect the device to the battery.
Installation of the platform
One of the first questions that SUV owners face when purchasing a winch is how to properly install the metal base on the frame? First you need to make sure that the platform fits the width of the frame. If the frame turns out to be too wide, you can use a hacksaw or grinder to cut off the side edge (“ear”), which limits the width of the metal base. On the site itself, you need to move the holes for installing fasteners. Then you need to firmly attach the base to the car frame and make sure that all the bolts are well tightened.
Why the winch should not protrude beyond the bumper line and other installation requirements
If the winch protrudes beyond the bumper line, it is not safe. Such a device violates the dimensions of the car and creates additional external obstacles. A protruding winch, not provided for by the design of the car, can cause an accident if cars do not keep their distance while driving. In addition, a protruding structural element of a machine can touch neighboring cars, road structures, injure pedestrians, etc.
The following requirements must be met when installing the winch:
- reliable fastening of the winch must be done using standard fasteners;
- the winch is allowed to protrude beyond the front edge of the bumper, provided that it is covered with a protective element that has a radius of curvature greater than 2.5 mm.
When installing the winch, the following must be considered:
- traction forces;
- installation location: front, middle, side, rear;
- selection of drive by type: electromechanical, electrohydraulic, mechanical. The most preferable for installation are winches equipped with a hydraulic drive, which is associated with their ease of control;
You should also follow the following recommendations and requirements:
- During operation of the winch, the load on the frame, axles, and suspension should not exceed the permissible values for a particular type of vehicle, especially when the winch pull is directed at an angle relative to the longitudinal axis of the vehicle.
- It is possible to install a device that limits the traction force of the winch automatically depending on the direction of traction.
- Regardless of the direction of traction, it is necessary to create the optimal direction of the cable during its movement, to provide for a minimum number of direction changes when laying the cable.
- Equipping a car with a winch should not affect the operation of other car units.
- The input shaft rotation speed for a mechanical winch with a worm drive must be less than the permissible level (up to 2,000 rpm). This indicator must be used as a guide when selecting the gear ratio of the power take-off mechanism. The minimum torque must be assessed taking into account the low efficiency of the worm gear.
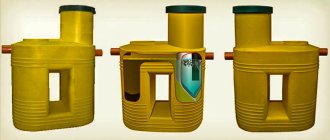
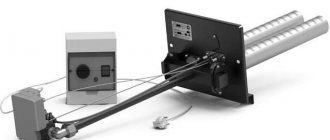
Installation of the control unit
The electrical control unit serves to supply power to the winch mechanism drive. This device can be mounted anywhere under the hood. The main thing is that the block is securely fixed and does not wobble on the base to which it is screwed. For example, it can be attached to a metal plate that is previously fixed under the battery and bent upward at an angle of 90 degrees. M6 bolts (4 pieces) can be used as fastening elements for installing the control unit.
To connect the control unit to the battery, you should use electrical wires with a sufficiently large cross-section (about 35 sq. mm). If they are too thin, due to high loads they will quickly burn out and melt. The length of the wires should be about 120–130 cm, so that there is some reserve and in the future there is no need to lengthen the wiring.
In case you need to de-energize the winch (for example, if the button in the cabin or the remote control does not work), a power switch should be installed under the hood. It is desirable that this device can withstand high currents (about 500–600 A).
How to install a winch on vehicles
Adding a winch to your Vehicle is a great addition to any off-road enthusiast's Vehicle. Getting caught in the mud in the middle of nowhere can throw anyone's day into disarray. Vehicle owners love the versatility that their vehicle offers, and adding a winch simply makes you more prepared. A winch allows you to pull yourself or a friend out of the mud and back on the road. Winches are easy to install, a little expensive and require familiar use.
Under the hood:
- How to install a winch on a trailer
- How to install a winch on a jeep
- How to install a winch on an ATV
- How to install a winch on KingQuad
How to install a winch on a trailer
Mark the center of your trailer where you will mount the winch using a ruler and marker. The winch should be as close to the front of the trailer as possible.
Open your winch kit and take out the winch template. This is a flat sheet of metal shaped like your winch. There will be holes drilled in it through which you will drill the winch. Place the center of the winch template at the marked center and draw the winch template onto your trailer using a marker.
Drill holes along the marked lines of the template. Place your winch on top of the holes and have a friend hold it in place.
Lie on your back and run under the trailer. Take one of your bolts and insert it through each hole to make sure the holes are lined up correctly.
Take your ratchet and bolts under the trailer. Secure it in place. Screw one bolt in partially and then repeat the process with the remaining bolts. Tighten each bolt gradually and evenly to avoid stressing the trailer or warping.
Drill a hole in the trailer and insert the rubber provided. Route the winch cables through this hole to your trailer's battery. Attach the red wire to the positive terminal of the battery and the black wire to the negative terminal.
Items you will need
- Roulette
- Markers
- Drill
- Winch with winch kit
- 3/8 inch bolts
- Set of ratchets and sockets
How to install a winch on a jeep
Attach the end piece to the front of the winch plate with two bolts using a torque wrench. Set the key to 50 pounds. torque.
Attach the winch to the winch plate using the four winch plate bolts. The bolts will go from the back into the legs of the winch. Use your dyno girl to tighten it down to 30 lbs. torque.
Remove the four bumper bolts that hold the tow hooks in place using a wrench.
Get help holding the winch on top of the bumper, above the four bumper bolt holes.
Drive the bumper bolts through the winch and tighten with a torque wrench to 75 pounds. torque.
First disconnect the negative cable from the car battery and then the positive cable using a wrench.
Push the red and black electrical cables from the winch through the front grille.
Route the red and black cables past the radiator on the passenger side of the Jeep.
First, place the red winch cable on the positive post of the battery and tighten it with a wrench. Place the black winch cable on the negative post and tighten with a wrench.
Connect the positive battery cable to the battery post and tighten with a wrench. Connect the negative battery cable to the battery post and tighten with a wrench.
Items you will need
- Winch kit (winch, winch hook, eye, winch cable, power cables
- towbar bumper bolts, roll bar bolts, passage bolts, winch/plate connecting bolts and
- winch)
- Ratchet wrench
- Wrench
How to install a winch on an ATV
Beginning
Install the circuit board for your specific ATV. You may have to buy a mounting plate just for your ATV if it doesn't fit. Use Loctite and secure the winch to the mounting plate. Then connect the winch wires to the ATV.
Connect six gauge winch wires to the ATV.
Connect the wires from the winch to the contactor/relay. This connects the power switch to the winch and allows electricity to flow from the ATV to the winch motor. In some cases, you may need to install a contactor box to complete this step. Typically the contactor is located under the seat or nearby. Try looking near the battery or under the rear pillar.
Connect the red and black wires from the ATV to the contactor box. Look at the instructions to see exactly how your winch will be installed on your specific ATV.
Mount the power switch on the handles or where you want the power switch to be. You can place this switch anywhere. But it is convenient to keep it on the steering wheel to control it while you are driving if necessary. You will have to run the wiring through the steering wheel or along the path where the rest of the steering wheel wiring is installed. If you have winch wiring pre-installed, use this as a guide.
Make it work
Connect the last black cables to the battery. This will power the winch and supply electricity from the battery.
Check your winch. It should sound like life. If not, you may have to look for a bad connection. Start testing the wires you have installed, starting with the relay box and ending with the steering wheel.
Check your steering wheel hot wires for proper connections. Since this is where the ignition is located, some wires only receive power when the ignition is on. Make sure your switch is connected to one of these wires.
Try your winch again. It should come to its senses. If not, review the diagram and reinstall the winch if necessary.
Items you will need
- tools
- winch
- Silicone Grease
- Mounting plate
How to install a winch on KingQuad
Attach the winch mount to the frame tabs behind the front bumper, making sure it is aligned with the holes in the frame. Install bolts, washers and nuts through the frame tabs. Apply a little Loctite to prevent the bolts from becoming loose due to vibration while riding. Install the winch onto the mount.
Connect the winch by connecting the wires from the winch to the contactor or relay according to the installation instructions in the repair manual. Depending on the model, you must also install a contactor box under the seat.
Install the roller passage and power switch. The latter should go in a convenient place, like a steering wheel. Route the switch wiring along the steering wheel. Finally, connect the winch to the battery. Check the connection by starting the ATV and engaging the winch.
Related articles:
- How to install a winch cable
- How to put a winch cable on a Warn winch
- Types of Winches
- How to Cover a Trailer with a Tarp
- How to Remove a Ford Explorer Replacement Clamp
- How does the snatch block work?
Securing the hawse
A fairlead is a special part that is mounted in the front bumper of a car. It has a narrow rectangular hole that limits the movement of the cable in the horizontal plane (left-right) when it is wound up. Thanks to the hawse, the front part of the body is not damaged when the cable moves diagonally (for example, when a tree, power pole or other support to which the cable is attached is located not in front of the stuck car, but to the side of it).
To secure the fairlead, you need to drill holes of the appropriate size in the body part. This element is secured using bolted connections. When installing the part, you need to make sure that there is no play, otherwise the hawse will quickly become loose and fall off.
At the last stage of installing the winch into the standard bumper, it is necessary to secure the previously removed body parts. After this, you can test turn on the winch mechanism and check its performance.
Remember
: If you do not have sufficient experience and the necessary skills, it is better to seek help from professional auto mechanics. This will give you confidence that the installation of the winch on the car will be done efficiently, quickly and without errors.
Preparing for installation
So, first, let's discuss the stationary installation of electric car winches, since they are the most popular among jeepers. Electric winches are usually installed on the front bumper of an SUV. It is possible to install it on the rear bumper, also on both sides, if this does not contradict the requirements of the traffic police, but we’ll talk about this a little later. First, we’ll tell you how to install a winch on a standard bumper.
Car winches are installed on special steel platforms or on a bumper, which has space for mounting the winch. Many winch models have mounting pads included with the winch. The kit also includes a roller cable guide, cable, hook, bolts of the required sizes and a device passport.
1. First, the bumper is removed, and the steel platform is mounted on the frame on tacks using bolts.
Important! The place on which the platform is mounted must be strong, reliable and capable of withstanding a load no less than the maximum lifting capacity of the winch.
The platform must be attached on 4 sides, so if the holes do not match, additional holes must be drilled. After installing the platform, it is worth trying on the bumper, since the dimensions of the platform may not coincide with the dimensions and features of the bumper; in this case, it is necessary to cut off the protruding parts of the platform with a grinder.
2. After installing the platform, you need to mount a cable guide on it, through which the cable with the hook will come out. If there is no room on the bumper for the hook to be pulled out, you will need to cut the window to the required size.
3. Next, install the winch, which is attached to the steel platform using the bolts included in the kit.
4. When the winch is mounted, it is time to connect the electrical control unit and wind the cable. It is recommended to install the electrical unit close to the battery away from dirt and moisture. If the space inside the bumper allows it, the unit is installed directly on the winch. Next, the positive cable of the winch is connected to the positive terminal, and the negative cable to the negative terminal of the battery.
5. Many models of electric winches operate using a wired control panel. After mounting and connection, the cable begins to wind, which is connected to the hook and installed on the winch before connecting the electrical unit. It is recommended to wind the cable slowly onto the drum to avoid uneven winding and the risk of the cable touching parts of the car.
Warning!
Winches are complex devices, the installation and connection of which must be carried out by qualified specialists in special service centers. Improper installation of the winch can result in damage to the device, vehicle, and surrounding people and objects.
Communities › UAZ drivers › Blog › Installation and connection of the Winch
Greetings to everyone and zhYpovodov in particular!
I’ll leave a short story in pictures: “How I screwed the Swan to the bumper!”
Oh, a little more detail here
!
Actually Winch no name Electric Winch 12000 LB
:
Guys, question! Share your proven connection diagram, or more precisely, how to correctly implement a forced power shutdown. There is a “push-button” automobile mass of the “classic” type, but I don’t know if it will withstand such a load... thank you in advance!
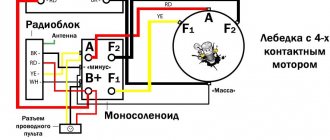
Electrical circuit of a car winch
Connection diagrams for various winches, motors, remote controls, solenoids, contactors, radio units. Honestly stolen from Forosenko and made more readable
Almost all motors are connected the same way. There are 4 contacts on the motor: Ground, A, F-1 and F-2 In addition, the contacts may have color marks: A - red F1 - Yellow, F2 - Black .
On most winch motors, the terminals are located as follows: A at the rear of the motor, F-1 and F-2 at the front edge of the motor, F-1 towards the rear of the winch and F-2 towards the front.