Home / Accessories and parts
Back
Reading time: 2 min
0
1460
Various tools are used to connect plastic parts - welding modules, soldering irons, hair dryers and guns.
All of them are united by a common operating principle - high temperature affects polypropylene or polyvinyl chloride, as a result of which the edging softens and facilitates the joining of elements.
However, different types of welding operations require different thermal tools. The operations performed by a hot-melt gun for plastic cannot replace a soldering iron or welding module. How, for example, to distinguish the first from the last.
- General information
- Operating principle of a heat gun
- Preparing for work
- Welding
Advantages
A plastic welding gun has many advantages. This device is a portable device. When using it, welding in hard-to-reach places will be possible. In addition to plastics, this machine can weld other materials.
The advantages include a short heating time to the required temperature. This is possible if the device power is at least 100 watts. The advantages are ergonomics, small dimensions and light weight.
Design
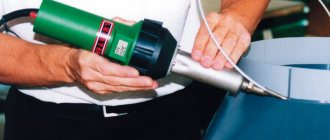
This instrument received this name because its appearance in shape resembles this type of firearm. A fireproof electrode acts as a conditional barrel, and there is a trigger on the handle.
The welding gun for plastic has a fairly simple device. It has an electric heater and fan built into a single, compact housing. It is recommended to choose guns equipped with manual temperature control and a digital scale. This brings great convenience to the welding process. The skill of independently selecting the required temperature is developed.
Simple models have a simple regulator with a rotary device, while more expensive models have electronic adjustment, which is less reliable during operation. The gun is connected to the power source using a cable.
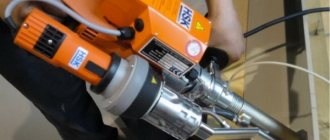
A hot-melt gun for welding plastic includes a plastic rod that is inserted into the area of the welding process. When the rod melts, its metal fills the gap between the connected products. Its composition must match the material of the parts being connected.
Welding tables for joining plastics
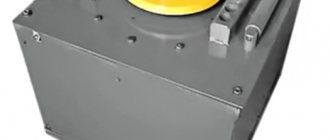
If the goal is to do the most accurate work with a clear seam, which is comparable in strength to the entire material, then a welding table for soldering plastic products would be the ideal solution. This equipment has the highest efficiency of all of the above, so there is no need to talk about any shortcomings. The table is a multi-component device, which includes a heater, rollers for movement, a supporting frame and a digital timer. The design allows welding to be carried out at a certain angle, which is sometimes very useful. The user can also manually program welding cycles and set specific temperatures.
Optional equipment
In order to carry out the procedure with the utmost quality, you will need not only the soldering unit itself, but also some auxiliary equipment for welding plastic, namely:
1. Roller. 2. Cutter. 3. Pressure roller. 4. Cleaning tools.
The latter include a scraper and a brush for cleaning plastic surfaces. Cutting knives are usually made in the shape of a crescent; this is necessary for the convenience of carrying out preparatory work immediately before soldering. The roller is used in cases where plastic welding occurs with hot air from a hair dryer overlapping, creating pressure and thereby improving the quality of the connection of elements. Only if you have a complete set of welding equipment for plastics can you count on a successful outcome, because in such painstaking work, every stage matters. It is especially recommended to purchase devices with current functionality, where it is possible to regulate the temperature of the air flow, so as not to overheat the product, violating the structural integrity.
Types of pistols
A welding gun can only have one electrode. This type has become widespread in workshops, small industries and for personal use. There is a device with two electrodes located next to each other. The details are placed between them. In this case, there is no need to connect the ground cable. When you press the trigger, the electrical circuit is closed and current flows between the electrodes. The release of heat causes the material placed between them to melt.
For joining plastic products, the gun can be likened to a powerful hair dryer, which, in addition to the heating element, contains a hot air blower and a nozzle for supplying this air to the welding site.
How to make a simple soldering iron (stapler) for plastic
Hello, dear readers and DIYers!
In the modern world, a huge number of products are made of plastic. This lightweight and fairly durable material is quite durable, but any part can break or crack. Typically, all kinds of cases, handles, and other parts that do not have special temperature requirements are made from low-melting plastics such as ABS.
Repairing cracks by gluing or fusing parts together is not always effective. Such methods do not work well on products subject to mechanical stress, and there is a high probability that the product will break in the same place. Such problems are very often encountered in car repair shops, especially when restoring cracked bumpers and other elements. In this case, craftsmen use a special “hot stapler” for plastic, with which the metal staple is heated and fused into the thickness of the plastic. This creates a rigid connection.
In this article, the author of the YouTube channel “Mextraf” will tell you how to make a reinforcing stapler for plastic.
This tool can be made in a few minutes at home. Of course, such a device is not intended for daily professional practice, but it is quite suitable for periodic repairs.
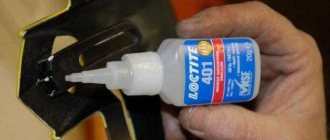
Materials needed for homemade products. — Relay 12V — Power supply 12V 6A — Nichrome wire — Staples for plastic stapler — Super glue 502, wooden block — Flux, solder, wires, terminal blocks.
Tools used by the author. — Electric soldering iron with temperature control — Screwdriver — Pliers, wire cutters, hammer — Screwdriver with a set of bits Manufacturing process. So, a long wooden block will serve as a handle, on the sides of which you need to make grooves for the wires.
The craftsman prepared a couple of shallow holes in the front of the holder. They can be drilled or nailed and pulled out.
The stripped ends of the power wires are inserted into these holes. After this, two nails with bitten heads are hammered into the holes. This creates a fairly good connection between the wire and the stud itself.
Now a terminal block is put on each stud and fixed on it. In this case, the nail should be clamped with only one screw and not be too long.
Instead, you can put a small tact button, and with its help turn on the relay and supply power to the bracket.
The positive wire from the power supply is soldered to one of the coil terminals and the common terminal of the relay.
One of the heater wires is soldered to the normally open terminal of the relay.
The negative wire from the block is connected to the second wire of the heater.
A thin two-core wire is soldered to the pins of the tact button.
The first end of this wire is connected to the remaining terminal of the coil, and the second is connected to the twist of the negative wire.
These tubes are fixed in the terminals with the second screw, and the device is ready.
It is enough to press the bracket against the plastic and fuse it halfway through the thickness. After this, the holder can be easily separated.
Of course, those who need such a tool very often will have to either improve the proposed design or purchase a factory-made hot stapler for plastic.
I thank the author for a simple “hot stapler” for welding plastic.
Good mood, good health, and interesting ideas to everyone! Subscribe to the telegram channel
site so as not to miss new articles.
The author's video can be viewed here.
Source
Become the author of the site, publish your own articles, descriptions of homemade products and pay for the text. Read more here.